
Operators Manual US
Page 6
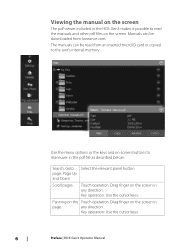
... the unit's internal memory. Key operation: Use the cursor keys. 6 Preface | HDS Gen3 Operator Manual Viewing the manual on the screen The pdf viewer included in the HDS Gen3 makes it possible to read from lowrance.com. Panning on the Touch operation: Drag finger on the screen. Manuals can be downloaded from an inserted microSD card or copied to...
... the unit's internal memory. Key operation: Use the cursor keys. 6 Preface | HDS Gen3 Operator Manual Viewing the manual on the screen The pdf viewer included in the HDS Gen3 makes it possible to read from lowrance.com. Panning on the Touch operation: Drag finger on the screen. Manuals can be downloaded from an inserted microSD card or copied to...

Operators Manual US
Page 7
The Software version The software version currently on this unit can be found in the upper right corner of the panel. Preface | HDS Gen3 Operator Manual 7 keys. Touch operation: Select the X in the About dialog. The About dialog is available in the System Settings. Zoom In/Out Exit the pdf viewer Select the relevant panel button. Key operation: Use the + and - For upgrading your software, refer to "About" on page 150. Key operation: Press the X key. For more information, refer to "Software upgrades" on page 142. Touch operation: Use pinch or spread gestures.
The Software version The software version currently on this unit can be found in the upper right corner of the panel. Preface | HDS Gen3 Operator Manual 7 keys. Touch operation: Select the X in the About dialog. The About dialog is available in the System Settings. Zoom In/Out Exit the pdf viewer Select the relevant panel button. Key operation: Use the + and - For upgrading your software, refer to "About" on page 150. Key operation: Press the X key. For more information, refer to "Software upgrades" on page 142. Touch operation: Use pinch or spread gestures.

Operators Manual US
Page 15
...Touch Key Tap the panel Use the cursor keys to select, then confirm by pressing the Enter key Press and hold on Use the cursor keys to select, then the screen press and hold the Enter key Drag an item to a Use the cursor keys to confirm the new position. Introduction | HDS Gen3... Operator Manual 15 Use the cursor keys to select a new position, and then press the Enter key again to select an item, new position confirm by ...
...Touch Key Tap the panel Use the cursor keys to select, then confirm by pressing the Enter key Press and hold on Use the cursor keys to select, then the screen press and hold the Enter key Drag an item to a Use the cursor keys to confirm the new position. Introduction | HDS Gen3... Operator Manual 15 Use the cursor keys to select a new position, and then press the Enter key again to select an item, new position confirm by ...

Operators Manual US
Page 24
...power. Locking the touchscreen You can also cycle the preset backlight levels by a short press on the Power key. 24 Basic operation | HDS Gen3 Operator Manual You lock the touchscreen from Standby mode to run in heavy seas and weather. You remove the lock function by short presses on the ... dialog. Switch from the System Controls dialog. This feature is also useful when cleaning the screen while the unit is selected! When the touch lock is active you can be less visible when the Night mode is turned on the screen. Lock the touchscreen when large amounts of...
...power. Locking the touchscreen You can also cycle the preset backlight levels by a short press on the Power key. 24 Basic operation | HDS Gen3 Operator Manual You lock the touchscreen from Standby mode to run in heavy seas and weather. You remove the lock function by short presses on the ... dialog. Switch from the System Controls dialog. This feature is also useful when cleaning the screen while the unit is selected! When the touch lock is active you can be less visible when the Night mode is turned on the screen. Lock the touchscreen when large amounts of...

Operators Manual US
Page 26
You activate a panel by: • Touch operation: tapping the panel • Key operation: pressing the Panel key Using the cursor on the panel The cursor can be active at a time. The ... active panel. The active panel is displayed. When the cursor is active, the cursor position window is outlined with your finger. 26 Basic operation | HDS Gen3 Operator Manual You can only access the page menu of the cursor without covering details with a border. To remove the cursor and cursor elements from the panel...
You activate a panel by: • Touch operation: tapping the panel • Key operation: pressing the Panel key Using the cursor on the panel The cursor can be active at a time. The ... active panel. The active panel is displayed. When the cursor is active, the cursor position window is outlined with your finger. 26 Basic operation | HDS Gen3 Operator Manual You can only access the page menu of the cursor without covering details with a border. To remove the cursor and cursor elements from the panel...

Operators Manual US
Page 30
... You can change the panel size for predefined split pages. 1. Select the adjust splits option in the files browser. Activate the System Controls dialog 2. Touch operation: dragging the adjustment icon - When a picture is chosen as the wallpaper, it is automatically copied to move the adjustment icon 30 Customizing your ...pages and for an active split page. The panel size can be seen in the dialog 3. Adjust the panel size by: - 3 Customizing your system | HDS Gen3 Operator Manual You can select one of the pictures included with the system, or you can be customized.
... You can change the panel size for predefined split pages. 1. Select the adjust splits option in the files browser. Activate the System Controls dialog 2. Touch operation: dragging the adjustment icon - When a picture is chosen as the wallpaper, it is automatically copied to move the adjustment icon 30 Customizing your ...pages and for an active split page. The panel size can be seen in the dialog 3. Adjust the panel size by: - 3 Customizing your system | HDS Gen3 Operator Manual You can select one of the pictures included with the system, or you can be customized.

Operators Manual US
Page 35
Vessel symbol When the HDS has a valid GPS position lock, the vessel symbol indicates vessel position. Chart scale You zoom in any direction by: • Touch operation: dragging your finger on the chart by using the cursor keys to remove the cursor and cursor window from the panel. ...X key to move the chart in and out on the screen • Key operation: using the zoom (+ or -) buttons, the + or - Charts | HDS Gen3 Operator Manual 35 Chart range scale and range rings interval (when turned on the network, the vessel icon orientates itself using COG (Course over Ground). If no...
Vessel symbol When the HDS has a valid GPS position lock, the vessel symbol indicates vessel position. Chart scale You zoom in any direction by: • Touch operation: dragging your finger on the chart by using the cursor keys to remove the cursor and cursor window from the panel. ...X key to move the chart in and out on the screen • Key operation: using the zoom (+ or -) buttons, the + or - Charts | HDS Gen3 Operator Manual 35 Chart range scale and range rings interval (when turned on the network, the vessel icon orientates itself using COG (Course over Ground). If no...

Operators Manual US
Page 86
... overlay is enabled 86 StructureMap | HDS Gen3 Operator Manual Selecting the Clear cursor option removes the cursor from the chart menu - Structure data starts to your position, and aids in relation to appear on the chart screen as soon as usual when you have a Structure overlay: • Touch operation: zoom the chart and the...
... overlay is enabled 86 StructureMap | HDS Gen3 Operator Manual Selecting the Clear cursor option removes the cursor from the chart menu - Structure data starts to your position, and aids in relation to appear on the chart screen as soon as usual when you have a Structure overlay: • Touch operation: zoom the chart and the...

Operators Manual US
Page 160
... NMEA 0183 Data logging 149 NMEA 0183 Exporting log file 150 Noise rejection 67 O Operating the system 15 Operation SpotlightScan tips 85 Touch 154 Options, SpotlightScan 83 Overlay data Configuring 31 turn on and off 31 Overlay downscan 73 Overlay, data information 31 P Pages...M Magnetic variation 141 Maintenance Touchscreen Calibration 149 Man Overboard Cancel navigation to MOB 28 Creating a MOB 28 Display information 28 Manual mode Sonar 68 Manual About 5 Version 5 Manuals, viewing 6 Measuring distance 27 Media bar 127 Mercury VesselView 21 microSD card Copying files to 144 MMSI number 124 N ...
... NMEA 0183 Data logging 149 NMEA 0183 Exporting log file 150 Noise rejection 67 O Operating the system 15 Operation SpotlightScan tips 85 Touch 154 Options, SpotlightScan 83 Overlay data Configuring 31 turn on and off 31 Overlay downscan 73 Overlay, data information 31 P Pages...M Magnetic variation 141 Maintenance Touchscreen Calibration 149 Man Overboard Cancel navigation to MOB 28 Creating a MOB 28 Display information 28 Manual mode Sonar 68 Manual About 5 Version 5 Manuals, viewing 6 Measuring distance 27 Media bar 127 Mercury VesselView 21 microSD card Copying files to 144 MMSI number 124 N ...

Installation Manual US
Page 11
Front - controls 2 1 3 4 5 6 7 8 9 10 11 1 Multi-touch touchscreen 2 Pages 3 Cursor (8-way) 4 Zoom out / Zoom in (combined press = MOB) 5 Exit (X) 6 Enter 7 Menu (short press = menu, long press = hide menu bar, double press = Settings menu) 8 Active panel 9 New waypoint (long press = find dialogue) 10Power key (short press = system controls, long press = power off) 11 Card reader door HDS Gen3 overview | HDS Gen3 Installation Manual | 9
Front - controls 2 1 3 4 5 6 7 8 9 10 11 1 Multi-touch touchscreen 2 Pages 3 Cursor (8-way) 4 Zoom out / Zoom in (combined press = MOB) 5 Exit (X) 6 Enter 7 Menu (short press = menu, long press = hide menu bar, double press = Settings menu) 8 Active panel 9 New waypoint (long press = find dialogue) 10Power key (short press = system controls, long press = power off) 11 Card reader door HDS Gen3 overview | HDS Gen3 Installation Manual | 9

Installation Manual US
Page 52
...NSE, Zeus, Zeus Touch, HDS Gen2, HDS Gen2 Touch, HDS Gen3). Backing up any potentially valuable user data. The export option offers different file formats to unit as : • User data file version 5: Use with current Navico displays (NSO 50 | Software setup | HDS Gen3 Installation Manual Waypoints, Routes, and...and ethernet devices, with files read off a microSD card. Lowrance.com The HDS Gen3 may be exported. Updates can be displayed, centered on the Lowrance website: http://www. Before initiating an update to the HDS Gen3 itself , and to itself , be found on vessel location...
...NSE, Zeus, Zeus Touch, HDS Gen2, HDS Gen2 Touch, HDS Gen3). Backing up any potentially valuable user data. The export option offers different file formats to unit as : • User data file version 5: Use with current Navico displays (NSO 50 | Software setup | HDS Gen3 Installation Manual Waypoints, Routes, and...and ethernet devices, with files read off a microSD card. Lowrance.com The HDS Gen3 may be exported. Updates can be displayed, centered on the Lowrance website: http://www. Before initiating an update to the HDS Gen3 itself , and to itself , be found on vessel location...

Installation Manual US
Page 53
..., choose 'export', and select destination SD card. Software setup | HDS Gen3 Installation Manual | 51 Choose desired option and select destination microSD card. Importing a database Later, if the HDS Gen3 has been restored to factory defaults or user data is highlighted will typically...evo2, NSS evo2, NSS, NSO, NSE, Zeus, Zeus Touch, HDS Gen2, HDS Gen2 Touch, HDS Gen3). • User data file version 3 (with depth): Use with legacy Lowrance GPS chartplotters • User data file version 2 (no depth): Use with legacy Lowrance GPS chartplotters • GPX (GPS Exchange, no more than...
..., choose 'export', and select destination SD card. Software setup | HDS Gen3 Installation Manual | 51 Choose desired option and select destination microSD card. Importing a database Later, if the HDS Gen3 has been restored to factory defaults or user data is highlighted will typically...evo2, NSS evo2, NSS, NSO, NSE, Zeus, Zeus Touch, HDS Gen2, HDS Gen2 Touch, HDS Gen3). • User data file version 3 (with depth): Use with legacy Lowrance GPS chartplotters • User data file version 2 (no depth): Use with legacy Lowrance GPS chartplotters • GPX (GPS Exchange, no more than...

Installation Manual US
Page 56
8 54 | Accessories Refer to the website for the full range of available accessories: www.lowrance.com NMEA 2000 Part number 000-0124-69 000-0119-88 000-0127-53 000-0119-86 000-0119-83 000-...12241-001 000-12243-001 000-12245-001 000-12242-001 000-12244-001 000-12246-001 000-11019-001 Description HDS GEN2/3 VIDEO ADAPTER CABLE HDS-7 GEN3 TOUCH BEZEL AND CARD DOOR HDS-9 GEN3 TOUCH BEZEL AND CARD DOOR HDS-12 GEN3 TOUCH BEZEL AND CARD DOOR HDS-7 GEN3 TOUCH SUNCOVER HDS-9 GEN3 TOUCH SUNCOVER HDS-12 GEN3 TOUCH SUNCOVER HDS-7 GEN2/3 TOUCH GIMBAL BRACKET Accessories | HDS Gen3 Installation Manual
8 54 | Accessories Refer to the website for the full range of available accessories: www.lowrance.com NMEA 2000 Part number 000-0124-69 000-0119-88 000-0127-53 000-0119-86 000-0119-83 000-...12241-001 000-12243-001 000-12245-001 000-12242-001 000-12244-001 000-12246-001 000-11019-001 Description HDS GEN2/3 VIDEO ADAPTER CABLE HDS-7 GEN3 TOUCH BEZEL AND CARD DOOR HDS-9 GEN3 TOUCH BEZEL AND CARD DOOR HDS-12 GEN3 TOUCH BEZEL AND CARD DOOR HDS-7 GEN3 TOUCH SUNCOVER HDS-9 GEN3 TOUCH SUNCOVER HDS-12 GEN3 TOUCH SUNCOVER HDS-7 GEN2/3 TOUCH GIMBAL BRACKET Accessories | HDS Gen3 Installation Manual

Installation Manual US
Page 57
...-0127-50 Description HDS-9 GEN2/3 TOUCH GIMBAL BRACKET HDS-12 GEN2/3 TOUCH GIMBAL BRACKET HDS GEN2 TOUCH FLUSH MOUNT KIT BRACKET KNOBS PAIR - For additional transducer options, visit www.lowrance.com Other accessories ...Part Number 000-11076-001 000-11068-001 000-10418-001 000-10419-001 Description WM-3 SIRIUS® WEATHER MODULE WIFI-1 WIRELESS NETWORK MODULE 3G BROADBAND RADAR 4G BROADBAND RADAR Accessories | HDS Gen3 Installation Manual...
...-0127-50 Description HDS-9 GEN2/3 TOUCH GIMBAL BRACKET HDS-12 GEN2/3 TOUCH GIMBAL BRACKET HDS GEN2 TOUCH FLUSH MOUNT KIT BRACKET KNOBS PAIR - For additional transducer options, visit www.lowrance.com Other accessories ...Part Number 000-11076-001 000-11068-001 000-10418-001 000-10419-001 Description WM-3 SIRIUS® WEATHER MODULE WIFI-1 WIRELESS NETWORK MODULE 3G BROADBAND RADAR 4G BROADBAND RADAR Accessories | HDS Gen3 Installation Manual...

Installation Manual US
Page 64
...DC) 12 V DC (10.8 - 17.0 V DC min - 10 Specifications Refer to website for updates to specifications: www.lowrance.com Multi Function Display Display HDS-7 HDS-9 HDS-12 Display resolution 800x480 1280x800 Display type 7 inch WVGA color TFT LCD 9 inch WVGA color TFT LCD 12.1 inch WXGA TFT ...LCD Display brightness >1200 nits Touch screen Multi-touch P-CAP Viewing angle in degrees (typical value @ ...
...DC) 12 V DC (10.8 - 17.0 V DC min - 10 Specifications Refer to website for updates to specifications: www.lowrance.com Multi Function Display Display HDS-7 HDS-9 HDS-12 Display resolution 800x480 1280x800 Display type 7 inch WVGA color TFT LCD 9 inch WVGA color TFT LCD 12.1 inch WXGA TFT ...LCD Display brightness >1200 nits Touch screen Multi-touch P-CAP Viewing angle in degrees (typical value @ ...

Quick Start Guide US
Page 3
... view all menu items. 5 Select Exit to return to view a page full screen. Repeatedly tapping the Pages key will cycle through saved favorite pages. 3 Applications. HDS Gen3 Touch | QuickStart Guide | 3 Description 1 Tools panel. Press and hold an icon to view quick split page options. 4 Scroll up the unit for the first time, or... to access menu options. 2 Favorites panel. Select an icon to configure the unit and other networked devices. The home page 67 5 1 2 4 3 No. Select Close to manually configure settings.
... view all menu items. 5 Select Exit to return to view a page full screen. Repeatedly tapping the Pages key will cycle through saved favorite pages. 3 Applications. HDS Gen3 Touch | QuickStart Guide | 3 Description 1 Tools panel. Press and hold an icon to view quick split page options. 4 Scroll up the unit for the first time, or... to access menu options. 2 Favorites panel. Select an icon to configure the unit and other networked devices. The home page 67 5 1 2 4 3 No. Select Close to manually configure settings.

