
Manual
Page 2
... RESPECT TO THE HARDWARE. Any changes or modifications not expressly approved by turning the equipment off and on a network server for the Software. Operation is permitted only if you have purchased an individual Software package for radio noise emissions from accident, abuse, or misapplication. Power Output: < 10mV/m @ 3m. LOGITECH IS WILLING TO LICENSE THE SOFTWARE TO YOU ONLY ON THE CONDITION...
... RESPECT TO THE HARDWARE. Any changes or modifications not expressly approved by turning the equipment off and on a network server for the Software. Operation is permitted only if you have purchased an individual Software package for radio noise emissions from accident, abuse, or misapplication. Power Output: < 10mV/m @ 3m. LOGITECH IS WILLING TO LICENSE THE SOFTWARE TO YOU ONLY ON THE CONDITION...
Manual
Page 3
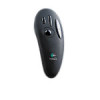
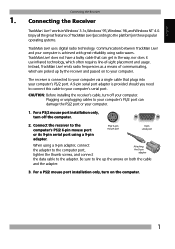
... connect Attaching the 9-pin adapter the data cable to the computer's PS/2 6-pin mouse port or its 9-pin serial port using radio waves. Instead, TrackMan Live! uses digital radio technology. For a PS/2 mouse port installation only, turn on to your computer's PS/2 port can get in the way, nor does it use infrared technology, which are picked up the arrows on both the cable and the adapter. 3. Connecting the Receiver TrackMan® Live!™ works in these popular operating systems. TrackMan Live! A 9-pin serial port adapter...
... connect Attaching the 9-pin adapter the data cable to the computer's PS/2 6-pin mouse port or its 9-pin serial port using radio waves. Instead, TrackMan Live! uses digital radio technology. For a PS/2 mouse port installation only, turn on to your computer's PS/2 port can get in the way, nor does it use infrared technology, which are picked up the arrows on both the cable and the adapter. 3. Connecting the Receiver TrackMan® Live!™ works in these popular operating systems. TrackMan Live! A 9-pin serial port adapter...
Manual
Page 4
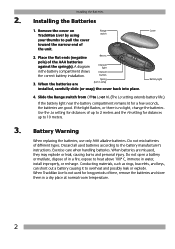
... 10 meters. 3. Use the Lo setting for distances of time, remove the batteries and store them in view) installed, carefully slide (or snap) the cover back into place. by using switch your thumbs to overheat and possibly leak or explode. Channel light Channel button 3. When the batteries are Spring (not in a dry place at normal room temperature. 2 Remove the cover on Range TrackMan Live! When TrackMan Live! Installing the Batteries 1. Cover Battery light 4.
... 10 meters. 3. Use the Lo setting for distances of time, remove the batteries and store them in view) installed, carefully slide (or snap) the cover back into place. by using switch your thumbs to overheat and possibly leak or explode. Channel light Channel button 3. When the batteries are Spring (not in a dry place at normal room temperature. 2 Remove the cover on Range TrackMan Live! When TrackMan Live! Installing the Batteries 1. Cover Battery light 4.
Manual
Page 5
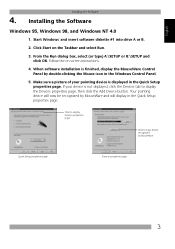
Installing the Software Windows 95, Windows 98, and Windows NT 4.0 1. English Installing the Software 4. Make sure a picture of your device is finished, display the MouseWare Control Panel by double-clicking the Mouse icon in the Quick Setup properties page. Start Windows® and insert software diskette #1 into drive A or B. 2. From the Run dialog box, select (or type) A:\SETUP or B:\SETUP and click OK. Click Start on -screen instructions. 4. Click to display Devices...
Installing the Software Windows 95, Windows 98, and Windows NT 4.0 1. English Installing the Software 4. Make sure a picture of your device is finished, display the MouseWare Control Panel by double-clicking the Mouse icon in the Quick Setup properties page. Start Windows® and insert software diskette #1 into drive A or B. 2. From the Run dialog box, select (or type) A:\SETUP or B:\SETUP and click OK. Click Start on -screen instructions. 4. Click to display Devices...
Manual
Page 6
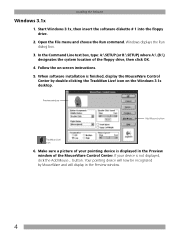
.... button. icon on -screen instructions. 5. Your pointing device will now be recognized by double-clicking the TrackMan Live! Open the File menu and choose the Run command. In the Command Line text box, type: A:\SETUP (or B:\SETUP) where A:\ (B:\) designates the system location of the MouseWare Control Center. Icon 6. Preview window Add Mouse button TrackMan Live! Installing the Software Windows 3.1x 1. When software installation is finished, display the MouseWare Control Center...
.... button. icon on -screen instructions. 5. Your pointing device will now be recognized by double-clicking the TrackMan Live! Open the File menu and choose the Run command. In the Command Line text box, type: A:\SETUP (or B:\SETUP) where A:\ (B:\) designates the system location of the MouseWare Control Center. Icon 6. Preview window Add Mouse button TrackMan Live! Installing the Software Windows 3.1x 1. When software installation is finished, display the MouseWare Control Center...
Manual
Page 7
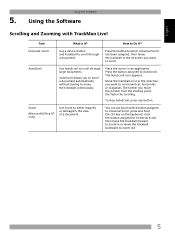
... cursor in the direction you move the trackball backward to which Universal Scroll has been assigned, then move the trackball in or move the pointer from the starting point, the faster the scrolling. You can use Zoom with TrackMan Live! How to AutoScroll. AutoScroll Use AutoScroll to scroll (vertical, horizontal, or diagonal). Press the button assigned to Do...
... cursor in the direction you move the trackball backward to which Universal Scroll has been assigned, then move the trackball in or move the pointer from the starting point, the faster the scrolling. You can use Zoom with TrackMan Live! How to AutoScroll. AutoScroll Use AutoScroll to scroll (vertical, horizontal, or diagonal). Press the button assigned to Do...
Manual
Page 8
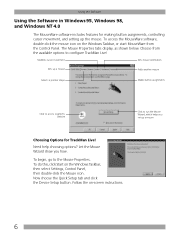
... the Quick Setup tab and click the Device Setup button. Using the Software Using the Software in Windows 95, Windows 98, and Windows NT 4.0 The MouseWare software includes features for TrackMan Live! Modifies cursor movement Sets mouse orientation Sets up a mouse Adds another mouse Selects a pointer shape Makes button assignments Click to access Logitech's website Click to the Mouse Properties. Need help choosing options? To do this, click Start on -screen instructions. 6 To...
... the Quick Setup tab and click the Device Setup button. Using the Software Using the Software in Windows 95, Windows 98, and Windows NT 4.0 The MouseWare software includes features for TrackMan Live! Modifies cursor movement Sets mouse orientation Sets up a mouse Adds another mouse Selects a pointer shape Makes button assignments Click to access Logitech's website Click to the Mouse Properties. Need help choosing options? To do this, click Start on -screen instructions. 6 To...
Manual
Page 9
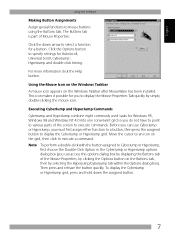
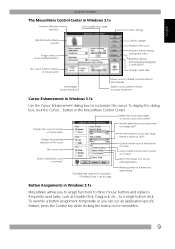
... point to display the Mouse Properties Tab quickly by clicking the Options button on the Windows Taskbar after MouseWare has been installed. For more information click the Help button. Click the Options button to execute commands. Move the cursor to an icon on the grid, then click to mouse buttons using the Buttons tab. The Buttons tab is part of the screen to specify settings for a button.
... point to display the Mouse Properties Tab quickly by clicking the Options button on the Windows Taskbar after MouseWare has been installed. For more information click the Help button. Click the Options button to execute commands. Move the cursor to an icon on the grid, then click to mouse buttons using the Buttons tab. The Buttons tab is part of the screen to specify settings for a button.
Manual
Page 10
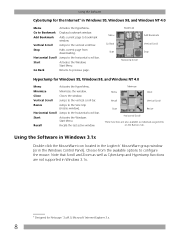
... active window. Choose from downloading. Note that Scroll and Zoom as well as individual assignments on the Buttons tab. Menu Minimize Close Recall Vertical Scroll Start Resize Horizontal Scroll These functions are also available as CyberJump and HyperJump functions are not supported in the Windows Control Panel). Using the Software CyberJump for the Internet* in Windows 95, Windows 98, and Windows NT 4.0 Menu Go...
... active window. Choose from downloading. Note that Scroll and Zoom as well as individual assignments on the Buttons tab. Menu Minimize Close Recall Vertical Scroll Start Resize Horizontal Scroll These functions are also available as CyberJump and HyperJump functions are not supported in the Windows Control Panel). Using the Software CyberJump for the Internet* in Windows 95, Windows 98, and Windows NT 4.0 Menu Go...
Manual
Page 11
.... 9 English Using the Software The MouseWare Control Center in Windows 3.1x Performs Windows functions Sets double-click speed Saves settings Identifies button being pressed Assigns shortcuts to second/third buttons Sets cursor travel in relation to mouse speed Interchanges button functions Cancels changes Enhances the cursor Provides channel setting and battery status Redetects devices after plugging/unplugging a serial mouse Provides online help Moves cursor to default command button automatically Adjusts cursor speed...
.... 9 English Using the Software The MouseWare Control Center in Windows 3.1x Performs Windows functions Sets double-click speed Saves settings Identifies button being pressed Assigns shortcuts to second/third buttons Sets cursor travel in relation to mouse speed Interchanges button functions Cancels changes Enhances the cursor Provides channel setting and battery status Redetects devices after plugging/unplugging a serial mouse Provides online help Moves cursor to default command button automatically Adjusts cursor speed...
Manual
Page 12
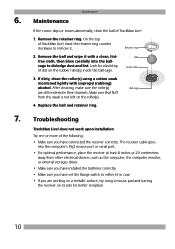
... set the Range switch to either Hi or Low. • If you have connected the receiver correctly. Retainer ring 2. After cleaning, make sure the roller(s) are working on the roller(s). Remove the ball and wipe it . does not work upon installation Try one or more of dirt on the rubber roller(s) inside the ball-cage. Ball Inside roller 3. 6. Troubleshooting TrackMan Live...
... set the Range switch to either Hi or Low. • If you have connected the receiver correctly. Retainer ring 2. After cleaning, make sure the roller(s) are working on the roller(s). Remove the ball and wipe it . does not work upon installation Try one or more of dirt on the rubber roller(s) inside the ball-cage. Ball Inside roller 3. 6. Troubleshooting TrackMan Live...
Manual
Page 13
... being used. To check the batteries, move The Range switch must be on and the receiver plugged in. The battery light should blink. The receiver light should turn on the device. Release the button. TrackMan Live! If the light does not blink, check the batteries for proper installation, and make these devices for conflicts, and change the settings as required. Move the device's ball for the unit to operate. Release the button. English Troubleshooting TrackMan Live! The...
... being used. To check the batteries, move The Range switch must be on and the receiver plugged in. The battery light should blink. The receiver light should turn on the device. Release the button. TrackMan Live! If the light does not blink, check the batteries for proper installation, and make these devices for conflicts, and change the settings as required. Move the device's ball for the unit to operate. Release the button. English Troubleshooting TrackMan Live! The...
Manual
Page 14
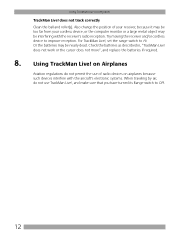
... not use TrackMan Live!, and make sure that you have turned its Range switch to Off. 12 For TrackMan Live!, set the range switch to improve reception. Check the batteries as described in, "TrackMan Live! Using TrackMan Live! Try moving the receiver and/or cordless device to Hi. Or the batteries may be nearly dead. does not work or the cursor does not move", and replace the batteries if required. 8. Also change the...
... not use TrackMan Live!, and make sure that you have turned its Range switch to Off. 12 For TrackMan Live!, set the range switch to improve reception. Check the batteries as described in, "TrackMan Live! Using TrackMan Live! Try moving the receiver and/or cordless device to Hi. Or the batteries may be nearly dead. does not work or the cursor does not move", and replace the batteries if required. 8. Also change the...
Manual
Page 80
...Card for the exchange. 78 Ltd. World Wide Web: http://www.logitech.com FTP: ftp://ftp.logitech.com/pub * Refer to -date addresses and phone numbers. Customer Support will give you must first contact Customer Support... IMSZ Kft. (Logitech) Vamhaz Krt. 10. 1/13 1053 Budapest - Corporate Headquarters LOGITECH Inc. Canada Sales & Marketing Office ...Logitech Addresses and Phone Numbers* Country Address Product Information (Infoline) Technical Help (Hotline) Benelux (B, LUX, NL) LOGITECH Northern Europe B.V. To exchange or return your product. Asian Pacific Headquarters LOGITECH...
...Card for the exchange. 78 Ltd. World Wide Web: http://www.logitech.com FTP: ftp://ftp.logitech.com/pub * Refer to -date addresses and phone numbers. Customer Support will give you must first contact Customer Support... IMSZ Kft. (Logitech) Vamhaz Krt. 10. 1/13 1053 Budapest - Corporate Headquarters LOGITECH Inc. Canada Sales & Marketing Office ...Logitech Addresses and Phone Numbers* Country Address Product Information (Infoline) Technical Help (Hotline) Benelux (B, LUX, NL) LOGITECH Northern Europe B.V. To exchange or return your product. Asian Pacific Headquarters LOGITECH...


