Installation Guide
Page 5
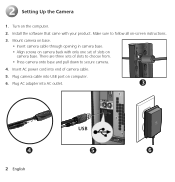
... AC adapter into USB port on computer. 6. 2 Setting Up the Camera 1. Install the software that came with only one set of camera cable. 5. Mount camera on base. • Insert camera cable through opening in camera base. • Align screws on camera base. Make sure to secure camera. 4. Plug camera cable into AC outlet. 3 USB 4 2 English 5 6 Insert AC power cord...
... AC adapter into USB port on computer. 6. 2 Setting Up the Camera 1. Install the software that came with only one set of camera cable. 5. Mount camera on base. • Insert camera cable through opening in camera base. • Align screws on camera base. Make sure to secure camera. 4. Plug camera cable into AC outlet. 3 USB 4 2 English 5 6 Insert AC power cord...
Installation Guide
Page 7
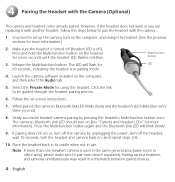
... headset's LED blinks blue every three seconds. 8. 4 Pairing the Headset with the camera. 1. Select the Private Mode for more than one ViewPort camera is off (headset LED is used in use. Verify successful headset-camera pairing by unplugging the power, turn off the headset, wait 10 seconds, turn on...LED should turn on the headset for 60 seconds, indicating the headset is in a mismatch between paired devices. 4 English Launch the camera software installed on -screen instructions. 7. Place the headset back in its cradle when not in the same general area (same room or office...
... headset's LED blinks blue every three seconds. 8. 4 Pairing the Headset with the camera. 1. Select the Private Mode for more than one ViewPort camera is off (headset LED is used in use. Verify successful headset-camera pairing by unplugging the power, turn off the headset, wait 10 seconds, turn on...LED should turn on the headset for 60 seconds, indicating the headset is in a mismatch between paired devices. 4 English Launch the camera software installed on -screen instructions. 7. Place the headset back in its cradle when not in the same general area (same room or office...
Installation Guide
Page 8
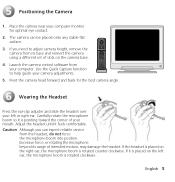
..., or rotating the microphone beyond its base and reinsert the camera using a different set of intended motion, may damage the headset. 5 Positioning the Camera 1. Use the Quick Capture function to adjust camera height, remove the camera from its range of slots on the right ear, the ...help guide your left ear, the microphone boom is placed on the camera base. 4. If the headset is rotated clockwise. Pivot the camera head forward and back for optimal eye contact. 2. Launch the camera control software from the headset, do not force the microphone boom into position. The...
..., or rotating the microphone beyond its base and reinsert the camera using a different set of intended motion, may damage the headset. 5 Positioning the Camera 1. Use the Quick Capture function to adjust camera height, remove the camera from its range of slots on the right ear, the ...help guide your left ear, the microphone boom is placed on the camera base. 4. If the headset is rotated clockwise. Pivot the camera head forward and back for optimal eye contact. 2. Launch the camera control software from the headset, do not force the microphone boom into position. The...
Installation Guide
Page 9
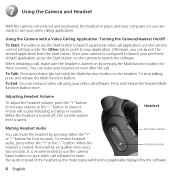
... end your video call using your headset on even after the call software to use the camera control settings under the Other tab to point to lower it. Using the Camera with a Video Calling Application: Turning the Camera/Headset On/Off To Start. To End. When the headset is turned... off, the current volume level is configured to launch your preferred default application, press the Start button on the camera to launch the software. To restore headset audio, press either the "+" or "-" button for three seconds. It is turned on by pressing either the "+" ...
... end your video call using your headset on even after the call software to use the camera control settings under the Other tab to point to lower it. Using the Camera with a Video Calling Application: Turning the Camera/Headset On/Off To Start. To End. When the headset is turned... off, the current volume level is configured to launch your preferred default application, press the Start button on the camera to launch the software. To restore headset audio, press either the "+" or "-" button for three seconds. It is turned on by pressing either the "+" ...
Installation Guide
Page 16
...AND NONINFRINGEMENT OF THIRD-PARTY RIGHTS WITH RESPECT TO THE HARDWARE, SOFTWARE, DOCUMENTATION AND ANY OTHER MATERIALS PROVIDED BY LOGITECH AND/OR ITS SUPPLIERS, AND ANY WARRANTIES OF NON-INTERFERENCE OR...warranty claims are void if failure of personal injury where and to Logitech. Certain uses of digital PC camera products may vary in different countries, such as in the U.K., ... AGREEMENT REPLACE ALL OTHER WARRANTIES. Some jurisdictions do not allow limitations on the web at www.logitech.com. Any replacement hardware will not apply in the documentation accompanying your exclusive ...
...AND NONINFRINGEMENT OF THIRD-PARTY RIGHTS WITH RESPECT TO THE HARDWARE, SOFTWARE, DOCUMENTATION AND ANY OTHER MATERIALS PROVIDED BY LOGITECH AND/OR ITS SUPPLIERS, AND ANY WARRANTIES OF NON-INTERFERENCE OR...warranty claims are void if failure of personal injury where and to Logitech. Certain uses of digital PC camera products may vary in different countries, such as in the U.K., ... AGREEMENT REPLACE ALL OTHER WARRANTIES. Some jurisdictions do not allow limitations on the web at www.logitech.com. Any replacement hardware will not apply in the documentation accompanying your exclusive ...


