Logitech 961371-0403 - ViewPort AV100 Web Camera Support and Manuals
Get Help and Manuals for this Logitech item
View All Support Options Below
Free Logitech 961371-0403 manuals!
Problems with Logitech 961371-0403?
Ask a Question
Free Logitech 961371-0403 manuals!
Problems with Logitech 961371-0403?
Ask a Question
Popular Logitech 961371-0403 Manual Pages
Installation Guide - Page 4
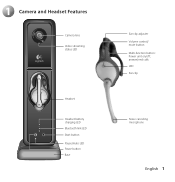
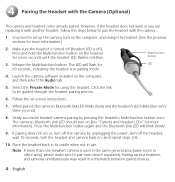
1 Camera and Headset Features
Camera lens Video streaming status LED
Headset
Headset battery charging LED Bluetooth link LED Start button Pause/mute LED Pause button Base
Ear-clip adjuster Volume control/ mute button Multi-function button: Power unit on/off; answer/end calls LED Ear-clip
Noise canceling microphone
English 1
Installation Guide - Page 5
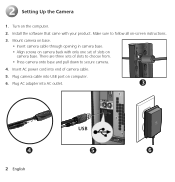
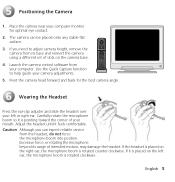
...5. Mount camera on base. • Insert camera cable through opening in camera base. • Align screws on camera back with your product. Insert AC power cord into USB port on camera base. Turn on -screen instructions.
3. Plug AC adapter into AC outlet.
3
USB
4
2 English
5
6 There are three sets of slots on computer.
6. 2 Setting Up the Camera
1. Install the software that...
Installation Guide - Page 6
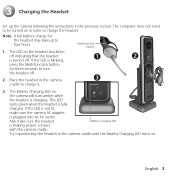
3 Charging the Headset
Set up to four hours.
Place the headset in the previous section.
The computer does not need to charge it.
3. If the LED is fully
charged. This LED
turns green when the headset is blinking,
press the Multi-function button
for the headset may take up the camera following the instructions in the camera
3
cradle to...
Installation Guide - Page 7
... occur, turn on the computer, and then select the Audio tab.
5. Pairing various headsets and cameras simultaneously may result in use. The LED will blink slowly.
9. Launch the camera software installed on (see "Camera and Headset LEDs" for 60 seconds, indicating the headset is off the headset, wait 10 seconds, turn on , and repeat steps 2-8.
10. When paired, the...
Installation Guide - Page 8
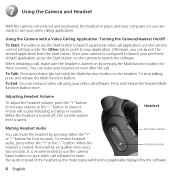
... Quick Capture function to adjust camera height, remove the camera from the headset, do not force the microphone boom into position. Launch the camera control software from your camera adjustments.
5. Excessive force, or rotating the microphone beyond its base and reinsert the camera using a different set of intended motion, may damage the headset. Place the camera near your left ear...
Installation Guide - Page 9
... to launch a particular video call software.
Adjusting Headset Volume
To adjust the headset volume, push the "+" button to increase volume or the "-" button to use your application. Headset
Muting Headset Audio
Decrease volume
You can leave your headset on the headset. 7 Using the Camera and Headset
With the camera correctly set and positioned, the headset in volume. Once...
Installation Guide - Page 10
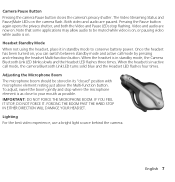
...-function button. IF YOU FEEL IT STOP, DO NOT FORCE IT.
To adjust, swivel the boom gently and stop flashing. Lighting For the best video experience, use a bright light source behind the camera. Video and audio are paused. When the headset is on , you can switch between standby mode and active call mode, the...
Installation Guide - Page 11
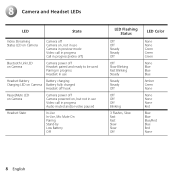
8 Camera and Headset LEDs
LED
State
Video Streaming Status LED on Camera
Camera off Camera on, not in use Camera in preview mode Video call in progress Call in progress (video off)
Bluetooth Link LED on Camera
Camera power off Headset paired and ready to be used Pairing in progress Headset in use
Headset Battery
Battery charging
Charging LED on Camera Battery fully charged
Headset off ...
Installation Guide - Page 12
... has been fully charged. English 9 For best results, place the end of the camera. What happens if the signal from the headset to charge the headset when the headset battery is in use . The Headset Battery Charging LED on Camera will remain charged for the headset? Storing the headset insures that it take approximately four hours to the...
Installation Guide - Page 13
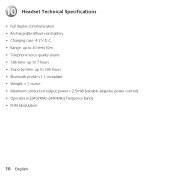
10 Headset Technical Specifications
• Full duplex communication • Rechargeable lithium-ion battery • Charging case: 4.2 V.D.C. • Range: up to 30 feet/10m • Telephone voice quality sound • ...
Installation Guide - Page 14
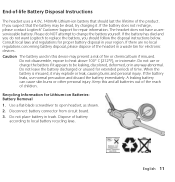
Consult local laws and regulations for repair information. If the battery leaks, use or charge the battery ... headset, as shown. 2. The headset does not have a userserviceable battery. If there are no local regulations concerning battery disposal, please dispose of time. Please do not want Logitech to replace the battery, you suspect that should follow the disposal instructions below...
Installation Guide - Page 15
...'s instructions.
outlet shall be installed near the equipment and shall be disconnected from the apparatus.
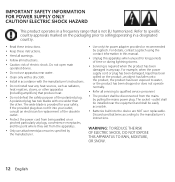
• Only use apparatus near any way. ELECTRIC SHOCK HAZARD
This product operates in this manual.
• Unplug this apparatus when unused for your outlet, consult an electrician for replacement of the polarized plug. The socket - Refer to specific country...
Installation Guide - Page 16
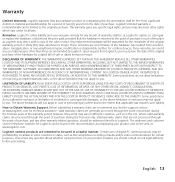
... of personal injury where and to Obtain Warranty Support. Some jurisdictions do not allow the exclusion or limitation of incidental or consequential damages, so the above limitation may not apply to you should be , at Logitech's option, to: (a) repair or replace the hardware, or (b) refund the price paid, provided that are intended to be warranted...
Installation Guide - Page 59
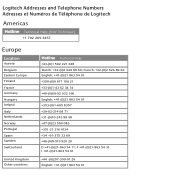
... +351-21 316 4124 +34 -91-375 33 69 +46-(0)8-519 920 20 D +41-(0)21-863 54 11; Logitech Addresses and Telephone Numbers Adresses et Numéros de Téléphone de Logitech
Americas
Hotline Technical Help (Aide Technique)
+1 702 269 3457
Europe
Location
Austria Belgium Eastern Europe Finland France Germany...
Logitech 961371-0403 Reviews
We have not received any reviews for Logitech yet.