Manual
Page 5
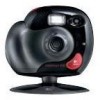
... digital pictures and videos, turn on LED QuickSync™ badge Power button Photo/video switch Status display Self-timer button Delete button English 1 Later, download your images to your Logitech® ClickSmart™ 420 digital camera plus webcam! Then launch the Logitech® camera software that's included with your creations quickly with family and friends over e-mail, or the Web. Share your camera. For video instant messaging or online video chat, connect the camera to the computer. Your pictures and videos are stored in camera memory. Shutter button Flash Lens...
... digital pictures and videos, turn on LED QuickSync™ badge Power button Photo/video switch Status display Self-timer button Delete button English 1 Later, download your images to your Logitech® ClickSmart™ 420 digital camera plus webcam! Then launch the Logitech® camera software that's included with your creations quickly with family and friends over e-mail, or the Web. Share your camera. For video instant messaging or online video chat, connect the camera to the computer. Your pictures and videos are stored in camera memory. Shutter button Flash Lens...
Manual
Page 6
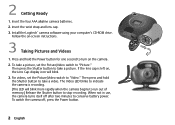
Install the Logitech® camera software using your computer's CD-ROM drive. If the lens cap is recording. (This LED will blink. 3. Then press and hold the Power button for one second to turn on -screen instructions. 3 Taking Pictures and Videos 1. For videos, set the Picture/Video switch to take a picture. When not in use, the camera turns itself off , press the Power button. 2 English Press and hold the Shutter button to "Picture." To take a picture, set the Picture/Video switch to conserve battery power. To switch the camera off after two minutes...
Install the Logitech® camera software using your computer's CD-ROM drive. If the lens cap is recording. (This LED will blink. 3. Then press and hold the Power button for one second to turn on -screen instructions. 3 Taking Pictures and Videos 1. For videos, set the Picture/Video switch to take a picture. When not in use, the camera turns itself off , press the Power button. 2 English Press and hold the Shutter button to "Picture." To take a picture, set the Picture/Video switch to conserve battery power. To switch the camera off after two minutes...

Manual
Page 7
... automatic flash with each shot. 3 Press Flash button to record video; Counter. Press the Timer button to delete the last picture. Before the two seconds are up, you have the option of video taken. 4. Timer. Lens-cap-on the timer; Video. the picture is 320 x 240 pixels. 2. Delete. Shows number of pictures or frames of not deleting your pictures by releasing the Delete button. 6. Press the Delete button for two seconds to turn on Indicator 7. Battery Status English 3 Camera Mode 6 Photo. Resolution...
... automatic flash with each shot. 3 Press Flash button to record video; Counter. Press the Timer button to delete the last picture. Before the two seconds are up, you have the option of video taken. 4. Timer. Lens-cap-on the timer; Video. the picture is 320 x 240 pixels. 2. Delete. Shows number of pictures or frames of not deleting your pictures by releasing the Delete button. 6. Press the Delete button for two seconds to turn on Indicator 7. Battery Status English 3 Camera Mode 6 Photo. Resolution...

Manual
Page 8
... blinks when images are deleted automatically. (See the online help system for more information about using QuickView.) • Delete the images without copying them. • Cancel. You can view new images while downloading to my computer. Open the cover protecting the USB connector on the computer. 5. Plug the other cable end into a USB port on the camera. 3. This option USB port USB conncetor transfers your camera, the QuickSync downloading program launches. After the transfer...
... blinks when images are deleted automatically. (See the online help system for more information about using QuickView.) • Delete the images without copying them. • Cancel. You can view new images while downloading to my computer. Open the cover protecting the USB connector on the computer. 5. Plug the other cable end into a USB port on the camera. 3. This option USB port USB conncetor transfers your camera, the QuickSync downloading program launches. After the transfer...

Manual
Page 9
... the Logitech® camera software. A drop-down list box displays. Download your pictures and videos! To e-mail a photo or video, use the "Attach to an E-mail" button in very dim light; With your camera and software, do video instant messaging, video chat, or live video broadcasting on your computer monitor or your desktop. English 5 Make sure your subject is between 3 and 7 feet (0.9 to 2.1 meters). From within the Logitech® camera software, click the Help button...
... the Logitech® camera software. A drop-down list box displays. Download your pictures and videos! To e-mail a photo or video, use the "Attach to an E-mail" button in very dim light; With your camera and software, do video instant messaging, video chat, or live video broadcasting on your computer monitor or your desktop. English 5 Make sure your subject is between 3 and 7 feet (0.9 to 2.1 meters). From within the Logitech® camera software, click the Help button...
Manual
Page 10
.../or video communications for any question about whether a proposed use of your batteries leak, use normal precaution and follow the battery manufacturer's recommendations. • When replacing batteries, use other battery types, such as the surreptitious recording of digital PC camera products may explode or leak, causing burns and personal injury. 7 Camera and Battery Warnings! • Don't expose the camera to guide located on the Logitech® software CD...
.../or video communications for any question about whether a proposed use of your batteries leak, use normal precaution and follow the battery manufacturer's recommendations. • When replacing batteries, use other battery types, such as the surreptitious recording of digital PC camera products may explode or leak, causing burns and personal injury. 7 Camera and Battery Warnings! • Don't expose the camera to guide located on the Logitech® software CD...

Manual
Page 29
... and Telephone Numbers Country EUROPEAN, MIDDLE EASTERN & AFRICAN HEADQUARTERS LOGITECH Trading S.A. AUSTRALIA LOGITECH Australia Computer Peripherals Pty Ltd. Industrial Park ROC Hsinchu... Tokyo, Japan 104-0061 Contact your local authorized distributor, or call our Customer Support Hotline in the USA Hotline Technical Help +41 (0) 21 863 54 01 English FAX +41 (0) 21 863 54 02 +1 702 269 3457 +886 (2) ...sur-Morges 6505 Kaiser Drive USA Fremont, CA 94555 Infoline Product Information +41 (0) 21 863 54 00 English FAX +41 (0) 21 863 54 02 (800) 231-7717 #2 Creation Road IV Science-Based - CANADA...
... and Telephone Numbers Country EUROPEAN, MIDDLE EASTERN & AFRICAN HEADQUARTERS LOGITECH Trading S.A. AUSTRALIA LOGITECH Australia Computer Peripherals Pty Ltd. Industrial Park ROC Hsinchu... Tokyo, Japan 104-0061 Contact your local authorized distributor, or call our Customer Support Hotline in the USA Hotline Technical Help +41 (0) 21 863 54 01 English FAX +41 (0) 21 863 54 02 +1 702 269 3457 +886 (2) ...sur-Morges 6505 Kaiser Drive USA Fremont, CA 94555 Infoline Product Information +41 (0) 21 863 54 00 English FAX +41 (0) 21 863 54 02 (800) 231-7717 #2 Creation Road IV Science-Based - CANADA...
Manual
Page 30
Logitech assumes no responsibility for any errors that may be registered. Information contained herein is subject to change without notice. All other Logitech marks are the property of their respective owners. Logitech® on the world wide web: www.logitech.com ©2002 Logitech. All rights reserved. Logitech, the Logitech logo, and other trademarks are owned by Logitech and may appear in this manual. Part number: 623092-0403
Logitech assumes no responsibility for any errors that may be registered. Information contained herein is subject to change without notice. All other Logitech marks are the property of their respective owners. Logitech® on the world wide web: www.logitech.com ©2002 Logitech. All rights reserved. Logitech, the Logitech logo, and other trademarks are owned by Logitech and may appear in this manual. Part number: 623092-0403