
Manual
Page 6
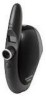
Press and hold camera's power button for two seconds. Deploy receiver antenna cA . Turn on -screen instructions. 2. Press Power button to the diagram inside battery compartment. 3. 2 Set Up the Camera 1. a c USB connector 2 English b 4. Install software first. Follow on camera. Install batteries in camera aA . Insert receiver cable into USB port when prompted by default. Note Power Save is on . Refer to turn camera back on by software bA . 5. Camera turns itself off after 10 minutes of inactivity.
Press and hold camera's power button for two seconds. Deploy receiver antenna cA . Turn on -screen instructions. 2. Press Power button to the diagram inside battery compartment. 3. 2 Set Up the Camera 1. a c USB connector 2 English b 4. Install software first. Follow on camera. Install batteries in camera aA . Insert receiver cable into USB port when prompted by default. Note Power Save is on . Refer to turn camera back on by software bA . 5. Camera turns itself off after 10 minutes of inactivity.
Manual
Page 7
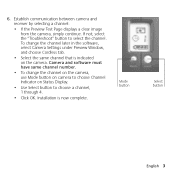
... channel number. • To change the channel later in the software, select Camera Settings under Preview Window, and choose Cordless tab. • Select the same channel that is now complete. Installation is indicated on Status Display. • Use Select button to choose a channel, 1 through 4. • Click OK. If not, select the "Troubleshoot" button to choose Channel Indicator on the camera. Mode button Select button English 3 To change...
... channel number. • To change the channel later in the software, select Camera Settings under Preview Window, and choose Cordless tab. • Select the same channel that is now complete. Installation is indicated on Status Display. • Use Select button to choose a channel, 1 through 4. • Click OK. If not, select the "Troubleshoot" button to choose Channel Indicator on the camera. Mode button Select button English 3 To change...

Manual
Page 8
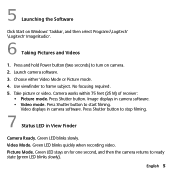
... function flashes when selected. 3. Use Select button to select choices within function (e.g., Channel indicator, channels 1 through 4.) 4. Captures video. 3 2. Press Select button to choose camera function. 2. 3 Status Display 1. Press the Mode button to choose function. 4. Battery level indicator 4 Selecting Camera Functions 1. Channel indicator (Select a channel, 1 through 4, or Power save 4 • Enable (On by default.) • Disable (when AC adapter is connected) 3. Takes a single picture. 2 • Video mode. Camera modes 1 • Picture mode...
... function flashes when selected. 3. Use Select button to select choices within function (e.g., Channel indicator, channels 1 through 4.) 4. Captures video. 3 2. Press Select button to choose camera function. 2. 3 Status Display 1. Press the Mode button to choose function. 4. Battery level indicator 4 Selecting Camera Functions 1. Channel indicator (Select a channel, 1 through 4, or Power save 4 • Enable (On by default.) • Disable (when AC adapter is connected) 3. Takes a single picture. 2 • Video mode. Camera modes 1 • Picture mode...
Manual
Page 9
... in camera software. • Video mode. Green LED stays on camera. 2. English 5 Use viewfinder to start filming. Camera works within 75 feet (25 M) of receiver: • Picture mode. Press Shutter button. Press Shutter button to frame subject. Image displays in camera software. Green LED blinks slowly. Video Mode. Picture Mode. Launch camera software. 3. Choose either Video Mode or Picture mode. 4. Take picture or video. Green LED blinks quickly when recording video. Press and hold Power button (two seconds) to turn on for one second, and then the camera...
... in camera software. • Video mode. Green LED stays on camera. 2. English 5 Use viewfinder to start filming. Camera works within 75 feet (25 M) of receiver: • Picture mode. Press Shutter button. Press Shutter button to frame subject. Image displays in camera software. Green LED blinks slowly. Video Mode. Picture Mode. Launch camera software. 3. Choose either Video Mode or Picture mode. 4. Take picture or video. Green LED blinks quickly when recording video. Press and hold Power button (two seconds) to turn on for one second, and then the camera...
Manual
Page 10
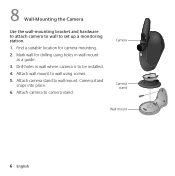
Find a suitable location for drilling using screws. 5. Camera stand snaps into place. 6. Camera Camera stand Wall mount 6 English Attach wall mount to wall mount. Attach camera stand to wall using holes in wall where camera is to be installed. 4. Mark wall for camera mounting. 2. Attach camera to set up a monitoring station. 1. 8 Wall-Mounting the Camera Use the wall-mounting bracket and hardware to attach camera to wall to camera stand. Drill holes in wall mount as a guide. 3.
Find a suitable location for drilling using screws. 5. Camera stand snaps into place. 6. Camera Camera stand Wall mount 6 English Attach wall mount to wall mount. Attach camera stand to wall using holes in wall where camera is to be installed. 4. Mark wall for camera mounting. 2. Attach camera to set up a monitoring station. 1. 8 Wall-Mounting the Camera Use the wall-mounting bracket and hardware to attach camera to wall to camera stand. Drill holes in wall mount as a guide. 3.
Manual
Page 11
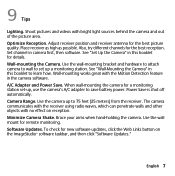
... for new software updates, click the Web Links button on reception. 9 Tips Lighting. Shoot pictures and videos with the Motion Detection feature in this booklet for a monitoring station set up a monitoring station. Set channel in this booklet to learn how. See "Set Up the Camera" in camera first, then software. Use the wall-mounting bracket and hardware to attach camera to wall to set -up to save battery power. Wall-mounting works great with...
... for new software updates, click the Web Links button on reception. 9 Tips Lighting. Shoot pictures and videos with the Motion Detection feature in this booklet for a monitoring station set up a monitoring station. Set channel in this booklet to learn how. See "Set Up the Camera" in camera first, then software. Use the wall-mounting bracket and hardware to attach camera to wall to set -up to save battery power. Wall-mounting works great with...
Manual
Page 12
... are intended to be prohibited by any word For additional information about Logitech® QuickCam® Web cameras, as well as the surreptitious recording of audio and/or video communications for certain purposes. Certain uses of your product is lawful, you have any activity within the software, click the Help button. 2. You can then click the • Contents tab to browse by...
... are intended to be prohibited by any word For additional information about Logitech® QuickCam® Web cameras, as well as the surreptitious recording of audio and/or video communications for certain purposes. Certain uses of your product is lawful, you have any activity within the software, click the Help button. 2. You can then click the • Contents tab to browse by...

Manual
Page 38
...,eamndaroktshaerreLotghietepcrhompearrktsyaoref tohwenired by Logitech and may be rergeisspteercetdi.vAelloowthneerrstr.aLdoegmitaerckhs aarsestuhme epsronpoerrteysopfotnhseiibr irleitsypefoctrivaenoywenrreorsr.sLtohgaittemchaaysasupmpeeas rnoinrethspisonsibility for any errors thmatamnuaayla. PaPratrntunmubmebr:e6r2: 36022310-1074-003403 Logitech® on the world wide web: www.logitech.com Logitech® on the world wide web: www.logitech.com ©2002 Logitech. pInpfeoarrminatthioisnmcaonnutaal.inInefdorhmearteioinn icsosnutbaijneecdt htoercehinainsgsuebwjeictthtooucthnaontgiecew...
...,eamndaroktshaerreLotghietepcrhompearrktsyaoref tohwenired by Logitech and may be rergeisspteercetdi.vAelloowthneerrstr.aLdoegmitaerckhs aarsestuhme epsronpoerrteysopfotnhseiibr irleitsypefoctrivaenoywenrreorsr.sLtohgaittemchaaysasupmpeeas rnoinrethspisonsibility for any errors thmatamnuaayla. PaPratrntunmubmebr:e6r2: 36022310-1074-003403 Logitech® on the world wide web: www.logitech.com Logitech® on the world wide web: www.logitech.com ©2002 Logitech. pInpfeoarrminatthioisnmcaonnutaal.inInefdorhmearteioinn icsosnutbaijneecdt htoercehinainsgsuebwjeictthtooucthnaontgiecew...


