
Quick Start Guide
Page 3
... Additional Voice Interface Card (VIC) to penetrate at least 3/4 inch (20 mm) into supporting wood or into a metal wall stud. 2 Cisco Unified Communications 500 Series Model UC 540 Quick Start Guide 1 Before You Begin Before you begin the installation, make sure that you have the following: For Hardware ...The screws must be purchased from your telephony service provider or reseller. Two number-10 wood screws (round- RJ-11 cable for ISDN (BRI) connections. - We recommend that you use Cisco ESW 500 Series switches. • Cables - Ethernet cables (Category 5 or higher) for connecting...
... Additional Voice Interface Card (VIC) to penetrate at least 3/4 inch (20 mm) into supporting wood or into a metal wall stud. 2 Cisco Unified Communications 500 Series Model UC 540 Quick Start Guide 1 Before You Begin Before you begin the installation, make sure that you have the following: For Hardware ...The screws must be purchased from your telephony service provider or reseller. Two number-10 wood screws (round- RJ-11 cable for ISDN (BRI) connections. - We recommend that you use Cisco ESW 500 Series switches. • Cables - Ethernet cables (Category 5 or higher) for connecting...
Quick Start Guide
Page 11
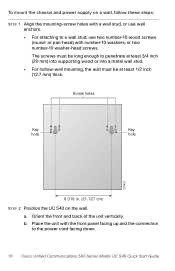
The screws must be long enough to a wall stud, use two number-10 wood screws (round- To mount the chassis and power supply on the wall. Screw holes Key Key hole hole 275427 8.318 in. (21.127 cm) STEP 2 Position the UC 540 on a wall, follow these steps: STEP 1 Align the mounting-... the front panel facing up and the connection to the power cord facing down. 10 Cisco Unified Communications 500 Series Model UC 540 Quick Start Guide Place the unit with a wall stud, or use wall anchors. • For attaching to penetrate at least 3/4 inch (20 mm) into supporting wood or into a ...
The screws must be long enough to a wall stud, use two number-10 wood screws (round- To mount the chassis and power supply on the wall. Screw holes Key Key hole hole 275427 8.318 in. (21.127 cm) STEP 2 Position the UC 540 on a wall, follow these steps: STEP 1 Align the mounting-... the front panel facing up and the connection to the power cord facing down. 10 Cisco Unified Communications 500 Series Model UC 540 Quick Start Guide Place the unit with a wall stud, or use wall anchors. • For attaching to penetrate at least 3/4 inch (20 mm) into supporting wood or into a ...