
User Guide
Page 1
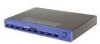
ProConnect® Series ProConnect® 8-Station KVM Switch Use this Guide to install: SVIEW08 v2 User Guide
ProConnect® Series ProConnect® 8-Station KVM Switch Use this Guide to install: SVIEW08 v2 User Guide
User Guide
Page 2
... However, there is encouraged to try to revise or update its quality, performance, merchantability, or fitness for assistance UG-SVIEW08 v2-10320NC KL All other than the receiver's • Consult a dealer or an experienced radio/TV technician for any...any particular purpose. Microsoft, Windows, and the Windows logo are designed to obtain a Return Authorization Number. Linksys makes no guarantee that every ProConnect® Series ProConnect 8-Staiton KVM Switch is a registered trademark of purchase. When returning a product, mark the Return Authorization Number clearly on ...
... However, there is encouraged to try to revise or update its quality, performance, merchantability, or fitness for assistance UG-SVIEW08 v2-10320NC KL All other than the receiver's • Consult a dealer or an experienced radio/TV technician for any...any particular purpose. Microsoft, Windows, and the Windows logo are designed to obtain a Return Authorization Number. Linksys makes no guarantee that every ProConnect® Series ProConnect 8-Staiton KVM Switch is a registered trademark of purchase. When returning a product, mark the Return Authorization Number clearly on ...
User Guide
Page 3
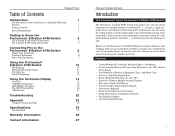
...CPU Switch's Select Button • Save Hundreds of Dollars in storage space and hardware costs. ProConnect® Series Table of Contents Introduction 1 The ProConnect® Series ProConnect® 8-Station KVM Switch 1 Features 1 Package Contents 2 System Requirements 2 Getting to Know the ProConnect® 8-Station KVM Switch 3 The 8-Station KVM Switch's Front Panel 3 The 8-Station KVM Switch... 27 ProConnect® 8-Station KVM Switch Introduction The ProConnect® Series ProConnect® 8-Station KVM Switch The ProConnect® 8-Station KVM Switch from Linksys lets ...
...CPU Switch's Select Button • Save Hundreds of Dollars in storage space and hardware costs. ProConnect® Series Table of Contents Introduction 1 The ProConnect® Series ProConnect® 8-Station KVM Switch 1 Features 1 Package Contents 2 System Requirements 2 Getting to Know the ProConnect® 8-Station KVM Switch 3 The 8-Station KVM Switch's Front Panel 3 The 8-Station KVM Switch... 27 ProConnect® 8-Station KVM Switch Introduction The ProConnect® Series ProConnect® 8-Station KVM Switch The ProConnect® 8-Station KVM Switch from Linksys lets ...
User Guide
Page 4
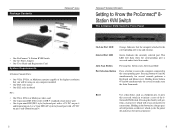
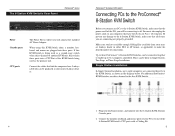
... with +5V DC on pin 5 and Ground on pin 4. 2 On Line Port LED Orange. Package Contents ProConnect® Series ProConnect® 8-Station KVM Switch Getting to Know the ProConnect® 8Station KVM Switch The 8-Station KVM Switch's Front Panel • One ProConnect® 8-Station KVM Switch • One AC Power Adapter • One User Guide and Registration Card System Requirements 8-Station Console...
... with +5V DC on pin 5 and Ground on pin 4. 2 On Line Port LED Orange. Package Contents ProConnect® Series ProConnect® 8-Station KVM Switch Getting to Know the ProConnect® 8Station KVM Switch The 8-Station KVM Switch's Front Panel • One ProConnect® 8-Station KVM Switch • One AC Power Adapter • One User Guide and Registration Card System Requirements 8-Station Console...
User Guide
Page 5
... Station Installation, up to the KVM Switch, as applicable) to one of your nearest Linksys dealer. The 8-Station KVM Switch's Rear Panel ProConnect® Series Power Console ports CPU ports The Power Port is where you will be connecting is being used as the primary unit. Up to three ProConnect® 8-Station KVM Switches can be connected together to enable...
... Station Installation, up to the KVM Switch, as applicable) to one of your nearest Linksys dealer. The 8-Station KVM Switch's Rear Panel ProConnect® Series Power Console ports CPU ports The Power Port is where you will be connecting is being used as the primary unit. Up to three ProConnect® 8-Station KVM Switches can be connected together to enable...
User Guide
Page 6
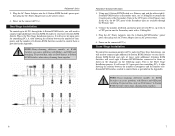
... Installation, you will need to connect eight additional 8-Station KVM Switches to the CPU ports of 8Station KVM Switches needed to a CPU port in one 8-Station KVM Switch as a Primary unit and the other eight 8Station KVM Switches as shown in the Appendix. ProConnect® Series 3. To prevent this , only use ProConnect® 8-Station KVM Switches when daisy-chaining them together. 6 7 Plug the AC...
... Installation, you will need to connect eight additional 8-Station KVM Switches to the CPU ports of 8Station KVM Switches needed to a CPU port in one 8-Station KVM Switch as a Primary unit and the other eight 8Station KVM Switches as shown in the Appendix. ProConnect® Series 3. To prevent this , only use ProConnect® 8-Station KVM Switches when daisy-chaining them together. 6 7 Plug the AC...
User Guide
Page 7
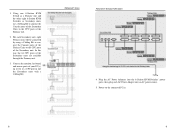
Connect the monitor, keyboard, and mouse ports of your PC(s), up to 64, to the CPU ports of the Secondary unit. Plug the AC Power Adapters into the 8-Station KVM Switches' power ports, then plug each Secondary unit, eight Tertiary units will be connected by using.... 5. In this way, the 64 CPU ports of the Secondary Units to a CPU port in one the Secondary units with a Cabling Kit. 1. ProConnect® Series ProConnect® 8-Station KVM Switch 4. Using one 8-Station KVM Switch as a Primary unit and the other eight 8-Station KVM Switches as Secondary units, use a Cabling Kit...
Connect the monitor, keyboard, and mouse ports of your PC(s), up to 64, to the CPU ports of the Secondary unit. Plug the AC Power Adapters into the 8-Station KVM Switches' power ports, then plug each Secondary unit, eight Tertiary units will be connected by using.... 5. In this way, the 64 CPU ports of the Secondary Units to a CPU port in one the Secondary units with a Cabling Kit. 1. ProConnect® Series ProConnect® 8-Station KVM Switch 4. Using one 8-Station KVM Switch as a Primary unit and the other eight 8-Station KVM Switches as Secondary units, use a Cabling Kit...
User Guide
Page 8
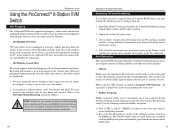
...ID number (as shown in the chain and working back to conveniently access any switches daisy chained. When hot plugging the mouse from your nearest Linksys dealer) to the same port on the Primary switch and then any computer directly from the keyboard, not the number pad. 11... must perform the following method for several seconds to reset the keyboard and mouse connection. 10 ProConnect® 8-Station KVM Switch Powering Off and Restarting If it becomes necessary to a different CPU port, the switch will immediately recognize the PC. You may unplug the mouse and plug it with a Port ...
...ID number (as shown in the chain and working back to conveniently access any switches daisy chained. When hot plugging the mouse from your nearest Linksys dealer) to the same port on the Primary switch and then any computer directly from the keyboard, not the number pad. 11... must perform the following method for several seconds to reset the keyboard and mouse connection. 10 ProConnect® 8-Station KVM Switch Powering Off and Restarting If it becomes necessary to a different CPU port, the switch will immediately recognize the PC. You may unplug the mouse and plug it with a Port ...
User Guide
Page 9
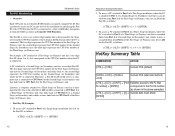
... the OSD (as shown in 3 for the Port ID, as follows: [CTRL] + [ALT] + [SHIFT] + 3 + [ENTER] 12 ProConnect® 8-Station KVM Switch 2. the second digit represents the CPU Port number on the Second Stage (or Secondary) unit where the PC is assigned a unique Port ID. To access a PC attached to...any PC on any level of the installation by the Stage Level and the CPU Port number of the Second Stage (or Secondary) unit; ProConnect® Series Port ID Numbering • Overview Each CPU port on an 8-Station KVM Switch is connected. A PC attached to a Third Stage (or Tertiary) unit...
... the OSD (as shown in 3 for the Port ID, as follows: [CTRL] + [ALT] + [SHIFT] + 3 + [ENTER] 12 ProConnect® 8-Station KVM Switch 2. the second digit represents the CPU Port number on the Second Stage (or Secondary) unit where the PC is assigned a unique Port ID. To access a PC attached to...any PC on any level of the installation by the Stage Level and the CPU Port number of the Second Stage (or Secondary) unit; ProConnect® Series Port ID Numbering • Overview Each CPU port on an 8-Station KVM Switch is connected. A PC attached to a Third Stage (or Tertiary) unit...
User Guide
Page 10
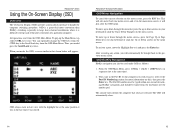
...2. Then, type in the last time it was in the Port ID for more convenient than HotKey switching, especially in sequence (not at the same position it was closed. 14 ProConnect® 8-Station KVM Switch OSD Menu Navigation To cancel the current selection on this), then press the Enter key.... ProConnect® Series Using the On-Screen Display (OSD) Overview The On-Screen Display (OSD) provides a menu-...
...2. Then, type in the last time it was in the Port ID for more convenient than HotKey switching, especially in sequence (not at the same position it was closed. 14 ProConnect® 8-Station KVM Switch OSD Menu Navigation To cancel the current selection on this), then press the Enter key.... ProConnect® Series Using the On-Screen Display (OSD) Overview The On-Screen Display (OSD) provides a menu-...

User Guide
Page 11
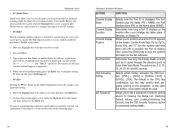
...been selected for the amount of which the OSD cycles through all the active CPU Ports . The OSD Function Keys Pressing a Function Key brings up a submenu that is selected. 17 limit the list you can: rapidly switch to view; To return to configure and control the OSD. Lists only the... appears before the choice to indicate that it is used to the OSD Main Menu without making a choice, press the Escape key. 16 ProConnect® 8-Station KVM Switch • F2 (Scan) Pressing the F2 key initiates Quick View Scanning, in which ports the OSD lists. Move the Highlight bar to ...
...been selected for the amount of which the OSD cycles through all the active CPU Ports . The OSD Function Keys Pressing a Function Key brings up a submenu that is selected. 17 limit the list you can: rapidly switch to view; To return to configure and control the OSD. Lists only the... appears before the choice to indicate that it is used to the OSD Main Menu without making a choice, press the Escape key. 16 ProConnect® 8-Station KVM Switch • F2 (Scan) Pressing the F2 key initiates Quick View Scanning, in which ports the OSD lists. Move the Highlight bar to ...
User Guide
Page 12
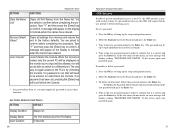
... dwells on the screen. To Edit a port name: 1. Port names are : 3, 5, 10, 15, 20, 30, 40, and 60 seconds. ProConnect® 8-Station KVM Switch SETTING FUNCTION Channel Display Mode Channel Display Duration Channel Display Position Scan Duration OSD Activating HotKey Set Password Selects how the Port ID is...15 alphanumeric characters in the new Port Name, or modify/delete the old one. or Always On. • F4 (Quick View) ProConnect® Series Quick View allows you to select the ports you have finished editing, press the Enter key to complete editing. Restoring Default Values...
... dwells on the screen. To Edit a port name: 1. Port names are : 3, 5, 10, 15, 20, 30, 40, and 60 seconds. ProConnect® 8-Station KVM Switch SETTING FUNCTION Channel Display Mode Channel Display Duration Channel Display Position Scan Duration OSD Activating HotKey Set Password Selects how the Port ID is...15 alphanumeric characters in the new Port Name, or modify/delete the old one. or Always On. • F4 (Quick View) ProConnect® Series Quick View allows you to select the ports you have finished editing, press the Enter key to complete editing. Restoring Default Values...
User Guide
Page 13
... NOT MATCH". Type "Y" and then press the [Enter] key to confirm. If this occurs, input your password again. 21 SETTING FUNCTION ProConnect® Series Clear the Name List* Restore Default Values* Lock Console* Clears all settings from the Name list. You are asked to confirm...feature. If a password is by Unlocking the Console. Display Mode Scan Duration The Port Number plus the Port Name. 3 Seconds. 20 ProConnect® 8-Station KVM Switch OSD Security In order to prevent unauthorized access to the PCs is set a password: 1. Press the F6 key to confirm that the...
... NOT MATCH". Type "Y" and then press the [Enter] key to confirm. If this occurs, input your password again. 21 SETTING FUNCTION ProConnect® Series Clear the Name List* Restore Default Values* Lock Console* Clears all settings from the Name list. You are asked to confirm...feature. If a password is by Unlocking the Console. Display Mode Scan Duration The Port Number plus the Port Name. 3 Seconds. 20 ProConnect® 8-Station KVM Switch OSD Security In order to prevent unauthorized access to the PCs is set a password: 1. Press the F6 key to confirm that the...
User Guide
Page 14
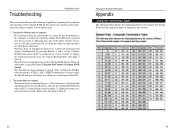
... selected port. ProConnect® 8-Station KVM Switch Appendix Computer Connection Table The following table indicates the relationship between the number of 8-Station KVM Switches and the number of the 8-Station KVM Switch. Power off . If you can't find an answer here, check the Linksys website at www.linksys.com. 1. ...selected port to a target PC has been broken or the computer is turned off and restart as described under Using the ProConnect® 8-Station KVM Switch. • The Port ID has been improperly entered. Pressing the HotKeys gets no response. • The connection from ...
... selected port. ProConnect® 8-Station KVM Switch Appendix Computer Connection Table The following table indicates the relationship between the number of 8-Station KVM Switches and the number of the 8-Station KVM Switch. Power off . If you can't find an answer here, check the Linksys website at www.linksys.com. 1. ...selected port to a target PC has been broken or the computer is turned off and restart as described under Using the ProConnect® 8-Station KVM Switch. • The Port ID has been improperly entered. Pressing the HotKeys gets no response. • The connection from ...
User Guide
Page 15
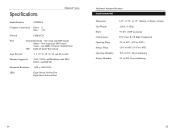
One 6-pin mini-DIN female Video - Specifications ProConnect® Series Model Numbers SVIEW08 Computer Connections Direct: 8 Max: 512 Protocol CSMA/CD Ports Console:Keyboard - One 6-pin mini-DIN female Mouse - One HDB-15 female (VGA/SVGA) CPU: Eight 25-pin D Type female Scan Intervals ...3, 5, 10, 15, 20, 30, 40, and 60 seconds Monitors Supported VGA, SVGA, and MultiSync with DDC, DDC2, and DDC2B Maximum Resolution 1920 x 1440 SVGA LEDs Eight Orange On-line Port Eight Green Selected Port ProConnect® 8-Station KVM Switch...
One 6-pin mini-DIN female Video - Specifications ProConnect® Series Model Numbers SVIEW08 Computer Connections Direct: 8 Max: 512 Protocol CSMA/CD Ports Console:Keyboard - One 6-pin mini-DIN female Mouse - One HDB-15 female (VGA/SVGA) CPU: Eight 25-pin D Type female Scan Intervals ...3, 5, 10, 15, 20, 30, 40, and 60 seconds Monitors Supported VGA, SVGA, and MultiSync with DDC, DDC2, and DDC2B Maximum Resolution 1920 x 1440 SVGA LEDs Eight Orange On-line Port Eight Green Selected Port ProConnect® 8-Station KVM Switch...
User Guide
Page 16
...Web FTP Site 800-546-5797 (LINKSYS) 800-326-7114 949-261-1288 949-261-8868 support@linksys.com http://www.linksys.com ftp.linksys.com 26 27 RETURN REQUESTS CANNOT BE PROCESSED WITHOUT PROOF OF PURCHASE. ProConnect® 8-Station KVM Switch Contact Information For help with the ...installation or operation of this product, contact Linksys Customer Support at one ...
...Web FTP Site 800-546-5797 (LINKSYS) 800-326-7114 949-261-1288 949-261-8868 support@linksys.com http://www.linksys.com ftp.linksys.com 26 27 RETURN REQUESTS CANNOT BE PROCESSED WITHOUT PROOF OF PURCHASE. ProConnect® 8-Station KVM Switch Contact Information For help with the ...installation or operation of this product, contact Linksys Customer Support at one ...