Cisco SPA9000 Voice System Administration Guide
Page 8
... Configuration Client Registration Using the Upgrade URL Using the Resync URL Using the Reboot URL Appendix B: SPA9000 Field Reference Router Tab Status page Wan Setup page Lan Setup page and Application page Voice tab Info page SPA9000 Voice System Administration Guide 168 169 170 172 173 173 175 177 178 179 180...
... Configuration Client Registration Using the Upgrade URL Using the Resync URL Using the Reboot URL Appendix B: SPA9000 Field Reference Router Tab Status page Wan Setup page Lan Setup page and Application page Voice tab Info page SPA9000 Voice System Administration Guide 168 169 170 172 173 173 175 177 178 179 180...
Cisco SPA9000 Voice System Administration Guide
Page 9
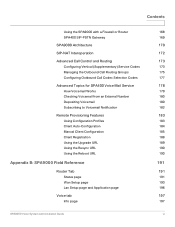
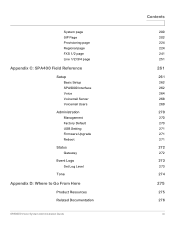
System page SIP Page Provisioning page Regional page FXS 1/2 page Line 1/2/3/4 page Appendix C: SPA400 Field Reference Setup Basic Setup SPA9000 Interface Voice Voicemail Server Voicemail Users Administration Management Factory Default USB Setting Firmware Upgrade Reboot Status Gateway Event Logs Set Log Level Tone Appendix D: Where to Go From Here Product Resources Related Documentation SPA9000 Voice System Administration Guide Contents 200 202 224 224 241 251 261 261 262 262 264 268 269 270 270 270 271 271 271 272 272 273 273 274 275 275 276 vii
System page SIP Page Provisioning page Regional page FXS 1/2 page Line 1/2/3/4 page Appendix C: SPA400 Field Reference Setup Basic Setup SPA9000 Interface Voice Voicemail Server Voicemail Users Administration Management Factory Default USB Setting Firmware Upgrade Reboot Status Gateway Event Logs Set Log Level Tone Appendix D: Where to Go From Here Product Resources Related Documentation SPA9000 Voice System Administration Guide Contents 200 202 224 224 241 251 261 261 262 262 264 268 269 270 270 270 271 271 271 272 272 273 273 274 275 275 276 vii
Cisco SPA9000 Voice System Administration Guide
Page 11
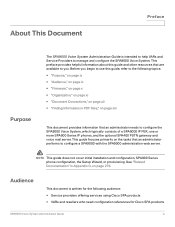
...begin to use this guide and other resources that an administrator performs to the following audience: • Service providers offering services using Cisco SPA products • VARs and resellers who need configuration references for the following topics: • "Purpose," on page ix &#...System, which typically consists of a SPA9000 IP PBX, one or more SPA900 Series IP phones, and the optional SPA400 PSTN gateway and voice mail server. NOTE This guide does not cover initial installation and configuration, SPA900 Series phone configuration, the Setup Wizard, or provisioning. Before you ....
...begin to use this guide and other resources that an administrator performs to the following audience: • Service providers offering services using Cisco SPA products • VARs and resellers who need configuration references for the following topics: • "Purpose," on page ix &#...System, which typically consists of a SPA9000 IP PBX, one or more SPA900 Series IP phones, and the optional SPA400 PSTN gateway and voice mail server. NOTE This guide does not cover initial installation and configuration, SPA900 Series phone configuration, the Setup Wizard, or provisioning. Before you ....

Cisco SPA9000 Voice System Administration Guide
Page 32
... NTP server. NOTE It is outside the address range assigned by the network, which has a connection to the SPA9000 Administration Web Server," on the phone display and are set an IP address that would occur if the IP address of the SPA9000 changed. Normally the date and time are used to use a static... Debug Information," on page 36 Setting Up the WAN Connection for the SPA9000 The SPA9000 becomes a DHCP client of any server on the Voice > Wan Setup page, Optional Settings section. If needed, you should select a static IP address between 192.168.1.2 and 192.168.1.49.
... NTP server. NOTE It is outside the address range assigned by the network, which has a connection to the SPA9000 Administration Web Server," on the phone display and are set an IP address that would occur if the IP address of the SPA9000 changed. Normally the date and time are used to use a static... Debug Information," on page 36 Setting Up the WAN Connection for the SPA9000 The SPA9000 becomes a DHCP client of any server on the Voice > Wan Setup page, Optional Settings section. If needed, you should select a static IP address between 192.168.1.2 and 192.168.1.49.

Cisco SPA9000 Voice System Administration Guide
Page 33
... 9 Click Submit All Changes. Configuring Daylight Saving Time You can enter a daylight saving time rule to set your system time. STEP 2 Click Router tab > Wan Setup. STEP 6 Click Voice tab > Regional. save = EXAMPLE: start=3/9/7;end=11/2/7;save=1 In this period. • : The start = ; Basic Administration of the SPA9000 Configuring Basic Settings...
... 9 Click Submit All Changes. Configuring Daylight Saving Time You can enter a daylight saving time rule to set your system time. STEP 2 Click Router tab > Wan Setup. STEP 6 Click Voice tab > Regional. save = EXAMPLE: start=3/9/7;end=11/2/7;save=1 In this period. • : The start = ; Basic Administration of the SPA9000 Configuring Basic Settings...
Cisco SPA9000 Voice System Administration Guide
Page 62
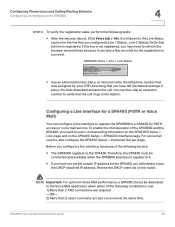
...; After the devices reboot, Click Voice tab > Info. For voice mail service, also configure the SPA400 Setup > Voicemail Server page. SPA9000 Voice System Administration Guide 60 Verify that you configure a line interface, be ...configured (Line 1 Status... SPA9000 Voice > Info > Line Status • Use an external phone to place an inbound call . Configuring Phone Lines and Calling Routing Behavior Configuring Line Interfaces on the SPA9000 4 STEP 6 To verify the... 4 Status). Before you have not yet set a static IP address for the registration to know the DHCP-obtained...
...; After the devices reboot, Click Voice tab > Info. For voice mail service, also configure the SPA400 Setup > Voicemail Server page. SPA9000 Voice System Administration Guide 60 Verify that you configure a line interface, be ...configured (Line 1 Status... SPA9000 Voice > Info > Line Status • Use an external phone to place an inbound call . Configuring Phone Lines and Calling Routing Behavior Configuring Line Interfaces on the SPA9000 4 STEP 6 To verify the... 4 Status). Before you have not yet set a static IP address for the registration to know the DHCP-obtained...

Cisco SPA9000 Voice System Administration Guide
Page 63
...synchronized on both devices. This entry must exactly match the user ID on page108. • Proxy: Enter the IP address of the SPA9000. Configuring Phone Lines and Calling Routing Behavior Configuring Line Interfaces on the SPA9000 4 STEP 1 Start Internet Explorer, and then enter ...the IP address of the SPA400. • Register Expires: 60 This setting ensures that any changes in settings are resynchronized every 60 seconds. For more information, see "Configuring a SPA400 to Interoperate with the SPA9000," on the SPA400 Setup > SPA9000 Interface page, User ...
...synchronized on both devices. This entry must exactly match the user ID on page108. • Proxy: Enter the IP address of the SPA9000. Configuring Phone Lines and Calling Routing Behavior Configuring Line Interfaces on the SPA9000 4 STEP 1 Start Internet Explorer, and then enter ...the IP address of the SPA400. • Register Expires: 60 This setting ensures that any changes in settings are resynchronized every 60 seconds. For more information, see "Configuring a SPA400 to Interoperate with the SPA9000," on the SPA400 Setup > SPA9000 Interface page, User ...

Cisco SPA9000 Voice System Administration Guide
Page 106
...that would occur if the IP address of the SPA400. You can check the obtained IP address on the network. Then click OK. STEP 3 Click Setup tab > Basic Setup. SPA9000 Voice System Administration Guide 104 The recommended setting is to obtain an IP Address via DHCP. NOTE ...By default, the SPA400 is on page106. STEP 4 Enter the following settings: Network Setup section: • Fixed IP address: Click the radio button, and then enter a valid IP address. Administering the SPA400 and Voice Mail Service Configuring the SPA400 Network Connection 5 Configuring the SPA400 ...
...that would occur if the IP address of the SPA400. You can check the obtained IP address on the network. Then click OK. STEP 3 Click Setup tab > Basic Setup. SPA9000 Voice System Administration Guide 104 The recommended setting is to obtain an IP Address via DHCP. NOTE ...By default, the SPA400 is on page106. STEP 4 Enter the following settings: Network Setup section: • Fixed IP address: Click the radio button, and then enter a valid IP address. Administering the SPA400 and Voice Mail Service Configuring the SPA400 Network Connection 5 Configuring the SPA400 ...
Cisco SPA9000 Voice System Administration Guide
Page 109
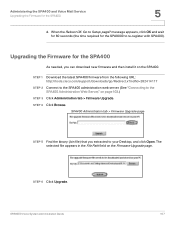
... download new firmware and then install it on the SPA400. STEP 1 Download the latest SPA400 firmware from the following URL: http://tools.cisco.com/support/downloads/go/Redirect.x?mdfid=282414117 STEP 2 Connect to the SPA400 administration web server. (See "Connecting to re-register with SPA400...). Administering the SPA400 and Voice Mail Service Upgrading the Firmware for the SPA400 As needed, you extracted to Setup page? The selected file appears in the File Path field on page103.) STEP 3 Click Administration tab > Firmware Upgrade. Go to your ...
... download new firmware and then install it on the SPA400. STEP 1 Download the latest SPA400 firmware from the following URL: http://tools.cisco.com/support/downloads/go/Redirect.x?mdfid=282414117 STEP 2 Connect to the SPA400 administration web server. (See "Connecting to re-register with SPA400...). Administering the SPA400 and Voice Mail Service Upgrading the Firmware for the SPA400 As needed, you extracted to Setup page? The selected file appears in the File Path field on page103.) STEP 3 Click Administration tab > Firmware Upgrade. Go to your ...

Cisco SPA9000 Voice System Administration Guide
Page 110
... SPA400. Configuring a SPA400 to Interoperate with the SPA9000 STEP 7 When the confirmation message appears, click OK. 5 STEP 8 When the Setup page reappears, verify that the Firmware Version number matches the firmware version that you need to register the SPA9000. For voice mail service, ...NOTE You may need to refresh your browser to configure a SPA9000 line interface for a SPA400 (PSTN or Voice Mail)," on the SPA400 Setup > Voicemail Server page. Administering the SPA400 and Voice Mail Service Configuring a SPA400 to Interoperate with the SPA9000 A SPA400 must be configured...
... SPA400. Configuring a SPA400 to Interoperate with the SPA9000 STEP 7 When the confirmation message appears, click OK. 5 STEP 8 When the Setup page reappears, verify that the Firmware Version number matches the firmware version that you need to register the SPA9000. For voice mail service, ...NOTE You may need to refresh your browser to configure a SPA9000 line interface for a SPA400 (PSTN or Voice Mail)," on the SPA400 Setup > Voicemail Server page. Administering the SPA400 and Voice Mail Service Configuring a SPA400 to Interoperate with the SPA9000 A SPA400 must be configured...
Cisco SPA9000 Voice System Administration Guide
Page 111
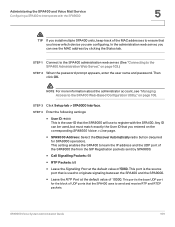
STEP 3 Click Setup tab > SPA9000 Interface. NOTE For more information about the administrator account, see the MAC address by SPA9000. • Call Signalling Packets: 68 • RTP Packets: ... Guide 109 Any ID can see "Managing Access to the SPA400 Web-Based Configuration Utility," on page106. This setting enables the SPA400 to learn the IP address and the UDP port of UDP ports that you know which device you entered on page103.) STEP 2 When the password prompt appears, enter the...
STEP 3 Click Setup tab > SPA9000 Interface. NOTE For more information about the administrator account, see the MAC address by SPA9000. • Call Signalling Packets: 68 • RTP Packets: ... Guide 109 Any ID can see "Managing Access to the SPA400 Web-Based Configuration Utility," on page106. This setting enables the SPA400 to learn the IP address and the UDP port of UDP ports that you know which device you entered on page103.) STEP 2 When the password prompt appears, enter the...
Cisco SPA9000 Voice System Administration Guide
Page 112
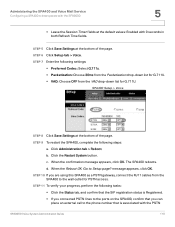
... gateway, connect the RJ11 cables from the VAD drop-down list for G.711U. • VAD: Choose OFF from the SPA400 to the phone number that is associated with 0 seconds in both Refresh Time fields. STEP 9 To restart the SPA400, complete the following settings: •... Preferred Codec: Select G.711u. • Packetization: Choose 30ms from the Packetization drop-down list for PSTN access. c. The SPA400 reboots. SPA400 Setup > Voice STEP 8 Click Save Settings at the bottom of the page. b. STEP 7 Enter the following steps: a. d. Administering the SPA400 and Voice ...
... gateway, connect the RJ11 cables from the VAD drop-down list for G.711U. • VAD: Choose OFF from the SPA400 to the phone number that is associated with 0 seconds in both Refresh Time fields. STEP 9 To restart the SPA400, complete the following settings: •... Preferred Codec: Select G.711u. • Packetization: Choose 30ms from the Packetization drop-down list for PSTN access. c. The SPA400 reboots. SPA400 Setup > Voice STEP 8 Click Save Settings at the bottom of the page. b. STEP 7 Enter the following steps: a. d. Administering the SPA400 and Voice ...

Cisco SPA9000 Voice System Administration Guide
Page 115
... to configure the voice mail server and set up the voice mail boxes for a SPA400 (PSTN or Voice Mail)," on page103.) STEP 2 Click Setup tab > Voicemail Server. SPA400 > Setup > Voicemail Server SPA9000 > Voice > Line N STEP 1 Connect to the SPA400 administration web server. (See "Connecting to the SPA400 Administration Web Server," on page...
... to configure the voice mail server and set up the voice mail boxes for a SPA400 (PSTN or Voice Mail)," on page103.) STEP 2 Click Setup tab > Voicemail Server. SPA400 > Setup > Voicemail Server SPA9000 > Voice > Line N STEP 1 Connect to the SPA400 administration web server. (See "Connecting to the SPA400 Administration Web Server," on page...

Cisco SPA9000 Voice System Administration Guide
Page 116
User ID: Enter the user's extension number. - STEP 5 Configure the voice mail users (required): a. SPA400 Setup > Voicemail Users SPA9000 Voice System Administration Guide 114 Click the Voicemail Users tab. Enable the voice mail accounts and enter the user's extensions and passwords: - ... can change their own passwords after logging on the voice mail server. b. Administering the SPA400 and Voice Mail Service Configuring a SPA400 for this user. SPA400 Setup > Voicemail Server: Voicemail Setting STEP 4 Click Save Settings.
User ID: Enter the user's extension number. - STEP 5 Configure the voice mail users (required): a. SPA400 Setup > Voicemail Users SPA9000 Voice System Administration Guide 114 Click the Voicemail Users tab. Enable the voice mail accounts and enter the user's extensions and passwords: - ... can change their own passwords after logging on the voice mail server. b. Administering the SPA400 and Voice Mail Service Configuring a SPA400 for this user. SPA400 Setup > Voicemail Server: Voicemail Setting STEP 4 Click Save Settings.

Cisco SPA9000 Voice System Administration Guide
Page 117
.... d. Administering the SPA400 and Voice Mail Service Configuring a SPA400 for Voice Mail Service 5 NOTE Later you configure each client station for voice mail access to Setup page? The SPA400 reboots.
.... d. Administering the SPA400 and Voice Mail Service Configuring a SPA400 for Voice Mail Service 5 NOTE Later you configure each client station for voice mail access to Setup page? The SPA400 reboots.

Cisco SPA9000 Voice System Administration Guide
Page 120
... browser window for each station that you need to configure. You should see a listing for this procedure for Voice Mail Service SPA400 > Setup > Voicemail Users 5 Phone Configuration > Ext N 193968 STEP 6 Click Submit All Changes. Refer to the following tasks: • Station Name: Verify that the station... name appears on the phone display and in the list of stations, and then repeat this station. Click Voice tab > Line 2. In the Proxy and Registration section...
... browser window for each station that you need to configure. You should see a listing for this procedure for Voice Mail Service SPA400 > Setup > Voicemail Users 5 Phone Configuration > Ext N 193968 STEP 6 Click Submit All Changes. Refer to the following tasks: • Station Name: Verify that the station... name appears on the phone display and in the list of stations, and then repeat this station. Click Voice tab > Line 2. In the Proxy and Registration section...

Cisco SPA9000 Voice System Administration Guide
Page 125
NOTE As a best practice, enable logging only when needed, and disable logging when you finish the investigation. STEP 6 In the Syslog Settings section, enter the IP address of the Syslog Server, which normally is a PC on the SPA400 SPA400 Event Logs 5 STEP 4 Click Save Settings. Administering the SPA400 and Voice Mail Service Enabling Debugging on the same network as the SPA400. SPA9000 Voice System Administration Guide 123 STEP 5 Click Setup tab > Basic Setup. Logging information can impact system performance.
NOTE As a best practice, enable logging only when needed, and disable logging when you finish the investigation. STEP 6 In the Syslog Settings section, enter the IP address of the Syslog Server, which normally is a PC on the SPA400 SPA400 Event Logs 5 STEP 4 Click Save Settings. Administering the SPA400 and Voice Mail Service Enabling Debugging on the same network as the SPA400. SPA9000 Voice System Administration Guide 123 STEP 5 Click Setup tab > Basic Setup. Logging information can impact system performance.

Cisco SPA9000 Voice System Administration Guide
Page 126
Administering the SPA400 and Voice Mail Service Enabling Debugging on the SPA400 SPA400 Setup > Basic Setup 5 STEP 7 Start a command prompt on the PC, and run the system logging software. STEP 8 Run the scenario that causes the problem and when done, press CTRL+C in the command window to Off. STEP 9 When you are finished collecting logs, return to the Event Logs page and reset the logs to stop the logs. SPA9000 Voice System Administration Guide 124
Administering the SPA400 and Voice Mail Service Enabling Debugging on the SPA400 SPA400 Setup > Basic Setup 5 STEP 7 Start a command prompt on the PC, and run the system logging software. STEP 8 Run the scenario that causes the problem and when done, press CTRL+C in the command window to Off. STEP 9 When you are finished collecting logs, return to the Event Logs page and reset the logs to stop the logs. SPA9000 Voice System Administration Guide 124

Cisco SPA9000 Voice System Administration Guide
Page 127
b. Current IP Address. Press the Setup button on the phone keypad. You can override this file by downloading a ...source with a default music file (Romance de Amor). Network, and then scroll down to find the IP address of the phone: a. Press 9 - It plays an internally stored music file repeatedly. Refer to the following topics: ...page125 • "Configuring a Streaming Audio Server," on page127 Using the Internal Music Source for each IP phone. SPA9000 Voice System Administration Guide 125 6 Configuring Music on Hold This chapter explains how to configure Music on Hold...
b. Current IP Address. Press the Setup button on the phone keypad. You can override this file by downloading a ...source with a default music file (Romance de Amor). Network, and then scroll down to find the IP address of the phone: a. Press 9 - It plays an internally stored music file repeatedly. Refer to the following topics: ...page125 • "Configuring a Streaming Audio Server," on page127 Using the Internal Music Source for each IP phone. SPA9000 Voice System Administration Guide 125 6 Configuring Music on Hold This chapter explains how to configure Music on Hold...

Cisco SPA9000 Voice System Administration Guide
Page 155
... the Auto Attendant. STEP 4 Click Submit All Changes. If a prompt has already been downloaded from the given URL, the download is erased. From an internal phone, you can be empty. • [ ] denotes an optional item. • If the prompt file name is none, the corresponding prompt currently saved in the flash... boots up. STEP 5 To verify that the prompts are localized, make a call to find and select the number for https. • root_path can press the Setup button, then press 1 - Directory, then 2 Corporate Directory, and then scroll down to the Auto Attendant.
... the Auto Attendant. STEP 4 Click Submit All Changes. If a prompt has already been downloaded from the given URL, the download is erased. From an internal phone, you can be empty. • [ ] denotes an optional item. • If the prompt file name is none, the corresponding prompt currently saved in the flash... boots up. STEP 5 To verify that the prompts are localized, make a call to find and select the number for https. • root_path can press the Setup button, then press 1 - Directory, then 2 Corporate Directory, and then scroll down to the Auto Attendant.