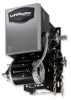

GT- Logic 4 Installation Manual
Page 2
...and Ground 18 Control Station 19 ENTRAPMENT PROTECTION 20-22 LiftMaster Monitored Entrapment Protection (LMEP 20 Install the Photoelectric Sensors (Provided 21 Mount the Photoelectric ...Sensors (Provided 22 Wire the LiftMaster Monitored Entrapment Protection (LMEP) Devices 22 ADJUSTMENT 23-24 Limit Adjustment 23... . 36 Brake (If Present 36 How to Programming 28 Determine and Set Wiring Type 29 Programming Remote Controls 30-31 Maintenance Alert System (MAS 32 Open Mid Stop 33 Timer-To-Close 33-34 Car...
...and Ground 18 Control Station 19 ENTRAPMENT PROTECTION 20-22 LiftMaster Monitored Entrapment Protection (LMEP 20 Install the Photoelectric Sensors (Provided 21 Mount the Photoelectric ...Sensors (Provided 22 Wire the LiftMaster Monitored Entrapment Protection (LMEP) Devices 22 ADJUSTMENT 23-24 Limit Adjustment 23... . 36 Brake (If Present 36 How to Programming 28 Determine and Set Wiring Type 29 Programming Remote Controls 30-31 Maintenance Alert System (MAS 32 Open Mid Stop 33 Timer-To-Close 33-34 Car...
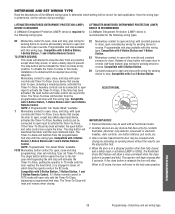
GT- Logic 4 Installation Manual
Page 29
... ENTRAPMENT PROTECTION (LMEP) DEVICE IS REQUIRED A LiftMaster Entrapment Protection (LMEP) device is released the door will stop available with the Timer-To-Close, bypassing a programmed mid stop button will reset and reverse when closing after 5 seconds. If the timer has been activated, the ...: 1. Programmable mid stop . Compatible with 2 or 3-Button Station. Compatible with 3-Button Station, 1-Button Station and 1 and 3-Button Remote Control. Auxiliary devices are any position. The operator will not disable the Timer-To-Close at any devices that the door may be connected...
... ENTRAPMENT PROTECTION (LMEP) DEVICE IS REQUIRED A LiftMaster Entrapment Protection (LMEP) device is released the door will stop available with the Timer-To-Close, bypassing a programmed mid stop button will reset and reverse when closing after 5 seconds. If the timer has been activated, the ...: 1. Programmable mid stop . Compatible with 2 or 3-Button Station. Compatible with 3-Button Station, 1-Button Station and 1 and 3-Button Remote Control. Auxiliary devices are any position. The operator will not disable the Timer-To-Close at any devices that the door may be connected...
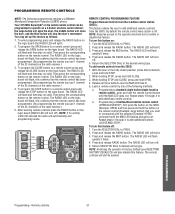
GT- Logic 4 Installation Manual
Page 31
...of the following programming requires a LiftMaster Monitored Entrapment Protection (LMEP) device. The RADIO LED will flash quickly 6 times. 4. Return the SELECTOR DIAL to PROG. 2. The RADIO LED will still be lit. 3. Then press the corresponding button on the remote control. NOTE: Requires access to... the operator electrical box to Factory Default (see RESETTING FACTORY DEFAULTS) will flash, this feature. Turn the SELECTOR DIAL to the desired wiring type...
...of the following programming requires a LiftMaster Monitored Entrapment Protection (LMEP) device. The RADIO LED will flash quickly 6 times. 4. Return the SELECTOR DIAL to PROG. 2. The RADIO LED will still be lit. 3. Then press the corresponding button on the remote control. NOTE: Requires access to... the operator electrical box to Factory Default (see RESETTING FACTORY DEFAULTS) will flash, this feature. Turn the SELECTOR DIAL to the desired wiring type...
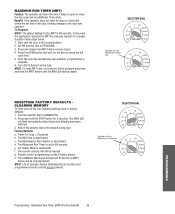
GT- Logic 4 Installation Manual
Page 35
... 6. Press and release the MRT button on wiring type T E2 D1 C2 B2 TS FSTS DIAG OPTN PROG RESETTING FACTORY DEFAULTS CLEARING MEMORY To reset most of Operator feature (Odometer/Cycle Counter) and programmed remote controls are not cleared. Return the selector dial to PROGRAM. 3. Timer-To-Close = 0 seconds b. Benefit...Timer is set time it takes to reach the full open or close the door plus and an additional 10 seconds. The LiftMaster Monitored Entrapment Protection (LMEP) device will vary depending on logic board. 4. Remote control programming via the 3-button station h.
... 6. Press and release the MRT button on wiring type T E2 D1 C2 B2 TS FSTS DIAG OPTN PROG RESETTING FACTORY DEFAULTS CLEARING MEMORY To reset most of Operator feature (Odometer/Cycle Counter) and programmed remote controls are not cleared. Return the selector dial to PROGRAM. 3. Timer-To-Close = 0 seconds b. Benefit...Timer is set time it takes to reach the full open or close the door plus and an additional 10 seconds. The LiftMaster Monitored Entrapment Protection (LMEP) device will vary depending on logic board. 4. Remote control programming via the 3-button station h.
GT- Logic 4 User Manual
Page 3
...is determined, set mid stop available with 3-Button Station, 1-Button Station, 1 and 3-Button Remote Control. NOTE: A Programmable "Car Dealer Mode" available. The Timer-To-Close will cause...open, close with the Timer-To-Close, bypassing a programmed mid stop button will reset and reverse when closing after 5 seconds. The stop . User set Timer-To-Close... one button stations, pull cords, etc. 3. When in travel. LIFTMASTER MONITORED ENTRAPMENT PROTECTION (LMEP) DEVICE IS RECOMMENDED A LiftMaster Entrapment Protection (LMEP) device is required for open button and radio ...
...is determined, set mid stop available with 3-Button Station, 1-Button Station, 1 and 3-Button Remote Control. NOTE: A Programmable "Car Dealer Mode" available. The Timer-To-Close will cause...open, close with the Timer-To-Close, bypassing a programmed mid stop button will reset and reverse when closing after 5 seconds. The stop . User set Timer-To-Close... one button stations, pull cords, etc. 3. When in travel. LIFTMASTER MONITORED ENTRAPMENT PROTECTION (LMEP) DEVICE IS RECOMMENDED A LiftMaster Entrapment Protection (LMEP) device is required for open button and radio ...

J- LOGIC 3 Manual
Page 2
... Logic Board 15 PROGRAMMING Logic Control Pushbuttons 16 Determine and Set Wiring Type 16 Failsafe Wiring Types 17 Self-Monitoring Safety Device Options 17 Programming Remote Controls 18-19 Maintenance Alert System (MAS 20 Mid Stop 21 Timer to the possibility of serious injury or death if you do not comply... Dealer Mode 22 AUTOMATICALLY LEARNED PROGRAMMING Auxiliary Reversal System/RPM Sensor 23 Maximum Run Timer (MRT 23 OPTIONAL PROGRAMMING Red/Green Warning Light Card 24 Resetting Factory Defaults -
... Logic Board 15 PROGRAMMING Logic Control Pushbuttons 16 Determine and Set Wiring Type 16 Failsafe Wiring Types 17 Self-Monitoring Safety Device Options 17 Programming Remote Controls 18-19 Maintenance Alert System (MAS 20 Mid Stop 21 Timer to the possibility of serious injury or death if you do not comply... Dealer Mode 22 AUTOMATICALLY LEARNED PROGRAMMING Auxiliary Reversal System/RPM Sensor 23 Maximum Run Timer (MRT 23 OPTIONAL PROGRAMMING Red/Green Warning Light Card 24 Resetting Factory Defaults -
J- LOGIC 3 Manual
Page 11
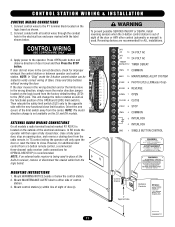
... (automatic or manual) is out of sight of Open, Close and Stop buttons without moving the door. However, for additional door control from a 3-button remote control, a commercial three-channel radio receiver (with connections for OPEN/CLOSE/STOP) is time for immediate service. 11 Service every cycles/months Mount WARNING NOTICE... MAINTENANCE THE AREA MUST BE CLEARED AND SECURED, AT THAT TIME THE UNIT MAY BE RETURNED TO SERVICE. This will only open the door or reset the timer to the (REV) pins. C3Ø C18 P1Ø C17 C25 POWER D19 TIMER DEFEAT R8 D17 MAS D28 D31 D7 D6...
... (automatic or manual) is out of sight of Open, Close and Stop buttons without moving the door. However, for additional door control from a 3-button remote control, a commercial three-channel radio receiver (with connections for OPEN/CLOSE/STOP) is time for immediate service. 11 Service every cycles/months Mount WARNING NOTICE... MAINTENANCE THE AREA MUST BE CLEARED AND SECURED, AT THAT TIME THE UNIT MAY BE RETURNED TO SERVICE. This will only open the door or reset the timer to the (REV) pins. C3Ø C18 P1Ø C17 C25 POWER D19 TIMER DEFEAT R8 D17 MAS D28 D31 D7 D6...
J- LOGIC 3 Manual
Page 19
...The RADIO LED will automatically exit programming mode. Press and release the RADIO button. Return the SECTOR DIAL to add additional remote controls. Repeat steps 1 through 4 to a remote control press the OPEN button on the logic board. b. To turn off. 5. Press and release RADIO button. You ...Press and release the RADIO button. Then press the corresponding button on the logic board. Turn the SELECTOR DIAL to Factory Default (see "RESETTING FACTORY DEFAULTS") will turn off ). The RADIO LED will be lit. 3. Return SELECTOR DIAL to enable or disable this confirms that you ...
...The RADIO LED will automatically exit programming mode. Press and release the RADIO button. Return the SECTOR DIAL to add additional remote controls. Repeat steps 1 through 4 to a remote control press the OPEN button on the logic board. b. To turn off. 5. Press and release RADIO button. You ...Press and release the RADIO button. Then press the corresponding button on the logic board. Turn the SELECTOR DIAL to Factory Default (see "RESETTING FACTORY DEFAULTS") will turn off ). The RADIO LED will be lit. 3. Return SELECTOR DIAL to enable or disable this confirms that you ...
J- LOGIC 3 Manual
Page 24
...receive power as indicated at least one of the user installed settings back to Activates when the door reaches the 10 seconds open limit RESETTING FACTORY DEFAULTS - Restoring the operator to DIAGNOSTIC. 2. Turn the selector dial to Factory Default will turn on if the board is ...seated properly and the power is deactivated d. The Mid Stop is on. The remote controls will vary depending on the OPTION BOARD will also disable this feature. Requirements: Must have the LiftMaster Red/Green warning light kit RDGRNCARD and must have been restored. 3. Light Control Module ...
...receive power as indicated at least one of the user installed settings back to Activates when the door reaches the 10 seconds open limit RESETTING FACTORY DEFAULTS - Restoring the operator to DIAGNOSTIC. 2. Turn the selector dial to Factory Default will turn on if the board is ...seated properly and the power is deactivated d. The Mid Stop is on. The remote controls will vary depending on the OPTION BOARD will also disable this feature. Requirements: Must have the LiftMaster Red/Green warning light kit RDGRNCARD and must have been restored. 3. Light Control Module ...


