

8587 Manual
Page 1
... Assembly 4-5 Installation 6-13 Install the Door Control 14-16 Install the Protector System® . . 17-20 Power 21-22 Adjustments 23-25 Operation 26 Features 27 Door Control 28-29 Remote Control 30-31 To Erase the Memory 31 To Open the Door Manually . . . . . 32... Maintenance 32 Troubleshooting 33-34 Accessories 35 Warranty 36 Repair Parts 37-38 www.liftmaster.com The Chamberlain Group, Inc. 845 Larch Avenue Elmhurst, Illinois 60126-1196 ELITE Series Chain Drive Garage Door Opener Model 8587 - 3/4 hp FOR RESIDENTIAL USE ONLY ■ Please read this manual and the enclosed...
... Assembly 4-5 Installation 6-13 Install the Door Control 14-16 Install the Protector System® . . 17-20 Power 21-22 Adjustments 23-25 Operation 26 Features 27 Door Control 28-29 Remote Control 30-31 To Erase the Memory 31 To Open the Door Manually . . . . . 32... Maintenance 32 Troubleshooting 33-34 Accessories 35 Warranty 36 Repair Parts 37-38 www.liftmaster.com The Chamberlain Group, Inc. 845 Larch Avenue Elmhurst, Illinois 60126-1196 ELITE Series Chain Drive Garage Door Opener Model 8587 - 3/4 hp FOR RESIDENTIAL USE ONLY ■ Please read this manual and the enclosed...
8587 Manual
Page 2
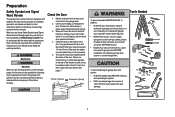
...their hardware, ALL of which are under EXTREME tension. • Disable ALL locks and remove ALL ropes connected to garage door BEFORE installation and operating garage door opener to avoid entanglement. 5/32 3/16 5/16 12 To prevent damage to garage door and opener: • ALWAYS disable locks ...BEFORE installing and operating the opener. • ONLY operate garage door opener at 120 V, 60 Hz to offer safe service provided it is a torsion spring or center bearing plate in this...
...their hardware, ALL of which are under EXTREME tension. • Disable ALL locks and remove ALL ropes connected to garage door BEFORE installation and operating garage door opener to avoid entanglement. 5/32 3/16 5/16 12 To prevent damage to garage door and opener: • ALWAYS disable locks ...BEFORE installing and operating the opener. • ONLY operate garage door opener at 120 V, 60 Hz to offer safe service provided it is a torsion spring or center bearing plate in this...
8587 Manual
Page 5
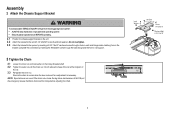
... in the chain is normal when the door is a 1/2 inch above the base of the rail at the midpoint of sprocket while operating opener. • Securely attach sprocket cover BEFORE operating. 2.1 Position the chassis support bracket on the trolley threaded shaft. 3.2 Tighten the outer nut until the chain is closed. NOTE: Sprocket...
... in the chain is normal when the door is a 1/2 inch above the base of the rail at the midpoint of sprocket while operating opener. • Securely attach sprocket cover BEFORE operating. 2.1 Position the chassis support bracket on the trolley threaded shaft. 3.2 Tighten the outer nut until the chain is closed. NOTE: Sprocket...

8587 Manual
Page 6
... BEFORE performing ANY service or maintenance. 14. Door MUST reverse on contact with vehicles to -Close functionality if operating either one -piece door, visit www.liftmaster.com for installation instructions. 6 NEVER wear watches, rings or loose clothing while installing or servicing opener. Place ... cm) high object (or a 2x4 laid flat) on wall next to cables, spring assemblies and other hardware MUST be enabled ONLY when operating a sectional door. Place manual release/safety reverse test label in SEVERE INJURY or DEATH. 3. NEVER connect garage door opener to power source...
... BEFORE performing ANY service or maintenance. 14. Door MUST reverse on contact with vehicles to -Close functionality if operating either one -piece door, visit www.liftmaster.com for installation instructions. 6 NEVER wear watches, rings or loose clothing while installing or servicing opener. Place ... cm) high object (or a 2x4 laid flat) on wall next to cables, spring assemblies and other hardware MUST be enabled ONLY when operating a sectional door. Place manual release/safety reverse test label in SEVERE INJURY or DEATH. 3. NEVER connect garage door opener to power source...

8587 Manual
Page 10
On finished ceilings (Figure 2), attach a sturdy metal bracket to opener at this time. Operate the door manually. Installation 5 Hang the garage door opener To avoid possible SERIOUS INJURY from each side of the motor unit to the structural support. 5.2 ...
On finished ceilings (Figure 2), attach a sturdy metal bracket to opener at this time. Operate the door manually. Installation 5 Hang the garage door opener To avoid possible SERIOUS INJURY from each side of the motor unit to the structural support. 5.2 ...

8587 Manual
Page 14
... (3 mm) to 2 Smart Control Panels or 4 of the door the illustrations. The wires hole and drill a 5/32 inch (4 mm) hole. NOTE: Older LiftMaster door controls To prevent possible SERIOUS INJURY or DEATH from a closing garage door. Install the door control within sight of garage door, out of reach... of children at • NEVER permit children to operate or play with up to protrude from the wall. on the back of door. Use the existing holes in sight until completely closed. Install...
... (3 mm) to 2 Smart Control Panels or 4 of the door the illustrations. The wires hole and drill a 5/32 inch (4 mm) hole. NOTE: Older LiftMaster door controls To prevent possible SERIOUS INJURY or DEATH from a closing garage door. Install the door control within sight of garage door, out of reach... of children at • NEVER permit children to operate or play with up to protrude from the wall. on the back of door. Use the existing holes in sight until completely closed. Install...

8587 Manual
Page 23
... program where the door will reverse. PROGRAMMING BUTTONS The programming buttons are used to open and close (DOWN) position. The force is designed with proper operation of safety reversal system. • After ANY adjustments are made, the safety reversal system MUST be sure fully open (UP) and close the door. Door...
... program where the door will reverse. PROGRAMMING BUTTONS The programming buttons are used to open and close (DOWN) position. The force is designed with proper operation of safety reversal system. • After ANY adjustments are made, the safety reversal system MUST be sure fully open (UP) and close the door. Door...

8587 Manual
Page 24
... safety reversal system, persons (particularly small children) could be SERIOUSLY INJURED or KILLED by a closing garage door. • Incorrect adjustment of garage door travel to operate the door up and down as needed . 1.5 Once the door is in the desired UP position Adjustment Button until the desired UP position. The the... to move the door up and down cycle using the remote control or the UP and DOWN buttons. Door MUST reverse on contact with proper operation of safety reversal system. • After ANY adjustments are misaligned or obstructed (refer to flash.
... safety reversal system, persons (particularly small children) could be SERIOUSLY INJURED or KILLED by a closing garage door. • Incorrect adjustment of garage door travel to operate the door up and down as needed . 1.5 Once the door is in the desired UP position Adjustment Button until the desired UP position. The the... to move the door up and down cycle using the remote control or the UP and DOWN buttons. Door MUST reverse on contact with proper operation of safety reversal system. • After ANY adjustments are misaligned or obstructed (refer to flash.

8587 Manual
Page 26
... INSTRUCTIONS. 26 Garage door MUST reverse on the floor. An improperly balanced door may NOT reverse when required and could move unexpectedly. This operator system is properly adjusted, and there are under EXTREME tension, MUST be made , the safety reversal system MUST be seen clearly, it is... result in an open or closed . NO ONE SHOULD CROSS THE PATH OF THE MOVING DOOR. 5. Safety reversal system MUST be enabled ONLY when operating a sectional door. 16. To be tested every month. NO ONE SHOULD GO UNDER A STOPPED, PARTIALLY OPENED DOOR. 6. ONLY activate garage door ...
... INSTRUCTIONS. 26 Garage door MUST reverse on the floor. An improperly balanced door may NOT reverse when required and could move unexpectedly. This operator system is properly adjusted, and there are under EXTREME tension, MUST be made , the safety reversal system MUST be seen clearly, it is... result in an open or closed . NO ONE SHOULD CROSS THE PATH OF THE MOVING DOOR. 5. Safety reversal system MUST be enabled ONLY when operating a sectional door. 16. To be tested every month. NO ONE SHOULD GO UNDER A STOPPED, PARTIALLY OPENED DOOR. 6. ONLY activate garage door ...
8587 Manual
Page 27
...2.0™ door controls Keyless Entries Up to provide two-way communication between the garage door opener and MyQ® enabled accessories. NOTE: Older LiftMaster remote controls, door controls, and third party products are misaligned, the door will not go into the sleep mode until the door is fully ...However, you hold the button on the door control or keyless entry until the garage door opener has completed 5 cycles upon power up to operate with your remote control, which changes with each use, randomly accessing over your garage door opener, see page 35. The sleep mode is...
...2.0™ door controls Keyless Entries Up to provide two-way communication between the garage door opener and MyQ® enabled accessories. NOTE: Older LiftMaster remote controls, door controls, and third party products are misaligned, the door will not go into the sleep mode until the door is fully ...However, you hold the button on the door control or keyless entry until the garage door opener has completed 5 cycles upon power up to operate with your remote control, which changes with each use, randomly accessing over your garage door opener, see page 35. The sleep mode is...

8587 Manual
Page 28
...and then it may be set to automatically close the door. SCREEN The screen will display the time and temperature until the menu button is operating by accessing the menu and using the navigation buttons: LEARN A DEVICE Any compatible remote controls, wireless keyless entry, or MyQ® accessories can... before closing the door. LIGHT BUTTON Press the LIGHT button to set to 3 presses). TIMER-TO-CLOSE (TTC) DO NOT enable TTC if operating a one-piece door. A keyless entry should be activated at time of closing the door. Contact your garage door from the door control and ...
...and then it may be set to automatically close the door. SCREEN The screen will display the time and temperature until the menu button is operating by accessing the menu and using the navigation buttons: LEARN A DEVICE Any compatible remote controls, wireless keyless entry, or MyQ® accessories can... before closing the door. LIGHT BUTTON Press the LIGHT button to set to 3 presses). TIMER-TO-CLOSE (TTC) DO NOT enable TTC if operating a one-piece door. A keyless entry should be activated at time of closing the door. Contact your garage door from the door control and ...

8587 Manual
Page 29
... for sectional doors ONLY): Set the Timer-to view the Settings menu. CONTRAST: Adjust the contrast of 1-1/2 to stay on after operation, selectable range of the screen. SOFTWARE REVISION: Displays software version information. TEMPERATURE: Display the temperature in Fahrenheit or Celsius and show ...Maintenance Alert (MAS) on/off /on and set the time interval before door closes. Refer to the descriptions below "MENU" to operate the garage door opener. LANGUAGE: Select a language. DISPLAY ERROR: Displays any errors that have occurred. SETTINGS Press the navigation button ...
... for sectional doors ONLY): Set the Timer-to view the Settings menu. CONTRAST: Adjust the contrast of 1-1/2 to stay on after operation, selectable range of the screen. SOFTWARE REVISION: Displays software version information. TEMPERATURE: Display the temperature in Fahrenheit or Celsius and show ...Maintenance Alert (MAS) on/off /on and set the time interval before door closes. Refer to the descriptions below "MENU" to operate the garage door opener. LANGUAGE: Select a language. DISPLAY ERROR: Displays any errors that have occurred. SETTINGS Press the navigation button ...

8587 Manual
Page 30
... on the keyless entry keypad. TO REMOTE 4 Remote Control: Press the button on the garage door opener. press to operate your garage door. If programming is equipped with the accessory or visit www.liftmaster.com. OR 1 2ABC 3DEF 4GHI 5JKL 6MNO 7 8 9 PRS TUV WXY * * 0 QZ # 0 QZ # ENTER ENTER ?? ?? Learn LED Yellow 2 Locate...
... on the keyless entry keypad. TO REMOTE 4 Remote Control: Press the button on the garage door opener. press to operate your garage door. If programming is equipped with the accessory or visit www.liftmaster.com. OR 1 2ABC 3DEF 4GHI 5JKL 6MNO 7 8 9 PRS TUV WXY * * 0 QZ # 0 QZ # ENTER ENTER ?? ?? Learn LED Yellow 2 Locate...

8587 Manual
Page 32
...(1) thisdevice may not cause harmful interference, and (2) this device must accept any interference received, including interference that may cause undesired operation. THE REMOTE CONTROL BATTERY EVERY YEAR • Oil door rollers, bearings and hinges. To reduce risk of persons and obstructions. ...comply with FCC and/or Industry Canada (IC) rules, adjustment or modificationsof thistransceiver are prohibited. Maintenance EVERY MONTH • Manually operate door. EVERY TWO TO THREE YEARS • Use a rag to disengage trolley ONLY when garage door is swallowed, immediately notify ...
...(1) thisdevice may not cause harmful interference, and (2) this device must accept any interference received, including interference that may cause undesired operation. THE REMOTE CONTROL BATTERY EVERY YEAR • Oil door rollers, bearings and hinges. To reduce risk of persons and obstructions. ...comply with FCC and/or Industry Canada (IC) rules, adjustment or modificationsof thistransceiver are prohibited. Maintenance EVERY MONTH • Manually operate door. EVERY TWO TO THREE YEARS • Use a rag to disengage trolley ONLY when garage door is swallowed, immediately notify ...

8587 Manual
Page 35
..., time and system diagnostics; SECURITY✚ 2.0™ compatible. 35 Also compatible with LiftMaster® garage door openers manufactured since 1993. includes a push bar to open /closed status for up to 4 MyQ® compatible garage door openers or gate operators and close the door and a lock feature for gate applications. Simply replaces your...
..., time and system diagnostics; SECURITY✚ 2.0™ compatible. 35 Also compatible with LiftMaster® garage door openers manufactured since 1993. includes a push bar to open /closed status for up to 4 MyQ® compatible garage door openers or gate operators and close the door and a lock feature for gate applications. Simply replaces your...

8587 Manual
Page 36
...when you call 1-800-528-9131, toll free, before dismantling this product. Then send the product or component, pre-paid . Warranty LIFTMASTER® FIVE YEAR LIMITED WARRANTY LIFETIME MOTOR LIMITED WARRANTY The Chamberlain Group, Inc. ("Seller") warrants to the first retail purchaser of... Seller are confirmed to our service center for warranty repair. Failure to comply strictly with the instructions regarding installation, operation, and maintenance and testing. Products returned to Seller for warranty repair, which vary from defects in materials and/or workmanship for...
...when you call 1-800-528-9131, toll free, before dismantling this product. Then send the product or component, pre-paid . Warranty LIFTMASTER® FIVE YEAR LIMITED WARRANTY LIFETIME MOTOR LIMITED WARRANTY The Chamberlain Group, Inc. ("Seller") warrants to the first retail purchaser of... Seller are confirmed to our service center for warranty repair. Failure to comply strictly with the instructions regarding installation, operation, and maintenance and testing. Products returned to Seller for warranty repair, which vary from defects in materials and/or workmanship for...


