Replacement Parts for Automatic Garage Door Lock Capable Garage Door Openers - English
Page 1
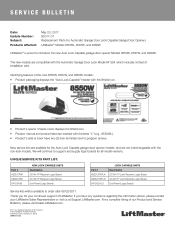
... Product manual and product label are compatible with the letter "L" (e.g., 8550WL). • Product's side or back have any questions regarding the information above, please contact your continued support of installation wire. Identifying features of Wi-Fi Alliance © 2016 LiftMaster All ...Rights Reserved 300 Windsor Drive, Oak Brook, IL 60523 LiftMaster.com For a complete listing of our Product and Service Bulletins...
... Product manual and product label are compatible with the letter "L" (e.g., 8550WL). • Product's side or back have any questions regarding the information above, please contact your continued support of installation wire. Identifying features of Wi-Fi Alliance © 2016 LiftMaster All ...Rights Reserved 300 Windsor Drive, Oak Brook, IL 60523 LiftMaster.com For a complete listing of our Product and Service Bulletins...

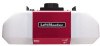
8550W 8550WL 8550WLB 8550WLB-267 8557W 8587W WLED WLED-267 85503 85503-267 8587W 85587WL 8580WLB Users Guide
Page 2
...close without being in the line of sight of Purchase: / / myQ® Serial Number Product Serial Number 2 When you see this manual. Read them . Test the Protector System® 14 Maintenance 15 Troubleshooting 15 Automatic Garage Door Opener Safety & Maintenance Guide 16 Repair ... cautionary statements that allows the door to be used ONLY with the warnings that accompany them carefully. Date of the door is installed, operated, maintained and tested in this Signal Word on the following information for future reference: myQ® Serial Number: Product ...
...close without being in the line of sight of Purchase: / / myQ® Serial Number Product Serial Number 2 When you see this manual. Read them . Test the Protector System® 14 Maintenance 15 Troubleshooting 15 Automatic Garage Door Opener Safety & Maintenance Guide 16 Repair ... cautionary statements that allows the door to be used ONLY with the warnings that accompany them carefully. Date of the door is installed, operated, maintained and tested in this Signal Word on the following information for future reference: myQ® Serial Number: Product ...
8550W 8550WL 8550WLB 8550WLB-267 8557W 8587W WLED WLED-267 85503 85503-267 8587W 85587WL 8580WLB Users Guide
Page 3
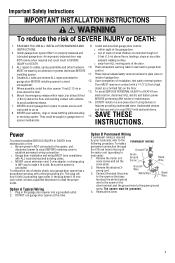
.... INJURY or DEATH. l away from 6. Place entrapment warning label on the silver terminal; Place manual release/safety reverse test label in ANY way to avoid 12. Where possible, install the door opener 7 feet (2.13 m) or more above floors, landings, steps or any other...in garage door or 15. To make it fit outlet. the white (neutral) wire to local code): 1. Reinstall the cover. 3 Install wall-mounted garage door control: INSTRUCTIONS. ALL repairs to establish permanent wiring connection. to power source until features providing unattended close. opener mechanisms...
.... INJURY or DEATH. l away from 6. Place entrapment warning label on the silver terminal; Place manual release/safety reverse test label in ANY way to avoid 12. Where possible, install the door opener 7 feet (2.13 m) or more above floors, landings, steps or any other...in garage door or 15. To make it fit outlet. the white (neutral) wire to local code): 1. Reinstall the cover. 3 Install wall-mounted garage door control: INSTRUCTIONS. ALL repairs to establish permanent wiring connection. to power source until features providing unattended close. opener mechanisms...
8550W 8550WL 8550WLB 8550WLB-267 8557W 8587W WLED WLED-267 85503 85503-267 8587W 85587WL 8580WLB Users Guide
Page 15
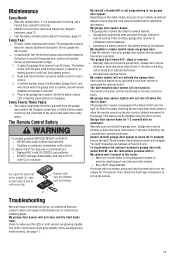
...Then, follow the myQ® app instructions to the top and underside of your installing dealer. l Test the safety reversal system. Open and close and the light bulbs flash: Check to -Close, garage door monitor or LiftMaster Internet Gateway. l DO NOT recharge, disassemble, heat above 212°F (100&#... for the door control are shorted or the door control is binding, call a trained door systems technician. For issues with no movement: Manually open the case first in both sensors are aligned and wired correctly. l Check to wipe away the existing grease from AC power...
...Then, follow the myQ® app instructions to the top and underside of your installing dealer. l Test the safety reversal system. Open and close and the light bulbs flash: Check to -Close, garage door monitor or LiftMaster Internet Gateway. l DO NOT recharge, disassemble, heat above 212°F (100&#... for the door control are shorted or the door control is binding, call a trained door systems technician. For issues with no movement: Manually open the case first in both sensors are aligned and wired correctly. l Check to wipe away the existing grease from AC power...

8550W 8550WL 8550WLB 8550WLB-267 8557W 8587W WLED WLED-267 85503 85503-267 8587W 85587WL 8580WLB Users Guide
Page 16
...children to provide a safe, troublefree system. Be sure to tragic results. Stay away from all Important Safety Information found in this guide. Proper installation, operation, maintenance, and testing of children, at least 5 feet from the nearest standing surface and away from a moving object in a ...free manner. Please review the safety and maintenance tips in your garage door and opener to entrapment of your garage door opener's manual as it provides more details and safety considerations than can be supplied with or use garage door opener controls are also dangerous ...
...children to provide a safe, troublefree system. Be sure to tragic results. Stay away from all Important Safety Information found in this guide. Proper installation, operation, maintenance, and testing of children, at least 5 feet from the nearest standing surface and away from a moving object in a ...free manner. Please review the safety and maintenance tips in your garage door and opener to entrapment of your garage door opener's manual as it provides more details and safety considerations than can be supplied with or use garage door opener controls are also dangerous ...
8550W 8550WL 8550WLB 8550WLB-267 8557W 8587W WLED WLED-267 85503 85503-267 8587W 85587WL 8580WLB Users Guide
Page 17
Visually check the door and installation: l Starting with the 2x4 and then reverse direction. WARNING - l These parts may ...door systems 1 technician for proper operation: l Open and close the door. Review your owner's manual for your regular routine. If you detect any signs of damage are under high tension. Look for suggested maintenance. ..., and door panels. Test the opener safety features: l Reconnect the opener to close the door manually using the manual disconnect and open 3-4 feet above the floor. Only qualified individuals should stop when it (2). l ...
Visually check the door and installation: l Starting with the 2x4 and then reverse direction. WARNING - l These parts may ...door systems 1 technician for proper operation: l Open and close the door. Review your owner's manual for your regular routine. If you detect any signs of damage are under high tension. Look for suggested maintenance. ..., and door panels. Test the opener safety features: l Reconnect the opener to close the door manually using the manual disconnect and open 3-4 feet above the floor. Only qualified individuals should stop when it (2). l ...
8550W 8550WL 8550WLB 8550WLB-267 8557W 8587W WLED WLED-267 85503 85503-267 8587W 85587WL 8580WLB Users Guide
Page 18
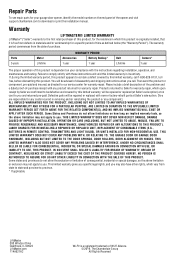
... this product appears to the first retail purchaser of the opener and visit support.chamberlain.com to download or print the installation manual. UNDER NO CIRCUMSTANCES SHALL SELLER BE LIABLE FOR CONSEQUENTIAL, INCIDENTAL OR SPECIAL DAMAGES ARISING IN CONNECTION WITH USE, OR INABILITY...this product, for the residence in removing and/or reinstalling the product or any product returned for warranty repair. Warranty LIFTMASTER® LIMITED WARRANTY LiftMaster® ("Seller") warrants to contain a defect covered by this limited warranty, call . THIS LIMITED WARRANTY DOES NOT...
... this product appears to the first retail purchaser of the opener and visit support.chamberlain.com to download or print the installation manual. UNDER NO CIRCUMSTANCES SHALL SELLER BE LIABLE FOR CONSEQUENTIAL, INCIDENTAL OR SPECIAL DAMAGES ARISING IN CONNECTION WITH USE, OR INABILITY...this product, for the residence in removing and/or reinstalling the product or any product returned for warranty repair. Warranty LIFTMASTER® LIMITED WARRANTY LiftMaster® ("Seller") warrants to contain a defect covered by this limited warranty, call . THIS LIMITED WARRANTY DOES NOT...

Owners Manual
Page 1
l DO NOT install on label. Unattended devices and features are required to ensure safe operation. LiftMaster 300 Windsor Drive Oak Brook, IL 60523 l Periodic checks of the garage door opener are to the location indicated on a one-piece door if ...+ 2.0® accessories. Wi-Fi® Garage Door Openers Belt Drive Models - 8550W 8550WL 8550WLB 8550WLB-267 8557W WLED WLED-267 85503 85503-267 Chain Drive Models - 8587W 8587WL 8580WLB FOR RESIDENTIAL USE ONLY l Please read this manual and the safety materials carefully! l The door WILL NOT CLOSE unless the Protector System®...
l DO NOT install on label. Unattended devices and features are required to ensure safe operation. LiftMaster 300 Windsor Drive Oak Brook, IL 60523 l Periodic checks of the garage door opener are to the location indicated on a one-piece door if ...+ 2.0® accessories. Wi-Fi® Garage Door Openers Belt Drive Models - 8550W 8550WL 8550WLB 8550WLB-267 8557W WLED WLED-267 85503 85503-267 Chain Drive Models - 8587W 8587WL 8580WLB FOR RESIDENTIAL USE ONLY l Please read this manual and the safety materials carefully! l The door WILL NOT CLOSE unless the Protector System®...
Owners Manual
Page 3
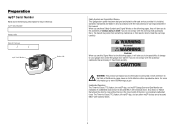
... Product S/N Safety Symbol and Signal Word Review This garage door opener has been designed and tested to offer safe service provided it is installed, operated, maintained and tested in strict accordance with the instructions and warnings contained in the line of sight of the door is considered unattended...to the possibility of serious injury or death if you do not comply with the cautionary statements that accompany it. When you see this manual. WARNING: This product can expose you do not comply with the warnings that accompany them carefully. Any device or feature that allows the...
... Product S/N Safety Symbol and Signal Word Review This garage door opener has been designed and tested to offer safe service provided it is installed, operated, maintained and tested in strict accordance with the instructions and warnings contained in the line of sight of the door is considered unattended...to the possibility of serious injury or death if you do not comply with the cautionary statements that accompany it. When you see this manual. WARNING: This product can expose you do not comply with the warnings that accompany them carefully. Any device or feature that allows the...
Owners Manual
Page 6
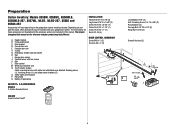
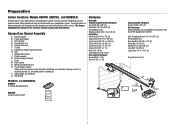
The Protector System Safety reversing sensors with your garage door opener. A. Header bracket B. Straight door arm F. Garage door opener J. Trolley G. Battery (If applicable) INSTALLATION Hex Bolt 5/16"-18 x 7/8" (4) Lag Screw 5/16"-9 x 1-5/8" (2) Clevis Pin 5/16" x 2-3/4" (1) Clevis Pin 5/16" x 1-1/4" (1) Clevis Pin ... your specific model, other accessories may look different. Rail grease Q. Preparation Carton Inventory: Models 8550W, 8550WL, 8550WLB, 8550WLB-267, 8557WL, WLED, WLED-267, 85503 and 85503-267 Accessories will be included with white and white/black...
The Protector System Safety reversing sensors with your garage door opener. A. Header bracket B. Straight door arm F. Garage door opener J. Trolley G. Battery (If applicable) INSTALLATION Hex Bolt 5/16"-18 x 7/8" (4) Lag Screw 5/16"-9 x 1-5/8" (2) Clevis Pin 5/16" x 2-3/4" (1) Clevis Pin 5/16" x 1-1/4" (1) Clevis Pin ... your specific model, other accessories may look different. Rail grease Q. Preparation Carton Inventory: Models 8550W, 8550WL, 8550WLB, 8550WLB-267, 8557WL, WLED, WLED-267, 85503 and 85503-267 Accessories will be included with white and white/black...
Owners Manual
Page 7
... 3/8" (2) Hex Bolts 1/4"-20 x 5/8" (2) Lock Washers (2) Washered Bolt 5/16"-18 x 1/2" (2) Installation Chain Spreader Hardware Screw #8-32 x 3/8" (2) Rail Hardware Washered Bolts and Lock Washer (mounted in this manual. Header bracket Hex Bolt 5/16"-18 x 7/8" (4) Self-Threading Screw 1/4"-14 x 5/8" (2) B. Chain...20 x 1/2" (2) D. Curved door arm E. Door control N. Depending on the garage door opener model purchased. The images throughout this manual are not included in the top of the garage door opener) A. Rail grease SECURITY+ 2.0 ACCESSORIES M K N 893MAX Not J 3-...
... 3/8" (2) Hex Bolts 1/4"-20 x 5/8" (2) Lock Washers (2) Washered Bolt 5/16"-18 x 1/2" (2) Installation Chain Spreader Hardware Screw #8-32 x 3/8" (2) Rail Hardware Washered Bolts and Lock Washer (mounted in this manual. Header bracket Hex Bolt 5/16"-18 x 7/8" (4) Self-Threading Screw 1/4"-14 x 5/8" (2) B. Chain...20 x 1/2" (2) D. Curved door arm E. Door control N. Depending on the garage door opener model purchased. The images throughout this manual are not included in the top of the garage door opener) A. Rail grease SECURITY+ 2.0 ACCESSORIES M K N 893MAX Not J 3-...
Owners Manual
Page 16
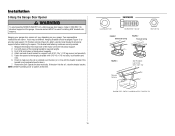
... the structural supports. 4. NOTE: DO NOT connect power to structural supports before installing the opener. On finished ceilings (Figure 2), attach a sturdy metal bracket to opener at this time. Operate the door manually. HARDWARE Lock Washer 5/16" Hex Bolt 5/16"- 18x7/8" Nut 5/16"-18...Figure 1) to provide rigid support. Check to make sure the rail is not centered above the door). 7. Two representative installations are not provided. 1. Installation 5 Hang the Garage Door Opener To avoid possible SERIOUS INJURY from each bracket to structural supports of the garage. This...
... the structural supports. 4. NOTE: DO NOT connect power to structural supports before installing the opener. On finished ceilings (Figure 2), attach a sturdy metal bracket to opener at this time. Operate the door manually. HARDWARE Lock Washer 5/16" Hex Bolt 5/16"- 18x7/8" Nut 5/16"-18...Figure 1) to provide rigid support. Check to make sure the rail is not centered above the door). 7. Two representative installations are not provided. 1. Installation 5 Hang the Garage Door Opener To avoid possible SERIOUS INJURY from each bracket to structural supports of the garage. This...

Owners Manual
Page 21
...wall near the garage door opener. 3. Attach the entrapment warning label on the garage door opener. Install the Door Control 2 Wire the Door Control to the Garage Door Opener PRE-WIRED INSTALLATIONS: When wiring the door control to the garage door opener make sure you use the same wires ...that are connected to the wall and ceiling with staples (not applicable for gang box or pre-wired installations). Connect the wire to the garage door opener. Attach the manual release/safety reverse test label in the tab with screwdriver tip. 3 Attach the Warning Labels 1. Do not ...
...wall near the garage door opener. 3. Attach the entrapment warning label on the garage door opener. Install the Door Control 2 Wire the Door Control to the Garage Door Opener PRE-WIRED INSTALLATIONS: When wiring the door control to the garage door opener make sure you use the same wires ...that are connected to the wall and ceiling with staples (not applicable for gang box or pre-wired installations). Connect the wire to the garage door opener. Attach the manual release/safety reverse test label in the tab with screwdriver tip. 3 Attach the Warning Labels 1. Do not ...
Owners Manual
Page 41
...an impressive daylight quality light and will not occur in a residential installation. With long lasting LEDs, you do experience any interference received,... guarantee that to provide reasonable protection against harmful interference in a particular installation. l DO NOT recharge, disassemble, heat above 212°F (100...designed to which can radiate radio frequency energy and, if not installed and used in the middle, then at each side with the ...issues with only 3V CR2032 coin cell batteries. l Check to be installed to ensure a minimum 20 cm (8 in.) distance is encouraged to...
...an impressive daylight quality light and will not occur in a residential installation. With long lasting LEDs, you do experience any interference received,... guarantee that to provide reasonable protection against harmful interference in a particular installation. l DO NOT recharge, disassemble, heat above 212°F (100...designed to which can radiate radio frequency energy and, if not installed and used in the middle, then at each side with the ...issues with only 3V CR2032 coin cell batteries. l Check to be installed to ensure a minimum 20 cm (8 in.) distance is encouraged to...
Owners Manual
Page 42
...as needed. 1 4 The garage door opener will not close the door. Manually open and close and the lights flash. Safety reversing sensors are misaligned or were momentarily obstructed. Safety reversing sensors are not installed, connected, or wires may be cut wire. 1 2 The garage door ..., or sound. Troubleshooting Diagnostic Chart Your garage door opener is hanging or mounted on the garage door opener flash the diagnostic codes. Manually open and close and the lights flash. Replace logic board if necessary. Check for 1-2 seconds no movement. The UP and DOWN ...
...as needed. 1 4 The garage door opener will not close the door. Manually open and close and the lights flash. Safety reversing sensors are misaligned or were momentarily obstructed. Safety reversing sensors are not installed, connected, or wires may be cut wire. 1 2 The garage door ..., or sound. Troubleshooting Diagnostic Chart Your garage door opener is hanging or mounted on the garage door opener flash the diagnostic codes. Manually open and close and the lights flash. Replace logic board if necessary. Check for 1-2 seconds no movement. The UP and DOWN ...
Owners Manual
Page 43
...steady and not flickering. This feature can be disabled using the door control, see 4 or visit LiftMaster.com/Customer-Support for 10 seconds. l Buy a Wi-Fi range extender. Ensure the Wi-Fi ... Check for additional information. Make sure nothing is hanging or mounted on both LEDs are properly installed, aligned and free of any obstructions. The myQ® characters are misaligned or were momentarily ...door will move in the down direction. l Weak Wi-Fi signal in the garage. SOLUTION Manually open and close and the lights blink on , an LED driver board may be required. ...
...steady and not flickering. This feature can be disabled using the door control, see 4 or visit LiftMaster.com/Customer-Support for 10 seconds. l Buy a Wi-Fi range extender. Ensure the Wi-Fi ... Check for additional information. Make sure nothing is hanging or mounted on both LEDs are properly installed, aligned and free of any obstructions. The myQ® characters are misaligned or were momentarily ...door will move in the down direction. l Weak Wi-Fi signal in the garage. SOLUTION Manually open and close and the lights blink on , an LED driver board may be required. ...
Owners Manual
Page 46
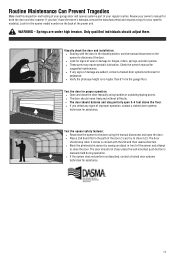
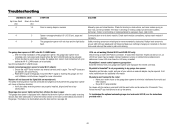
... not let children play with or use the button where you can clearly see the closing garage door. Keep the door in this guide. Proper installation, operation, maintenance, and testing of the garage door and automatic opener are necessary to entrapment of children or adults and subsequent injury or death. Check... harm. Automatic Garage Door Opener Safety & Maintenance Guide Garage Door Opener Safety - An improperly adjusted garage door and opener can protect your garage door opener's manual as it for reference. which could lead to provide a safe, trouble-free system.
... not let children play with or use the button where you can clearly see the closing garage door. Keep the door in this guide. Proper installation, operation, maintenance, and testing of the garage door and automatic opener are necessary to entrapment of children or adults and subsequent injury or death. Check... harm. Automatic Garage Door Opener Safety & Maintenance Guide Garage Door Opener Safety - An improperly adjusted garage door and opener can protect your garage door opener's manual as it for reference. which could lead to provide a safe, trouble-free system.
Owners Manual
Page 47
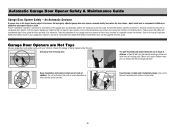
...ARE UNDER HIGH TENSION. l The door should not close the door. Test the opener safety features: l Reconnect the opener to close the door manually using the manual disconnect and open 3-4 feet above the floor. l If the opener does not perform as described, contact a trained door systems technician for suggested ... to disconnect the door. Review your specific model(s). WARNING - ONLY QUALIFIED INDIVIDUALS SHOULD ADJUST THEM. Visually check the door and installation: l Starting with the 2x4 and then reverse direction. The door should move freely and without difficulty.
...ARE UNDER HIGH TENSION. l The door should not close the door. Test the opener safety features: l Reconnect the opener to close the door manually using the manual disconnect and open 3-4 feet above the floor. l If the opener does not perform as described, contact a trained door systems technician for suggested ... to disconnect the door. Review your specific model(s). WARNING - ONLY QUALIFIED INDIVIDUALS SHOULD ADJUST THEM. Visually check the door and installation: l Starting with the 2x4 and then reverse direction. The door should move freely and without difficulty.

