8160WB Product Guide
Page 2
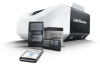
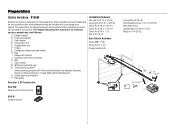
...enable Timer-to all LiftMaster® openers manufactured since January 1993. All Rights Reserved. Apple is a registered trademark of Gentex Corporation. SHIPPING WEIGHT (in lbs.) 22 20 CARTONS (2) HEAD RAIL (7') CARTON 1: 19.81" x 11.94" x 11.19" --Ga ra ge Door O pen er Hea d ( 8160WB ) --Ba tte ...174; and the UL logo are trademarks of garage door openers and lighting controls via smartphone, tablet or c o m p u t e r. HomeKit is installed on the model and year of injury to 150°F Frequency: --Remote Contr ol: 310, 315 a nd 390 MHz Tri-Band* --Gar a g e Door O pene r :...
...enable Timer-to all LiftMaster® openers manufactured since January 1993. All Rights Reserved. Apple is a registered trademark of Gentex Corporation. SHIPPING WEIGHT (in lbs.) 22 20 CARTONS (2) HEAD RAIL (7') CARTON 1: 19.81" x 11.94" x 11.19" --Ga ra ge Door O pen er Hea d ( 8160WB ) --Ba tte ...174; and the UL logo are trademarks of garage door openers and lighting controls via smartphone, tablet or c o m p u t e r. HomeKit is installed on the model and year of injury to 150°F Frequency: --Remote Contr ol: 310, 315 a nd 390 MHz Tri-Band* --Gar a g e Door O pene r :...

Owners Manual
Page 1
... Windsor Drive Oak Brook, IL 60523 Send it in by texting the photo to receive updates and offers from LiftMaster Take a photo of the garage door opener are to be used ONLY with myQ® and Security+ 2.0® accessories. • DO NOT install on label...a one-piece door if using devices or features providing unattended close. Wi-Fi® Garage Door Opener Contractor Series Chain Drive Models 8160W, 8160WB, 8164W, and 8165W Contractor Series Belt Drive Model 8155W FOR RESIDENTIAL USE ONLY • Please read this manual and the safety materials carefully! • The door WILL NOT ...
... Windsor Drive Oak Brook, IL 60523 Send it in by texting the photo to receive updates and offers from LiftMaster Take a photo of the garage door opener are to be used ONLY with myQ® and Security+ 2.0® accessories. • DO NOT install on label...a one-piece door if using devices or features providing unattended close. Wi-Fi® Garage Door Opener Contractor Series Chain Drive Models 8160W, 8160WB, 8164W, and 8165W Contractor Series Belt Drive Model 8155W FOR RESIDENTIAL USE ONLY • Please read this manual and the safety materials carefully! • The door WILL NOT ...
Owners Manual
Page 2
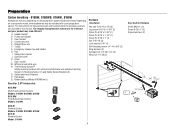
..., 8165W 6 Carton Inventory - Contents Preparation 3 Carton Inventory - Models 8155W 7 Assembly for Models: 8160W, 8160WB, 8164W, 8165W 8 Assembly for Model: 8155W 9 Installation 10 Install the Door Control 19-21 Install the Door Control - 882LMW 19 Install the Door Control - 883LMW 20 Troubleshooting 43-44 Accessories ...
..., 8165W 6 Carton Inventory - Contents Preparation 3 Carton Inventory - Models 8155W 7 Assembly for Models: 8160W, 8160WB, 8164W, 8165W 8 Assembly for Model: 8155W 9 Installation 10 Install the Door Control 19-21 Install the Door Control - 882LMW 19 Install the Door Control - 883LMW 20 Troubleshooting 43-44 Accessories ...
Owners Manual
Page 6
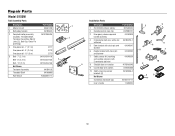
... and your product may be included with white and white/black wire attached: Sending Sensor (1) Receiving Sensor (1) and Safety Sensor Brackets (2) O. Door control M. Battery Backup (Model 8160WB only) Security+ 2.0® Accessories Hardware Installation Hex bolt 5/16"-18 x 7/8" (4) Lag screw 5/16"-9 x 1-5/8" (2) Clevis Pin 5/16" x 2-3/4" (1) Clevis Pin 5/16" x 1-1/4" (1) Clevis Pin 5/16" x 1" (1) Nut 5/16"-18...
... and your product may be included with white and white/black wire attached: Sending Sensor (1) Receiving Sensor (1) and Safety Sensor Brackets (2) O. Door control M. Battery Backup (Model 8160WB only) Security+ 2.0® Accessories Hardware Installation Hex bolt 5/16"-18 x 7/8" (4) Lag screw 5/16"-9 x 1-5/8" (2) Clevis Pin 5/16" x 2-3/4" (1) Clevis Pin 5/16" x 1-1/4" (1) Clevis Pin 5/16" x 1" (1) Nut 5/16"-18...
Owners Manual
Page 7
... accessories may be attached to the accessory and are for these accessories will vary depending on the garage door opener model purchased. Header bracket B. Belt L. The images throughout this manual are not included in this manual. Pulley and bracket C. Door bracket D. The Protector System® Safety ...
... accessories may be attached to the accessory and are for these accessories will vary depending on the garage door opener model purchased. Header bracket B. Belt L. The images throughout this manual are not included in this manual. Pulley and bracket C. Door bracket D. The Protector System® Safety ...
Owners Manual
Page 8
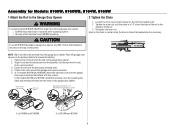
...Loosen the inner nut and lock washer on the packing material to prevent scratching. 1. Fasten the rail with hex screws. Assembly for Models: 8160W, 8160WB, 8164W, 8165W 1 Attach the Rail to the Garage Door Opener To avoid possible SERIOUS INJURY to garage door opener, use the bolts... the rail, chain, and styrofoam. 3. Position the chain around the garage door opener sprocket. 5. a) For models 8160W and 8160WB, attach the sprocket cover over the sprocket. b) For models 8164W and 8165W, install the sprocket cover by squeezing the sides and inserting the tabs into the slots on the...
...Loosen the inner nut and lock washer on the packing material to prevent scratching. 1. Fasten the rail with hex screws. Assembly for Models: 8160W, 8160WB, 8164W, 8165W 1 Attach the Rail to the Garage Door Opener To avoid possible SERIOUS INJURY to garage door opener, use the bolts... the rail, chain, and styrofoam. 3. Position the chain around the garage door opener sprocket. 5. a) For models 8160W and 8160WB, attach the sprocket cover over the sprocket. b) For models 8164W and 8165W, install the sprocket cover by squeezing the sides and inserting the tabs into the slots on the...
Owners Manual
Page 9
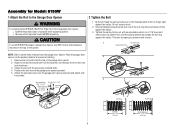
... use any tools. 2. Cut the tape from the top of the nut ring slots and brace it is finger tight against the trolley. 3. Assembly for Model: 8155W 1 Attach the Rail to the Garage Door Opener To avoid possible SERIOUS INJURY to prevent scratching. 1. Insert a flathead screwdriver tip into one of the...
... use any tools. 2. Cut the tape from the top of the nut ring slots and brace it is finger tight against the trolley. 3. Assembly for Model: 8155W 1 Attach the Rail to the Garage Door Opener To avoid possible SERIOUS INJURY to prevent scratching. 1. Insert a flathead screwdriver tip into one of the...
Owners Manual
Page 15
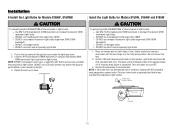
... the range or performance of your remote control(s). 3. Do not remove the lens. 2. Installation 6 Install the Light Bulbs for Models 8160W, 8160WB Install the Light Bulbs for approximately 4-1/2 minutes when power is in each socket. Rotate the lens up to vibration, replace with A19...Use ONLY A19 incandescent (100W maximum) or compact fluorescent (26W maximum) light bulbs. The lights will turn ON and remain lit for Models 8155W, 8164W and 8165W To prevent possible OVERHEATING of lens. Insert an A19 incandescent (100W maximum) or compact fluorescent (26W, 100W equivalent...
... the range or performance of your remote control(s). 3. Do not remove the lens. 2. Installation 6 Install the Light Bulbs for Models 8160W, 8160WB Install the Light Bulbs for approximately 4-1/2 minutes when power is in each socket. Rotate the lens up to vibration, replace with A19...Use ONLY A19 incandescent (100W maximum) or compact fluorescent (26W maximum) light bulbs. The lights will turn ON and remain lit for Models 8155W, 8164W and 8165W To prevent possible OVERHEATING of lens. Insert an A19 incandescent (100W maximum) or compact fluorescent (26W, 100W equivalent...
Owners Manual
Page 28
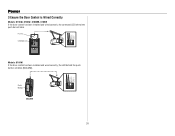
Push Button 883LMW 28 RED WHITE WHITE GREY RED WHITE WHITE GREY Power 3 Ensure the Door Control is Wired Correctly Models: 8155W, 8160W, 8160WB, 8165W If the door control has been installed and wired correctly, the command LED behind the push button will blink. Push bar COMMAND LED Models: 8164W If the door control has been installed and wired correctly, the LED behind the push bar will blink (883LMW).
Push Button 883LMW 28 RED WHITE WHITE GREY RED WHITE WHITE GREY Power 3 Ensure the Door Control is Wired Correctly Models: 8155W, 8160W, 8160WB, 8165W If the door control has been installed and wired correctly, the command LED behind the push button will blink. Push bar COMMAND LED Models: 8164W If the door control has been installed and wired correctly, the LED behind the push bar will blink (883LMW).
Owners Manual
Page 35
...Your garage door opener is compatible with myQ and Security+ 2.0® accessories, see page 39. Compatible with up . NOTE: Older LiftMaster remote controls, door controls, and third party products are misaligned, the door will not close the door if you hold the button on... 100 billion new codes. Alert2Close The Alert2Close feature provides a visual and an audible alert that can be adjusted using a TTC enabled door control (Models 881LMW or 880LMW). The sleep mode shuts the garage door opener down direction. When the door is closed . If the door senses an obstruction ...
...Your garage door opener is compatible with myQ and Security+ 2.0® accessories, see page 39. Compatible with up . NOTE: Older LiftMaster remote controls, door controls, and third party products are misaligned, the door will not close the door if you hold the button on... 100 billion new codes. Alert2Close The Alert2Close feature provides a visual and an audible alert that can be adjusted using a TTC enabled door control (Models 881LMW or 880LMW). The sleep mode shuts the garage door opener down direction. When the door is closed . If the door senses an obstruction ...

Owners Manual
Page 40
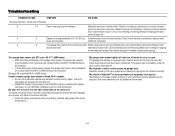
Older LiftMaster remote controls are heard. 1 2 "cli"cckl"ick" LEARN Button LEARN LED 40 MODEL 882LMW 1. Repeat the steps above for compatible accessories. Then press the ENTER button. The garage door opener lights will flash (or two clicks will stop ... USING THE PUSH BUTTON DOOR CONTROL - Operation Remote Control Your remote control has been programmed at the factory to operate with the accessory or visit LiftMaster.com. Programming can be heard) and the Command LED will be done through the door control or the learn button the garage door opener. To...
Older LiftMaster remote controls are heard. 1 2 "cli"cckl"ick" LEARN Button LEARN LED 40 MODEL 882LMW 1. Repeat the steps above for compatible accessories. Then press the ENTER button. The garage door opener lights will flash (or two clicks will stop ... USING THE PUSH BUTTON DOOR CONTROL - Operation Remote Control Your remote control has been programmed at the factory to operate with the accessory or visit LiftMaster.com. Programming can be heard) and the Command LED will be done through the door control or the learn button the garage door opener. To...
Owners Manual
Page 44
... garage door: Erase the memory from your vehicle an external adapter may be disabled using the door control, see page 4 or visit WiFiHelp.LiftMaster.com for more information. l Weak Wi-Fi signal in the down direction. l Verify the safety reversing sensors are misaligned or were momentarily obstructed...If the door is moving stops or reverses. My door will not close the door. If door is hanging or mounted on the make, model, and year of your garage door opener and reprogram the remote control(s). Check travel module connections, replace travel module. This feature can be...
... garage door: Erase the memory from your vehicle an external adapter may be disabled using the door control, see page 4 or visit WiFiHelp.LiftMaster.com for more information. l Weak Wi-Fi signal in the down direction. l Verify the safety reversing sensors are misaligned or were momentarily obstructed...If the door is moving stops or reverses. My door will not close the door. If door is hanging or mounted on the make, model, and year of your garage door opener and reprogram the remote control(s). Check travel module connections, replace travel module. This feature can be...

Owners Manual
Page 46
...(E.G., BATTERIES IN REMOTE CONTROL TRANSMITTERS AND LIGHT BULBS), OR UNITS INSTALLED FOR NON-RESIDENTIAL USE. WARRANTY PERIOD Models Parts Motor Accessories Belt Battery Backup* 8160W 8165W 8164W 1 year 4 years 1 year N/A N/A 8160WB 1 year 4 years 1 year N/A 1 year 8155W 1 year 4 years 1 year 10 years N/A...province. 46 This limited warranty gives you specific legal rights, and you may not apply to you. Warranty LIFTMASTER® LIMITED WARRANTY LiftMaster® ("Seller") warrants to the first retail purchaser of this product, for the residence in which this product...
...(E.G., BATTERIES IN REMOTE CONTROL TRANSMITTERS AND LIGHT BULBS), OR UNITS INSTALLED FOR NON-RESIDENTIAL USE. WARRANTY PERIOD Models Parts Motor Accessories Belt Battery Backup* 8160W 8165W 8164W 1 year 4 years 1 year N/A N/A 8160WB 1 year 4 years 1 year N/A 1 year 8155W 1 year 4 years 1 year 10 years N/A...province. 46 This limited warranty gives you specific legal rights, and you may not apply to you. Warranty LIFTMASTER® LIMITED WARRANTY LiftMaster® ("Seller") warrants to the first retail purchaser of this product, for the residence in which this product...
Owners Manual
Page 48
...and without difficulty. l Look for assistance. l If any signs of improper operation, contact a trained door systems technician for the opener model number on the back of the power unit. WARNING - Springs are evident, contact a trained door systems technician for signs of wear or damage...is manually held during operation. 1 l If the opener does not perform as described, contact a trained door systems technician for your specific model(s). l The door should stop when it (2). l If you don't have the owner's manuals, contact the manufacturer(s) and request a copy for assistance...
...and without difficulty. l Look for assistance. l If any signs of improper operation, contact a trained door systems technician for the opener model number on the back of the power unit. WARNING - Springs are evident, contact a trained door systems technician for signs of wear or damage...is manually held during operation. 1 l If the opener does not perform as described, contact a trained door systems technician for your specific model(s). l The door should stop when it (2). l If you don't have the owner's manuals, contact the manufacturer(s) and request a copy for assistance...

Owners Manual
Page 49
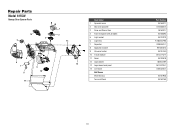
Repair Parts Models 8160W, 8160WB, 8164W and 8165W Rail Assembly Parts Description 1 Master link kit 2 Chain pulley bracket 3 Complete trolley assembly (includes: Threaded Shaft, Nuts [2], Washer, Clevis Pin, Ring, Master ...
Repair Parts Models 8160W, 8160WB, 8164W and 8165W Rail Assembly Parts Description 1 Master link kit 2 Chain pulley bracket 3 Complete trolley assembly (includes: Threaded Shaft, Nuts [2], Washer, Clevis Pin, Ring, Master ...
Owners Manual
Page 50
Repair Parts Model 8155W Rail Assembly Parts Description Part Number 1 Master link kit 004A1008 2 Belt pulley bracket 041B5424 3 Complete trolley assembly (includes: Threaded Shaft, Tensioner Assembly, Master Links [2], ...
Repair Parts Model 8155W Rail Assembly Parts Description Part Number 1 Master link kit 004A1008 2 Belt pulley bracket 041B5424 3 Complete trolley assembly (includes: Threaded Shaft, Tensioner Assembly, Master Links [2], ...
Owners Manual
Page 51
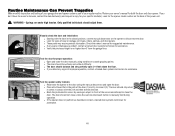
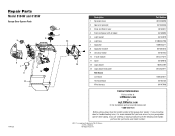
Repair Parts Model 8155W Garage Door Opener Parts 14 3 5 4 6 7 8 11 9 10 1 2 12 13 Description 1 Sprocket cover 2 Gear and sprocket 3 Drive and Worm Gear 4 Front end panel with all labels 5 Light socket 6 Light lens 7 Capacitor 8 Capacitor bracket 9 Universal motor 10 Travel module 11 Cover 12 Logic board 13 Logic board end panel 14 Line Cord Not Shown Wire Harness Terminal Block Part Number 041A4371 041A4885-4 041A2817 041A8393 041C0279 K108D0079M 030B0532-1 K012A0373 041D7440 041D7742-7 041D9018 050ACTWF 041D0239-1 041B4245-1 041A7946 041A3150 51
Repair Parts Model 8155W Garage Door Opener Parts 14 3 5 4 6 7 8 11 9 10 1 2 12 13 Description 1 Sprocket cover 2 Gear and sprocket 3 Drive and Worm Gear 4 Front end panel with all labels 5 Light socket 6 Light lens 7 Capacitor 8 Capacitor bracket 9 Universal motor 10 Travel module 11 Cover 12 Logic board 13 Logic board end panel 14 Line Cord Not Shown Wire Harness Terminal Block Part Number 041A4371 041A4885-4 041A2817 041A8393 041C0279 K108D0079M 030B0532-1 K012A0373 041D7440 041D7742-7 041D9018 050ACTWF 041D0239-1 041B4245-1 041A7946 041A3150 51
Owners Manual
Page 52
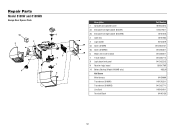
... socket (8160W) 2b End panel with light socket (8160WB) 3 Light lens 4 Light socket 5a Cover (8160W) 5b Cover (8160WB) 6 Motor with travel module 8 7 Travel module 8 Logic board end panel 9 Receiver logic board 10 Battery Backup (Model 8160WB only) Not Shown Wire Harness Transformer (8160W) Transformer (8160WB) Line Cord Terminal Block 52 Part Number 041B5348-2 041A7756...
... socket (8160W) 2b End panel with light socket (8160WB) 3 Light lens 4 Light socket 5a Cover (8160W) 5b Cover (8160WB) 6 Motor with travel module 8 7 Travel module 8 Logic board end panel 9 Receiver logic board 10 Battery Backup (Model 8160WB only) Not Shown Wire Harness Transformer (8160W) Transformer (8160WB) Line Cord Terminal Block 52 Part Number 041B5348-2 041A7756...
Owners Manual
Page 53
... 041A2817 041A8393 041C0279 K108D0079M 030B0532-1 K012A0373 041D7440 041D7742-7 041D9018 050ACTWF 041D0239-1 041B4245-1 041A3150 041A7946 Contact Information Visit us online at: LiftMaster.com or myLiftMaster.com Or for installation and service information call: 1-800-528-9131 Before calling, please have access to your ...garage door opener while calling. If you have the model number of Wi-Fi Alliance. © 2018, LiftMaster All Rights Reserved Wi-Fi® is recommended that you are calling about a troubleshooting issue, it is a...
... 041A2817 041A8393 041C0279 K108D0079M 030B0532-1 K012A0373 041D7440 041D7742-7 041D9018 050ACTWF 041D0239-1 041B4245-1 041A3150 041A7946 Contact Information Visit us online at: LiftMaster.com or myLiftMaster.com Or for installation and service information call: 1-800-528-9131 Before calling, please have access to your ...garage door opener while calling. If you have the model number of Wi-Fi Alliance. © 2018, LiftMaster All Rights Reserved Wi-Fi® is recommended that you are calling about a troubleshooting issue, it is a...
8155W 8164W 8165W 8160 8160WB Users Guide - English French
Page 7
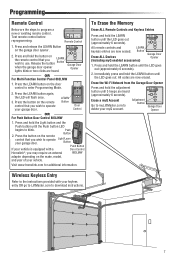
... instructions. 7 Remote Control 2. Press and hold the adjustment button until 3 beeps are now erased. Press the button on the make, model, and year of your keyless entry OR go to LiftMaster.com to delete your garage door. Visit www.homelink.com for additional information. All codes are heard (approximately 6 seconds). Press and...
... instructions. 7 Remote Control 2. Press and hold the adjustment button until 3 beeps are now erased. Press the button on the make, model, and year of your keyless entry OR go to LiftMaster.com to delete your garage door. Visit www.homelink.com for additional information. All codes are heard (approximately 6 seconds). Press and...


