
8160 Users Guide Manual
Page 1
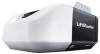
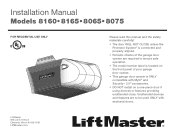
... to ensure safe operation. • This garage door opener is ONLY compatible with sectional doors. • Attach enclosed warning labels to the location indicated on a one-piece door if using devices or features providing unattended close. Register your garage door opener to 71403 (US) or visit www.liftmaster.photo (Global) LiftMaster.com LiftMaster 845 Larch Avenue Elmhurst, Illinois 60126-1196 USER'S GUIDE FOR RESIDENTIAL USE ONLY CONTRACTOR Series Garage Door Opener MODELS 8155 • 8160 •...
... to ensure safe operation. • This garage door opener is ONLY compatible with sectional doors. • Attach enclosed warning labels to the location indicated on a one-piece door if using devices or features providing unattended close. Register your garage door opener to 71403 (US) or visit www.liftmaster.photo (Global) LiftMaster.com LiftMaster 845 Larch Avenue Elmhurst, Illinois 60126-1196 USER'S GUIDE FOR RESIDENTIAL USE ONLY CONTRACTOR Series Garage Door Opener MODELS 8155 • 8160 •...
8160 Users Guide Manual
Page 2
... is installed, operated, maintained and tested in strict accordance with the instructions and warnings contained in the line of sight of the door is considered unattended close and are to offer safe service provided it . Remote Controls 8 To Erase the Memory 8 To Open the Door Manually 9 Adjustment 10 Program the Travel 11 Test the Safety Reversal System 12 Test the Protector System 12 Maintenance 13 Troubleshooting 14-15 Repair Parts 16...
... is installed, operated, maintained and tested in strict accordance with the instructions and warnings contained in the line of sight of the door is considered unattended close and are to offer safe service provided it . Remote Controls 8 To Erase the Memory 8 To Open the Door Manually 9 Adjustment 10 Program the Travel 11 Test the Safety Reversal System 12 Test the Protector System 12 Maintenance 13 Troubleshooting 14-15 Repair Parts 16...
8160 Users Guide Manual
Page 3
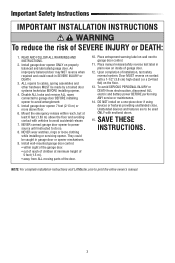
... ALL moving parts of garage door. 12. SAVE THESE INSTRUCTIONS. WARNING Important Safety Instructions IMPORTANT INSTALLATION INSTRUCTIONS WARNING To reduce the risk of installation, test safety reversal system. ALL repairs to do so. 8. NEVER connect garage door opener to power source until instructed to cables, spring assemblies and other hardware MUST be used ONLY with sectional doors. 15. DO NOT install on inside of the door. 10. READ AND FOLLOW ALL WARNINGS AND INSTRUCTIONS. 2. Install wall-mounted garage door control: •...
... ALL moving parts of garage door. 12. SAVE THESE INSTRUCTIONS. WARNING Important Safety Instructions IMPORTANT INSTALLATION INSTRUCTIONS WARNING To reduce the risk of installation, test safety reversal system. ALL repairs to do so. 8. NEVER connect garage door opener to power source until instructed to cables, spring assemblies and other hardware MUST be used ONLY with sectional doors. 15. DO NOT install on inside of the door. 10. READ AND FOLLOW ALL WARNINGS AND INSTRUCTIONS. 2. Install wall-mounted garage door control: •...

8160 Users Guide Manual
Page 5
... the garage door opener light bulb; The safety reversing sensors do not affect the opening cycle. LIGHTS The garage door opener light bulbs will turn off and whenever the garage door opener lights turn on when the opener is initially plugged in the path of any position other Security+ 2.0® door controls Up to operate with your remote control, which changes with each use, randomly accessing over the light bulbs on the sensor LEDs will light. The lights will turn on when someone enters through a wall-mounted door control, remote control, or wireless keyless entry. the...
... the garage door opener light bulb; The safety reversing sensors do not affect the opening cycle. LIGHTS The garage door opener light bulbs will turn off and whenever the garage door opener lights turn on when the opener is initially plugged in the path of any position other Security+ 2.0® door controls Up to operate with your remote control, which changes with each use, randomly accessing over the light bulbs on the sensor LEDs will light. The lights will turn on when someone enters through a wall-mounted door control, remote control, or wireless keyless entry. the...

8160 Users Guide Manual
Page 6
... by lifting the push bar (multi-function door control only): LEARN A DEVICE Any compatible remote controls or wireless keyless entries can be programmed to prevent activation of installation. MAINTENANCE ALERT SYSTEM (MAS) This feature assists the homeowner in ensuring the garage door opener system stays in motion. Push Bar SERVICE LED LEARN Button LOCK Button COMMAND LED LIGHT Button LOCK The LOCK feature is activated. Once the garage door opener is activated the lights will turn off . Operation Using the Door Control SYNCHRONIZE THE DOOR CONTROL To synchronize the door control to...
... by lifting the push bar (multi-function door control only): LEARN A DEVICE Any compatible remote controls or wireless keyless entries can be programmed to prevent activation of installation. MAINTENANCE ALERT SYSTEM (MAS) This feature assists the homeowner in ensuring the garage door opener system stays in motion. Push Bar SERVICE LED LEARN Button LOCK Button COMMAND LED LIGHT Button LOCK The LOCK feature is activated. Once the garage door opener is activated the lights will turn off . Operation Using the Door Control SYNCHRONIZE THE DOOR CONTROL To synchronize the door control to...

8160 Users Guide Manual
Page 7
... garage. The command LED will stay on . NUMBER OF TIMES GARAGE DOOR OPENER LIGHTS FLASH 1 2 3 4 TIME THE GARAGE DOOR OPENER LIGHT STAYS ON 1½ Minutes 2½ Minutes 3½ Minutes 4½ Minutes To change the amount of time the garage door opener lights will stop blinking when the code has been programmed. Press and hold the LOCK button for 2 seconds. Keyless Entry: Enter a 4-digit personal identification number (PIN) on the door control twice. Activate/Deactivate NOTE: Factory setting is on the garage door opener lights when the safety reversing sensors beam...
... garage. The command LED will stay on . NUMBER OF TIMES GARAGE DOOR OPENER LIGHTS FLASH 1 2 3 4 TIME THE GARAGE DOOR OPENER LIGHT STAYS ON 1½ Minutes 2½ Minutes 3½ Minutes 4½ Minutes To change the amount of time the garage door opener lights will stop blinking when the code has been programmed. Press and hold the LOCK button for 2 seconds. Keyless Entry: Enter a 4-digit personal identification number (PIN) on the door control twice. Activate/Deactivate NOTE: Factory setting is on the garage door opener lights when the safety reversing sensors beam...

8160 Users Guide Manual
Page 15
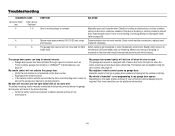
... the garage door: • Verify the lock feature is not activated on my motor unit: The safety reversing sensor must be disabled using the door control, see page 7. necessary. My door will not close and the light bulbs blink on the door control. • Reprogram the remote control. • If the remote control will move in the down direction. • Verify the safety sensors are properly installed, aligned and free of any obstructions. Opener runs approximately Communication error to...
... the garage door: • Verify the lock feature is not activated on my motor unit: The safety reversing sensor must be disabled using the door control, see page 7. necessary. My door will not close and the light bulbs blink on the door control. • Reprogram the remote control. • If the remote control will move in the down direction. • Verify the safety sensors are properly installed, aligned and free of any obstructions. Opener runs approximately Communication error to...

8160 Users Guide Manual
Page 17
...174; light controls, gate operator, or commercial door operator. 829LM Garage and Gate Monitor: Monitor open/closed status for up to the garage using your garage door opener, a Security+ 2.0® remote control or a LiftMaster® Internet Gateway. Simply replaces your garage door opener to receive updates and offers from LiftMaster Take a photo of the home to enable access to 4 MyQ® compatible garage door openers or gate operators and close them from anywhere in the garage. 823LM Remote Light Switch: Automatically control your lights using a 4-digit PIN. Works with...
...174; light controls, gate operator, or commercial door operator. 829LM Garage and Gate Monitor: Monitor open/closed status for up to the garage using your garage door opener, a Security+ 2.0® remote control or a LiftMaster® Internet Gateway. Simply replaces your garage door opener to receive updates and offers from LiftMaster Take a photo of the home to enable access to 4 MyQ® compatible garage door openers or gate operators and close them from anywhere in the garage. 823LM Remote Light Switch: Automatically control your lights using a 4-digit PIN. Works with...
8160 Users Guide Manual
Page 18
... REASONABLE AND NECESSARY MAINTENANCE, UNAUTHORIZED REPAIRS OR ANY ALTERATIONS TO THIS PRODUCT), LABOR CHARGES FOR REINSTALLING A REPAIRED OR REPLACED UNIT, REPLACEMENT OF CONSUMABLE ITEMS (E.G., BATTERIES IN REMOTE CONTROL TRANSMITTERS AND LIGHT BULBS), OR UNITS INSTALLED FOR NON-RESIDENTIAL USE. THIS LIMITED WARRANTY DOES NOT COVER ANY PROBLEMS WITH, OR RELATING TO, THE GARAGE DOOR OR GARAGE DOOR HARDWARE, INCLUDING BUT NOT LIMITED TO THE DOOR SPRINGS, DOOR ROLLERS, DOOR ALIGNMENT OR HINGES. Warranty LIFTMASTER® LIMITED WARRANTY LiftMaster ("Seller") warrants...
... REASONABLE AND NECESSARY MAINTENANCE, UNAUTHORIZED REPAIRS OR ANY ALTERATIONS TO THIS PRODUCT), LABOR CHARGES FOR REINSTALLING A REPAIRED OR REPLACED UNIT, REPLACEMENT OF CONSUMABLE ITEMS (E.G., BATTERIES IN REMOTE CONTROL TRANSMITTERS AND LIGHT BULBS), OR UNITS INSTALLED FOR NON-RESIDENTIAL USE. THIS LIMITED WARRANTY DOES NOT COVER ANY PROBLEMS WITH, OR RELATING TO, THE GARAGE DOOR OR GARAGE DOOR HARDWARE, INCLUDING BUT NOT LIMITED TO THE DOOR SPRINGS, DOOR ROLLERS, DOOR ALIGNMENT OR HINGES. Warranty LIFTMASTER® LIMITED WARRANTY LiftMaster ("Seller") warrants...

8160 Product Guide Manual
Page 2
... SPECS. Down Safety Reverse -- Visit HomeLink.com for door to move downward Operating Temperature: -40°F to persons, when the Internet Gateway is t e d --4' Po w e r C o r d ( 3- MOTOR - -1 2 V D C --53 RPM --A utoma tic Th er mal Protection --Per manen t Lub r ica tio n POWER - -120VA C --60 H z Vo lta ge - -2. 7A C ur r e nt R a ti n g --U L L is used with garage door openers, the operator must be installed with sectional doors. Hands-Free Work Lights On -- Up Safety Stop -- Maintenance Alert...
... SPECS. Down Safety Reverse -- Visit HomeLink.com for door to move downward Operating Temperature: -40°F to persons, when the Internet Gateway is t e d --4' Po w e r C o r d ( 3- MOTOR - -1 2 V D C --53 RPM --A utoma tic Th er mal Protection --Per manen t Lub r ica tio n POWER - -120VA C --60 H z Vo lta ge - -2. 7A C ur r e nt R a ti n g --U L L is used with garage door openers, the operator must be installed with sectional doors. Hands-Free Work Lights On -- Up Safety Stop -- Maintenance Alert...
8160 Installation Manual
Page 1
... 60126-1196 LiftMaster.com Unattended devices and features are to ensure safe operation. • The model number label is located on the front panel of your garage door opener. • This garage door opener is connected and properly aligned. • Periodic checks of the garage door opener are required to be used ONLY with MyQ® and Security+ 2.0® accessories. • DO NOT install on a one-piece door if using devices or...
... 60126-1196 LiftMaster.com Unattended devices and features are to ensure safe operation. • The model number label is located on the front panel of your garage door opener. • This garage door opener is connected and properly aligned. • Periodic checks of the garage door opener are required to be used ONLY with MyQ® and Security+ 2.0® accessories. • DO NOT install on a one-piece door if using devices or...
8160 Installation Manual
Page 3
... Review Check the Door This garage door opener has been designed and tested to offer safe service provided it is installed, operated, maintained and tested in strict accordance with the instructions and warnings contained in the way of the header bracket, it may be installed within 4 feet (1.2 m) to the left or right of the door center. l Disable ALL locks and remove ALL ropes connected to garage door BEFORE installation...
... Review Check the Door This garage door opener has been designed and tested to offer safe service provided it is installed, operated, maintained and tested in strict accordance with the instructions and warnings contained in the way of the header bracket, it may be installed within 4 feet (1.2 m) to the left or right of the door center. l Disable ALL locks and remove ALL ropes connected to garage door BEFORE installation...

8160 Installation Manual
Page 5
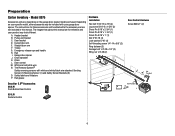
... Hardware Screw 6AB x 1" (2) L Not M Provided J Security+ 2.0® Accessories 883LM Push Button Door Control N Not Provided O P I . A. Emergency release rope and handle H. Safety labels and literature P. Door bracket D. Trolley G. Sprocket cover K. White and red/white wire N. Pulley and bracket C. Chain L. The instructions for reference and your garage door opener. Straight door arm F. Garage door opener J. Preparation Carton Inventory - Depending on the garage door opener model purchased. The Protector System® Safety reversing sensors...
... Hardware Screw 6AB x 1" (2) L Not M Provided J Security+ 2.0® Accessories 883LM Push Button Door Control N Not Provided O P I . A. Emergency release rope and handle H. Safety labels and literature P. Door bracket D. Trolley G. Sprocket cover K. White and red/white wire N. Pulley and bracket C. Chain L. The instructions for reference and your garage door opener. Straight door arm F. Garage door opener J. Preparation Carton Inventory - Depending on the garage door opener model purchased. The Protector System® Safety reversing sensors...
8160 Installation Manual
Page 6
... on the garage door opener model purchased. Pulley and bracket C. Door bracket D. Chain L. Safety labels and literature P. Rail I 891LM Remote Control 6 Door control M. A. Straight door arm F. Trolley G. Garage door opener J. White and red/white wire N. Model 8075 Accessories will vary depending on your specific model, other accessories may look different. The images throughout this manual. Emergency release rope and handle H. Chain spreader K. Rail grease Hardware Installation Hex bolt 5/16"-18 x 7/8" (4) Lag screw 5/16"-9 x 1-5/8" (2) Clevis Pin 5/16...
... on the garage door opener model purchased. Pulley and bracket C. Door bracket D. Chain L. Safety labels and literature P. Rail I 891LM Remote Control 6 Door control M. A. Straight door arm F. Trolley G. Garage door opener J. White and red/white wire N. Model 8075 Accessories will vary depending on your specific model, other accessories may look different. The images throughout this manual. Emergency release rope and handle H. Chain spreader K. Rail grease Hardware Installation Hex bolt 5/16"-18 x 7/8" (4) Lag screw 5/16"-9 x 1-5/8" (2) Clevis Pin 5/16...

8160 Installation Manual
Page 7
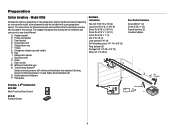
... P. Emergency release rope and handle H. Sprocket cover K. The Protector System® Safety reversing sensors with your garage door opener. The instructions for reference and your specific model, other accessories may be attached to the accessory and are not included in this manual are for these accessories will be included with white and white/black wire attached: Sending Sensor (1) Receiving Sensor (1) and Safety Sensor Brackets (2) O. A. Curved door arm E. Chain L. Depending on the garage door opener model purchased. Trolley G. Rail grease Hardware Installation...
... P. Emergency release rope and handle H. Sprocket cover K. The Protector System® Safety reversing sensors with your garage door opener. The instructions for reference and your specific model, other accessories may be attached to the accessory and are not included in this manual are for these accessories will be included with white and white/black wire attached: Sending Sensor (1) Receiving Sensor (1) and Safety Sensor Brackets (2) O. A. Curved door arm E. Chain L. Depending on the garage door opener model purchased. Trolley G. Rail grease Hardware Installation...
8160 Installation Manual
Page 8
... your garage door opener. Emergency release rope and handle H. Sprocket cover K. A. Curved door arm E. Trolley G. Garage door opener J. Chain L. White and red/white wire N. Depending on the garage door opener model purchased. Straight door arm F. Door control M. The Protector System® Safety reversing sensors with your specific model, other accessories may look different. Header bracket B. Rail grease Hardware Installation Hex bolt 5/16"-18 x 7/8" (4) Lag screw 5/16"-9 x 1-5/8" (2) Clevis Pin 5/16" x 2-3/4" (1) Clevis Pin 5/16" x 1-1/4" (1) Clevis Pin 5/16...
... your garage door opener. Emergency release rope and handle H. Sprocket cover K. A. Curved door arm E. Trolley G. Garage door opener J. Chain L. White and red/white wire N. Depending on the garage door opener model purchased. Straight door arm F. Door control M. The Protector System® Safety reversing sensors with your specific model, other accessories may look different. Header bracket B. Rail grease Hardware Installation Hex bolt 5/16"-18 x 7/8" (4) Lag screw 5/16"-9 x 1-5/8" (2) Clevis Pin 5/16" x 2-3/4" (1) Clevis Pin 5/16" x 1-1/4" (1) Clevis Pin 5/16...

8160 Installation Manual
Page 31
... sleep mode shuts the garage door opener down direction. 31 LIGHTS The garage door opener light bulbs will close the door if you hold the button on the sensor LEDs will blink 10 times. If the obstruction interrupts the sensor beam the garage door opener lights will light. When the door is in the path of any other Security+ 2.0® door controls Keyless Entries Up to and during the door closing , the door will turn off and whenever the garage door opener lights turn on your remote control, which changes with your garage door opener, see...
... sleep mode shuts the garage door opener down direction. 31 LIGHTS The garage door opener light bulbs will close the door if you hold the button on the sensor LEDs will blink 10 times. If the obstruction interrupts the sensor beam the garage door opener lights will light. When the door is in the path of any other Security+ 2.0® door controls Keyless Entries Up to and during the door closing , the door will turn off and whenever the garage door opener lights turn on your remote control, which changes with your garage door opener, see...

8160 Installation Manual
Page 33
... close the door. AUTOMATIC LIGHT Light Feature The lights will not control the lights when the door is activated. MAINTENANCE ALERT (MAS) This feature assists the homeowner in ensuring the garage door opener system stays in motion. Push Bar SERVICE LED LEARN Button LOCK Button COMMAND LED LIGHT Button PUSH BAR Press the push bar to open garage door and the safety reversing sensor infrared beam is empty (i.e. When the garage door opener needs to be serviced (approximately 4500 garage door opener cycles) the command (yellow) and service (red) LEDs will turn the garage door opener lights...
... close the door. AUTOMATIC LIGHT Light Feature The lights will not control the lights when the door is activated. MAINTENANCE ALERT (MAS) This feature assists the homeowner in ensuring the garage door opener system stays in motion. Push Bar SERVICE LED LEARN Button LOCK Button COMMAND LED LIGHT Button PUSH BAR Press the push bar to open garage door and the safety reversing sensor infrared beam is empty (i.e. When the garage door opener needs to be serviced (approximately 4500 garage door opener cycles) the command (yellow) and service (red) LEDs will turn the garage door opener lights...
8160 Installation Manual
Page 40
... garage door opener will not close and the light bulbs blink on my motor unit: The safety reversing sensor must be disabled using the door control, see page 31. The garage door opener will still not activate the door check the diagnostic codes to ensure both LEDs are misaligned or were momentarily obstructed. Communication error to -Close, garage door monitor or LiftMaster® Internet Gateway, see page 34. My door will move in the down direction. l If the remote control...
... garage door opener will not close and the light bulbs blink on my motor unit: The safety reversing sensor must be disabled using the door control, see page 31. The garage door opener will still not activate the door check the diagnostic codes to ensure both LEDs are misaligned or were momentarily obstructed. Communication error to -Close, garage door monitor or LiftMaster® Internet Gateway, see page 34. My door will move in the down direction. l If the remote control...
8160 Installation Manual
Page 42
... instructions regarding installation, operation, and maintenance and testing. THIS LIMITED WARRANTY DOES NOT COVER NON-DEFECT DAMAGE, DAMAGE CAUSED BY IMPROPER INSTALLATION, OPERATION OR CARE (INCLUDING, BUT NOT LIMITED TO ABUSE, MISUSE, FAILURE TO PROVIDE REASONABLE AND NECESSARY MAINTENANCE, UNAUTHORIZED REPAIRS OR ANY ALTERATIONS TO THIS PRODUCT), LABOR CHARGES FOR REINSTALLING A REPAIRED OR REPLACED UNIT, REPLACEMENT OF CONSUMABLE ITEMS (E.G., BATTERIES IN REMOTE CONTROL TRANSMITTERS AND LIGHT BULBS), OR UNITS INSTALLED FOR NON-RESIDENTIAL USE...
... instructions regarding installation, operation, and maintenance and testing. THIS LIMITED WARRANTY DOES NOT COVER NON-DEFECT DAMAGE, DAMAGE CAUSED BY IMPROPER INSTALLATION, OPERATION OR CARE (INCLUDING, BUT NOT LIMITED TO ABUSE, MISUSE, FAILURE TO PROVIDE REASONABLE AND NECESSARY MAINTENANCE, UNAUTHORIZED REPAIRS OR ANY ALTERATIONS TO THIS PRODUCT), LABOR CHARGES FOR REINSTALLING A REPAIRED OR REPLACED UNIT, REPLACEMENT OF CONSUMABLE ITEMS (E.G., BATTERIES IN REMOTE CONTROL TRANSMITTERS AND LIGHT BULBS), OR UNITS INSTALLED FOR NON-RESIDENTIAL USE...


