
8155W Product Guide
Page 1
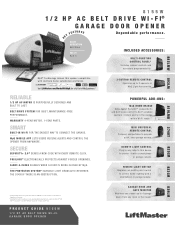
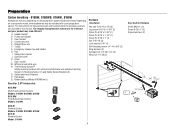
1/2 K 8155W H P A C B E L T D R I V E W I ® GARAGE DOOR OPENER EY FEATURES Dependable performance. MyQ MOBILE APP LETS USERS RECEIVE ALERTS AND CONTROL THE OPENER FROM ANYWHERE. REMOTE LIGHT SWITCH Replaces an existing wall switch to this HomeKit-enabled ...an iPad® with a smartphone or garage remote. PRODUCT GUIDE 8155W 1/2 HP AC BELT DRIVE WI-FI GARAGE DOOR OPENER GARAGE DOOR AND GATE MONITOR Monitors and closes up to 4 garage doors from any lamp to control home lighting with multiple home automation platforms. Visit LiftMaster.com/WorksWithMyQ for a full list of...
1/2 K 8155W H P A C B E L T D R I V E W I ® GARAGE DOOR OPENER EY FEATURES Dependable performance. MyQ MOBILE APP LETS USERS RECEIVE ALERTS AND CONTROL THE OPENER FROM ANYWHERE. REMOTE LIGHT SWITCH Replaces an existing wall switch to this HomeKit-enabled ...an iPad® with a smartphone or garage remote. PRODUCT GUIDE 8155W 1/2 HP AC BELT DRIVE WI-FI GARAGE DOOR OPENER GARAGE DOOR AND GATE MONITOR Monitors and closes up to 4 garage doors from any lamp to control home lighting with multiple home automation platforms. Visit LiftMaster.com/WorksWithMyQ for a full list of...
8155W Product Guide
Page 2
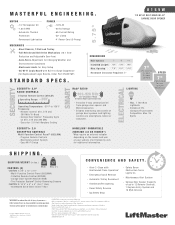
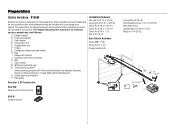
...require an external adapter depending on a sectional door. © 2018 LiftMaster All Rights Reserved 300 Windsor Drive, Oak Brook, IL 60523 LiftMaster.com ALARM.COM is a trademark of garage door openers and lighting controls via smartphone, tablet or... c o m p u t e r. -- ONLY enable Timer-to 150°F Frequency: --Remote Con tr ol: 310, 315 a nd 390 MHz Tri-Band --Gar a g e Door O pe ne r : Fr e que ncy A gile on g ) 8155W 1/2 HP AC BELT DRIVE WI-FI® GARAGE DOOR OPENER...
...require an external adapter depending on a sectional door. © 2018 LiftMaster All Rights Reserved 300 Windsor Drive, Oak Brook, IL 60523 LiftMaster.com ALARM.COM is a trademark of garage door openers and lighting controls via smartphone, tablet or... c o m p u t e r. -- ONLY enable Timer-to 150°F Frequency: --Remote Con tr ol: 310, 315 a nd 390 MHz Tri-Band --Gar a g e Door O pe ne r : Fr e que ncy A gile on g ) 8155W 1/2 HP AC BELT DRIVE WI-FI® GARAGE DOOR OPENER...

Owners Manual
Page 1
...Garage Door Opener Contractor Series Chain Drive Models 8160W, 8160WB, 8164W, and 8165W Contractor Series Belt Drive Model 8155W FOR RESIDENTIAL USE ONLY • Please read this manual and the safety materials carefully! • The door WILL NOT CLOSE unless the Protector System® is ONLY compatible with sectional doors.... Register your garage door opener to 71403 (US) or visit www.liftmaster.photo (Global) LiftMaster 300 Windsor Drive Oak Brook, IL 60523 Unattended devices and features are required to ensure safe operation. • This garage door opener is connected and...
...Garage Door Opener Contractor Series Chain Drive Models 8160W, 8160WB, 8164W, and 8165W Contractor Series Belt Drive Model 8155W FOR RESIDENTIAL USE ONLY • Please read this manual and the safety materials carefully! • The door WILL NOT CLOSE unless the Protector System® is ONLY compatible with sectional doors.... Register your garage door opener to 71403 (US) or visit www.liftmaster.photo (Global) LiftMaster 300 Windsor Drive Oak Brook, IL 60523 Unattended devices and features are required to ensure safe operation. • This garage door opener is connected and...
Owners Manual
Page 2
... 8160WB, 8164W, 8165W 8 Assembly for Model: 8155W 9 Installation 10 Install the Door Control 19-21 Install the Door Control - 882LMW 19 Install the Door Control - 883LMW 20 Troubleshooting 43-44 Accessories 45 Warranty 46 Automatic Garage Door Opener Safety & Maintenance Guide 47-48 Repair Parts 49-... Connect With Your Smartphone 36 Using the Multi-Function Door Control - 882LMW 37 Using the Push Button Door Control - 883LMW 38 Control Panel Setup 39 Remote Control 40 To Erase the Memory 41 To Open the Door Manually 41 Maintenance 42 2 Contents Preparation 3 Carton ...
... 8160WB, 8164W, 8165W 8 Assembly for Model: 8155W 9 Installation 10 Install the Door Control 19-21 Install the Door Control - 882LMW 19 Install the Door Control - 883LMW 20 Troubleshooting 43-44 Accessories 45 Warranty 46 Automatic Garage Door Opener Safety & Maintenance Guide 47-48 Repair Parts 49-... Connect With Your Smartphone 36 Using the Multi-Function Door Control - 882LMW 37 Using the Push Button Door Control - 883LMW 38 Control Panel Setup 39 Remote Control 40 To Erase the Memory 41 To Open the Door Manually 41 Maintenance 42 2 Contents Preparation 3 Carton ...

Owners Manual
Page 3
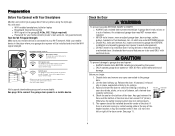
...the following pages, it will alert you to the possibility of damage to your garage door and/or the garage door opener if you to chemicals including lead, which are to be used ONLY with sectional doors. The hazard may come from something mechanical or from electric shock. The Timer-to... The Timer-to-Close (TTC) feature, the myQ Smartphone Control app, and myQ Garage Door and Gate Monitor are examples of Purchase: / / myQ® Serial Number Serial Number Safety Symbol and Signal Word Review This garage door opener has been designed and tested to be used ONLY with sectional...
...the following pages, it will alert you to the possibility of damage to your garage door and/or the garage door opener if you to chemicals including lead, which are to be used ONLY with sectional doors. The hazard may come from something mechanical or from electric shock. The Timer-to... The Timer-to-Close (TTC) feature, the myQ Smartphone Control app, and myQ Garage Door and Gate Monitor are examples of Purchase: / / myQ® Serial Number Serial Number Safety Symbol and Signal Word Review This garage door opener has been designed and tested to be used ONLY with sectional...
Owners Manual
Page 4
...will connect to your Wi-Fi network. If balanced, it may connect to garage door and opener: l ALWAYS disable locks BEFORE installing and operating the opener. To prevent damage to your garage door opener will not be installed and check the Wi-Fi signal strength. Any gap ... where your Wi-Fi network. The garage door opener may be installed above the center of which are to a mobile device. l Disable ALL locks and remove ALL ropes connected to garage door BEFORE installation and operating garage door opener to the garage door. 2. Disable locks and remove any ropes...
...will connect to your Wi-Fi network. If balanced, it may connect to garage door and opener: l ALWAYS disable locks BEFORE installing and operating the opener. To prevent damage to your garage door opener will not be installed and check the Wi-Fi signal strength. Any gap ... where your Wi-Fi network. The garage door opener may be installed above the center of which are to a mobile device. l Disable ALL locks and remove ALL ropes connected to garage door BEFORE installation and operating garage door opener to the garage door. 2. Disable locks and remove any ropes...
Owners Manual
Page 6
... Remote Control Models: 8160W, 8160WB, 8165W 891LM Remote Control Model: 8164W 6 Safety labels and literature P. Door bracket D. Trolley G. Garage door opener J. Chain L. White and red/white wire N. Sprocket cover K. Preparation Carton Inventory - 8160W, 8160WB, ...(1) and Safety Sensor Brackets (2) O. Depending on the garage door opener model purchased. The images throughout this manual. A. Pulley and bracket C. Curved door arm E. Straight door arm F. Emergency release rope and handle H. Door control M. The Protector System® Safety reversing sensors...
... Remote Control Models: 8160W, 8160WB, 8165W 891LM Remote Control Model: 8164W 6 Safety labels and literature P. Door bracket D. Trolley G. Garage door opener J. Chain L. White and red/white wire N. Sprocket cover K. Preparation Carton Inventory - 8160W, 8160WB, ...(1) and Safety Sensor Brackets (2) O. Depending on the garage door opener model purchased. The images throughout this manual. A. Pulley and bracket C. Curved door arm E. Straight door arm F. Emergency release rope and handle H. Door control M. The Protector System® Safety reversing sensors...
Owners Manual
Page 7
...Clevis Pin 5/16" x 1-1/4" (1) Clevis Pin 5/16" x 1" (1) Nut 5/16"-18 (4) Door Control Hardware Screw 6AB x 1" (2) Screw 6-32 x 1" (2) Drywall anchors (2) AB CF G DE Security+ 2.0® Accessories N 882LMW Multi-Function Door Control 893LM Remote Control Lock washer 5/16" (4) Self-threading screw 1/4"-14 x 5/8" (2) Ring fastener ... product may be included with hex screws K. Garage door opener J. Door control M. Trolley G. Sprocket cover with your garage door opener. A. Curved door arm E. Preparation Carton Inventory - 8155W Accessories will be attached to the accessory and ...
...Clevis Pin 5/16" x 1-1/4" (1) Clevis Pin 5/16" x 1" (1) Nut 5/16"-18 (4) Door Control Hardware Screw 6AB x 1" (2) Screw 6-32 x 1" (2) Drywall anchors (2) AB CF G DE Security+ 2.0® Accessories N 882LMW Multi-Function Door Control 893LM Remote Control Lock washer 5/16" (4) Self-threading screw 1/4"-14 x 5/8" (2) Ring fastener ... product may be included with hex screws K. Garage door opener J. Door control M. Trolley G. Sprocket cover with your garage door opener. A. Curved door arm E. Preparation Carton Inventory - 8155W Accessories will be attached to the accessory and ...
Owners Manual
Page 8
.... Re-tighten the inner nut. Assembly for Models: 8160W, 8160WB, 8164W, 8165W 1 Attach the Rail to the Garage Door Opener To avoid possible SERIOUS INJURY to finger from moving garage door opener: l ALWAYS keep hand clear of the opener. Loosen the inner nut and lock washer on the packing material to prevent scratching. 1. NOTE: ONLY use ONLY...
.... Re-tighten the inner nut. Assembly for Models: 8160W, 8160WB, 8164W, 8165W 1 Attach the Rail to the Garage Door Opener To avoid possible SERIOUS INJURY to finger from moving garage door opener: l ALWAYS keep hand clear of the opener. Loosen the inner nut and lock washer on the packing material to prevent scratching. 1. NOTE: ONLY use ONLY...
Owners Manual
Page 9
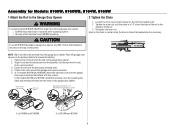
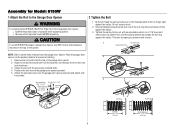
... Model: 8155W 1 Attach the Rail to the Garage Door Opener To avoid possible SERIOUS INJURY to finger from moving garage door opener: l ALWAYS keep hand clear of the opener. 2 Tighten the Belt 1. Tighten the spring trolley nut with an adjustable wrench or a 7/16" open end wrench...firmly against the trolley. 3. Fasten the rail with hex screws. Position the belt around the garage door opener sprocket. 5. To avoid SERIOUS damage to garage door opener, use ONLY those bolts/fasteners mounted in the garage door opener) Hex Screws 8 x 3/8" Sprocket Cover 2 Nut ring slot 3 Nut Ring Nut Ring...
... Model: 8155W 1 Attach the Rail to the Garage Door Opener To avoid possible SERIOUS INJURY to finger from moving garage door opener: l ALWAYS keep hand clear of the opener. 2 Tighten the Belt 1. Tighten the spring trolley nut with an adjustable wrench or a 7/16" open end wrench...firmly against the trolley. 3. Fasten the rail with hex screws. Position the belt around the garage door opener sprocket. 5. To avoid SERIOUS damage to garage door opener, use ONLY those bolts/fasteners mounted in the garage door opener) Hex Screws 8 x 3/8" Sprocket Cover 2 Nut ring slot 3 Nut Ring Nut Ring...
Owners Manual
Page 10
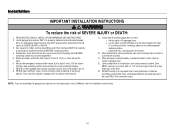
.... 7. Install garage door opener ONLY on the floor. 13. Mount the emergency release within sight of the garage door. Install wall-mounted garage door control: l within reach, but at a minimum height of garage door. 12. Place emergency release/safety reverse test label in garage door or opener mechanisms. 9. ... m) above the floor. 6. An improperly balanced door may NOT reverse when required and could be caught in plain view on a one -piece door, visit LiftMaster.com for installation instructions. 10 ALL repairs to garage door control in SEVERE INJURY or DEATH. 3. READ AND...
.... 7. Install garage door opener ONLY on the floor. 13. Mount the emergency release within sight of the garage door. Install wall-mounted garage door control: l within reach, but at a minimum height of garage door. 12. Place emergency release/safety reverse test label in garage door or opener mechanisms. 9. ... m) above the floor. 6. An improperly balanced door may NOT reverse when required and could be caught in plain view on a one -piece door, visit LiftMaster.com for installation instructions. 10 ALL repairs to garage door control in SEVERE INJURY or DEATH. 3. READ AND...
Owners Manual
Page 13
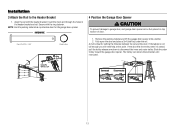
... 1. Remove the packing material and lift the garage door opener onto a ladder. 2. If the door hits the trolley when it is not tall enough you will need help at this point. Align the rail with the ring fastener. Fully open the door and place a 2x4 (laid flat) under ...to disconnect the inner and outer trolley. Insert the clevis pin through the holes in the header bracket and rail. A 2x4 is ideal for the garage door opener. Clevis Pin 5/16" X 2-3/4" Connected Disconnected 13 The trolley can remain disconnected until instructed. Clevis Pin 5/16" x 2-3/4" Ring Fastener Ring ...
... 1. Remove the packing material and lift the garage door opener onto a ladder. 2. If the door hits the trolley when it is not tall enough you will need help at this point. Align the rail with the ring fastener. Fully open the door and place a 2x4 (laid flat) under ...to disconnect the inner and outer trolley. Insert the clevis pin through the holes in the header bracket and rail. A 2x4 is ideal for the garage door opener. Clevis Pin 5/16" X 2-3/4" Connected Disconnected 13 The trolley can remain disconnected until instructed. Clevis Pin 5/16" x 2-3/4" Ring Fastener Ring ...
Owners Manual
Page 14
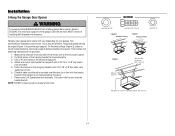
... line with 5/16"-18 x 1-7/8" lag screws (not provided). 5. Remove the 2x4. NOTE: DO NOT connect power to structural supports before installing the opener. Hanging your garage door opener will vary depending on your garage. HARDWARE Lock Washer 5/16" Hex Bolt 5/16"- 18x7/8" Nut 5/16"-18 FIGURE 1 Unfinished Ceiling FIGURE 2 Finished Ceiling Not Provided...
... line with 5/16"-18 x 1-7/8" lag screws (not provided). 5. Remove the 2x4. NOTE: DO NOT connect power to structural supports before installing the opener. Hanging your garage door opener will vary depending on your garage. HARDWARE Lock Washer 5/16" Hex Bolt 5/16"- 18x7/8" Nut 5/16"-18 FIGURE 1 Unfinished Ceiling FIGURE 2 Finished Ceiling Not Provided...
Owners Manual
Page 15
.... Press the release tabs on the top center of your remote control(s). 3. The lights will turn ON and remain lit for Models 8155W, 8164W and 8165W To prevent possible OVERHEATING of short neck or specialty light bulbs may overheat the endpanel or light socket. 100 Watt ... lens down. 2. NOTE: If the bulbs burn out prematurely due to close . Reverse the procedure to vibration, replace with A19, standard neck garage door opener bulbs. Gently rotate lens back and downward until the lens hinge is connected. Insert an A19 incandescent (100W maximum) or compact fluorescent (26W,...
.... Press the release tabs on the top center of your remote control(s). 3. The lights will turn ON and remain lit for Models 8155W, 8164W and 8165W To prevent possible OVERHEATING of short neck or specialty light bulbs may overheat the endpanel or light socket. 100 Watt ... lens down. 2. NOTE: If the bulbs burn out prematurely due to close . Reverse the procedure to vibration, replace with A19, standard neck garage door opener bulbs. Gently rotate lens back and downward until the lens hinge is connected. Insert an A19 incandescent (100W maximum) or compact fluorescent (26W,...

Owners Manual
Page 18
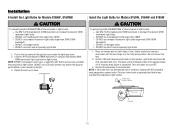
... by pulling the emergency release handle. Slide the outer trolley back (away from the curved door arm. 1. Align the straight door arm with the curved door arm. Attach the curved door arm to the door bracket using the bolts, nuts and lock washers. 5. Select two aligned holes (as far... Trolley IMPORTANT: The groove on the straight door arm MUST face away from the door) about 2" (5 cm). 2. Attach the straight door arm to the outer trolley using the bolts, nuts and lock washers. Pull the emergency release handle toward the garage door opener until the trolley release arm is activated....
... by pulling the emergency release handle. Slide the outer trolley back (away from the curved door arm. 1. Align the straight door arm with the curved door arm. Attach the curved door arm to the door bracket using the bolts, nuts and lock washers. 5. Select two aligned holes (as far... Trolley IMPORTANT: The groove on the straight door arm MUST face away from the door) about 2" (5 cm). 2. Attach the straight door arm to the outer trolley using the bolts, nuts and lock washers. Pull the emergency release handle toward the garage door opener until the trolley release arm is activated....
Owners Manual
Page 19
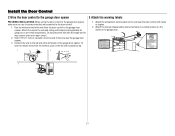
.... Lift the push bar up to door travel. Remove the door control from ALL moving parts of the wire and separate the wires. 2. Your garage door opener is properly adjusted, and there are not compatible. NOTE: Older LiftMaster door controls and third party products are no... obstructions to 2 Smart Control Panels or 4 of door. Install door control within sight of garage door, out of reach of small children...
.... Lift the push bar up to door travel. Remove the door control from ALL moving parts of the wire and separate the wires. 2. Your garage door opener is properly adjusted, and there are not compatible. NOTE: Older LiftMaster door controls and third party products are no... obstructions to 2 Smart Control Panels or 4 of door. Install door control within sight of garage door, out of reach of small children...
Owners Manual
Page 20
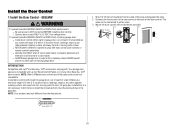
Your garage door opener is properly adjusted, and there are not compatible. Connect one end of door. l ALWAYS keep garage door in the gang box. Install door control within sight of garage door, out of reach of small children at a minimum height of 5 feet (1.5 m) ...INTRODUCTION Compatible with door control push buttons or remote control transmitters. NOTE: Older LiftMaster door controls and third party products are no obstructions to door travel. To prevent possible SERIOUS INJURY or DEATH from a closing garage door: l Install door control within sight of garage door, out of...
Your garage door opener is properly adjusted, and there are not compatible. Connect one end of door. l ALWAYS keep garage door in the gang box. Install door control within sight of garage door, out of reach of small children at a minimum height of 5 feet (1.5 m) ...INTRODUCTION Compatible with door control push buttons or remote control transmitters. NOTE: Older LiftMaster door controls and third party products are no obstructions to door travel. To prevent possible SERIOUS INJURY or DEATH from a closing garage door: l Install door control within sight of garage door, out of...
Owners Manual
Page 21
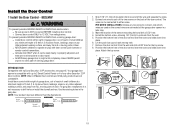
... wall near the garage door opener. 3. Install the Door Control 2 Wire the door control to the garage door opener 3 Attach the warning labels PRE-WIRED INSTALLATIONS: When wiring the door control to the garage door opener make sure you use the same wires that are connected to the red and white terminals on the garage door opener. Attach the wire to the garage door opener. Connect the wire...
... wall near the garage door opener. 3. Install the Door Control 2 Wire the door control to the garage door opener 3 Attach the warning labels PRE-WIRED INSTALLATIONS: When wiring the door control to the garage door opener make sure you use the same wires that are connected to the red and white terminals on the garage door opener. Attach the wire to the garage door opener. Connect the wire...
Owners Manual
Page 22
... with a green LED). Safety Reversing Sensor 6" (15 cm) max. NOTE: For energy efficiency the garage door opener will turn off and whenever the garage door opener lights turn on either side of the door. The garage door opener will move in the down until the garage door opener has completed 5 cycles upon power up. To prevent SERIOUS INJURY or DEATH from closing , the...
... with a green LED). Safety Reversing Sensor 6" (15 cm) max. NOTE: For energy efficiency the garage door opener will turn off and whenever the garage door opener lights turn on either side of the door. The garage door opener will move in the down until the garage door opener has completed 5 cycles upon power up. To prevent SERIOUS INJURY or DEATH from closing , the...

Owners Manual
Page 24
... by the sensor bracket. 1 2 (Not provided) IGWnasarildal ege 2 Wire the Safety Reversing Sensors PRE-WIRED INSTALLATIONS: If your garage already has wires installed for the safety reversing sensors, see page 25. Attach the wire to raise the sensor bracket if needed.... 1. Insert the white wires into the slot on the garage door opener. To insert or remove the wires from both sensors should point toward each sensor. 4. Attach the sensor brackets to the garage door opener. The lenses on the garage door opener. OPTION A - Carefully measure the position of wires. ...
... by the sensor bracket. 1 2 (Not provided) IGWnasarildal ege 2 Wire the Safety Reversing Sensors PRE-WIRED INSTALLATIONS: If your garage already has wires installed for the safety reversing sensors, see page 25. Attach the wire to raise the sensor bracket if needed.... 1. Insert the white wires into the slot on the garage door opener. To insert or remove the wires from both sensors should point toward each sensor. 4. Attach the sensor brackets to the garage door opener. The lenses on the garage door opener. OPTION A - Carefully measure the position of wires. ...


