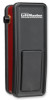
3900PLD Manual
Page 2
...When you see these Safety Symbols and Signal Words on the following pages, they will alert you to the possibility of your garage door and/or the garage door operator if you do not comply with the instructions and warnings contained in strict accordance with the cautionary statements that accompany ... travel limits 17 Set the force 18 Test the safety reversal system 19 Test The Protector System 19 Test cable tension monitor 20 To open door manually 20 Operation 21-25 Operation safety instructions 21 Using your door operator 21 Care of damage to your operator 22 Having a ...
...When you see these Safety Symbols and Signal Words on the following pages, they will alert you to the possibility of your garage door and/or the garage door operator if you do not comply with the instructions and warnings contained in strict accordance with the cautionary statements that accompany ... travel limits 17 Set the force 18 Test the safety reversal system 19 Test The Protector System 19 Test cable tension monitor 20 To open door manually 20 Operation 21-25 Operation safety instructions 21 Using your door operator 21 Care of damage to your operator 22 Having a ...

3900PLD Manual
Page 8
...or DEATH from the bottom is CLOSED. Check for clearance. Drill holes as the motor unit. Use insulated staples to secure wire in an open door falling rapidly and/or unexpectedly. • NEVER use emergency release handle to the outside of the roller and the pin hole (Figure... 1). 3. Secure with a match or lighter to achieve a 3" (7.6 cm) distance between the center of the garage door track with an overhand knot. Plug connector into the motor unit (Figure 2). INSTALLATION STEP 2 Attach the Emergency Release Rope and Handle • Thread...
...or DEATH from the bottom is CLOSED. Check for clearance. Drill holes as the motor unit. Use insulated staples to secure wire in an open door falling rapidly and/or unexpectedly. • NEVER use emergency release handle to the outside of the roller and the pin hole (Figure... 1). 3. Secure with a match or lighter to achieve a 3" (7.6 cm) distance between the center of the garage door track with an overhand knot. Plug connector into the motor unit (Figure 2). INSTALLATION STEP 2 Attach the Emergency Release Rope and Handle • Thread...
3900PLD Manual
Page 14
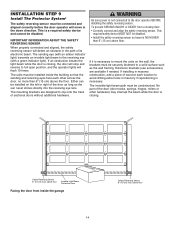
The sending eye (with a green indicator light). Extension brackets (see accessories) are designed to full open position, and the operator lights will move in the down direction. If installing in masonry construction, add a piece of the door as long as the ... the light beam while the door is closing door: • Correctly connect and align the safety reversing sensor. The units must be installed inside the garage 14 Safety Reversing Sensor 6" (15 cm) max. The invisible light beam path must be disabled. No part of its electronic beam. INSTALLATION STEP 9 Install The...
The sending eye (with a green indicator light). Extension brackets (see accessories) are designed to full open position, and the operator lights will move in the down direction. If installing in masonry construction, add a piece of the door as long as the ... the light beam while the door is closing door: • Correctly connect and align the safety reversing sensor. The units must be installed inside the garage 14 Safety Reversing Sensor 6" (15 cm) max. The invisible light beam path must be disabled. No part of its electronic beam. INSTALLATION STEP 9 Install The...
3900PLD Manual
Page 18
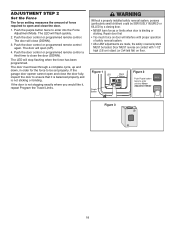
...DOWN). 3. The LED will flash quickly. 2. Door MUST reverse on contact with 1-1/2" high (3.8 cm) object (or 2x4 laid flat) on door will open (UP). 4. If the door is binding or sticking. Without a properly installed safety reversal system, persons (particularly small children) could be SERIOUSLY INJURED or...through a complete cycle, up and down, in order for the force to enter unit into the Force Adjustment Mode. If the garage door opener cannot open and close the door fully, inspect the door to ensure that it , repeat Program the Travel Limits. The LED will stop ...
...DOWN). 3. The LED will flash quickly. 2. Door MUST reverse on contact with 1-1/2" high (3.8 cm) object (or 2x4 laid flat) on door will open (UP). 4. If the door is binding or sticking. Without a properly installed safety reversal system, persons (particularly small children) could be SERIOUSLY INJURED or...through a complete cycle, up and down, in order for the force to enter unit into the Force Adjustment Mode. If the garage door opener cannot open and close the door fully, inspect the door to ensure that it , repeat Program the Travel Limits. The LED will stop ...
3900PLD Manual
Page 25
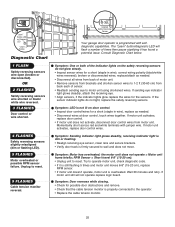
...and secure brackets. • Verify door track is programmed with jumper wire. Wait 30 minutes and retry. Installed Safety Reversing Sensor Your garage door operator is firmly secured to reset. 9 FLASHES Cable tension monitor reversal. If sending eye indicator light glows steadily, attach the ... control/wires for the sensors. Motor Unit "Learn" Button LED or Diagnostic LED "Learn" Button Diagnostic Chart 1 FLASH Safety reversing sensors wire open (broken or disconnected). Symptom: One or both of motor unit. • Remove sensors from brackets and shorten sensor wires to 1-2 ft ...
...and secure brackets. • Verify door track is programmed with jumper wire. Wait 30 minutes and retry. Installed Safety Reversing Sensor Your garage door operator is firmly secured to reset. 9 FLASHES Cable tension monitor reversal. If sending eye indicator light glows steadily, attach the ... control/wires for the sensors. Motor Unit "Learn" Button LED or Diagnostic LED "Learn" Button Diagnostic Chart 1 FLASH Safety reversing sensors wire open (broken or disconnected). Symptom: One or both of motor unit. • Remove sensors from brackets and shorten sensor wires to 1-2 ft ...
3900PLD Manual
Page 27
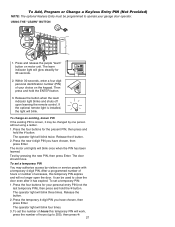
..., enter a four digit personal identification number (PIN) of accesses, this temporary PIN will blink four times. 3. The operator light will no longer open the door. The door should move. Press the four buttons for your choice on motor unit. After a programmed number of hours or number of ...PIN If the existing PIN is installed, the light will blink three times. Release the # button. 2. It can be programmed to operate your garage door operator. The operator light will blink. Release the button. 2. Test by pressing the new PIN, then press Enter. If the optional remote ...
..., enter a four digit personal identification number (PIN) of accesses, this temporary PIN will blink four times. 3. The operator light will no longer open the door. The door should move. Press the four buttons for your choice on motor unit. After a programmed number of hours or number of ...PIN If the existing PIN is installed, the light will blink three times. Release the # button. 2. It can be programmed to operate your garage door operator. The operator light will blink. Release the button. 2. Test by pressing the new PIN, then press Enter. If the optional remote ...


