
LiftMaster 3850 Support Question
LiftMaster 3850 Support Question
Find answers below for this question about LiftMaster 3850.Need a LiftMaster 3850 manual? We have 1 online manual for this item!
Question posted by avicopel on February 4th, 2014
Liftmaster 3850 Garage Opener Battery Wont Charge
The person who posted this question about this LiftMaster product did not include a detailed explanation. Please use the "Request More Information" button to the right if more details would help you to answer this question.
Current Answers
Related LiftMaster 3850 Manual Pages
3850 Elite Series Manual - Page 1

...;
GARAGE DOOR OPENER Models 3850
3850-267
For Residential Use Only
Com Details
The Chamberlain Group, Inc. 845 Larch Avenue Elmhurst, Illinois 60126-1196 www.liftmaster.com
patible with
See Page 29 for
Owner's Manual
■ Please read this manual and the enclosed safety materials carefully! ■ Fasten the manual near the garage door after installation. ■ The door...
3850 Elite Series Manual - Page 2

...
Operation
26-33
Operation safety instructions 26
Using garage door opener 26
Using the wall-mounted door control 27
Using the remote control 28
Troubleshooting 28
The remote control battery 28
EverCharge® Standby Power System (optional 29
To open the door manually 30
Care of your garage door and/or the garage door opener if you do not comply with the...
3850 Elite Series Manual - Page 3

... ALL locks and remove ALL ropes connected to garage door BEFORE installing and operating garage door opener to make sure your garage door is balanced and is any ropes connected to garage door.
• Complete the following test to avoid entanglement. Lift the door about halfway as illustrated below. Release the door.
Preparing your garage door
Before you begin:
• Disable locks...
3850 Elite Series Manual - Page 4
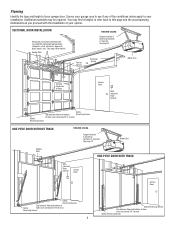
... CEILING
Support bracket & fastening hardware is required. Additional materials may find it helpful to refer back to your opener. Safety Reversing Sensor
Survey your garage door. Planning
Identify the type and height of your garage area to see if any of the conditions below apply to this page and the accompanying illustrations as you...
3850 Elite Series Manual - Page 5

...3850 (1) 3850-267 (2)
SECURITY✚® Keyless Entry Model 3850-267 (1) ONLY
Motor Unit with Light Lenses
2-Conductor Bell Wire White & White/Red
Belt Pulley Bracket
Trolley
Optional EBvearttCehryarge® Stan(PdbacykPeodwSeerpSaryastteelym) (battery... Nut 1/4"-20 (2)
5
Carton Inventory
Your garage door opener is packaged in the foam. If anything is also listed below .
3850 Elite Series Manual - Page 6

... 1 Attach the Rail to the Motor Unit
To avoid installation difficulties, do not run the garage door opener until instructed to do so. • Remove the two washered bolts mounted on top of ...bolts through the rail into one of motor unit.
Tighten bolts securely. To avoid SERIOUS damage to door opener. • Position belt over belt pulley. Washered Bolt 5/16"-18x1/2"
Rail Hole
USE ONLY ...
3850 Elite Series Manual - Page 7

... in mounting plate. Upon completion of the door.
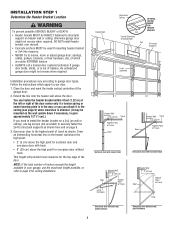
10. Install wall-mounted garage door control:
• within sight of the garage door.
• out of reach of children at minimum height of 5 feet (1.5 m).
• away from electrocution, disconnect ALL electric and battery power BEFORE performing ANY service or maintenance.
7 You have now finished assembling your garage door opener.
3850 Elite Series Manual - Page 8
... or center bearing plate is in your door.
1. Header Wall 2" (5 cm) Track
Highest Point of Travel
Door
Header Wall Track 2" (5 cm)
Highest Point
Door
of inches exceeds the height available in the way; Close the door and mark the inside vertical centerline of balance.
Open your door to your garage, use lag screws (not provided) to securely...
3850 Elite Series Manual - Page 10
..."x2-3/4"
Ring Fastener
10 Header Wall Header Bracket Belt Pulley Bracket
Garage Door
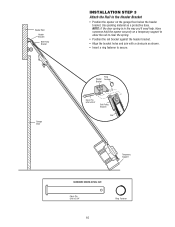
INSTALLATION STEP 3 Attach the Rail to the Header Bracket
• Position the opener on a temporary support to allow the rail to secure. Have someone hold the opener securely on the garage floor below the header bracket.
Use packing material as shown.
•...
3850 Elite Series Manual - Page 11

... convenient for setting an ideal door-to your door type as a support, raise the top of the opener to this point.
ENGAGED
Trolley Release Arm
RELEASED
ONE-PIECE DOOR WITHOUT TRACK
• With the door fully open and parallel to the floor, measure the distance from ceiling. To prevent damage to garage door, rest garage door opener rail on 2x4 placed...
3850 Elite Series Manual - Page 12

... bracket and fastening hardware are shown. Grease the top and underside of the motor unit to make sure the rail is not centered above the door). 7.
Measure the distance from a falling garage door opener, fasten it SECURELY to structural supports of the hanging bracket to provide rigid support. INSTALLATION STEP 5 Hang the...
3850 Elite Series Manual - Page 13

... a single gang box (Figure 1). To prevent possible SERIOUS INJURY or DEATH from ALL moving parts of door and door hardware.
If additional wall controls are desired to operate the same garage door opener, it can be mounted to each garage door opener. Adjust screw for snug fit.
• Drill and install top screw with 6AB x 1-1/4" self-tapping screws...
3850 Elite Series Manual - Page 14

... A19 size bulbs. ALWAYS wear protective gloves and eye protection when changing the battery or working around the battery compartment. Then the lights will turn OFF.
• Reverse the procedure to close the lens.
• Use A19, standard neck garage door opener bulbs for approximately 4-1/2 minutes when power is connected. To prevent possible OVERHEATING of...
3850 Elite Series Manual - Page 15

... trolley.
• Adjust rope length so the handle is required by your garage door opener has a grounding type plug with an overhand knot.
To prevent possible SERIOUS INJURY or... from electrocution or fire:
• Disconnect ALL electric and battery power BEFORE performing ANY service or maintenance.
• Garage door installation and wiring MUST be grounded.
• Reinstall the ...
3850 Elite Series Manual - Page 16

... power is closing . The invisible light beam path must be disabled. • Install the safety reversing sensor so beam is closing , the door will stop and reverse to the garage door opener BEFORE installing the safety reversing sensor. INSTALLATION STEP 11 Install The Protector System®
The safety reversing sensor must be connected and...
3850 Elite Series Manual - Page 17
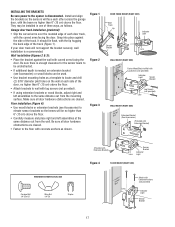
...edge of each other across the garage door, with the curved arms facing the door. Make sure all door hardware obstructions are cleared.
Install ...and align the brackets so the sensors will not support the bracket securely, wall installation is disconnected.
INSTALLING THE BRACKETS
Be sure power to the opener...
3850 Elite Series Manual - Page 29
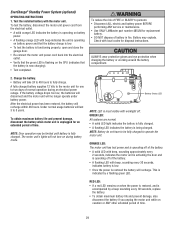
... from the electrical outlet.
• A solid orange LED indicates the battery is now charging).
• Test completed. Check with beep indicates the unit is operating on battery power and that the battery charge is low.
• To test the battery is functioning properly, open and close the garage door.
• Re-connect the motor unit power cord back into...
3850 Elite Series Manual - Page 31

...If the trolley re-engages with a security light feature. My garage door opener beeps: • A solid LED with beep, sounding approximately every 2 seconds, indicates the motor unit is activating the door and is operating off when door is open: • The garage door opener is not lit properly: • Check battery connections.
8.
If it does, deactivate the Lock Mode...
3850 Elite Series Manual - Page 38

...for a garage with model 3850 only. Surge Protector: The Garage Door Opener Surge Protector is open garage door manually from outside by disengaging trolley.
373P
41A5281
Extension Brackets:
(Optional) For safety reversing sensor installation onto the wall or floor.
374LM
377LM
SECURITY✚® Keyless Entry :
Enables homeowner to protect LiftMaster® garage door openers against...
3850 Elite Series Manual - Page 40
...CHARGES FOR REINSTALLING A REPAIRED OR REPLACED UNIT, REPLACEMENT OF BATTERIES IN REMOTE CONTROL TRANSMITTERS AND LIGHT BULBS OR UNITS INSTALLED FOR NON-RESIDENTIAL USE.
SIMPLY DIAL OUR TOLL FREE NUMBER:
1-800-528-9131
www.liftmaster... TO, THE GARAGE DOOR OR GARAGE DOOR HARDWARE, INCLUDING BUT NOT LIMITED TO THE DOOR SPRINGS, DOOR ROLLERS, DOOR ALIGNMENT OR HINGES. LIFTMASTER® SERVICE ...
Similar Questions

Remote Control For Liftmaster /chamberlain 3850 Garage Door Opener
what is the correct remote control for the chamberlain/liftmaster 3850 garage door opener
what is the correct remote control for the chamberlain/liftmaster 3850 garage door opener
(Posted by sendtoalice 9 years ago)

How To Change Battery In Liftmaster Elite 3850 Garage Door Opener
(Posted by redanirob6 10 years ago)


If You Take Out The Back Up Battery On A Elite 3850 Garage Door Opener, It Will
still operate when the electric is on won't it. i have a low back up battery.
still operate when the electric is on won't it. i have a low back up battery.
(Posted by szenov 10 years ago)