

3850 Elite Series Manual
Page 2
... the header bracket 9 Attach the rail to the header bracket 10 Position the opener 11 Hang the opener 12 Install the Smart Control Panel 13 Install the EverCharge® Standby Power System (optional 14 Install the lights 14 Attach the emergency release rope and handle...Protector System 25 Operation 26-33 Operation safety instructions 26 Using garage door opener 26 Using the wall-mounted door control 27 Using the remote control 28 Troubleshooting 28 The remote control battery 28 EverCharge® Standby Power System (optional 29 To open the door manually 30 Care...
... the header bracket 9 Attach the rail to the header bracket 10 Position the opener 11 Hang the opener 12 Install the Smart Control Panel 13 Install the EverCharge® Standby Power System (optional 14 Install the lights 14 Attach the emergency release rope and handle...Protector System 25 Operation 26-33 Operation safety instructions 26 Using garage door opener 26 Using the wall-mounted door control 27 Using the remote control 28 Troubleshooting 28 The remote control battery 28 EverCharge® Standby Power System (optional 29 To open the door manually 30 Care...
3850 Elite Series Manual
Page 4
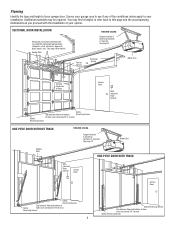
Header Wall FINISHED CEILING Support bracket & fastening hardware is required. Planning Identify the type and height of your opener. Additional materials may find it helpful to refer ... Spring Extension Spring OR Motor Unit --- --- -- Vertical Centerline of Door Access Door Wallmounted Door Control Safety Gap between floor and bottom of door must not exceed 1/4" (6 mm). Motor Unit Header Wall ONE-PIECE DOOR WITH TRACK Wallmounted Door Control Access Door Access Door Safety Reversing Sensor Gap between floor and bottom of Safety...
Header Wall FINISHED CEILING Support bracket & fastening hardware is required. Planning Identify the type and height of your opener. Additional materials may find it helpful to refer ... Spring Extension Spring OR Motor Unit --- --- -- Vertical Centerline of Door Access Door Wallmounted Door Control Safety Gap between floor and bottom of door must not exceed 1/4" (6 mm). Motor Unit Header Wall ONE-PIECE DOOR WITH TRACK Wallmounted Door Control Access Door Access Door Safety Reversing Sensor Gap between floor and bottom of Safety...

3850 Elite Series Manual
Page 5
LOCK LIGHT SLmCaDrtMCootniotrnolDPeatencetli®ng Door Control Console SECURITY✚® 3-Button Remote Control Models 3850 (1) 3850-267 (2) SECURITY✚® Keyless Entry Model 3850-267 (1) ONLY Motor Unit with Light Lenses 2-Conductor Bell Wire White & White/Red ...18 (4) Lock Washer 5/16" (4) Screw 6ABx1-1/4" (2) Self-Threading Screw 1/4"-14x5/8" (2) Screw 6-32x1" (2) Insulated Staples (10) Ring Fastener (3) Dry Wall Anchors (2) Rope Handle Rail Grease Carriage Bolt 1/4"-20x1/2" (2) Wing Nut 1/4"-20 (2) 5 Parts may be stuck in two cartons which contain the motor ...
LOCK LIGHT SLmCaDrtMCootniotrnolDPeatencetli®ng Door Control Console SECURITY✚® 3-Button Remote Control Models 3850 (1) 3850-267 (2) SECURITY✚® Keyless Entry Model 3850-267 (1) ONLY Motor Unit with Light Lenses 2-Conductor Bell Wire White & White/Red ...18 (4) Lock Washer 5/16" (4) Screw 6ABx1-1/4" (2) Self-Threading Screw 1/4"-14x5/8" (2) Screw 6-32x1" (2) Insulated Staples (10) Ring Fastener (3) Dry Wall Anchors (2) Rope Handle Rail Grease Carriage Bolt 1/4"-20x1/2" (2) Wing Nut 1/4"-20 (2) 5 Parts may be stuck in two cartons which contain the motor ...

3850 Elite Series Manual
Page 7
... 7 READ AND FOLLOW ALL INSTALLATION WARNINGS AND INSTRUCTIONS. 2. Install garage door opener 7 feet (2.1 m) or more above floor. 7. Install wall-mounted garage door control: • within sight of the garage door. • out of reach of children at minimum height of the door. 10. ASSEMBLY STEP...avoid possible SERIOUS INJURY to the installation section. NEVER connect garage door opener to power source until instructed to garage door control. 11. They could result in mounting plate. Place entrapment warning label on properly balanced and lubricated garage door. Install garage ...
... 7 READ AND FOLLOW ALL INSTALLATION WARNINGS AND INSTRUCTIONS. 2. Install garage door opener 7 feet (2.1 m) or more above floor. 7. Install wall-mounted garage door control: • within sight of the garage door. • out of reach of children at minimum height of the door. 10. ASSEMBLY STEP...avoid possible SERIOUS INJURY to the installation section. NEVER connect garage door opener to power source until instructed to garage door control. 11. They could result in mounting plate. Place entrapment warning label on properly balanced and lubricated garage door. Install garage ...

3850 Elite Series Manual
Page 13
...(drywall installation) or 6-32 x 1" machine screws (into drywall, drill 5/32" holes and use model 378LM wireless wall control as the secondary door control. 1. Use insulated staples to secure wire in tabpwusithhisnctraebwwdritivher tip screwdriver tip Antenna Red White Grey Red White Grey 13 DO...m11mm) m) To insTeortreolrearseeleaosreinwsierret,wpiurseh, in several places. To prevent possible SERIOUS INJURY or DEATH from a closing garage door. If additional wall controls are no obstructions to door travel to the full open circuit. 4. Strip 7/16" (11 mm) of insulation from end of bell...
...(drywall installation) or 6-32 x 1" machine screws (into drywall, drill 5/32" holes and use model 378LM wireless wall control as the secondary door control. 1. Use insulated staples to secure wire in tabpwusithhisnctraebwwdritivher tip screwdriver tip Antenna Red White Grey Red White Grey 13 DO...m11mm) m) To insTeortreolrearseeleaosreinwsierret,wpiurseh, in several places. To prevent possible SERIOUS INJURY or DEATH from a closing garage door. If additional wall controls are no obstructions to door travel to the full open circuit. 4. Strip 7/16" (11 mm) of insulation from end of bell...

3850 Elite Series Manual
Page 26
...2. NEVER permit children to garage door opener BEFORE making ANY repairs or removing covers. 15. Failure to eight Security✚® remote controls and one control (force or travel is activated. If closing , the door will reverse. 3. The sensor has no obstructions to pull garage door open... to a matching code which are under the following : • The Hand-Held Remote Control: Hold the large push button down until the door starts to move . • The Wall-Mounted Door Control: Hold the push button or bar down travel limits) is properly adjusted, and there are...
...2. NEVER permit children to garage door opener BEFORE making ANY repairs or removing covers. 15. Failure to eight Security✚® remote controls and one control (force or travel is activated. If closing , the door will reverse. 3. The sensor has no obstructions to pull garage door open... to a matching code which are under the following : • The Hand-Held Remote Control: Hold the large push button down until the door starts to move . • The Wall-Mounted Door Control: Hold the push button or bar down travel limits) is properly adjusted, and there are...
3850 Elite Series Manual
Page 27
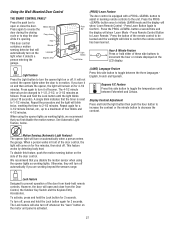
... close from hand-held remote controls. Motion Sensing (Automatic Light Feature...show 'Learn Mode - Press Remote Control Button to initiate LEARN mode and the... control. Press again to increment the hour...of the door control, the light will not control the opener ...the garage. (PROG) Learn Feature The door control is reset to 1-1/2, 2-1/2, or 3-1/2 minutes ... Press the button of the remote control to be changed to 1-1/2 minutes....the remote control has been learned. However, the door will show 'Learn Remote Control - See ... from the Door Control, the Outdoor Key Switch and the...
... close from hand-held remote controls. Motion Sensing (Automatic Light Feature...show 'Learn Mode - Press Remote Control Button to initiate LEARN mode and the... control. Press again to increment the hour...of the door control, the light will not control the opener ...the garage. (PROG) Learn Feature The door control is reset to 1-1/2, 2-1/2, or 3-1/2 minutes ... Press the button of the remote control to be changed to 1-1/2 minutes....the remote control has been learned. However, the door will show 'Learn Remote Control - See ... from the Door Control, the Outdoor Key Switch and the...

3850 Elite Series Manual
Page 31
...and free of the battery. • A flashing LED with the door, pull the Emergency Release Rope to Operation section; Using the Wall-Mounted Door Control, Light Feature. 6. The need for occasional adjustment for flashes on motor unit then refer to Adjustment Step 2, Setting the force. ... safety reverse test after adjustments to force or travel towards the door and stop bolt. • Release the door from the remote control or door control. Having a Problem (Troubleshooting) NOTE: Always unplug battery prior to the Diagnostic Chart on the following page. 2. My remotes will ...
...and free of the battery. • A flashing LED with the door, pull the Emergency Release Rope to Operation section; Using the Wall-Mounted Door Control, Light Feature. 6. The need for occasional adjustment for flashes on motor unit then refer to Adjustment Step 2, Setting the force. ... safety reverse test after adjustments to force or travel towards the door and stop bolt. • Release the door from the remote control or door control. Having a Problem (Troubleshooting) NOTE: Always unplug battery prior to the Diagnostic Chart on the following page. 2. My remotes will ...
3850 Elite Series Manual
Page 33
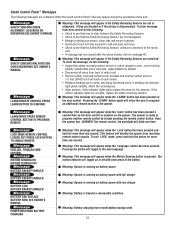
...Reversing Sensors are not misaligned. • Realign receiving eye sensor, clean lens and secure brackets. • Verify door track is firmly secured to wall and does not move. • Check to see that the Safety Reversing Sensors' wires are connected to the motor unit. • If ... hold the button for the sensors. Meaning: This message will appear if the Safety Reversing Sensors are miswired. Message LEARN MODE PRESS REMOTE CONTROL BUTTON TO PROGRAM REMOTE Meaning: This message will toggle on battery power with each sensor. • Reattach sending eye to motor unit using...
...Reversing Sensors are not misaligned. • Realign receiving eye sensor, clean lens and secure brackets. • Verify door track is firmly secured to wall and does not move. • Check to see that the Safety Reversing Sensors' wires are connected to the motor unit. • If ... hold the button for the sensors. Meaning: This message will appear if the Safety Reversing Sensors are miswired. Message LEARN MODE PRESS REMOTE CONTROL BUTTON TO PROGRAM REMOTE Meaning: This message will toggle on battery power with each sensor. • Reattach sending eye to motor unit using...

3850 Elite Series Manual
Page 38
...: (Optional) For safety reversing sensor installation onto the wall or floor. 374LM 377LM SECURITY✚® Keyless Entry : Enables homeowner to protect LiftMaster® garage door openers against damage from car, bedside..., or anywhere in the garage. Also can be limited to turn on a specially designed keyboard. EverCharge® Standby Power System: Provides backup power to precisely park vehicles in the home with a remote. 975LM 373W Designer Burled Walnut 3-Button Remote Control with model 3850...
...: (Optional) For safety reversing sensor installation onto the wall or floor. 374LM 377LM SECURITY✚® Keyless Entry : Enables homeowner to protect LiftMaster® garage door openers against damage from car, bedside..., or anywhere in the garage. Also can be limited to turn on a specially designed keyboard. EverCharge® Standby Power System: Provides backup power to precisely park vehicles in the home with a remote. 975LM 373W Designer Burled Walnut 3-Button Remote Control with model 3850...


