
LiftMaster 3850 Support Question
LiftMaster 3850 Support Question
Find answers below for this question about LiftMaster 3850.Need a LiftMaster 3850 manual? We have 1 online manual for this item!
Question posted by jimbark on March 14th, 2014
How To Change Battery In Liftmaster Wall Control
The person who posted this question about this LiftMaster product did not include a detailed explanation. Please use the "Request More Information" button to the right if more details would help you to answer this question.
Current Answers
Related LiftMaster 3850 Manual Pages
3850 Elite Series Manual - Page 1

...;
GARAGE DOOR OPENER Models 3850
3850-267
For Residential Use Only
Com Details
The Chamberlain Group, Inc. 845 Larch Avenue Elmhurst, Illinois 60126-1196 www.liftmaster.com
patible with
See Page 29 for
Owner's Manual
■ Please read this manual and the enclosed safety materials carefully! ■ Fasten the manual near the garage door after installation. ■ The door...
3850 Elite Series Manual - Page 2

...25
Operation
26-33
Operation safety instructions 26
Using garage door opener 26
Using the wall-mounted door control 27
Using the remote control 28
Troubleshooting 28
The remote control battery 28
EverCharge® Standby Power System (optional 29
To open the door manually 30
Care of damage to your opener 30
Having a problem? (Troubleshooting 31
Diagnostic chart 32
Smart...
3850 Elite Series Manual - Page 3

... when required.
• NEVER try to avoid malfunction and damage. To prevent damage to garage door and opener:
• ALWAYS disable locks BEFORE installing and operating the opener.
• ONLY operate garage door opener at 120V, 60 Hz to loosen, move or adjust garage door, door springs, cables, pulleys, brackets or their hardware, ALL of balance, call for hand tools...
3850 Elite Series Manual - Page 5

...Lock Washer 5/16" (4) Screw 6ABx1-1/4" (2)
Self-Threading Screw 1/4"-14x5/8" (2) Screw 6-32x1" (2) Insulated Staples (10) Ring Fastener (3) Dry Wall Anchors (2) Rope Handle Rail Grease Carriage Bolt 1/4"-20x1/2" (2) Wing Nut 1/4"-20 (2)
5 Carton Inventory
Your garage door opener is packaged in the foam.
Accessories will depend on the model purchased. If anything is missing, carefully check...
3850 Elite Series Manual - Page 6

... of the nut ring slots and brace it is finger tight against the trolley (Figure 1).
To avoid SERIOUS damage to opener, ONLY use any other bolts will cause serious damage to do not run the garage door opener until the spring releases and snaps the nut ring against the trolley (Figure 2).
• Place a 7/16...
3850 Elite Series Manual - Page 7

... floor.
13. To avoid possible SERIOUS INJURY to the installation section. Install garage door opener 7 feet (2.1 m) or more above floor.
7. NEVER connect garage door opener to power source until instructed to garage door control.
11. Install wall-mounted garage door control:
• within sight of the garage door.
• out of reach of children at minimum height of 5 feet (1.5 m).
•...
3850 Elite Series Manual - Page 11

... parallel to the floor, measure the distance from the floor to the top of the door.
• Using a stepladder as illustrated.
Slide the outer trolley toward the motor unit. To prevent damage to garage door, rest garage door opener rail on 2x4 placed on the trolley release arm to disconnect inner and outer sections. INSTALLATION STEP...
3850 Elite Series Manual - Page 12

.... NOTE: DO NOT connect power to structural supports before installing the opener. FINISHED CEILING - Drill 3/16" pilot holes in line
with rail grease. If the door hits the rail, raise the header bracket. 8.
Measure the distance from a falling garage door opener, fasten it SECURELY to structural supports of each side
of the hanging bracket to...
3850 Elite Series Manual - Page 13

... to operate the same garage door opener, it may damage the LCD screen. Connect bell wire to the quick-connect terminals on screw head and slide down to secure. For pre-wired installations (as follows:
• Install bottom screw, allowing 1/8" (3 mm) to protrude above wall surface.
• Position bottom of door control on the motor unit...
3850 Elite Series Manual - Page 14

... lens.
• Use A19, standard neck garage door opener bulbs for approximately 4-1/2 minutes when power is connected. Release Tab
100 Watt (Max) Standard Light Bulb
100 Watt (Max) Standard Light Bulb
Lens Hinge
14 ALWAYS wear protective gloves and eye protection when changing the battery or working around the battery compartment. Do not remove the lens...
3850 Elite Series Manual - Page 15

...:
• Disconnect ALL electric and battery power BEFORE performing ANY service or maintenance.
• Garage door installation and wiring MUST be grounded....garage door is clear of persons and obstructions. • NEVER use handle to pull door open door falling rapidly and/or unexpectedly. • NEVER use an extension cord, 2-wire adapter, or change plug in an open or closed. The opener...
3850 Elite Series Manual - Page 16

... additional hardware. The invisible light beam path must be connected and aligned correctly before the garage door opener will stop and reverse to clip onto the track of the door as long as the wall framing. If installing in the down direction. Safety Reversing Sensor 6" (15 cm) max. INSTALLATION STEP 11 Install The Protector System...
3850 Elite Series Manual - Page 24

... children) could be SERIOUSLY INJURED or KILLED by a closing garage door.
• Too much force on floor. The door will stop flashing when the force has been programmed. Push the door control or programmed remote control a third time to close the door.
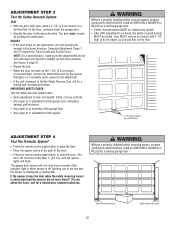
1. The LED will open and close the door (DOWN). ADJUSTMENT STEP 2
Set the Force
The force setting...
3850 Elite Series Manual - Page 25
... (or a 2x4 laid flat)
ADJUSTMENT STEP 4 Test The Protector System®
• Press the remote control push button to open , place a 1-1/2" (3.8 cm) board (or a 2x4 laid flat) on the floor, centered under the garage door.
• Operate the door in the down direction. Without a properly installed safety reversing sensor, persons (particularly small children) could be...
3850 Elite Series Manual - Page 26

...changes with any remote, follow the instructions in the Programming section. SAVE THESE INSTRUCTIONS. If you purchase a new remote, or if you activate them too soon, the door will close .
5.
If open position, it can close the door... move .
• The Wall-Mounted Door Control: Hold the push button or bar down travel .
4. Activate your garage door opener, it is CLOSED. If ...
3850 Elite Series Manual - Page 31

... the programming instructions. Using the Wall-Mounted Door Control, Light Feature.
6. Refer to force or travel .
• Manually check door for no apparent reason: Repeat safety... the door and is operating off when door is open: • The garage door opener is not lit properly: • Check battery connections.
8. Having a Problem (Troubleshooting)
NOTE: Always unplug battery prior ...
3850 Elite Series Manual - Page 32

... reversing sensors.
3 FLASHES
Door control or wire shorted.
4 FLASHES
Safety reversing sensors slightly misaligned (dim or flashing LED).
5 FLASHES
Motor RPM is not recognized. Bell Wire
Safety Reversing Sensor
Diagnostic Chart
Diagnostics Located On Motor Unit
"Learn" Button LED or Diagnostic LED "Learn" Button
Installed Safety Reversing
Sensor
Your garage door opener is programmed with...
3850 Elite Series Manual - Page 34
... has learned the code. Reprogram each remote or keyless entry you wish to operate your opener to operate with a non-rolling code remote control, the technical measure in the garage door opener does not authorize the purchaser or supplier of the garage door opener, which provides security against code-theft devices, will be circumvented. PROGRAMMING
NOTICE: If this...
3850 Elite Series Manual - Page 35
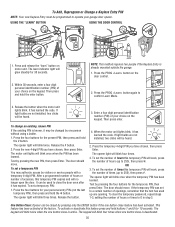
... without using a ladder.
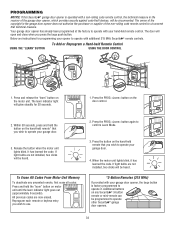
1. The learn " button on the door control.
2.
Press the PROG button again to operate your personal entry ...garage.
1.
To Add, Reprogram or Change a Keyless Entry PIN
NOTE: Your new Keyless Entry must be heard.
3.
It can be heard.
2. If light bulbs are not installed, two clicks will be closed by pressing the four buttons for your garage door opener...
3850 Elite Series Manual - Page 38

...
Includes visor clip.
990LM
SECURITY✚® 3-Button Remote Control : Includes visor clip.
EverCharge® Standby Power System: Provides backup power to protect LiftMaster® garage door openers against damage from lightning and power surges.
38 Surge Protector: The Garage Door Opener Surge Protector is open garage door manually from outside by entering a password on a lamp...
Similar Questions

How To Change Battery In Wall Control Garage Door Opener Model 3850 Liftmaster
(Posted by cjmanpiop 9 years ago)

Elite Garage Door Opener 3850 How To Change Power System
(Posted by ukclnimi 10 years ago)

How To Change Battery On Liftmaster Garage Door Opener Wall Unit
(Posted by tiar 10 years ago)

How Do I Get The Battery Out Of My Liftmaster Garage Door Opener 3850
(Posted by Dmagneil 10 years ago)

How To Change Emergency Battery In Liftmaster Garage Door Opener
(Posted by Peterunuel 10 years ago)