

3850 Elite Series Manual
Page 2
... word review 2 Preparing your garage door 3 Tools needed 3 Planning 4 Carton inventory 5 Hardware inventory 5 Assembly 6-7 Attach the rail to the motor unit 6 Set the belt tension 6 Attach the belt cap retainer 7 Installation 7-22 Installation safety instructions 7 Determine the header bracket location 8 Install the header bracket 9 Attach the rail to the header bracket 10...
... word review 2 Preparing your garage door 3 Tools needed 3 Planning 4 Carton inventory 5 Hardware inventory 5 Assembly 6-7 Attach the rail to the motor unit 6 Set the belt tension 6 Attach the belt cap retainer 7 Installation 7-22 Installation safety instructions 7 Determine the header bracket location 8 Install the header bracket 9 Attach the rail to the header bracket 10...

3850 Elite Series Manual
Page 5
... Control Console SECURITY✚® 3-Button Remote Control Models 3850 (1) 3850-267 (2) SECURITY✚® Keyless Entry Model 3850-267 (1) ONLY Motor Unit with Light Lenses 2-Conductor Bell Wire White & White/Red Belt Pulley Bracket Trolley Optional EBvearttCehryarge® Stan(PdbacykPeodwSeerpSaryastteelym) (battery) Belt RReemmootteeCCoonnttrrooll VVisisoorrCClilpip : Styrofoam Belt Cap Retainer One-Piece Rail CEYILING MOUNT ONL UP...
... Control Console SECURITY✚® 3-Button Remote Control Models 3850 (1) 3850-267 (2) SECURITY✚® Keyless Entry Model 3850-267 (1) ONLY Motor Unit with Light Lenses 2-Conductor Bell Wire White & White/Red Belt Pulley Bracket Trolley Optional EBvearttCehryarge® Stan(PdbacykPeodwSeerpSaryastteelym) (battery) Belt RReemmootteeCCoonnttrrooll VVisisoorrCClilpip : Styrofoam Belt Cap Retainer One-Piece Rail CEYILING MOUNT ONL UP...

3850 Elite Series Manual
Page 6
Use only these bolts! Washered Bolt 5/16"-18x1/2" Rail Hole USE ONLY THIS TYPE AND SIZE BOLT Motor Unit Belt Pulley Rail Hole ASSEMBLY STEP 2 Set the Belt Tension • By hand, thread the spring trolley nut on the threaded shaft until it firmly against the trolley (Figure 2). • Place a ... Insert both washered bolts through the rail into one of motor unit. • Align rail and styrofoam over the motor unit belt pulley. This extends the spring for optimum belt tension. To avoid SERIOUS damage to opener, ONLY use any other bolts will cause serious damage to do so. • ...
Use only these bolts! Washered Bolt 5/16"-18x1/2" Rail Hole USE ONLY THIS TYPE AND SIZE BOLT Motor Unit Belt Pulley Rail Hole ASSEMBLY STEP 2 Set the Belt Tension • By hand, thread the spring trolley nut on the threaded shaft until it firmly against the trolley (Figure 2). • Place a ... Insert both washered bolts through the rail into one of motor unit. • Align rail and styrofoam over the motor unit belt pulley. This extends the spring for optimum belt tension. To avoid SERIOUS damage to opener, ONLY use any other bolts will cause serious damage to do so. • ...

3850 Elite Series Manual
Page 7
...opener: • ALWAYS keep hand clear of belt pulley while operating opener. • SECURELY attach belt pulley cover BEFORE operating. 8x3/8" Hex Screws HARDWARE SHOWN ACTUAL SIZE Hex Screw #8x3/8" WARNING Belt Cap Retainer Motor Unit Belt Pulley Mounting Plate WARNING INSTALLATION IMPORTANT INSTALLATION INSTRUCTIONS... wear watches, rings or loose clothing while installing or servicing opener. ASSEMBLY STEP 3 Attach the Belt Cap Retainer • Position the belt cap retainer over the motor unit belt pulley so the three holes in cap align with the three holes in garage door or opener...
...opener: • ALWAYS keep hand clear of belt pulley while operating opener. • SECURELY attach belt pulley cover BEFORE operating. 8x3/8" Hex Screws HARDWARE SHOWN ACTUAL SIZE Hex Screw #8x3/8" WARNING Belt Cap Retainer Motor Unit Belt Pulley Mounting Plate WARNING INSTALLATION IMPORTANT INSTALLATION INSTRUCTIONS... wear watches, rings or loose clothing while installing or servicing opener. ASSEMBLY STEP 3 Attach the Belt Cap Retainer • Position the belt cap retainer over the motor unit belt pulley so the three holes in cap align with the three holes in garage door or opener...
3850 Elite Series Manual
Page 10
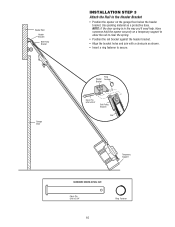
... against the header bracket. • Align the bracket holes and join with a clevis pin as a protective base. Ring Header Fastener Bracket Clevis Pin 5/16"x2-3/4" Belt Pulley Bracket Rail Temporary Support HARDWARE SHOWN ACTUAL SIZE Clevis Pin 5/16"x2-3/4" Ring Fastener 10 Header Wall Header Bracket...
... against the header bracket. • Align the bracket holes and join with a clevis pin as a protective base. Ring Header Fastener Bracket Clevis Pin 5/16"x2-3/4" Belt Pulley Bracket Rail Temporary Support HARDWARE SHOWN ACTUAL SIZE Clevis Pin 5/16"x2-3/4" Ring Fastener 10 Header Wall Header Bracket...

3850 Elite Series Manual
Page 31
... and the light bulbs blink on the following page. My door reverses for flashes on motor unit then refer to a closed position. • Loosen the belt by a beep sounding every 30 seconds, replace the battery. 31 Trolley 4.
... and the light bulbs blink on the following page. My door reverses for flashes on motor unit then refer to a closed position. • Loosen the belt by a beep sounding every 30 seconds, replace the battery. 31 Trolley 4.
3850 Elite Series Manual
Page 36
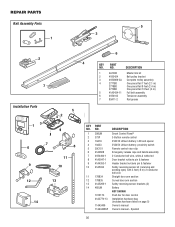
... for door control 41A2770-13 Installation hardware bag (includes hardware listed on page 5) 114A3406 Owner's manual 114A3406SP Owner's manual - DESCRIPTION 1 4A1008 Master link kit 2 41B5424 Belt pulley bracket 3 41B3869-3A Complete trolley assembly 4 2777BD 2778BD 2770BD One-piece Rail 7 feet (2.1 m) One-piece Rail 8 feet (2.4 m) One-piece Rail 10 feet (3 m) 5 41A5434-11...
... for door control 41A2770-13 Installation hardware bag (includes hardware listed on page 5) 114A3406 Owner's manual 114A3406SP Owner's manual - DESCRIPTION 1 4A1008 Master link kit 2 41B5424 Belt pulley bracket 3 41B3869-3A Complete trolley assembly 4 2777BD 2778BD 2770BD One-piece Rail 7 feet (2.1 m) One-piece Rail 8 feet (2.4 m) One-piece Rail 10 feet (3 m) 5 41A5434-11...
3850 Elite Series Manual
Page 37
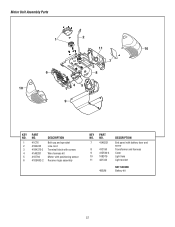
NO. DESCRIPTION 1 41C76 Belt cap and sprocket 2 41B4245 Line cord 3 41B4375-3 Terminal block with screws 4 41A6281 Wire harness kit 5 41D794 Motor with battery door and screw Transformer and harness Cover Light lens Light socket NOT SHOWN Battery kit 37 NO. 7 41A6231 8 41C190 9 41D504-4 10 108D79 11 4A1344 485LM DESCRIPTION End panel with positioning sensor 6 41DB002-2 Receiver logic assembly KEY PART NO. Motor Unit Assembly Parts 1 2 11 10 7 3 6 8 45 10 9 KEY PART NO.
NO. DESCRIPTION 1 41C76 Belt cap and sprocket 2 41B4245 Line cord 3 41B4375-3 Terminal block with screws 4 41A6281 Wire harness kit 5 41D794 Motor with battery door and screw Transformer and harness Cover Light lens Light socket NOT SHOWN Battery kit 37 NO. 7 41A6231 8 41C190 9 41D504-4 10 108D79 11 4A1344 485LM DESCRIPTION End panel with positioning sensor 6 41DB002-2 Receiver logic assembly KEY PART NO. Motor Unit Assembly Parts 1 2 11 10 7 3 6 8 45 10 9 KEY PART NO.
3850 Elite Series Manual
Page 40
...product, pre-paid . Country Club Road Tucson, Arizona 85706 SERVICE INFORMATION TOLL FREE NUMBER: 1-800-528-9131 LIFTMASTER FIVE YEAR LIMITED WARRANTY LIFETIME MOTOR AND BELT LIMITED WARRANTY ONE YEAR LIMITED WARRANTY FOR EVERCHARGE® STANDBY POWER BATTERY The Chamberlain Group, Inc. ("Seller") warrants...will be repaired or replaced with any product returned for the residence in the Yellow Pages, or call 1-800-528-9131; LIFTMASTER® SERVICE IS ON CALL OUR LARGE SERVICE ORGANIZATION SPANS AMERICA INSTALLATION AND SERVICE INFORMATION IS AS NEAR AS YOUR TELEPHONE. ...
...product, pre-paid . Country Club Road Tucson, Arizona 85706 SERVICE INFORMATION TOLL FREE NUMBER: 1-800-528-9131 LIFTMASTER FIVE YEAR LIMITED WARRANTY LIFETIME MOTOR AND BELT LIMITED WARRANTY ONE YEAR LIMITED WARRANTY FOR EVERCHARGE® STANDBY POWER BATTERY The Chamberlain Group, Inc. ("Seller") warrants...will be repaired or replaced with any product returned for the residence in the Yellow Pages, or call 1-800-528-9131; LIFTMASTER® SERVICE IS ON CALL OUR LARGE SERVICE ORGANIZATION SPANS AMERICA INSTALLATION AND SERVICE INFORMATION IS AS NEAR AS YOUR TELEPHONE. ...

