
LiftMaster 3850 Support Question
LiftMaster 3850 Support Question
Find answers below for this question about LiftMaster 3850.Need a LiftMaster 3850 manual? We have 1 online manual for this item!
Question posted by Lcbarham75 on August 24th, 2021
3850p Belt
I can't find belt number 41A5685 for my liftmaster garage door. Model is 3850P..serial number 43171100287. Manufactured in 10/07..
Current Answers
Answer #1: Posted by SonuKumar on August 25th, 2021 1:10 AM
SonuKumar

Member since:
May 9th, 2021 Points: 16,633,680

Member since:
May 9th, 2021 Points: 16,633,680
https://www.garagedoorsupplyco.com/Liftmaster-3850_c_316.html
https://www.liftmaster.com/parts/c/parts
https://www.northshorecommercialdoor.com/mo38esrepa.html
https://www.northshorecommercialdoor.com/liftmaster-belt-drive-3850.html
Please respond to my effort to provide you with the best possible solution by using the "Acceptable Solution" and/or the "Helpful" buttons when the answer has proven to be helpful.
Regards,
Sonu
Your search handyman for all e-support needs!!
Related LiftMaster 3850 Manual Pages
3850 Elite Series Manual - Page 1

®
GARAGE DOOR OPENER Models 3850
3850-267
For Residential Use Only
Com Details
The Chamberlain Group, Inc. 845 Larch Avenue Elmhurst, Illinois 60126-1196 www.liftmaster.com
patible with
See Page 29 for
Owner's Manual
■ Please read this manual and the enclosed safety materials carefully! ■ Fasten the manual near the garage door after installation. ■ The door WILL...
3850 Elite Series Manual - Page 2

... your garage door 3
Tools needed 3
Planning 4
Carton inventory 5
Hardware inventory 5
Assembly
6-7
Attach the rail to the motor unit 6
Set the belt tension 6
Attach the belt cap retainer 7
Installation
7-22
Installation safety instructions 7
Determine the header bracket location 8
Install the header bracket 9
Attach the rail to the header bracket 10
Position the opener...
3850 Elite Series Manual - Page 3

... see if there is out of which are under EXTREME tension.
• Disable ALL locks and remove ALL ropes connected to garage door BEFORE installing and operating garage door opener to avoid malfunction and damage. Carpenter's Level (optional)
12 Tape Measure
Pencil
Stepladder
Drill Bits
Drill
3/16", 5/16"
and 5/32"
Sockets and Wrench 1/2", 5/8", 7/16", 9/16...
3850 Elite Series Manual - Page 4
... it helpful to refer back to see if any of your opener.
Torsion Spring
Extension
Spring OR
Motor Unit
--- --- -- Safety Reversing Sensor See page 19 for lightweight garage doors (fiberglass, steel, aluminum, door with the installation of door must not exceed 1/4" (6 mm)
Reversing Sensor
ONE-PIECE DOOR WITHOUT TRACK
FINISHED CEILING
Support bracket & fastening hardware is...
3850 Elite Series Manual - Page 5

... 5/16" (4) Screw 6ABx1-1/4" (2)
Self-Threading Screw 1/4"-14x5/8" (2) Screw 6-32x1" (2) Insulated Staples (10) Ring Fastener (3) Dry Wall Anchors (2) Rope Handle Rail Grease Carriage Bolt 1/4"-20x1/2" (2) Wing Nut 1/4"-20 (2)
5 Carton Inventory
Your garage door opener is packaged in the foam. Accessories will depend on the model purchased. Parts may be stuck in two cartons which contain the...
3850 Elite Series Manual - Page 6

...into the motor unit. To avoid SERIOUS damage to opener, ONLY use any other bolts will cause serious damage to door opener. • Position belt over belt pulley. Washered Bolt 5/16"-18x1/2"
Rail Hole
USE... 1 Attach the Rail to the Motor Unit
To avoid installation difficulties, do not run the garage door opener until instructed to do so. • Remove the two washered bolts mounted on top of ...
3850 Elite Series Manual - Page 7

... or DEATH.
3. Upon completion of the door.
10. You have now finished assembling your garage door opener. NEVER wear watches, rings or loose clothing while installing or servicing opener. Door MUST reverse on contact with the three holes in mounting plate. Install garage door opener 7 feet (2.1 m) or more above floor.
7. ASSEMBLY STEP 3 Attach the Belt Cap Retainer
• Position the...
3850 Elite Series Manual - Page 8
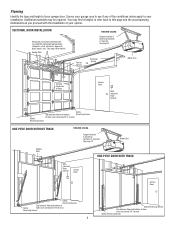
... the header bracket within 4 feet (1.22 m) of the left or right of Travel
Sectional door with curved track
One-piece door with track.
• 8" (20 cm) above the door. Open your door.
1.
Close the door and mark the inside vertical centerline of Garage Door
2x4
OPTIONAL CEILING MOUNT FOR HEADER BRACKET
Structural Supports
Level (optional)
Installation procedures vary...
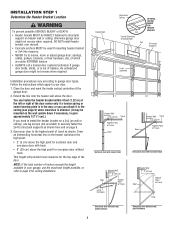
3850 Elite Series Manual - Page 10
Header Wall Header Bracket Belt Pulley Bracket
Garage Door
INSTALLATION STEP 3 Attach the Rail to the Header Bracket
• Position the opener on a temporary support to allow the rail to secure... the opener securely on the garage floor below the header bracket. NOTE: If the door spring is in the way you'll need help.
Ring Header Fastener Bracket
Clevis Pin 5/16"x2-3/4"
Belt Pulley Bracket...
3850 Elite Series Manual - Page 11

...opener more than 4" (10 cm) above this height.
• The top of the door should be level with the top of Door
2x4 is used to determine
the correct mounting height
from ceiling.
11
Rail
Door.... SECTIONAL DOOR OR ONE-PIECE DOOR WITH TRACK
A 2x4 laid flat is completed. Slide the outer trolley toward the motor unit. To prevent damage to garage door, rest garage door opener rail on...
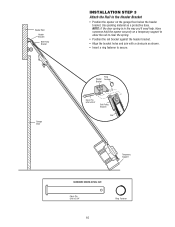
3850 Elite Series Manual - Page 12

... the motor unit to provide rigid support. Drill 3/16" pilot holes in line
with rail grease. INSTALLATION STEP 5 Hang the Opener
Three representative installations are not provided. 1. Measure the distance from a falling garage door opener, fasten it SECURELY to structural supports of the hanging bracket to a support with 5/16"-18x7/8"
hex bolts, lock washers...
3850 Elite Series Manual - Page 13

...desired to operate the same garage door opener, it may damage the LCD screen. Fasten with door control push buttons or remote controls. • Activate door ONLY when it can be... x 1" machine screws (into drywall, drill 5/32" holes and use model 378LM wireless wall control as the secondary door control.
1. HARDWARE SHOWN ACTUAL SIZE
Screw 6ABx1-1/4" (standard installation)
Insulated ...
3850 Elite Series Manual - Page 14

... • Verify the battery wires are seated in each socket.
To prevent damage to the opener: • DO NOT use bulbs larger than 100W. • ONLY use halogen bulbs. ...to close the lens.
• Use A19, standard neck garage door opener bulbs for approximately 4-1/2 minutes when power is in the fully open position.
ALWAYS wear protective gloves and eye protection when changing the...
3850 Elite Series Manual - Page 15

...
Trolley Release Arm
Overhand Knot
INSTALLATION STEP 10 Electrical Requirements
To avoid installation difficulties, do not run the opener at this time.
Weak or broken springs or unbalanced door could fall. If the plug doesn't fit into a grounding type outlet. Be sure the opener is required by your garage door opener has a grounding type plug with a third...
3850 Elite Series Manual - Page 16

... the light beam while the door is closing, the door will flash 10 times.
Be sure power is necessary to mount the units on the left or right of its electronic beam.
If it is not connected to full open position, and the opener lights will stop and reverse to the garage door opener BEFORE installing the safety...
3850 Elite Series Manual - Page 17
...using extension brackets or wood blocks, adjust right and left assemblies at each other across the garage door, with the beam no higher than 6" (15 cm) above the floor.
• ...
IGWnasariladl gee
Fasten Wood Block to the opener is recommended. They may be used.
• Use bracket mounting holes as shown.
Make sure all door hardware obstructions are cleared. Floor installation ...
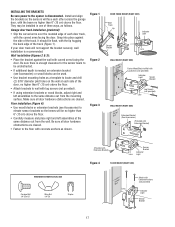
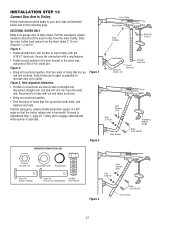
3850 Elite Series Manual - Page 19

... top and bottom or side to Step 13. Contact your door manufacturer for direct attachment of the clevis pin and door arm. Center the door bracket on wood doors. Header Bracket
Door Bracket Location
Vertical Centerline of Garage Door
HORIZONTAL AND VERTICAL REINFORCEMENT IS NEEDED FOR LIGHTWEIGHT GARAGE DOORS (FIBERGLASS, ALUMINUM, STEEL, DOORS WITH GLASS PANEL, ETC.). (NOT PROVIDED)
Figure...
3850 Elite Series Manual - Page 21
...DOORS ONLY
Make sure garage door is operated.
Cut about 6" (15 cm) from the door) about 2" (5 cm) (Figures 1, 2 and 3). Proceed to your door type as illustrated below and on the following page. INSTALLATION STEP 13 Connect Door...outer trolley from the inner trolley.
Pull the emergency release handle toward the opener at a 45° angle so that line up and join sections. Figure 1
Figure...
3850 Elite Series Manual - Page 31

...door from the opener by pulling the Emergency Release Rope. • Manually bring the door to the Diagnostic Chart on the motor unit then refer to a closed position. • Loosen the belt...before the garage door opener will not activate the door: • Verify your door, check diagnostic LED for flashes on the following the programming instructions. Refer to Installation Step 10: Install...
3850 Elite Series Manual - Page 38

... ring and fastening strip. For use with NO access door. Surge Protector: The Garage Door Opener Surge Protector is open garage door manually from outside by entering a password on a lamp, television or other appliance from lightning and power surges.
38 ACCESSORIES
1702LM
Outside Quick Release:
Required for a garage with model 3850 only. Also can be limited to turn on a specially...
Similar Questions

Problem With Elite Series Garage Door Model 3850 Won't Close
(Posted by acerseerki 9 years ago)

Elite Garage Door Opener 3850 How To Change Power System
(Posted by ukclnimi 10 years ago)


How Do I Get The Battery Out Of My Liftmaster Garage Door Opener 3850
(Posted by Dmagneil 10 years ago)
