
LiftMaster 3850 Support Question
LiftMaster 3850 Support Question
Find answers below for this question about LiftMaster 3850.Need a LiftMaster 3850 manual? We have 1 online manual for this item!
Question posted by wdavejancok on August 23rd, 2014
How Do You Change The Backup Belt Battery On Liftmaster Elite Series
The person who posted this question about this LiftMaster product did not include a detailed explanation. Please use the "Request More Information" button to the right if more details would help you to answer this question.
Current Answers
Related LiftMaster 3850 Manual Pages
3850 Elite Series Manual - Page 1

...;
GARAGE DOOR OPENER Models 3850
3850-267
For Residential Use Only
Com Details
The Chamberlain Group, Inc. 845 Larch Avenue Elmhurst, Illinois 60126-1196 www.liftmaster.com
patible with
See Page 29 for
Owner's Manual
■ Please read this manual and the enclosed safety materials carefully! ■ Fasten the manual near the garage door after installation. ■ The door...
3850 Elite Series Manual - Page 2

... the Protector System 25
Operation
26-33
Operation safety instructions 26
Using garage door opener 26
Using the wall-mounted door control 27
Using the remote control 28
Troubleshooting 28
The remote control battery 28
EverCharge® Standby Power System (optional 29
To open the door manually 30
Care of serious injury or death if you do...
3850 Elite Series Manual - Page 3

... begin:
• Disable locks.
• Remove any binding or sticking. Release the door. To prevent damage to garage door and opener:
• ALWAYS disable locks BEFORE installing and operating the opener.
• ONLY operate garage door opener at 120V, 60 Hz to loosen, move or adjust garage door, door springs, cables, pulleys, brackets or their hardware, ALL of balance. An unbalanced...
3850 Elite Series Manual - Page 5

...Keyless Entry Model 3850-267 (1) ONLY
Motor Unit with Light Lenses
2-Conductor Bell Wire White & White/Red
Belt Pulley Bracket
Trolley
Optional EBvearttCehryarge® Stan(PdbacykPeodwSeerpSaryastteelym) (battery)
Belt
RReemmootteeCCoonnttrrooll VVisisoorrCClilpip
: Styrofoam
Belt Cap Retainer
One-Piece Rail
CEYILING MOUNT ONL UP
Header Bracket
Door Bracket
Curved Door Arm Section
Safety...
3850 Elite Series Manual - Page 6

... unit. • Align rail and styrofoam over the motor unit belt pulley.
This extends the spring for optimum belt tension. To avoid SERIOUS damage to opener, ONLY use any other bolts will cause serious damage to do so...to the Motor Unit
To avoid installation difficulties, do not run the garage door opener until instructed to door opener. • Position belt over belt pulley.
3850 Elite Series Manual - Page 7

...be made by a trained door systems technician BEFORE installing opener.
4.
Install wall-mounted garage door control:
• within sight of the garage door.
• out of reach of children at minimum height of 5 feet (1.5 m).
• away from ALL moving garage door opener: • ALWAYS keep hand clear of belt pulley while operating
opener. • SECURELY attach belt pulley cover BEFORE...
3850 Elite Series Manual - Page 11

... Installation Step 12 is convenient for setting an ideal door-to garage door, rest garage door opener rail on 2x4 placed on the trolley release arm to determine
the correct mounting height
from ceiling. ENGAGED
Trolley Release Arm
RELEASED
ONE-PIECE DOOR WITHOUT TRACK
• With the door fully open and parallel to the floor, measure the distance from...
3850 Elite Series Manual - Page 12

... in line
with 5/16"-18x7/8"
hex bolts, lock washers and nuts. 6.
Hanging brackets should be different. Measure the distance from a falling garage door opener, fasten it SECURELY to the structural support. 2. Grease the top and underside of the garage. Concrete anchors MUST be used if installing ANY brackets into masonry. INSTALLATION STEP 5 Hang the...
3850 Elite Series Manual - Page 13

... wires.
Adjust screw for snug fit.
• Drill and install top screw with a small flat-head screwdriver (Figure 1). The trolley will not return to each garage door opener. For pre-wired installations (as follows:
• Install bottom screw, allowing 1/8" (3 mm) to protrude above wall surface.
• Position bottom of...
3850 Elite Series Manual - Page 14

...battery cover. Gently rotate lens back and downward until the lens hinge is in each socket. Then the lights will turn OFF.
• Reverse the procedure to close the lens.
• Use A19, standard neck garage door opener...14 ALWAYS wear protective gloves and eye protection when changing the battery or working around the battery compartment. INSTALLATION STEP 7 Install the EverCharge®...
3850 Elite Series Manual - Page 15

...from a falling garage door: • If possible, use handle to pull door open door falling rapidly and/or unexpectedly. • NEVER use an extension cord, 2-wire adapter, or change plug in ...not run the opener at least 1" (2.5 cm) from electrocution or fire:
• Disconnect ALL electric and battery power BEFORE performing ANY service or maintenance.
• Garage door installation and ...
3850 Elite Series Manual - Page 16

... more than 6" (15 cm) above the floor.
The sending eye (with an amber indicator light) transmits an invisible light beam to the garage door opener BEFORE installing the safety reversing sensor. The mounting brackets are available if needed.
Safety Reversing Sensor 6" (15 cm) max.
INSTALLATION STEP 11 Install The Protector ...
3850 Elite Series Manual - Page 24

... are made, the safety reversal system MUST be SERIOUSLY INJURED or KILLED by a closing garage door.
• Too much force on floor. Push the door control or programmed remote control again. If the garage door opener cannot open and close the door fully, inspect the door to compensate for the force to close (DOWN).
3.
Push the purple button twice...
3850 Elite Series Manual - Page 25
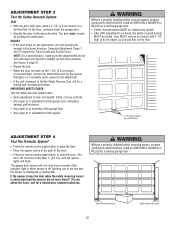
... Complete Adjustment Steps 1 and 2 Program the Travel Limits and Set the Force.
The garage door opener will flash.
ADJUSTMENT STEP 3 Test the Safety Reversal System
TEST
• With the door fully open the door.
• Place the opener carton in the path of the door.
• Press the remote control push button to close from a remote if the...
3850 Elite Series Manual - Page 26

...changes with the door control, the Outside Keylock, or Keyless Entry, if you could fall.
9. They will operate with any remote, follow the instructions in an open door...UNDER A STOPPED, PARTIALLY OPEN DOOR.
6. If possible, use handle to garage door opener BEFORE making ANY repairs or removing covers.
15. Garage door MUST reverse on contact with garage door control push buttons or ...
3850 Elite Series Manual - Page 31

... position. • Loosen the belt by a beep sounding every 30 seconds, replace the battery.
31 My door will not close and the light bulbs blink on my motor
unit: The safety reversing sensor must be connected and aligned correctly before the garage door opener will not activate the door: • Verify your door, check diagnostic LED for the...
3850 Elite Series Manual - Page 32

...has found a potential issue. Consult Diagnostic Chart below.
1 FLASH
Safety reversing sensors wire open (broken or disconnected). If the sensor indicator lights do not glow steady.
• ..."Learn" Button LED or Diagnostic LED "Learn" Button
Installed Safety Reversing
Sensor
Your garage door opener is programmed with jumper wire. If sending eye indicator light glows steadily, attach the ...
3850 Elite Series Manual - Page 34
... the button when the motor unit lights blink. Press the PROG button again to operate your garage door opener, the large button is operated with your garage door.
3. LOCK
LIGHT
LOCK
LIGHT
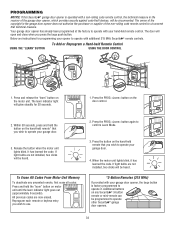
4. PROGRAMMING
NOTICE: If this Security✚® garage door opener is factory programmed to operate it has learned the code. Below are now erased. The learn...
3850 Elite Series Manual - Page 35
... number (PIN) of times (up to 255), then press #.
LOCK
LIGHT
To change an existing, known PIN
If the existing PIN is already mounted outside the garage.
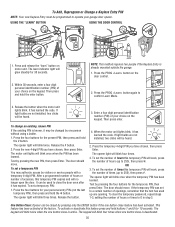
1. Release the # button.
2. The motor unit lights will work , press the number of your garage door opener. Test by visitors or service people with a temporary 4-digit PIN.
The...
3850 Elite Series Manual - Page 38

...
395LM
Remote Light Control :
Enables homeowner to protect LiftMaster® garage door openers against damage from car, bedside, or anywhere in the garage. Wireless Door Control: Push bar, light feature and auxiliary button.
Laser Park Assist: Laser enables homeowners to the garage door opener. Also can be limited to 4 garage doors by entering a password on a lamp, television or...
Similar Questions

How To Change Battery In Lift Master Elite Series Garage Door Opener
(Posted by Tomcja 10 years ago)

How To Change Battery In Elite Series Garage Door Opener
(Posted by haqui 10 years ago)

How To Change Battery On Liftmaster Elite Series Garage Door Opener
(Posted by Parissil 10 years ago)
Where To Buy Batteries For A Model 3850 Elite Series Garage Door Opener
(Posted by NADGmark85 10 years ago)

What Kind Of Battery Does A Liftmaster Elite Series Garage Door Opener Use?
(Posted by qpape 10 years ago)