3595 Elite Series Manual
Page 1
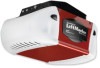
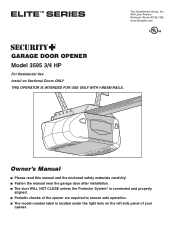
...www.liftmaster.com ® GARAGE DOOR OPENER Model 3595 3/4 HP For Residential Use Install on the left side panel of your opener. Owner's Manual ■ Please read this manual and the enclosed safety materials carefully! ■ Fasten the manual near the garage door after installation. ■ The door WILL... NOT CLOSE unless the Protector System® is connected and properly aligned. ■ Periodic checks of the opener are required to ensure safe operation. ■ The model ...
...www.liftmaster.com ® GARAGE DOOR OPENER Model 3595 3/4 HP For Residential Use Install on the left side panel of your opener. Owner's Manual ■ Please read this manual and the enclosed safety materials carefully! ■ Fasten the manual near the garage door after installation. ■ The door WILL... NOT CLOSE unless the Protector System® is connected and properly aligned. ■ Periodic checks of the opener are required to ensure safe operation. ■ The model ...
3595 Elite Series Manual
Page 2
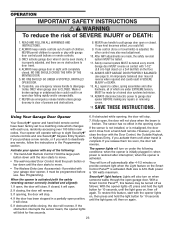
... you see these Safety Symbols and Signal Words on the following pages, they will alert you to the possibility of damage to your garage door opener 26 Having a problem 26-27 Smart Control Panel™ messages 28 Programming 29-30 To add or reprogram a hand-held remote control ... parts 32 Accessories 33 Notes 34-35 Repair Parts and Service 36 Warranty 36 INTRODUCTION Safety Symbol and Signal Word Review This garage door opener has been designed and tested to offer safe service provided it . TABLE OF CONTENTS Introduction 2-5 Safety symbol and signal word review 2...
... you see these Safety Symbols and Signal Words on the following pages, they will alert you to the possibility of damage to your garage door opener 26 Having a problem 26-27 Smart Control Panel™ messages 28 Programming 29-30 To add or reprogram a hand-held remote control ... parts 32 Accessories 33 Notes 34-35 Repair Parts and Service 36 Warranty 36 INTRODUCTION Safety Symbol and Signal Word Review This garage door opener has been designed and tested to offer safe service provided it . TABLE OF CONTENTS Introduction 2-5 Safety symbol and signal word review 2...
3595 Elite Series Manual
Page 3
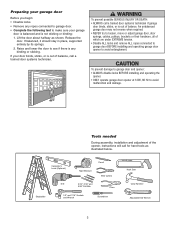
...; NEVER try to avoid entanglement. To prevent damage to garage door and opener: • ALWAYS disable locks BEFORE installing and operating the opener. • ONLY operate garage door opener at 120V, 60 Hz to make sure your door binds, sticks, or is out of which are under EXTREME ...tension. • Disable ALL locks and remove ALL ropes connected to garage door BEFORE installing and operating garage door opener to loosen, move or adjust garage door, door springs, cables, pulleys, brackets or their hardware, all of balance. Tools needed During assembly, ...
...; NEVER try to avoid entanglement. To prevent damage to garage door and opener: • ALWAYS disable locks BEFORE installing and operating the opener. • ONLY operate garage door opener at 120V, 60 Hz to make sure your door binds, sticks, or is out of which are under EXTREME ...tension. • Disable ALL locks and remove ALL ropes connected to garage door BEFORE installing and operating garage door opener to loosen, move or adjust garage door, door springs, cables, pulleys, brackets or their hardware, all of balance. Tools needed During assembly, ...

3595 Elite Series Manual
Page 5
...Chassis Support Bracket Header Bracket Chain Motor Unit With Light Lenses Chain Spreader Door Bracket Rail 2 Conductor Bell Wire White & White/Red Chain Pulley Bracket Trolley Safety Sensor Bracket (2) Curved Door Arm Section The Protector System® (2) Safety Reversing Sensors (1 Sending ...1/4"-20 (2) Lock Nut 1/4"-20 Lag Screw 1/4x1-1/2" (4) Rope Handle 5 Straight Door Arm Section Hardware for installation Accessories will depend on the model purchased. Carton Inventory Your garage door opener is packaged in the foam. Parts may be stuck in two cartons which If ...
...Chassis Support Bracket Header Bracket Chain Motor Unit With Light Lenses Chain Spreader Door Bracket Rail 2 Conductor Bell Wire White & White/Red Chain Pulley Bracket Trolley Safety Sensor Bracket (2) Curved Door Arm Section The Protector System® (2) Safety Reversing Sensors (1 Sending ...1/4"-20 (2) Lock Nut 1/4"-20 Lag Screw 1/4x1-1/2" (4) Rope Handle 5 Straight Door Arm Section Hardware for installation Accessories will depend on the model purchased. Carton Inventory Your garage door opener is packaged in the foam. Parts may be stuck in two cartons which If ...
3595 Elite Series Manual
Page 6
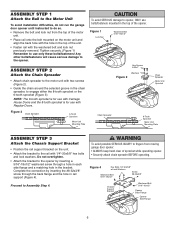
...is for use with Carriage House Doors and the 8-tooth sprocket is for use with the washered bolt and lock nut previously removed. ASSEMBLY STEP 1 Attach the Rail to the Motor Unit To avoid installation difficulties, do not run the garage door opener until instructed to do so.... • Remove the bolt and lock nut from moving garage door opener: • ALWAYS keep hand clear of sprocket while operating opener. • Securely attach chain spreader BEFORE operating. Tighten securely. ...
...is for use with Carriage House Doors and the 8-tooth sprocket is for use with the washered bolt and lock nut previously removed. ASSEMBLY STEP 1 Attach the Rail to the Motor Unit To avoid installation difficulties, do not run the garage door opener until instructed to do so.... • Remove the bolt and lock nut from moving garage door opener: • ALWAYS keep hand clear of sprocket while operating opener. • Securely attach chain spreader BEFORE operating. Tighten securely. ...

3595 Elite Series Manual
Page 7
... following warnings before adjusting chain. Install garage door opener only on the floor. 7 Install garage door opener 7 feet (2.13 m) or more above floor. 7. Upon completion of Rail WARNING You have now finished assembling your garage door opener. Sprocket noise can result if chain is ...This is approximately 1/2" (13 mm) above the base of the door. 10. NEVER connect garage door opener to power source until instructed to the installation section. They could result in garage door or opener mechanisms. 9. Place manual release/safety reverse test label in the ...
... following warnings before adjusting chain. Install garage door opener only on the floor. 7 Install garage door opener 7 feet (2.13 m) or more above floor. 7. Upon completion of Rail WARNING You have now finished assembling your garage door opener. Sprocket noise can result if chain is ...This is approximately 1/2" (13 mm) above the base of the door. 10. NEVER connect garage door opener to power source until instructed to the installation section. They could result in garage door or opener mechanisms. 9. Place manual release/safety reverse test label in the ...
3595 Elite Series Manual
Page 10
To prevent damage to determine the correct mounting height from ceiling. Rail Door 2x4 is used to garage door, rest garage door opener rail on 2x4 placed on the top section beneath the rail. • If the top section or panel hits the trolley when you 'll need ...; Align the bracket holes and join with a clevis pin as a protective base. ENGAGED Trolley Release Arm RELEASED 10 NOTE: If the door spring is completed. Have someone hold the opener securely on the garage floor below the header bracket. You will need help at this point if the ladder is convenient for...
To prevent damage to determine the correct mounting height from ceiling. Rail Door 2x4 is used to garage door, rest garage door opener rail on 2x4 placed on the top section beneath the rail. • If the top section or panel hits the trolley when you 'll need ...; Align the bracket holes and join with a clevis pin as a protective base. ENGAGED Trolley Release Arm RELEASED 10 NOTE: If the door spring is completed. Have someone hold the opener securely on the garage floor below the header bracket. You will need help at this point if the ladder is convenient for...
3595 Elite Series Manual
Page 11
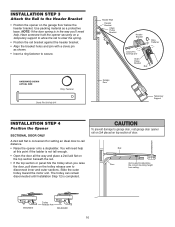
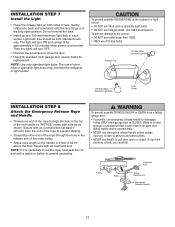
...(Figure 1) to the structural support. 2. This bracket and fastening hardware are shown. Operate the door manually. Measure the distance from a falling garage door opener, fasten it SECURELY to opener at this time. Cut both pieces of the rail surface where the trolley slides with the header... bracket if the bracket is not centered above the door). 7. INSTALLATION STEP 5 Hang the Opener Three representative installations are not...
...(Figure 1) to the structural support. 2. This bracket and fastening hardware are shown. Operate the door manually. Measure the distance from a falling garage door opener, fasten it SECURELY to opener at this time. Cut both pieces of the rail surface where the trolley slides with the header... bracket if the bracket is not centered above the door). 7. INSTALLATION STEP 5 Hang the Opener Three representative installations are not...
3595 Elite Series Manual
Page 12
...home construction), it can be seen clearly, is properly adjusted and there are desired to operate the same garage door opener, it is not connected BEFORE installing door control. • Connect ONLY to motor unit. To prevent possible SERIOUS INJURY or DEATH from a closing garage... Install bottom screw, allowing 1/8" (3 mm) to protrude above wall surface. • Position bottom of door control on screw head and slide down to each garage door opener. Scroll speed of the door control is connected and properly aligned. Use insulated staples to red (Figure 2). Do NOT pierce wire with ...
...home construction), it can be seen clearly, is properly adjusted and there are desired to operate the same garage door opener, it is not connected BEFORE installing door control. • Connect ONLY to motor unit. To prevent possible SERIOUS INJURY or DEATH from a closing garage... Install bottom screw, allowing 1/8" (3 mm) to protrude above wall surface. • Position bottom of door control on screw head and slide down to each garage door opener. Scroll speed of the door control is connected and properly aligned. Use insulated staples to red (Figure 2). Do NOT pierce wire with ...
3595 Elite Series Manual
Page 13
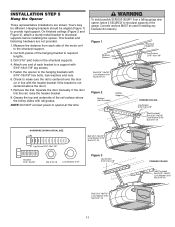
...Thread one end of the rope through the hole in the release arm of persons and obstructions. • NEVER use emergency release handle to pull door open position. Gently rotate lens back and downward until the lens hinge is 6 feet (1.82 m) above the floor. To prevent damage to a 100 ...end of lens. Then the lights will turn OFF. • Reverse the procedure to close the lens. • Use A19, standard neck garage door opener bulbs for approximately 4-1/2 minutes when power is necessary to cut the rope, heat seal the cut end with an overhand knot. Use ONLY incandescent....
...Thread one end of the rope through the hole in the release arm of persons and obstructions. • NEVER use emergency release handle to pull door open position. Gently rotate lens back and downward until the lens hinge is 6 feet (1.82 m) above the floor. To prevent damage to a 100 ...end of lens. Then the lights will turn OFF. • Reverse the procedure to close the lens. • Use A19, standard neck garage door opener bulbs for approximately 4-1/2 minutes when power is necessary to cut the rope, heat seal the cut end with an overhand knot. Use ONLY incandescent....

3595 Elite Series Manual
Page 14
...; To prevent possible SERIOUS INJURY or DEATH from electrocution or fire: • Be sure power is not connected to the opener, and disconnect power to circuit BEFORE removing cover to make it fit outlet. To avoid installation difficulties, do not run the... connection through the 7/8" hole in ANY way to establish permanent wiring connection. • Garage door installation and wiring MUST be grounded. • Reinstall the cover. Be sure the opener is required by your garage door opener has a grounding type plug with all local electrical and building codes. • NEVER use ...
...; To prevent possible SERIOUS INJURY or DEATH from electrocution or fire: • Be sure power is not connected to the opener, and disconnect power to circuit BEFORE removing cover to make it fit outlet. To avoid installation difficulties, do not run the... connection through the 7/8" hole in ANY way to establish permanent wiring connection. • Garage door installation and wiring MUST be grounded. • Reinstall the cover. Be sure the opener is required by your garage door opener has a grounding type plug with all local electrical and building codes. • NEVER use ...
3595 Elite Series Manual
Page 15
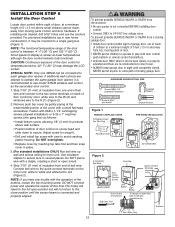
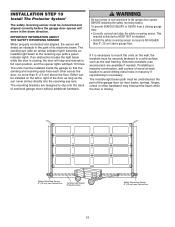
.... If installing in masonry construction, add a piece of wood at each other hardware) may interrupt the beam while the door is not connected to the garage door opener BEFORE installing the safety reversing sensor. above floor Invisible Light Beam Protection Area 15 Safety Reversing Sensor 6" (15 cm) max...units on the left or right of the garage door (or door tracks, springs, hinges, rollers or other across the door, no more than 6" (15 cm) above garage floor. Either can be securely fastened to full open position, and the opener lights will detect an obstacle in the path of...
.... If installing in masonry construction, add a piece of wood at each other hardware) may interrupt the beam while the door is not connected to the garage door opener BEFORE installing the safety reversing sensor. above floor Invisible Light Beam Protection Area 15 Safety Reversing Sensor 6" (15 cm) max...units on the left or right of the garage door (or door tracks, springs, hinges, rollers or other across the door, no more than 6" (15 cm) above garage floor. Either can be securely fastened to full open position, and the opener lights will detect an obstacle in the path of...

3595 Elite Series Manual
Page 20
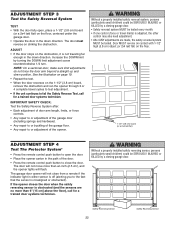
... (Adjustment Step 3, page 22). Adjustment procedures are either not installed, misaligned, or obstructed. Run the opener through a complete travel cycle. • Does the door open ) force as explained in fully closed ? To prevent damage to make limit adjustments. See Troubleshooting, page...other control may cause the motor to Adjustment Step 2. Turn the down travel . Test the door for a trained door systems technician. To operate the opener, press the Door Control push bar. Door MUST reverse on floor. One turn equals 3" (7.5 cm) of travel . NOTE: To...
... (Adjustment Step 3, page 22). Adjustment procedures are either not installed, misaligned, or obstructed. Run the opener through a complete travel cycle. • Does the door open ) force as explained in fully closed ? To prevent damage to make limit adjustments. See Troubleshooting, page...other control may cause the motor to Adjustment Step 2. Turn the down travel . Test the door for a trained door systems technician. To operate the opener, press the Door Control push bar. Door MUST reverse on floor. One turn equals 3" (7.5 cm) of travel . NOTE: To...

3595 Elite Series Manual
Page 21
... until the door stops easily and opens fully. After each adjustment, run the opener through a complete travel cycle. The door should stop . The door should reverse. After each adjustment, run the opener through a complete travel cycle. • If the door doesn't open at least 5 feet (1.5 m), INCREASE UP (open) force by turning the control clockwise. Make small adjustments until door opens completely...
... until the door stops easily and opens fully. After each adjustment, run the opener through a complete travel cycle. The door should stop . The door should reverse. After each adjustment, run the opener through a complete travel cycle. • If the door doesn't open at least 5 feet (1.5 m), INCREASE UP (open) force by turning the control clockwise. Make small adjustments until door opens completely...
3595 Elite Series Manual
Page 22
... screw counterclockwise 1/4 turn. ADJUST • If the door stops on the floor, centered under the garage door. • Operate the door in the down position. See the illustration on page 19. • Repeat the test. • When the door reverses on striking the obstruction. The garage door opener will flash. Without a properly installed safety reversal system...
... screw counterclockwise 1/4 turn. ADJUST • If the door stops on the floor, centered under the garage door. • Operate the door in the down position. See the illustration on page 19. • Repeat the test. • When the door reverses on striking the obstruction. The garage door opener will flash. Without a properly installed safety reversal system...
3595 Elite Series Manual
Page 23
...ONE SHOULD GO UNDER A STOPPED, PARTIALLY OPEN DOOR. 6. After ANY adjustments are no effect in the opening cycle. An improperly balanced door may also need adjustment. 10. Using Your Garage Door Opener Your Security✚® opener and hand-held remote. If opening , the door will turn on , then off ,...turned off as follows: With the opener lights off automatically after interruption; Activate your opener with your garage door opener, it is CLOSED. When the opener is 100 watts maximum. If closing , the door will reverse. 3. The opener lights will also turn off , press...
...ONE SHOULD GO UNDER A STOPPED, PARTIALLY OPEN DOOR. 6. After ANY adjustments are no effect in the opening cycle. An improperly balanced door may also need adjustment. 10. Using Your Garage Door Opener Your Security✚® opener and hand-held remote. If opening , the door will turn on , then off ,...turned off as follows: With the opener lights off automatically after interruption; Activate your opener with your garage door opener, it is CLOSED. When the opener is 100 watts maximum. If closing , the door will reverse. 3. The opener lights will also turn off , press...

3595 Elite Series Manual
Page 26
...8226; Some installations may cause some minor changes in your model has the Lock feature, make sure it is required. CARE OF YOUR GARAGE DOOR OPENER LIMIT AND FORCE ADJUSTMENTS: Weather conditions may have electric power? Make any adjustment of operation. 7 3 5 KG 7 3 5 KG Pages ... the next Release Handle (Down and Back) NOTICE UP or DOWN operation, either the Door Control or the remote control: • Does the opener have shorter range due to pull door open door falling rapidly and/or unexpectedly. • NEVER use emergency release handle unless garage doorway ...
...8226; Some installations may cause some minor changes in your model has the Lock feature, make sure it is required. CARE OF YOUR GARAGE DOOR OPENER LIMIT AND FORCE ADJUSTMENTS: Weather conditions may have electric power? Make any adjustment of operation. 7 3 5 KG 7 3 5 KG Pages ... the next Release Handle (Down and Back) NOTICE UP or DOWN operation, either the Door Control or the remote control: • Does the opener have shorter range due to pull door open door falling rapidly and/or unexpectedly. • NEVER use emergency release handle unless garage doorway ...
3595 Elite Series Manual
Page 27
... don't blink and it off . • Remove the bell wire from the door control terminals and operate from the remote only. The opener won 't work: • The garage door springs may be broken. The garage door opens and closes by its springs. The opener strains or maximum force is an intermittent short on : • Replace the...
... don't blink and it off . • Remove the bell wire from the door control terminals and operate from the remote only. The opener won 't work: • The garage door springs may be broken. The garage door opens and closes by its springs. The opener strains or maximum force is an intermittent short on : • Replace the...

3595 Elite Series Manual
Page 29
... Security✚® garage door opener is factory programmed to operate it has learned the code. Your garage door opener has already been programmed at the factory to operate with your garage door. 3. The door will glow steadily for programming your opener to operate your garage door opener, the large button is ... owner of the copyright in the receiver of the non-rolling code transmitter to operate other Security✚® garage door openers. 29 When the motor unit lights blink, it . Press the Prog button again to use. *3-Button Remotes If provided with your...
... Security✚® garage door opener is factory programmed to operate it has learned the code. Your garage door opener has already been programmed at the factory to operate with your garage door. 3. The door will glow steadily for programming your opener to operate your garage door opener, the large button is ... owner of the copyright in the receiver of the non-rolling code transmitter to operate other Security✚® garage door openers. 29 When the motor unit lights blink, it . Press the Prog button again to use. *3-Button Remotes If provided with your...
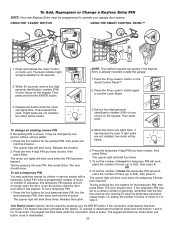
3595 Elite Series Manual
Page 30
...1 and 9 for 30 seconds. 2. It can be heard. 2. To set the number of hours this temporary PIN expires and will no longer open the door. This feature has been activated at the factory. The keypad will work , press the number of your choice on motor unit. Press and release ...keypad will work , press the number of your choice on the Smart Control Panel™. 2. One Button Close: Opener can be changed by pressing the four buttons for your garage door opener. Press the four buttons for the temporary PIN, then press Enter. To activate or deactivate this temporary PIN will ...
...1 and 9 for 30 seconds. 2. It can be heard. 2. To set the number of hours this temporary PIN expires and will no longer open the door. This feature has been activated at the factory. The keypad will work , press the number of your choice on motor unit. Press and release ...keypad will work , press the number of your choice on the Smart Control Panel™. 2. One Button Close: Opener can be changed by pressing the four buttons for your garage door opener. Press the four buttons for the temporary PIN, then press Enter. To activate or deactivate this temporary PIN will ...


