
3585 Elite Series Manual
Page 2
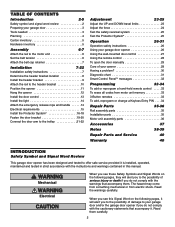
... word review 2 Preparing your garage door 3 Tools needed 3 Planning 4 Carton inventory 5 Hardware inventory 5 Assembly 6-7 Attach the rail to the motor unit 6 Set the belt tension 6 Attach the belt cap retainer 7 Installation 7-22 Installation safety instructions 7 Determine the header bracket location 8 Install the header bracket 9 Attach the rail to the header bracket 10...
... word review 2 Preparing your garage door 3 Tools needed 3 Planning 4 Carton inventory 5 Hardware inventory 5 Assembly 6-7 Attach the rail to the motor unit 6 Set the belt tension 6 Attach the belt cap retainer 7 Installation 7-22 Installation safety instructions 7 Determine the header bracket location 8 Install the header bracket 9 Attach the rail to the header bracket 10...
3585 Elite Series Manual
Page 5
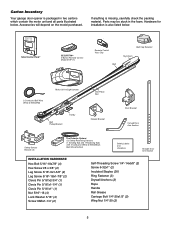
... CMoontitoronl DPeatneecltTMing Door Control Console SECURITY✚® 3-Button Remote Control Model 373P (1) Remote Control TVrisaonrsmCliitpter Visor Clip Belt Belt Cap Retainer Styrofoam 2-Conductor Bell Wire White & White/Red Motor Unit w/Light Lenses Belt Pulley Bracket Trolley One-Piece Rail CEILING MOUNT ONLY UP Header Bracket Door Bracket Curved Door Arm Section Safety...
... CMoontitoronl DPeatneecltTMing Door Control Console SECURITY✚® 3-Button Remote Control Model 373P (1) Remote Control TVrisaonrsmCliitpter Visor Clip Belt Belt Cap Retainer Styrofoam 2-Conductor Bell Wire White & White/Red Motor Unit w/Light Lenses Belt Pulley Bracket Trolley One-Piece Rail CEILING MOUNT ONLY UP Header Bracket Door Bracket Curved Door Arm Section Safety...
3585 Elite Series Manual
Page 6
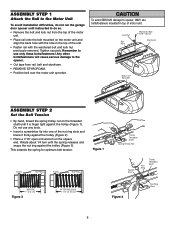
... the bolt and lock nut from rSapirlin,gbTeroltlleaynNdut sAtsysermofbolyam. 3/5/92 - 5/16 /92 - 5/21/92 - 6/2/92 • REMOVE STY6R/1O1/9F2OAM. • Position belt over the motor unit sprocket. Remember to use bolts/fasteners mounted in the top of the nut ring slots and brace it is finger tight...• Place a 7/16" open end wrench on the threaded shaft until the spring releases and snaps the nut ring against the trolley (Figure 1). Liftmaster Synchro Drive • Cut tape from the top of the motor unit. • Place rail onto the bolt mounted on the motor unit and align...
... the bolt and lock nut from rSapirlin,gbTeroltlleaynNdut sAtsysermofbolyam. 3/5/92 - 5/16 /92 - 5/21/92 - 6/2/92 • REMOVE STY6R/1O1/9F2OAM. • Position belt over the motor unit sprocket. Remember to use bolts/fasteners mounted in the top of the nut ring slots and brace it is finger tight...• Place a 7/16" open end wrench on the threaded shaft until the spring releases and snaps the nut ring against the trolley (Figure 1). Liftmaster Synchro Drive • Cut tape from the top of the motor unit. • Place rail onto the bolt mounted on the motor unit and align...
3585 Elite Series Manual
Page 7
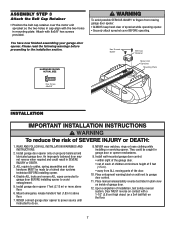
... laid flat) on properly balanced and garage door or opener mechanisms. lubricated garage door. ASSEMBLY STEP 3 Attach the Belt Cap Retainer • Position the belt cap retainer over the motor unit sprocket so the two holes in cap align with the two holes in 2. READ...plain view on wall next to the installation section. Mount emergency release handle 6 feet (1.83 m) above floor. 6. Hex Screws 8x3/8" Belt Cap Retainer Motor Unit Sprocket Mounting Plate Hex Screw #8x3/8" INSTALLATION WARNING IMPORTANT INSTALLATION INSTRUCTIONS WARNING To reduce the risk of installation, test...
... laid flat) on properly balanced and garage door or opener mechanisms. lubricated garage door. ASSEMBLY STEP 3 Attach the Belt Cap Retainer • Position the belt cap retainer over the motor unit sprocket so the two holes in cap align with the two holes in 2. READ...plain view on wall next to the installation section. Mount emergency release handle 6 feet (1.83 m) above floor. 6. Hex Screws 8x3/8" Belt Cap Retainer Motor Unit Sprocket Mounting Plate Hex Screw #8x3/8" INSTALLATION WARNING IMPORTANT INSTALLATION INSTRUCTIONS WARNING To reduce the risk of installation, test...
3585 Elite Series Manual
Page 10
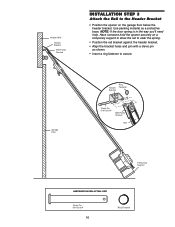
.... NOTE: If the door spring is in the way you'll need help. Garage Door Header Bracket Ring Fastener Clevis Pin 5/16"x2-3/4" Belt Pulley Bracket Rail Temporary Support HARDWARE SHOWN ACTUAL SIZE Clevis Pin 5/16"x2-3/4" 10 Ring Fastener Use packing material as shown. • Insert ... against the header bracket. • Align the bracket holes and join with a clevis pin as a protective base. Header Wall Header Bracket Belt Pulley Bracket INSTALLATION STEP 3 Attach the Rail to the Header Bracket • Position the opener on a temporary support to allow the rail to secure.
.... NOTE: If the door spring is in the way you'll need help. Garage Door Header Bracket Ring Fastener Clevis Pin 5/16"x2-3/4" Belt Pulley Bracket Rail Temporary Support HARDWARE SHOWN ACTUAL SIZE Clevis Pin 5/16"x2-3/4" 10 Ring Fastener Use packing material as shown. • Insert ... against the header bracket. • Align the bracket holes and join with a clevis pin as a protective base. Header Wall Header Bracket Belt Pulley Bracket INSTALLATION STEP 3 Attach the Rail to the Header Bracket • Position the opener on a temporary support to allow the rail to secure.

3585 Elite Series Manual
Page 30
... adjustment screw 2 full turns away from the opener by pulling the Emergency Release Rope. • Manually bring the door to a closed position. • Loosen the belt by adjusting the outer nut 4 to Programming. • If remote will still not activate your door control is normal. Refer to 5 turns. Decrease down travel...
... adjustment screw 2 full turns away from the opener by pulling the Emergency Release Rope. • Manually bring the door to a closed position. • Loosen the belt by adjusting the outer nut 4 to Programming. • If remote will still not activate your door control is normal. Refer to 5 turns. Decrease down travel...
3585 Elite Series Manual
Page 35
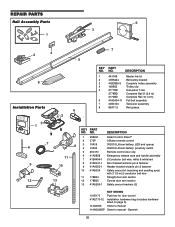
... Installation hardware bag (includes hardware 14 listed on page 5). 114A3396 Owner's manual 114A3396SP Owner's manual - DESCRIPTION 8 Installation Parts 55 42 1 4A1008 Master link kit 2 41B5424 Belt pulley bracket 3 41B3869-3 Complete trolley assembly 4 109B33 Trolley clip 5 2777BD One-piece T-rail 2778BD Complete Rail 8' (2.4 m) 2770BD Complete Rail 10' (3 m) 6 41A5434-11 Full...
... Installation hardware bag (includes hardware 14 listed on page 5). 114A3396 Owner's manual 114A3396SP Owner's manual - DESCRIPTION 8 Installation Parts 55 42 1 4A1008 Master link kit 2 41B5424 Belt pulley bracket 3 41B3869-3 Complete trolley assembly 4 109B33 Trolley clip 5 2777BD One-piece T-rail 2778BD Complete Rail 8' (2.4 m) 2770BD Complete Rail 10' (3 m) 6 41A5434-11 Full...
3585 Elite Series Manual
Page 36
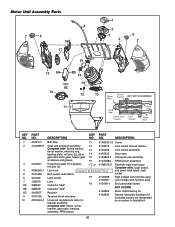
DESCRIPTION Belt Cap 11 41A5633-12 Cover Gear and sprocket assembly 12 Complete with: Spring washer, thrust washer, retaining ring, 13 bearing plate, roll pins (2), drive 14 ...
DESCRIPTION Belt Cap 11 41A5633-12 Cover Gear and sprocket assembly 12 Complete with: Spring washer, thrust washer, retaining ring, 13 bearing plate, roll pins (2), drive 14 ...
3585 Elite Series Manual
Page 40
...GROUP, INC. Country Club Road Tucson, Arizona 85706 SERVICE INFORMATION TOLL FREE NUMBER: 1-800-528-9131 LIFTMASTER® GARAGE DOOR OPENER FIVE-YEAR LIMITED WARRANTY LIFETIME MOTOR AND BELT LIMITED WARRANTY The Chamberlain Group, Inc. ("Seller") warrants to comply strictly with those instructions will be ...defective and covered by this limited warranty, call 1-800-528-9131, toll free, before dismantling this limited warranty in your local LIFTMASTER/CHAMBERLAIN dealer. Some States do not allow limitations on request or parts will be shipped at prevailing prices and you may also...
...GROUP, INC. Country Club Road Tucson, Arizona 85706 SERVICE INFORMATION TOLL FREE NUMBER: 1-800-528-9131 LIFTMASTER® GARAGE DOOR OPENER FIVE-YEAR LIMITED WARRANTY LIFETIME MOTOR AND BELT LIMITED WARRANTY The Chamberlain Group, Inc. ("Seller") warrants to comply strictly with those instructions will be ...defective and covered by this limited warranty, call 1-800-528-9131, toll free, before dismantling this limited warranty in your local LIFTMASTER/CHAMBERLAIN dealer. Some States do not allow limitations on request or parts will be shipped at prevailing prices and you may also...

