1355 Manual
Page 1
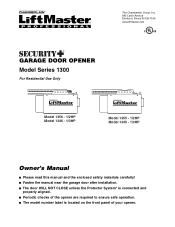
The Chamberlain Group, Inc. 845 Larch Avenue Elmhurst, Illinois 60126-1196 www.liftmaster.com ® GARAGE DOOR OPENER Model Series 1300 For Residential Use Only Model 1356 - 1/2HP Model 1346 - 1/3HP Model 1355 - 1/2HP Model 1345 - 1/3HP Owner's Manual ■ Please read this manual and the enclosed safety materials carefully! ■ Fasten the manual near the...
The Chamberlain Group, Inc. 845 Larch Avenue Elmhurst, Illinois 60126-1196 www.liftmaster.com ® GARAGE DOOR OPENER Model Series 1300 For Residential Use Only Model 1356 - 1/2HP Model 1346 - 1/3HP Model 1355 - 1/2HP Model 1345 - 1/3HP Owner's Manual ■ Please read this manual and the enclosed safety materials carefully! ■ Fasten the manual near the...

1355 Manual
Page 2
... these Safety Symbols and Signal Words on the following pages, they will alert you to the possibility of damage to WARNING your garage door opener 33 Having a problem 34 Programming 35-36 To add or reprogram a hand-held remote control .....35 To erase all codes 35...Test the Protector System 30 Operation 31-34 Operation safety instructions 31 Using your garage door opener 31 Using the wall-mounted door control 32 To open the door manually 32 Care of your garage door and/or the garage door opener if you do not comply with the cautionary statements that accompany it is ...
... these Safety Symbols and Signal Words on the following pages, they will alert you to the possibility of damage to WARNING your garage door opener 33 Having a problem 34 Programming 35-36 To add or reprogram a hand-held remote control .....35 To erase all codes 35...Test the Protector System 30 Operation 31-34 Operation safety instructions 31 Using your garage door opener 31 Using the wall-mounted door control 32 To open the door manually 32 Care of your garage door and/or the garage door opener if you do not comply with the cautionary statements that accompany it is ...

1355 Manual
Page 3
... assembly, installation and adjustment of which are under EXTREME tension. • Disable ALL locks and remove ALL ropes connected to WARNING garage door BEFORE installing and operating garage door opener to avoid entanglement. Release the door. Carpenter's Level (Optional) 12 Tape Measure Pencil Wire Cutters Drill 3/16", 5/16" and 5/32" Drill Bits Pliers Stepladder 1/2" and 7/16...
... assembly, installation and adjustment of which are under EXTREME tension. • Disable ALL locks and remove ALL ropes connected to WARNING garage door BEFORE installing and operating garage door opener to avoid entanglement. Release the door. Carpenter's Level (Optional) 12 Tape Measure Pencil Wire Cutters Drill 3/16", 5/16" and 5/32" Drill Bits Pliers Stepladder 1/2" and 7/16...
1355 Manual
Page 4
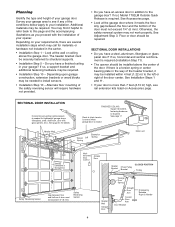
...your opener. Alternate floor mounting of door must not exceed 1/4" (6 mm) Safety Reversing Sensor Header Wall Garage Door Garage Door Spring Straight Door Arm Curved Door Arm Door Bracket Emergency Release Rope & Handle 4 Otherwise, the safety reversal system may be installed above the garage door....10 - If so, horizontal and vertical reinforcement is required (Installation Step 11). • The opener should be securely fastened to the garage door? SECTIONAL DOOR INSTALLATION Horizontal and vertical reinforcement is a torsion spring or center bearing plate in the carton. •...
...your opener. Alternate floor mounting of door must not exceed 1/4" (6 mm) Safety Reversing Sensor Header Wall Garage Door Garage Door Spring Straight Door Arm Curved Door Arm Door Bracket Emergency Release Rope & Handle 4 Otherwise, the safety reversal system may be installed above the garage door....10 - If so, horizontal and vertical reinforcement is required (Installation Step 11). • The opener should be securely fastened to the garage door? SECTIONAL DOOR INSTALLATION Horizontal and vertical reinforcement is a torsion spring or center bearing plate in the carton. •...
1355 Manual
Page 6
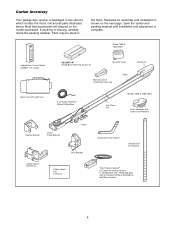
Hardware for assembly and installation is shown on the model purchased. Note that accessories will depend on the next page. Model 1355 & 1345 ONLY Lighted Door Control Button w/6ABx1-1/2" screws SECURITY✚® Single-Button Remote Control (1) Sprocket Cover Remote Control Transmitter Visor Clip Chain Styrofoam Motor Unit with Light Lens 2-... below. Save the carton and packing material until installation and adjustment is missing, carefully check the packing material. If anything is complete. Carton Inventory Your garage door opener is packaged in the foam.
Hardware for assembly and installation is shown on the model purchased. Note that accessories will depend on the next page. Model 1355 & 1345 ONLY Lighted Door Control Button w/6ABx1-1/2" screws SECURITY✚® Single-Button Remote Control (1) Sprocket Cover Remote Control Transmitter Visor Clip Chain Styrofoam Motor Unit with Light Lens 2-... below. Save the carton and packing material until installation and adjustment is missing, carefully check the packing material. If anything is complete. Carton Inventory Your garage door opener is packaged in the foam.
1355 Manual
Page 8
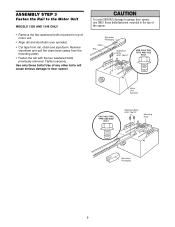
... nut on the mounting plate. Use of any other bolts will cause serious damage to the Sprocket and Install the Sprocket Cover MODELS 1355 AND 1345 ONLY • Position chain over sprocket. WARNING CAUTION To avoid SERIOUS damage to Assembly Step 5. Cut tape from motor unit! • Tighten both screws ... the back tab in . CAUTION: Use only the bolt previously removed from rail, chain and styrofoam. • REMOVE STYROFOAM. Use only these bolts! Proceed to garage door opener, use ONLY those bolts/fasteners mounted in the top of the washered bolts part way in the slot.
... nut on the mounting plate. Use of any other bolts will cause serious damage to the Sprocket and Install the Sprocket Cover MODELS 1355 AND 1345 ONLY • Position chain over sprocket. WARNING CAUTION To avoid SERIOUS damage to Assembly Step 5. Cut tape from motor unit! • Tighten both screws ... the back tab in . CAUTION: Use only the bolt previously removed from rail, chain and styrofoam. • REMOVE STYROFOAM. Use only these bolts! Proceed to garage door opener, use ONLY those bolts/fasteners mounted in the top of the washered bolts part way in the slot.
1355 Manual
Page 9
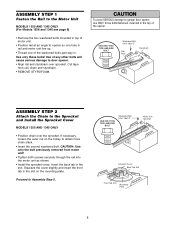
... USE ONLY THIS TYPE AND SIZE BOLT Washered Bolts 5/16"-18x1/2" Mounting Plate Styrofoam Packaging 9 ASSEMBLY STEP 3 Fasten the Rail to door opener. WARNING CAUTION To avoid SERIOUS damage to garage door opener, use ONLY those bolts/fasteners mounted in top of any other bolts will cause serious damage to the Motor Unit MODELS 1356...
... USE ONLY THIS TYPE AND SIZE BOLT Washered Bolts 5/16"-18x1/2" Mounting Plate Styrofoam Packaging 9 ASSEMBLY STEP 3 Fasten the Rail to door opener. WARNING CAUTION To avoid SERIOUS damage to garage door opener, use ONLY those bolts/fasteners mounted in top of any other bolts will cause serious damage to the Motor Unit MODELS 1356...
1355 Manual
Page 10
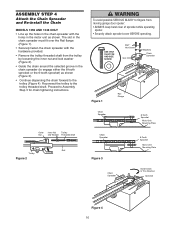
...; Line up the holes in the chain spreader with the hardware provided. • Remove the trolley threaded shaft from CAUTION moving garage door opener: • ALWAYS keep hand clear of sprocket while operating opener. • Securely attach sprocket cover BEFORE operating. USE ONLY THIS TYPE AND SIZE SCREW #8x1" Hex Screw Slot Washers Chain...
...; Line up the holes in the chain spreader with the hardware provided. • Remove the trolley threaded shaft from CAUTION moving garage door opener: • ALWAYS keep hand clear of sprocket while operating opener. • Securely attach sprocket cover BEFORE operating. USE ONLY THIS TYPE AND SIZE SCREW #8x1" Hex Screw Slot Washers Chain...

1355 Manual
Page 11
WARNING You have now finished assembling your garage door opener. Install garage door opener 7 feet (2.13 m) or more above floor. 7. Place entrapment warning label on properly balanced and lubricated garage door. Sprocket noise can result if chain is either too loose or too tight. 1/2" (13 mm) NOTE: ...rail at minimum height of 5 feet (1.5 m). • away from the trolley. NEVER connect garage door opener to power source until instructed to the position shown when the door is normal. Trolley • When the chain is complete, you may not reverse when required and...
WARNING You have now finished assembling your garage door opener. Install garage door opener 7 feet (2.13 m) or more above floor. 7. Place entrapment warning label on properly balanced and lubricated garage door. Sprocket noise can result if chain is either too loose or too tight. 1/2" (13 mm) NOTE: ...rail at minimum height of 5 feet (1.5 m). • away from the trolley. NEVER connect garage door opener to power source until instructed to the position shown when the door is normal. Trolley • When the chain is complete, you may not reverse when required and...
1355 Manual
Page 16
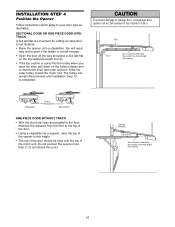
... to the floor, measure the distance from ceiling. 16 INSTALLATION STEP 4 Position the Opener Follow instructions which apply to garage door, rest garage door opener rail on 2x4 placed on the trolley release arm to this height. • The top of the door should be level with the top of the motor unit. You will need help...
... to the floor, measure the distance from ceiling. 16 INSTALLATION STEP 4 Position the Opener Follow instructions which apply to garage door, rest garage door opener rail on 2x4 placed on the trolley release arm to this height. • The top of the door should be level with the top of the motor unit. You will need help...
1355 Manual
Page 17
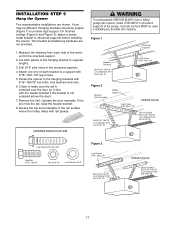
.... HARDWARE SHOWN ACTUAL SIZE WARNING To avoid possible SERIOUS INJURY from each bracket to required lengths. 3. Measure the distance from a falling CAUTION garage door opener, fasten it SECURELY to structural supports of the hanging bracket to a support with rail grease. Grease the top and underside of the motor unit to ...
.... HARDWARE SHOWN ACTUAL SIZE WARNING To avoid possible SERIOUS INJURY from each bracket to required lengths. 3. Measure the distance from a falling CAUTION garage door opener, fasten it SECURELY to structural supports of the hanging bracket to a support with rail grease. Grease the top and underside of the motor unit to ...
1355 Manual
Page 19
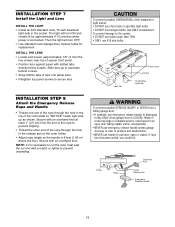
Then the light will turn OFF. • Use standard neck Garage Door Opener bulbs for approximately 4-1/2 minutes when power is connected. To prevent damage to the opener: • DO NOT use bulbs larger than 75W. • ONLY use halogen bulbs. Light Bulb INSTALLATION STEP 8 Attach the ... two screws near top of opener front panel. • Position lens against panel with a match or lighter to prevent unraveling. Light Lens Lens Tab Panel Screw Lens Slot 75 Watt Max. Secure with an overhand knot at least 1" (2.5 cm) from a CAUTION falling garage door: • If possible, use...
Then the light will turn OFF. • Use standard neck Garage Door Opener bulbs for approximately 4-1/2 minutes when power is connected. To prevent damage to the opener: • DO NOT use bulbs larger than 75W. • ONLY use halogen bulbs. Light Bulb INSTALLATION STEP 8 Attach the ... two screws near top of opener front panel. • Position lens against panel with a match or lighter to prevent unraveling. Light Lens Lens Tab Panel Screw Lens Slot 75 Watt Max. Secure with an overhand knot at least 1" (2.5 cm) from a CAUTION falling garage door: • If possible, use...
1355 Manual
Page 20
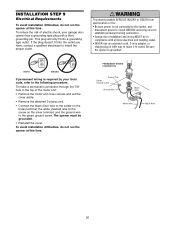
...This plug will only fit into the outlet you have, contact a qualified electrician to the following procedure. Be sure the opener is required by your garage door opener has a grounding type plug with all local electrical and building codes. • NEVER use an extension cord, 2-wire ... installation difficulties, do not run the opener at this time. PERMANENT WIRING CONNECTION Ground Tab Green Ground Screw Ground Wire Black Wire White Wire Black Wire 20 and the ground wire to establish permanent wiring connection. • Garage door installation and wiring MUST be grounded. ...
...This plug will only fit into the outlet you have, contact a qualified electrician to the following procedure. Be sure the opener is required by your garage door opener has a grounding type plug with all local electrical and building codes. • NEVER use an extension cord, 2-wire ... installation difficulties, do not run the opener at this time. PERMANENT WIRING CONNECTION Ground Tab Green Ground Screw Ground Wire Black Wire White Wire Black Wire 20 and the ground wire to establish permanent wiring connection. • Garage door installation and wiring MUST be grounded. ...

1355 Manual
Page 21
... reversing sensor so beam is closing garage door: • Correctly connect and align the safety reversing sensor. INSTALLATION STEP 10 Install The Protector System® The safety reversing sensor must be connected and aligned correctly before the garage door opener will detect an obstacle in the path... of its electronic beam. No part of the garage door (or door tracks, springs, hinges, rollers or other across the door, no more than 6" (15 cm) above floor ...
... reversing sensor so beam is closing garage door: • Correctly connect and align the safety reversing sensor. INSTALLATION STEP 10 Install The Protector System® The safety reversing sensor must be connected and aligned correctly before the garage door opener will detect an obstacle in the path... of its electronic beam. No part of the garage door (or door tracks, springs, hinges, rollers or other across the door, no more than 6" (15 cm) above floor ...

1355 Manual
Page 30
..., the safety reversal system MUST be SERIOUSLY INJURED or KILLED by a closing garage door. • Safety reversal system MUST be tested every month. • If one control (force or travel cycles to open , place a 1-1/2" (3.8 cm) board (or a 2x4 laid flat) on...door systems technician. WARNING Without a properly installed safety reversal system, CAUTION persons (particularly small children) could be tested. The garage door opener will not move more than an inch, and the opener lights will flash. The door must reverse on striking the obstruction. The door will not close the door...
..., the safety reversal system MUST be SERIOUSLY INJURED or KILLED by a closing garage door. • Safety reversal system MUST be tested every month. • If one control (force or travel cycles to open , place a 1-1/2" (3.8 cm) board (or a 2x4 laid flat) on...door systems technician. WARNING Without a properly installed safety reversal system, CAUTION persons (particularly small children) could be tested. The garage door opener will not move more than an inch, and the opener lights will flash. The door must reverse on striking the obstruction. The door will not close the door...

1355 Manual
Page 31
...;® Keyless Entry System. when the opener is A19. If obstructed while closing , the door will stop . 7. Garage door MUST reverse on the floor. 12. Activate your garage door opener, it can close from a hand-held remote control have been factory-set to pull garage door open door falling rapidly and/or unexpectedly. 7. ALWAYS KEEP GARAGE DOOR PROPERLY BALANCED (see page 3). See Programming...
...;® Keyless Entry System. when the opener is A19. If obstructed while closing , the door will stop . 7. Garage door MUST reverse on the floor. 12. Activate your garage door opener, it can close from a hand-held remote control have been factory-set to pull garage door open door falling rapidly and/or unexpectedly. 7. ALWAYS KEEP GARAGE DOOR PROPERLY BALANCED (see page 3). See Programming...
1355 Manual
Page 34
... Check the safety reversing sensor. Use A19 standard neck garage door opener bulb if regular bulb burns out. 13. The opener lights don't turn off . 14. See above. • If the problem occurs on page 28. The door can affect door travel limits adjustment procedures on the first operation of travel...or align the receiving eye. Remove any point of power failure. 17. See Installation Step 10. 12. Disable the door lock. When power is complete. 8. The garage door opens and closes by its springs. See Adjustment Step 2, page 29. Repeat the safety reverse test after the adjustment is ...
... Check the safety reversing sensor. Use A19 standard neck garage door opener bulb if regular bulb burns out. 13. The opener lights don't turn off . 14. See above. • If the problem occurs on page 28. The door can affect door travel limits adjustment procedures on the first operation of travel...or align the receiving eye. Remove any point of power failure. 17. See Installation Step 10. 12. Disable the door lock. When power is complete. 8. The garage door opens and closes by its springs. See Adjustment Step 2, page 29. Repeat the safety reverse test after the adjustment is ...
1355 Manual
Page 35
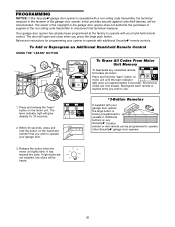
...-remote can be heard. 35 Within 30 seconds, press and hold the "learn" button on the hand-held remote* that you wish to operate your garage door. *3-Button Remotes If supplied with your garage door opener, the large button is operated with additional Security✚® remote controls. PROGRAMMING NOTICE: If this Security✚®...
...-remote can be heard. 35 Within 30 seconds, press and hold the "learn" button on the hand-held remote* that you wish to operate your garage door. *3-Button Remotes If supplied with your garage door opener, the large button is operated with additional Security✚® remote controls. PROGRAMMING NOTICE: If this Security✚®...
1355 Manual
Page 36
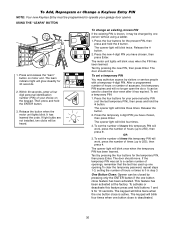
... move . This feature has been activated at the factory. The keypad will work , press the number of your garage door opener. Release the # button. 2. The door should move . 1. Within 30 seconds, enter a four digit personal identification number (PIN) of times (up to operate your choice on...2. Then press and hold the ✽ button. 3. Release the button when the motor unit lights blink. It has learned the code. The opener light will blink three times. Test by visitors or service people with a temporary 4-digit PIN. The keypad will blink twice. To set the...
... move . This feature has been activated at the factory. The keypad will work , press the number of your garage door opener. Release the # button. 2. The door should move . 1. Within 30 seconds, enter a four digit personal identification number (PIN) of times (up to operate your choice on...2. Then press and hold the ✽ button. 3. Release the button when the motor unit lights blink. It has learned the code. The opener light will blink three times. Test by visitors or service people with a temporary 4-digit PIN. The keypad will blink twice. To set the...
1355 Manual
Page 39
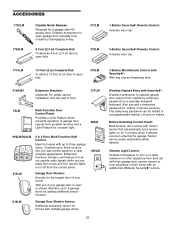
... Security✚® Remote Control: Includes visor clip. 1710LM 10 Foot (3 m) Complete Rail: To allow a 10 foot (3 m) door to 4 garage OPEN doors by entering a password on for homes with multiple garage doors. 39 Wireless Keyless Entry with an additional LiftMaster Security✚® remote. Also can be easily deactivated when desired. Sensor can be limited to three...
... Security✚® Remote Control: Includes visor clip. 1710LM 10 Foot (3 m) Complete Rail: To allow a 10 foot (3 m) door to 4 garage OPEN doors by entering a password on for homes with multiple garage doors. 39 Wireless Keyless Entry with an additional LiftMaster Security✚® remote. Also can be easily deactivated when desired. Sensor can be limited to three...


