User's Guide
Page 1
January 2003 www.lexmark.com Z700 Series Color Jetprinter™ P700 Series Photo Jetprinter™ User's Guide for Windows • Setup troubleshooting A checklist to find solutions to common setup problems. • Printer overview Learn about the printer parts and the printer software. • Printing ideas How to print several projects on various types of paper. • Maintenance Caring for your cartridges and ordering supplies. • General troubleshooting Error messages, print quality problems, paper jams, and much more.
January 2003 www.lexmark.com Z700 Series Color Jetprinter™ P700 Series Photo Jetprinter™ User's Guide for Windows • Setup troubleshooting A checklist to find solutions to common setup problems. • Printer overview Learn about the printer parts and the printer software. • Printing ideas How to print several projects on various types of paper. • Maintenance Caring for your cartridges and ordering supplies. • General troubleshooting Error messages, print quality problems, paper jams, and much more.
User's Guide
Page 3
Contents Chapter 1: Printer overview 5 Understanding the printer parts 5 Using memory cards (Lexmark P700 Series only 7 Using the printer software 8 Using the paper type sensor 12 Chapter 2: Printing ideas 13 Printing on plain paper 13 Printing photos 14 ... Printing transparencies 35 Printing your document in reverse order 37 Printing a banner 39 Printing on custom size paper 41 Chapter 3: Maintenance 43 Replacing the print cartridges 43 Aligning the print cartridges 47 Improving print quality 47 Contents 3
Contents Chapter 1: Printer overview 5 Understanding the printer parts 5 Using memory cards (Lexmark P700 Series only 7 Using the printer software 8 Using the paper type sensor 12 Chapter 2: Printing ideas 13 Printing on plain paper 13 Printing photos 14 ... Printing transparencies 35 Printing your document in reverse order 37 Printing a banner 39 Printing on custom size paper 41 Chapter 3: Maintenance 43 Replacing the print cartridges 43 Aligning the print cartridges 47 Improving print quality 47 Contents 3
User's Guide
Page 4
Preserving the print cartridges 49 Ordering supplies 50 Chapter 4: Setup troubleshooting 51 Troubleshooting checklist 51 Solving printer software installation problems 52 Chapter 5: General troubleshooting 55 Solving network printing problems 55 Understanding error messages and flashing lights 55 Resolving unsuccessful or slow printing 57 Clearing paper misfeeds or jams 59 Solving print quality problems 60 Solving specialty media problems 63 Notices 64 Glossary 66 Index 70 Contents 4
Preserving the print cartridges 49 Ordering supplies 50 Chapter 4: Setup troubleshooting 51 Troubleshooting checklist 51 Solving printer software installation problems 52 Chapter 5: General troubleshooting 55 Solving network printing problems 55 Understanding error messages and flashing lights 55 Resolving unsuccessful or slow printing 57 Clearing paper misfeeds or jams 59 Solving print quality problems 60 Solving specialty media problems 63 Notices 64 Glossary 66 Index 70 Contents 4
User's Guide
Page 6
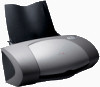
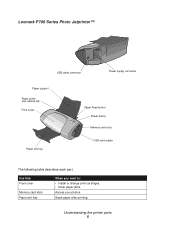
Lexmark P700 Series Photo Jetprinter™ USB cable connector Power supply connector Paper support Paper guide and release tab Front cover Paper exit tray Paper Feed button Power button Memory card slots USB card reader The following table describes each part. Use this: Front cover Memory card slots Paper exit tray When you want to: • Install or change print cartridges. • Clear paper jams. Access your photos. Understanding the printer parts 6 Stack paper after printing.
Lexmark P700 Series Photo Jetprinter™ USB cable connector Power supply connector Paper support Paper guide and release tab Front cover Paper exit tray Paper Feed button Power button Memory card slots USB card reader The following table describes each part. Use this: Front cover Memory card slots Paper exit tray When you want to: • Install or change print cartridges. • Clear paper jams. Access your photos. Understanding the printer parts 6 Stack paper after printing.
User's Guide
Page 10
... turn like the pages of your paper size is not installed. Note: If you want to print. Note: This option is not available if a black cartridge is not listed, select Custom Size. Print Layout tab From: Layout Duplexing Select: Normal, Banner, Mirror, N-up, Poster, or Booklet. • Two-Sided to print... From: Paper Size Orientation Select: Paper, Envelope, Banner, or Borderless, and then select the size specific to print more than one copy of your color cartridge. For help, see page 41. If you want to your settings.
... turn like the pages of your paper size is not installed. Note: If you want to print. Note: This option is not available if a black cartridge is not listed, select Custom Size. Print Layout tab From: Layout Duplexing Select: Normal, Banner, Mirror, N-up, Poster, or Booklet. • Two-Sided to print... From: Paper Size Orientation Select: Paper, Envelope, Banner, or Borderless, and then select the size specific to print more than one copy of your color cartridge. For help, see page 41. If you want to your settings.
User's Guide
Page 11
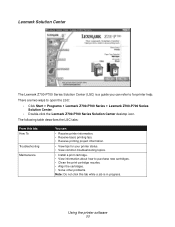
...View common troubleshooting topics. • Install a print cartridge. • View information about how to open the LSC: • Click Start Programs Lexmark Z700-P700 Series Lexmark Z700-P700 Series Solution Center. • Double-click the Lexmark Z700-P700 Series Solution Center desktop icon. The following ...table describes the LSC tabs: From this tab while a job is in progress. Using the printer software 11 Lexmark Solution Center The Lexmark Z700-P700 Series Solution Center (LSC) is a guide you can : • Receive printer information. • Receive basic printing...
...View common troubleshooting topics. • Install a print cartridge. • View information about how to open the LSC: • Click Start Programs Lexmark Z700-P700 Series Lexmark Z700-P700 Series Solution Center. • Double-click the Lexmark Z700-P700 Series Solution Center desktop icon. The following ...table describes the LSC tabs: From this tab while a job is in progress. Using the printer software 11 Lexmark Solution Center The Lexmark Z700-P700 Series Solution Center (LSC) is a guide you can : • Receive printer information. • Receive basic printing...
User's Guide
Page 14
If you are using plain A4 or letter size paper, and you want to print with your printer. • A photo cartridge. Step 1: Load the photo paper • For best results, use photo paper that is made for more information on photo cards, see page 43. • ... printers. If you may want to print a borderless photo using another software program, you want to adjust the settings. For more information. To print on cartridges, see page 19.
If you are using plain A4 or letter size paper, and you want to print with your printer. • A photo cartridge. Step 1: Load the photo paper • For best results, use photo paper that is made for more information on photo cards, see page 43. • ... printers. If you may want to print a borderless photo using another software program, you want to adjust the settings. For more information. To print on cartridges, see page 19.
User's Guide
Page 23
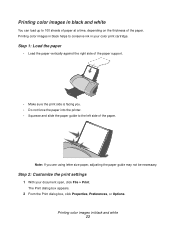
... load up to 100 sheets of paper at a time, depending on the thickness of the paper. Step 2: Customize the print settings 1 With your color print cartridge. Printing color images in black and white 23
... load up to 100 sheets of paper at a time, depending on the thickness of the paper. Step 2: Customize the print settings 1 With your color print cartridge. Printing color images in black and white 23
User's Guide
Page 43
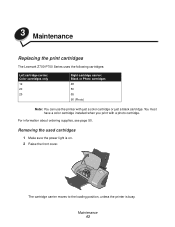
... information about ordering supplies, see page 50. Removing the used cartridges 1 Make sure the power light is busy. 3 Maintenance Replacing the print cartridges The Lexmark Z700-P700 Series uses the following cartridges: Left cartridge carrier: Color cartridges only 19 20 25 Right cartridge carrier: Black or Photo cartridges 48 50 55 90 (Photo) Note: You can use the...
... information about ordering supplies, see page 50. Removing the used cartridges 1 Make sure the power light is busy. 3 Maintenance Replacing the print cartridges The Lexmark Z700-P700 Series uses the following cartridges: Left cartridge carrier: Color cartridges only 19 20 25 Right cartridge carrier: Black or Photo cartridges 48 50 55 90 (Photo) Note: You can use the...

User's Guide
Page 44
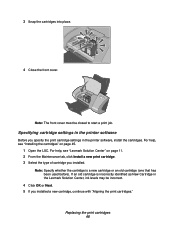
Store them in an airtight container or dispose of them properly. Replacing the print cartridges 44 3 Pull the cartridges toward you until you hear a snap. 4 Remove the used cartridges.
Store them in an airtight container or dispose of them properly. Replacing the print cartridges 44 3 Pull the cartridges toward you until you hear a snap. 4 Remove the used cartridges.
User's Guide
Page 45
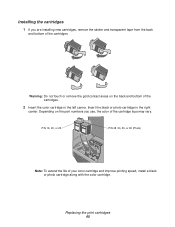
... the color of the cartridge tops may vary. P/N 19, 20, or 25 P/N 48, 50, 55, or 90 (Photo) Note: To extend the life of the cartridges. 2 Insert the color cartridge in the right carrier. Replacing the print cartridges 45 Insert the black or photo cartridge in the left carrier.... Depending on the part numbers you are installing new cartridges, remove the sticker and transparent tape from the...
... the color of the cartridge tops may vary. P/N 19, 20, or 25 P/N 48, 50, 55, or 90 (Photo) Note: To extend the life of the cartridges. 2 Insert the color cartridge in the right carrier. Replacing the print cartridges 45 Insert the black or photo cartridge in the left carrier.... Depending on the part numbers you are installing new cartridges, remove the sticker and transparent tape from the...
User's Guide
Page 46
... page 11. 2 From the Maintenance tab, click Install a new print cartridge. 3 Select the type of cartridge you installed a new cartridge, continue with "Aligning the print cartridges." Specifying cartridge settings in the printer software Before you specify the print cartridge settings in the Lexmark Solution Center, ink levels may be closed to start a print job. If an old...
... page 11. 2 From the Maintenance tab, click Install a new print cartridge. 3 Select the type of cartridge you installed a new cartridge, continue with "Aligning the print cartridges." Specifying cartridge settings in the printer software Before you specify the print cartridge settings in the Lexmark Solution Center, ink levels may be closed to start a print job. If an old...
User's Guide
Page 47
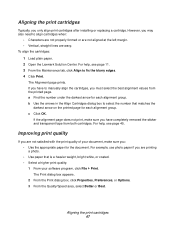
... a photo. • Use paper that matches the darkest arrow on the printed page for the document. c Click OK. Aligning the print cartridges 47 The Alignment page prints. The Print dialog box appears. 2 From the Print dialog box, click Properties, Preferences, or Options. 3 From...and transparent tape from the printed page. To align the cartridges: 1 Load plain paper. 2 Open the Lexmark Solution Center. For help , see page 45. Aligning the print cartridges Typically, you must select the best alignment values from both cartridges. For example, use photo paper if you : •...
... a photo. • Use paper that matches the darkest arrow on the printed page for the document. c Click OK. Aligning the print cartridges 47 The Alignment page prints. The Print dialog box appears. 2 From the Print dialog box, click Properties, Preferences, or Options. 3 From...and transparent tape from the printed page. To align the cartridges: 1 Load plain paper. 2 Open the Lexmark Solution Center. For help , see page 45. Aligning the print cartridges Typically, you must select the best alignment values from both cartridges. For example, use photo paper if you : •...

User's Guide
Page 48
... step 3, and then print your document still does not have the print quality you want, follow these steps: 1 Reinsert the print cartridges: a Remove the print cartridges. c Print your print quality has improved. A nozzle page prints, forcing ink through the nozzles to fix horizontal streaks. d If print... help, see page 45. b Dampen a clean, lint-free cloth with step 2. 2 Clean the print nozzles: a Load paper. b Insert the print cartridges. c Gently hold the cloth against the nozzles for about three seconds, and then wipe in the direction shown. For help , see page 43. b Open...
... step 3, and then print your document still does not have the print quality you want, follow these steps: 1 Reinsert the print cartridges: a Remove the print cartridges. c Print your print quality has improved. A nozzle page prints, forcing ink through the nozzles to fix horizontal streaks. d If print... help, see page 45. b Dampen a clean, lint-free cloth with step 2. 2 Clean the print nozzles: a Load paper. b Insert the print cartridges. c Gently hold the cloth against the nozzles for about three seconds, and then wipe in the direction shown. For help , see page 43. b Open...
User's Guide
Page 49
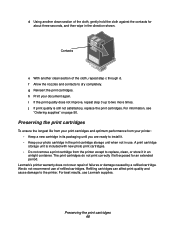
... the cloth against the contacts for an extended period. Lexmark's printer warranty does not cover repair of failures or damage caused by a refilled cartridge. Preserving the print cartridges To ensure the longest life from your print cartridges and optimum performance from the printer except to the printer.... f Allow the nozzles and contacts to install it in use Lexmark supplies. For best results, use . d Using another clean section of refilled cartridges. i If the print quality does not improve, repeat step 3 up to two more times. For ...
... the cloth against the contacts for an extended period. Lexmark's printer warranty does not cover repair of failures or damage caused by a refilled cartridge. Preserving the print cartridges To ensure the longest life from your print cartridges and optimum performance from the printer except to the printer.... f Allow the nozzles and contacts to install it in use Lexmark supplies. For best results, use . d Using another clean section of refilled cartridges. i If the print quality does not improve, repeat step 3 up to two more times. For ...
User's Guide
Page 50
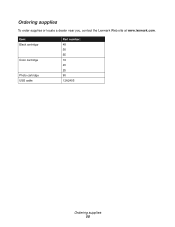
Item: Black cartridge Color cartridge Photo cartridge USB cable Part number: 48 50 55 19 20 25 90 12A2405 Ordering supplies 50 Ordering supplies To order supplies or locate a dealer near you, contact the Lexmark Web site at www.lexmark.com.
Item: Black cartridge Color cartridge Photo cartridge USB cable Part number: 48 50 55 19 20 25 90 12A2405 Ordering supplies 50 Ordering supplies To order supplies or locate a dealer near you, contact the Lexmark Web site at www.lexmark.com.
User's Guide
Page 51
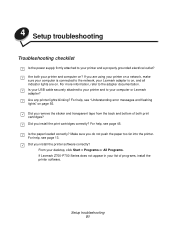
...page 55. Setup troubleshooting 51 If you are using your printer on a network, make sure your computer is connected to the network, your Lexmark adapter is on, and all indicator lights are on ? Make sure you install the printer software correctly? For help , see page 45...computer or Lexmark adapter? 4 Setup troubleshooting Troubleshooting checklist Is the power supply firmly attached to your printer and computer on . Did you remove the sticker and transparent tape from the back and bottom of programs, install the printer software. Did you install the print cartridges correctly?...
...page 55. Setup troubleshooting 51 If you are using your printer on a network, make sure your computer is connected to the network, your Lexmark adapter is on, and all indicator lights are on ? Make sure you install the printer software correctly? For help , see page 45...computer or Lexmark adapter? 4 Setup troubleshooting Troubleshooting checklist Is the power supply firmly attached to your printer and computer on . Did you remove the sticker and transparent tape from the back and bottom of programs, install the printer software. Did you install the print cartridges correctly?...
User's Guide
Page 55
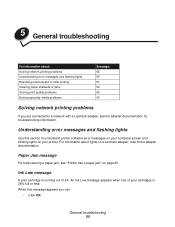
... you can: • Click OK. Understanding error messages and flashing lights Use this message appears you are connected to a network with a Lexmark adapter, see "Printer has a paper jam" on your cartridges is running out of your printer. When this section to the adapter documentation. Paper Jam message For help clearing a paper jam...
... you can: • Click OK. Understanding error messages and flashing lights Use this message appears you are connected to a network with a Lexmark adapter, see "Printer has a paper jam" on your cartridges is running out of your printer. When this section to the adapter documentation. Paper Jam message For help clearing a paper jam...
User's Guide
Page 56
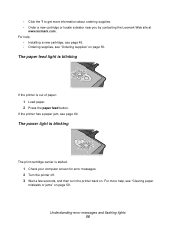
...Turn the printer off. 3 Wait a few seconds, and then turn the printer back on page 50. The power light is blinking The print cartridge carrier is out of paper: 1 Load paper. 2 Press the paper feed button. Understanding error messages and flashing lights 56 • Click the ... a paper jam, see "Ordering supplies" on . For more information about ordering supplies. • Order a new cartridge or locate a dealer near you by contacting the Lexmark Web site at www.lexmark.com. to get more help : • Installing a new cartridge, see page 45. • Ordering supplies, see page 60.
...Turn the printer off. 3 Wait a few seconds, and then turn the printer back on page 50. The power light is blinking The print cartridge carrier is out of paper: 1 Load paper. 2 Press the paper feed button. Understanding error messages and flashing lights 56 • Click the ... a paper jam, see "Ordering supplies" on . For more information about ordering supplies. • Order a new cartridge or locate a dealer near you by contacting the Lexmark Web site at www.lexmark.com. to get more help : • Installing a new cartridge, see page 45. • Ordering supplies, see page 60.
User's Guide
Page 58
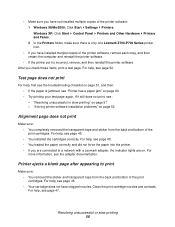
...have not installed multiple copies of the print cartridges. If it still does not print, see the adapter documentation. Printer ejects a blank page after appearing to a network with a Lexmark adapter, the indicator lights are on. Clean the print cartridge nozzles and contacts. For help , see page... 52. For help , see page 45. • Your cartridge does not have installed multiple copies of the print cartridges. Test page does not print...
...have not installed multiple copies of the print cartridges. If it still does not print, see the adapter documentation. Printer ejects a blank page after appearing to a network with a Lexmark adapter, the indicator lights are on. Clean the print cartridge nozzles and contacts. For help , see page... 52. For help , see page 45. • Your cartridge does not have installed multiple copies of the print cartridges. Test page does not print...


