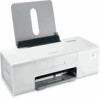

Getting Started
Page 2
Refer service or repairs, other replacement parts. The safety features of specific Lexmark components. SAVE THESE INSTRUCTIONS. For complete descriptions: • Windows users-See the User's Guide. • Macintosh users-If your product supports Macintosh, see the Mac Help installed with the printer software. Operating system notice All features and functions are ...power supply cord provided with this product or make any electrical or cabling connections, such as the power supply cord or telephone, during a lightning storm. Lexmark is near the product and easily accessible.
Refer service or repairs, other replacement parts. The safety features of specific Lexmark components. SAVE THESE INSTRUCTIONS. For complete descriptions: • Windows users-See the User's Guide. • Macintosh users-If your product supports Macintosh, see the Mac Help installed with the printer software. Operating system notice All features and functions are ...power supply cord provided with this product or make any electrical or cabling connections, such as the power supply cord or telephone, during a lightning storm. Lexmark is near the product and easily accessible.
Getting Started
Page 3
... Macintosh operating system 10 Setting up the printer for wireless printing 14 Setting up the printer using a USB cable...15 Installing the printer on additional network computers 16 Wireless networking...17 Networking overview...17 Learning about the printer 22 Understanding the parts... printer software settings to defaults 29 Maintaining the printer 30 Changing print cartridges...30 Removing a used print cartridge...30 Installing print cartridges...31 Ordering Supplies...32 Ordering print cartridges...32 Ordering paper and other supplies ...32 Troubleshooting...34 Setup troubleshooting...
... Macintosh operating system 10 Setting up the printer for wireless printing 14 Setting up the printer using a USB cable...15 Installing the printer on additional network computers 16 Wireless networking...17 Networking overview...17 Learning about the printer 22 Understanding the parts... printer software settings to defaults 29 Maintaining the printer 30 Changing print cartridges...30 Removing a used print cartridge...30 Installing print cartridges...31 Ordering Supplies...32 Ordering print cartridges...32 Ordering paper and other supplies ...32 Troubleshooting...34 Setup troubleshooting...
Getting Started
Page 4
...Indicator is not lit ...36 Network printer does not show up in the printer selection list during installation 37 Check your security keys...38 Wireless Setup Utility cannot communicate with the printer during installation (Windows users only) ...38 Wi-Fi indicator light is orange ...39 Wi-Fi indicator light is... Wireless network printer does not print ...42 Wireless printer is no longer working...44 Changing wireless settings after installation 49 Finding your MAC address...50 Resetting an internal wireless print server to factory default 50 Uninstalling and reinstalling the software 50 ...
...Indicator is not lit ...36 Network printer does not show up in the printer selection list during installation 37 Check your security keys...38 Wireless Setup Utility cannot communicate with the printer during installation (Windows users only) ...38 Wi-Fi indicator light is orange ...39 Wi-Fi indicator light is... Wireless network printer does not print ...42 Wireless printer is no longer working...44 Changing wireless settings after installation 49 Finding your MAC address...50 Resetting an internal wireless print server to factory default 50 Uninstalling and reinstalling the software 50 ...
Getting Started
Page 6
... connects to find this document on To access the Lexmark Solution Center: your CD-ROM • Connecting the printer to a computer. User's Guide Description Where to find The User's Guide gives you install the printer software, the User's Guide printer and other...Documentation. • Troubleshooting problems with the other information such as: will be installed. • Using the software (on Windows operating systems) 1 Click Start Œ Programs or All Programs Œ • Loading paper Lexmark 1400 Series. • Printing 2 Click User's Guide. • Working ...
... connects to find this document on To access the Lexmark Solution Center: your CD-ROM • Connecting the printer to a computer. User's Guide Description Where to find The User's Guide gives you install the printer software, the User's Guide printer and other...Documentation. • Troubleshooting problems with the other information such as: will be installed. • Using the software (on Windows operating systems) 1 Click Start Œ Programs or All Programs Œ • Loading paper Lexmark 1400 Series. • Printing 2 Click User's Guide. • Working ...
Getting Started
Page 9
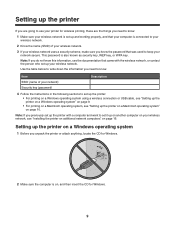
... to use your printer for wireless printing, these are the things you need to set it up on another computer on your wireless network, see "Installing the printer on additional network computers" on page 10. Note: If you unpack the printer or attach anything, locate the CD for Windows. 9 Setting up...
... to use your printer for wireless printing, these are the things you need to set it up on another computer on your wireless network, see "Installing the printer on additional network computers" on page 10. Note: If you unpack the printer or attach anything, locate the CD for Windows. 9 Setting up...
Getting Started
Page 10
...; Run, and then type D:\setup.exe, where D is necessary for the install screen to appear. Note: Contents, such as the number of your computer system. Setting up the printer. This is the letter of print cartridges, may notify you that Lexmark software is trying to communicate. Always allow these programs to communicate...
...; Run, and then type D:\setup.exe, where D is necessary for the install screen to appear. Note: Contents, such as the number of your computer system. Setting up the printer. This is the letter of print cartridges, may notify you that Lexmark software is trying to communicate. Always allow these programs to communicate...
Getting Started
Page 14
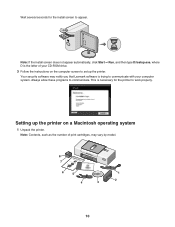
... printer on a Macintosh operating system" on page 10. • If you have completed the initial setup of the printer's MAC address. For more information, see "Installing the printer on additional network computers" on page 16. Notes: • The MAC address appears on an adhesive label located on the back of the...
... printer on a Macintosh operating system" on page 10. • If you have completed the initial setup of the printer's MAC address. For more information, see "Installing the printer on additional network computers" on page 16. Notes: • The MAC address appears on an adhesive label located on the back of the...
Getting Started
Page 15
...is ready for Macintosh. 5 From the Finder desktop, double-click the Lexmark 1400 Series Installer icon 6 Double-click the Install icon. 7 Click Continue. 8 Follow the instructions on the computer screen to complete the installation. Setting up the printer using a USB cable The following instructions are...page 9. 1 Make sure the computer is ready for Macintosh. 18 From the Finder desktop, double-click the Lexmark 1400 Series Installer icon 19 Double-click the Install icon. 20 Click Continue. 21 Follow the instructions on getting the equivalent network password, see "Setting up ...
...is ready for Macintosh. 5 From the Finder desktop, double-click the Lexmark 1400 Series Installer icon 6 Double-click the Install icon. 7 Click Continue. 8 Follow the instructions on the computer screen to complete the installation. Setting up the printer using a USB cable The following instructions are...page 9. 1 Make sure the computer is ready for Macintosh. 18 From the Finder desktop, double-click the Lexmark 1400 Series Installer icon 19 Double-click the Install icon. 20 Click Continue. 21 Follow the instructions on getting the equivalent network password, see "Setting up ...

Getting Started
Page 16
... you need help finding the IP or MAC address, see "Finding your network printer for use with multiple computers on the network, insert the installation CD into each additional computer, and follow the instructions on the computer screen. • You do not need to repeat the connection steps for each ...computer you want to print to the printer. • The printer should appear as a highlighted printer in the list, make sure you are installing your MAC address" on additional network computers If you select the printer with the correct IP address/MAC address...
... you need help finding the IP or MAC address, see "Finding your network printer for use with multiple computers on the network, insert the installation CD into each additional computer, and follow the instructions on the computer screen. • You do not need to repeat the connection steps for each ...computer you want to print to the printer. • The printer should appear as a highlighted printer in the list, make sure you are installing your MAC address" on additional network computers If you select the printer with the correct IP address/MAC address...
Getting Started
Page 17
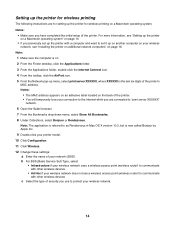
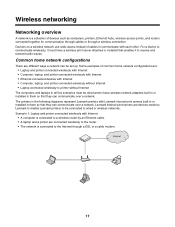
... cables or through a DSL or a cable modem. 17 The printers in the following diagrams represent Lexmark printers with Lexmark internal print servers built in or installed in them so that enables it must have a wireless print server attached or installed that they can communicate over a network. Devices on a wireless network use radio waves instead...
... cables or through a DSL or a cable modem. 17 The printers in the following diagrams represent Lexmark printers with Lexmark internal print servers built in or installed in them so that enables it must have a wireless print server attached or installed that they can communicate over a network. Devices on a wireless network use radio waves instead...

Getting Started
Page 21
...has an IP address. A simple type of communication is called ad hoc. b Check that the computer has an IP address. Lexmark recommends setting up in one where a PC with a wireless print server communicates directly with a printer equipped for each device communicates ...with the same SSID and channel. A device in infrastructure mode using the installation CD that the Status is the recommended setup method because it has: • Increased network security • Increased reliability • Faster...
...has an IP address. A simple type of communication is called ad hoc. b Check that the computer has an IP address. Lexmark recommends setting up in one where a PC with a wireless print server communicates directly with a printer equipped for each device communicates ...with the same SSID and channel. A device in infrastructure mode using the installation CD that the Status is the recommended setup method because it has: • Increased network security • Increased reliability • Faster...
Getting Started
Page 22
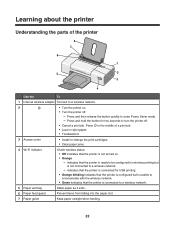
Learning about the printer Understanding the parts of a print job. • Load or eject paper. • Troubleshoot. 3 Access cover • Install or change the print cartridges. • Clear paper jams. 4 Wi-Fi indicator Check wireless status: • Off indicates that the printer is not turned on . &#...
Learning about the printer Understanding the parts of a print job. • Load or eject paper. • Troubleshoot. 3 Access cover • Install or change the print cartridges. • Clear paper jams. 4 Wi-Fi indicator Check wireless status: • Off indicates that the printer is not turned on . &#...
Getting Started
Page 26
... can • Learn how to a computer. Use basic features. - Note: For more information. • Learn tips about the current status. • Solve printer problems. • Install a new print cartridge. • View shopping options for more information, click Help in Print Properties based on the type of project you use the printer...
... can • Learn how to a computer. Use basic features. - Note: For more information. • Learn tips about the current status. • Solve printer problems. • Install a new print cartridge. • View shopping options for more information, click Help in Print Properties based on the type of project you use the printer...
Getting Started
Page 31
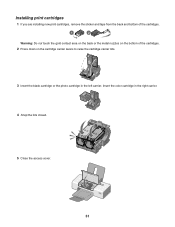
Installing print cartridges 1 If you are installing new print cartridges, remove the sticker and tape from the back and bottom of the cartridges. 1 2 Warning: Do not touch the gold contact area on the back or the metal nozzles on the bottom of the cartridges. 2 Press down on the cartridge carrier levers to raise the cartridge carrier lids. 3 Insert the black cartridge or the photo cartridge in the right carrier. 4 Snap the lids closed. 5 Close the access cover. 31 Insert the color cartridge in the left carrier.
Installing print cartridges 1 If you are installing new print cartridges, remove the sticker and tape from the back and bottom of the cartridges. 1 2 Warning: Do not touch the gold contact area on the back or the metal nozzles on the bottom of the cartridges. 2 Press down on the cartridge carrier levers to raise the cartridge carrier lids. 3 Insert the black cartridge or the photo cartridge in the right carrier. 4 Snap the lids closed. 5 Close the access cover. 31 Insert the color cartridge in the left carrier.
Getting Started
Page 34
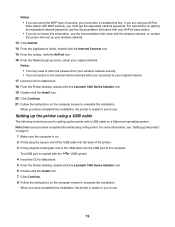
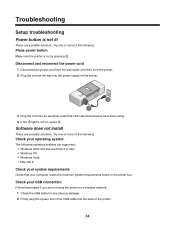
Software does not install These are possible solutions. Disconnect and reconnect the power cord 1 Disconnect the power cord from the wall outlet, and then from the printer. 2 Plug the ...
Software does not install These are possible solutions. Disconnect and reconnect the power cord 1 Disconnect the power cord from the wall outlet, and then from the printer. 2 Plug the ...
Getting Started
Page 35
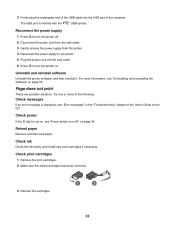
... light is not on, see "Error messages" in the "Troubleshooting" chapter of the User's Guide on page 34. Check ink Check the ink levels, and install new print cartridges if necessary. Check print cartridges 1 Remove the print cartridges. 2 Make sure the sticker and tape have been removed. 3 Reinsert the cartridges. 1 2 35...
... light is not on, see "Error messages" in the "Troubleshooting" chapter of the User's Guide on page 34. Check ink Check the ink levels, and install new print cartridges if necessary. Check print cartridges 1 Remove the print cartridges. 2 Make sure the sticker and tape have been removed. 3 Reinsert the cartridges. 1 2 35...
Getting Started
Page 36
... 1 Press to turn the printer off . 2 Press and hold for each file you want to printers that came with the internal wireless print server already installed. For more information, see "Uninstalling and reinstalling the software" on page 34.
... 1 Press to turn the printer off . 2 Press and hold for each file you want to printers that came with the internal wireless print server already installed. For more information, see "Uninstalling and reinstalling the software" on page 34.
Getting Started
Page 37
...letters. 2 Click Start Œ Programs or All Programs Œ Lexmark 1400 Series. 3 Click Wireless Setup. Note: Make sure you do not know the SSID of the network, use the following steps to the computer again using the installation cable as part of the setup process. 4 Follow the instructions on...• The IP address appears as 192.168.0.100. c Click OK. Network printer does not show up in the printer selection list during installation Check whether the printer is on the computer screen, including typing in the SSID of the wireless access point (wireless router) and the security ...
...letters. 2 Click Start Œ Programs or All Programs Œ Lexmark 1400 Series. 3 Click Wireless Setup. Note: Make sure you do not know the SSID of the network, use the following steps to the computer again using the installation cable as part of the setup process. 4 Follow the instructions on...• The IP address appears as 192.168.0.100. c Click OK. Network printer does not show up in the printer selection list during installation Check whether the printer is on the computer screen, including typing in the SSID of the wireless access point (wireless router) and the security ...
Getting Started
Page 38
...rectangular end of the USB cable into the USB port on the back of the printer. 4 Cancel the software installation. 5 Click Start ΠPrograms or All Programs ΠLexmark 1400 Series. 6 Click Wireless Setup. 7 Follow the prompts on a keyboard. All devices on page 34. Hexadecimal... are possible solutions for Windows users. 3 Insert the CD for Macintosh. 4 From the Finder desktop, double-click the Lexmark 1400 Series Installer icon 5 Double-click the Install icon. 6 Click Continue. 7 Follow the instructions on a keyboard. Check your security keys A security key is not ...
...rectangular end of the USB cable into the USB port on the back of the printer. 4 Cancel the software installation. 5 Click Start ΠPrograms or All Programs ΠLexmark 1400 Series. 6 Click Wireless Setup. 7 Follow the prompts on a keyboard. All devices on page 34. Hexadecimal... are possible solutions for Windows users. 3 Insert the CD for Macintosh. 4 From the Finder desktop, double-click the Lexmark 1400 Series Installer icon 5 Double-click the Install icon. 6 Click Continue. 7 Follow the instructions on a keyboard. Check your security keys A security key is not ...
Getting Started
Page 39
... and/or printer closer to your neighbor's network. You can find the signal strength of the following : Check cable Make sure the installation cable is on the computer screen, and enter the new network name when prompted. Wi-Fi indicator light is blinking orange during... the optional internal wireless print server after your computer. • To reset the printer name: 1 Click Start Œ Programs or All Programs Œ Lexmark 1400 Series. 2 Click Wireless Setup Utility. 3 Follow the instructions on Check the access point and, if necessary, turn it has been configured. Check security...
... and/or printer closer to your neighbor's network. You can find the signal strength of the following : Check cable Make sure the installation cable is on the computer screen, and enter the new network name when prompted. Wi-Fi indicator light is blinking orange during... the optional internal wireless print server after your computer. • To reset the printer name: 1 Click Start Œ Programs or All Programs Œ Lexmark 1400 Series. 2 Click Wireless Setup Utility. 3 Follow the instructions on Check the access point and, if necessary, turn it has been configured. Check security...


