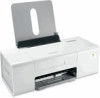
Getting Started
Page 3
... Maintaining the printer 30 Changing print cartridges...30 Removing a used print cartridge...30 Installing print cartridges...31 Ordering Supplies...32 Ordering print cartridges...32 Ordering paper and other supplies ...32 Troubleshooting...34 Setup troubleshooting...34 Power button is not lit ...34 Software does not install ...34 Page does not print ...35...
... Maintaining the printer 30 Changing print cartridges...30 Removing a used print cartridge...30 Installing print cartridges...31 Ordering Supplies...32 Ordering print cartridges...32 Ordering paper and other supplies ...32 Troubleshooting...34 Setup troubleshooting...34 Power button is not lit ...34 Software does not install ...34 Page does not print ...35...
Getting Started
Page 6
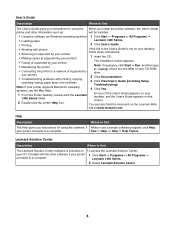
.... • Using the software (on Windows operating systems) 1 Click Start Œ Programs or All Programs Œ • Loading paper Lexmark 1400 Series. • Printing 2 Click User's Guide. • Working with printing, copying, scanning, faxing, paper jams, and misfeeds 3 Click View User's Guide (including Setup Troubleshooting). User's Guide Description Where to find The User...
.... • Using the software (on Windows operating systems) 1 Click Start Œ Programs or All Programs Œ • Loading paper Lexmark 1400 Series. • Printing 2 Click User's Guide. • Working with printing, copying, scanning, faxing, paper jams, and misfeeds 3 Click View User's Guide (including Setup Troubleshooting). User's Guide Description Where to find The User...
Getting Started
Page 11
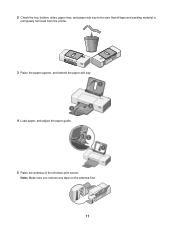
2 Check the top, bottom, sides, paper tray, and paper exit tray to be sure that all tape and packing material is completely removed from the printer. 3 Raise the paper support, and extend the paper exit tray. 4 Load paper, and adjust the paper guide. 5 Raise the antenna of the wireless print server. Note: Make sure you remove any tape on the antenna first. 11
2 Check the top, bottom, sides, paper tray, and paper exit tray to be sure that all tape and packing material is completely removed from the printer. 3 Raise the paper support, and extend the paper exit tray. 4 Load paper, and adjust the paper guide. 5 Raise the antenna of the wireless print server. Note: Make sure you remove any tape on the antenna first. 11
Getting Started
Page 22
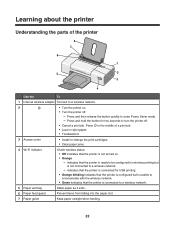
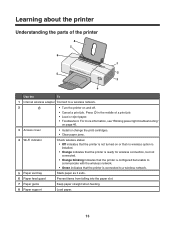
...wireless network. • Green indicates that the printer is connected to a wireless network. 5 Paper exit tray Stack paper as it exits. 6 Paper feed guard Prevent items from falling into the paper slot. 7 Paper guide Keep paper straight when feeding. 22 Press in the middle of the printer 8 7 6 1 5... about the printer Understanding the parts of a print job. • Load or eject paper. • Troubleshoot. 3 Access cover • Install or change the print cartridges. • Clear paper jams. 4 Wi-Fi indicator Check wireless status: • Off indicates that the printer...
...wireless network. • Green indicates that the printer is connected to a wireless network. 5 Paper exit tray Stack paper as it exits. 6 Paper feed guard Prevent items from falling into the paper slot. 7 Paper guide Keep paper straight when feeding. 22 Press in the middle of the printer 8 7 6 1 5... about the printer Understanding the parts of a print job. • Load or eject paper. • Troubleshoot. 3 Access cover • Install or change the print cartridges. • Clear paper jams. 4 Wi-Fi indicator Check wireless status: • Off indicates that the printer...

Getting Started
Page 23
Connect the printer to a wireless network. 23 Use the 8 Paper support To Load paper. 1 Use the 1 USB port 2 Power supply 2 3 To Connect the printer to a computer using . 2 1 3 If the light is not on the printer. 2 Plug the power cord into the power supply on , press . 3 Internal wireless adapter Connect to a power source using the power cord. 1 Plug the power cord all the way into an electrical outlet that other electrical devices have been using a USB cable.
Connect the printer to a wireless network. 23 Use the 8 Paper support To Load paper. 1 Use the 1 USB port 2 Power supply 2 3 To Connect the printer to a computer using . 2 1 3 If the light is not on the printer. 2 Plug the power cord into the power supply on , press . 3 Internal wireless adapter Connect to a power source using the power cord. 1 Plug the power cord all the way into an electrical outlet that other electrical devices have been using a USB cable.
Getting Started
Page 27
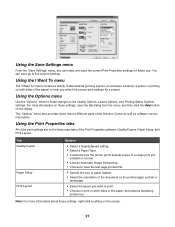
...Using the Print Properties tabs All of the Print Properties software: Quality/Copies, Paper Setup, and Print Layout. Tab Quality/Copies Paper Setup Print Layout Options • Select a Quality/Speed setting. • Select a Paper Type. • Customize how the printer prints several copies of a single ... Sharpening. • Choose to have the last page printed first. • Specify the size of paper loaded. • Select the orientation of the document on both sides of the paper, and select a duplexing preference. Note: For more information on these settings, right-click a setting ...
...Using the Print Properties tabs All of the Print Properties software: Quality/Copies, Paper Setup, and Print Layout. Tab Quality/Copies Paper Setup Print Layout Options • Select a Quality/Speed setting. • Select a Paper Type. • Customize how the printer prints several copies of a single ... Sharpening. • Choose to have the last page printed first. • Specify the size of paper loaded. • Select the orientation of the document on both sides of the paper, and select a duplexing preference. Note: For more information on these settings, right-click a setting ...
Getting Started
Page 32
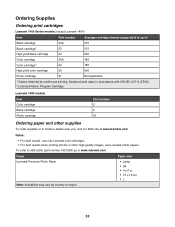
.../IEC 24711 (FDIS). 2 Licensed Return Program Cartridge Lexmark 1480 models Item Color cartridge Black cartridge Photo cartridge Part number 2 3 31 Ordering paper and other high-quality images, use Lexmark photo papers. Ordering Supplies Ordering print cartridges Lexmark 1400 Series models (except Lexmark 1480) Item Part number Average cartridge standard page yield...country or region. To order a USB cable (part number 1021294) go to locate a dealer near you, visit our Web site at www.lexmark.com. Paper Lexmark Premium Photo Paper Note: Availability may vary by continuous printing.
.../IEC 24711 (FDIS). 2 Licensed Return Program Cartridge Lexmark 1480 models Item Color cartridge Black cartridge Photo cartridge Part number 2 3 31 Ordering paper and other high-quality images, use Lexmark photo papers. Ordering Supplies Ordering print cartridges Lexmark 1400 Series models (except Lexmark 1480) Item Part number Average cartridge standard page yield...country or region. To order a USB cable (part number 1021294) go to locate a dealer near you, visit our Web site at www.lexmark.com. Paper Lexmark Premium Photo Paper Note: Availability may vary by continuous printing.

Getting Started
Page 33
Paper Lexmark Photo Paper Lexmark PerfectFinishTM Photo Paper Note: Availability may vary by country or region. Paper size • Letter • A4 • 4 x 6 in. • 10 x 15 cm • Letter • A4 • 4 x 6 in. • 10 x 15 cm •L For information on how to purchase Lexmark Premium Photo Paper, Lexmark Photo Paper, or Lexmark PerfectFinish Photo Paper in your country or region, go to www.lexmark.com. 33
Paper Lexmark Photo Paper Lexmark PerfectFinishTM Photo Paper Note: Availability may vary by country or region. Paper size • Letter • A4 • 4 x 6 in. • 10 x 15 cm • Letter • A4 • 4 x 6 in. • 10 x 15 cm •L For information on how to purchase Lexmark Premium Photo Paper, Lexmark Photo Paper, or Lexmark PerfectFinish Photo Paper in your country or region, go to www.lexmark.com. 33
Getting Started
Page 35
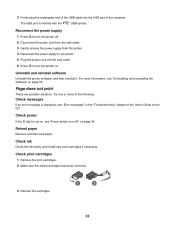
.... Check power If the light is not on, see "Power button is displayed, see "Uninstalling and reinstalling the software" on page 34. Reload paper Remove and then load paper. Reconnect the power supply 1 Press to turn the printer off. 2 Disconnect the power cord from the wall outlet. 3 Gently remove the power supply...
.... Check power If the light is not on, see "Power button is displayed, see "Uninstalling and reinstalling the software" on page 34. Reload paper Remove and then load paper. Reconnect the power supply 1 Press to turn the printer off. 2 Disconnect the power cord from the wall outlet. 3 Gently remove the power supply...
User's Guide
Page 3
... the printer 13 Understanding the parts of the printer 13 Learning about the software 15 Using the printer software...15 Using the Lexmark Imaging Studio...15 Using the Solution Center...16 Using Print Properties...17 Opening Print Properties ...17 Using the Save Settings menu ... Using the Print Properties tabs...18 Using the Toolbar...19 Resetting printer software settings to defaults 20 Loading paper and various paper types 21 Loading paper...21 Loading various paper types...21 Printing...24 Printing a document...24 Printing a banner...24 Printing cards...24 Printing collated copies...25...
... the printer 13 Understanding the parts of the printer 13 Learning about the software 15 Using the printer software...15 Using the Lexmark Imaging Studio...15 Using the Solution Center...16 Using Print Properties...17 Opening Print Properties ...17 Using the Save Settings menu ... Using the Print Properties tabs...18 Using the Toolbar...19 Resetting printer software settings to defaults 20 Loading paper and various paper types 21 Loading paper...21 Loading various paper types...21 Printing...24 Printing a document...24 Printing a banner...24 Printing cards...24 Printing collated copies...25...
User's Guide
Page 4
... cartridge nozzles ...34 Wiping the print cartridge nozzles and contacts 35 Preserving the print cartridges...36 Ordering supplies...36 Using genuine Lexmark print cartridges 37 Refilling a print cartridge...37 Recycling Lexmark products...37 Troubleshooting...38 Setup troubleshooting...38 Power light is not lit...38 Software does not install ...38 Page does not... quality at the edges of the page...42 Poor text and graphic quality ...43 Partial document or photo prints...44 Jams and misfeeds troubleshooting 44 Paper jam in the printer ...44 Paper jam in the paper support ...44 4
... cartridge nozzles ...34 Wiping the print cartridge nozzles and contacts 35 Preserving the print cartridges...36 Ordering supplies...36 Using genuine Lexmark print cartridges 37 Refilling a print cartridge...37 Recycling Lexmark products...37 Troubleshooting...38 Setup troubleshooting...38 Power light is not lit...38 Software does not install ...38 Page does not... quality at the edges of the page...42 Poor text and graphic quality ...43 Partial document or photo prints...44 Jams and misfeeds troubleshooting 44 Paper jam in the printer ...44 Paper jam in the paper support ...44 4

User's Guide
Page 5
Paper or specialty media misfeeds...44 Printer does not feed paper, envelopes, or specialty media 45 Banner paper jams ...45 Blinking power light troubleshooting 46 Power light blinks slowly...46 Power light blinks rapidly ...46 Error messages troubleshooting...46 Cartridge Alert ...46 Black cartridge replacement required 46 Color cartridge replacement required 46 Black and Color cartridge replacement required 47 Paper Jam ...47 Out of Paper...47 Removing and reinstalling the software 47 Notices...48 Edition notice...48 Power consumption...50 Index...51 5
Paper or specialty media misfeeds...44 Printer does not feed paper, envelopes, or specialty media 45 Banner paper jams ...45 Blinking power light troubleshooting 46 Power light blinks slowly...46 Power light blinks rapidly ...46 Error messages troubleshooting...46 Cartridge Alert ...46 Black cartridge replacement required 46 Color cartridge replacement required 46 Black and Color cartridge replacement required 47 Paper Jam ...47 Out of Paper...47 Removing and reinstalling the software 47 Notices...48 Edition notice...48 Power consumption...50 Index...51 5
User's Guide
Page 8
...Help: 4 Click Yes. 1 From the Finder desktop, double-click the Lexmark 1400 Series folder. Note: If your printer) 2 Click Documentation. • Troubleshooting problems with printing, copying, scanning, faxing, paper jams, and misfeeds 3 Click View User's Guide (including Setup Troubleshooting). An...installed. • Using the software (on Windows operating systems) 1 Click Start Œ Programs or All Programs Œ • Loading paper Lexmark 1400 Series. • Printing 2 Click User's Guide. • Working with the other software, if your desktop, and the User's Guide...
...Help: 4 Click Yes. 1 From the Finder desktop, double-click the Lexmark 1400 Series folder. Note: If your printer) 2 Click Documentation. • Troubleshooting problems with printing, copying, scanning, faxing, paper jams, and misfeeds 3 Click View User's Guide (including Setup Troubleshooting). An...installed. • Using the software (on Windows operating systems) 1 Click Start Œ Programs or All Programs Œ • Loading paper Lexmark 1400 Series. • Printing 2 Click User's Guide. • Working with the other software, if your desktop, and the User's Guide...
User's Guide
Page 13
... see "Blinking power light troubleshooting" on page 46. 3 Access cover • Install or change the print cartridges. • Clear paper jams. 4 Wi-Fi indicator Check wireless status: • Off indicates that the printer is not turned on or that no wireless ... Press in the middle of the printer 8 7 6 1 5 2 3 4 Use the To 1 Internal wireless adapter Connect to a wireless network. 5 Paper exit tray Stack paper as it exits. 6 Paper feed guard Prevent items from falling into the paper slot. 7 Paper guide Keep paper straight when feeding. 8 Paper support Load paper. 13
... see "Blinking power light troubleshooting" on page 46. 3 Access cover • Install or change the print cartridges. • Clear paper jams. 4 Wi-Fi indicator Check wireless status: • Off indicates that the printer is not turned on or that no wireless ... Press in the middle of the printer 8 7 6 1 5 2 3 4 Use the To 1 Internal wireless adapter Connect to a wireless network. 5 Paper exit tray Stack paper as it exits. 6 Paper feed guard Prevent items from falling into the paper slot. 7 Paper guide Keep paper straight when feeding. 8 Paper support Load paper. 13

User's Guide
Page 18
... Want To" menu contains a variety of task wizards (printing a photo, an envelope, a banner, a poster, or printing on both sides of the paper) to help you want to print. • Choose to different parts of the print settings are on the printed page: portrait or landscape. •... links to print on both sides of the Print Properties software: Quality/Copies, Paper Setup, and Print Layout. Tab Quality/Copies Paper Setup Print Layout Options • Select a Quality/Speed setting. • Select a Paper Type. • Customize how the printer prints several copies of a single print...
... Want To" menu contains a variety of task wizards (printing a photo, an envelope, a banner, a poster, or printing on both sides of the paper) to help you want to print. • Choose to different parts of the print settings are on the printed page: portrait or landscape. •... links to print on both sides of the Print Properties software: Quality/Copies, Paper Setup, and Print Layout. Tab Quality/Copies Paper Setup Print Layout Options • Select a Quality/Speed setting. • Select a Paper Type. • Customize how the printer prints several copies of a single print...
User's Guide
Page 21
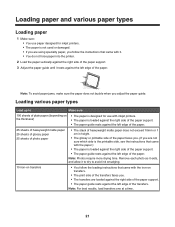
... instructions that came with the paper.) • The paper is not used or damaged. • If you are loaded against the right side of the paper support. • The paper guide rests against the left edge of the paper. Loading paper and various paper types Loading paper 1 Make sure: •... You use with inkjet printers. • The paper is loaded against the right side of the paper support. • The paper guide rests ...
... instructions that came with the paper.) • The paper is not used or damaged. • If you are loaded against the right side of the paper support. • The paper guide rests against the left edge of the paper. Loading paper and various paper types Loading paper 1 Make sure: •... You use with inkjet printers. • The paper is loaded against the right side of the paper support. • The paper guide rests ...
User's Guide
Page 22
... • The envelopes are designed for use with inkjet printers. • The envelopes are loaded against the right side of the paper support. • The paper guide rests against the left edge of the transparencies. Remove each transparency as it exits, and allow it to dry to within ...; The rough side of the transparencies faces you. • You don't use transparencies with paper backing sheets. • The transparencies are loaded against the right side of the paper support. • The paper guide rests against the left edge of the envelopes. Warning: Do not use envelopes that have...
... • The envelopes are designed for use with inkjet printers. • The envelopes are loaded against the right side of the paper support. • The paper guide rests against the left edge of the transparencies. Remove each transparency as it exits, and allow it to dry to within ...; The rough side of the transparencies faces you. • You don't use transparencies with paper backing sheets. • The transparencies are loaded against the right side of the paper support. • The paper guide rests against the left edge of the envelopes. Warning: Do not use envelopes that have...

User's Guide
Page 23
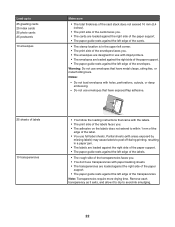
...17. • The paper is loaded against the right side of the paper support. • The paper guide rests against the left edge of the paper. 100 sheets of custom-size paper (depending on the thickness) • The print side of the paper faces you. • The paper size fits within these ....0 inches • The paper is loaded against the right side of the paper support. • The paper guide rests against the left edge of pages needed to 20 sheets of banner paper Make sure • You remove all the paper from the paper support before loading the banner paper. • You tear ...
...17. • The paper is loaded against the right side of the paper support. • The paper guide rests against the left edge of the paper. 100 sheets of custom-size paper (depending on the thickness) • The print side of the paper faces you. • The paper size fits within these ....0 inches • The paper is loaded against the right side of the paper support. • The paper guide rests against the left edge of pages needed to 20 sheets of banner paper Make sure • You remove all the paper from the paper support before loading the banner paper. • You tear ...

User's Guide
Page 24
..., click File ΠPrint. 4 Click Properties, Preferences, Options, or Setup. 5 From the Layout drop-down menu, select Banner. 6 From the Banner Paper Size drop-down menu, select Letter Banner or A4 Banner. 7 Click OK. 8 Click OK or Print. Printing a banner 1 Tear off only the number ...of sheets needed for other types of paper on a level surface behind the printer, and feed up over the paper support. 3 With your document open , click File ΠPrint. 3 Click Properties, Preferences, Options, or Setup. 4 Adjust ...
..., click File ΠPrint. 4 Click Properties, Preferences, Options, or Setup. 5 From the Layout drop-down menu, select Banner. 6 From the Banner Paper Size drop-down menu, select Letter Banner or A4 Banner. 7 Click OK. 8 Click OK or Print. Printing a banner 1 Tear off only the number ...of sheets needed for other types of paper on a level surface behind the printer, and feed up over the paper support. 3 With your document open , click File ΠPrint. 3 Click Properties, Preferences, Options, or Setup. 4 Adjust ...

User's Guide
Page 25
Collated Not collated 1 Load paper. 2 With a document open, click File Œ Print. 3 Click Properties, Preferences, Options, or Setup. 4 From the Quality/Copies tab, select the number of copies to print. 5 ...; Make sure the same orientation is also selected in the software application. 7 Click OK. 8 Click OK. 9 Click OK or Print. 25 Notes: • To avoid paper jams, do not force the cards into the printer. • To prevent smudging, remove each copy as a set (collated) or to print the copies as...
Collated Not collated 1 Load paper. 2 With a document open, click File Œ Print. 3 Click Properties, Preferences, Options, or Setup. 4 From the Quality/Copies tab, select the number of copies to print. 5 ...; Make sure the same orientation is also selected in the software application. 7 Click OK. 8 Click OK. 9 Click OK or Print. 25 Notes: • To avoid paper jams, do not force the cards into the printer. • To prevent smudging, remove each copy as a set (collated) or to print the copies as...


