
User's Guide
Page 39
Be careful not to scratch them. • Flex a stack of envelopes back and forth to loosen them, and then fan them . Straighten the edges on a level surface. • Hold transparencies by the edges, and then fan ...; Flex sheets of paper back and forth to loosen them, and then fan them . Straighten the edges on a level surface. 39 Note: Avoid touching the print side of the transparencies. Straighten the edges on a level surface. Do not fold or crease the paper.
Be careful not to scratch them. • Flex a stack of envelopes back and forth to loosen them, and then fan them . Straighten the edges on a level surface. • Hold transparencies by the edges, and then fan ...; Flex sheets of paper back and forth to loosen them, and then fan them . Straighten the edges on a level surface. 39 Note: Avoid touching the print side of the transparencies. Straighten the edges on a level surface. Do not fold or crease the paper.

User's Guide
Page 40
...stack height by forcing paper under the stack height limiter. • Load envelopes with the recommended print side facedown and the short edge of the paper entering the printer first....touch the edges of the paper stack. • Load letter, A4, and transparencies with the recommended print side facedown and the long edge of the paper entering the printer first. • Load A3, A5..., B4, folio, legal, and statement paper with the flap side up. Notes: - Warning: Never use envelopes with very gentle pushing. Make sure the paper fits loosely in the multipurpose feeder. Note: Load only one ...
...stack height by forcing paper under the stack height limiter. • Load envelopes with the recommended print side facedown and the short edge of the paper entering the printer first....touch the edges of the paper stack. • Load letter, A4, and transparencies with the recommended print side facedown and the long edge of the paper entering the printer first. • Load A3, A5..., B4, folio, legal, and statement paper with the flap side up. Notes: - Warning: Never use envelopes with very gentle pushing. Make sure the paper fits loosely in the multipurpose feeder. Note: Load only one ...

User's Guide
Page 47
... transparencies, fan the stack to Envelope, and select the envelope size. • Use envelopes designed specifically for use envelopes that are 0.12-0.14 mm (4.8-5.4 mil) in thickness or 161-179 g/m2 in the sealed or closed position - When printing on the Lexmark Web site at www.lexmark.com/publications. From MarkVision Professional, Print Properties, or the control panel...
... transparencies, fan the stack to Envelope, and select the envelope size. • Use envelopes designed specifically for use envelopes that are 0.12-0.14 mm (4.8-5.4 mil) in thickness or 161-179 g/m2 in the sealed or closed position - When printing on the Lexmark Web site at www.lexmark.com/publications. From MarkVision Professional, Print Properties, or the control panel...

User's Guide
Page 49
This setting applies to 305 x 483 mm (11.7 x 19 in.)2 7 3/4 Envelope 98 x 191 mm X X X (Monarch) (3.9 x 7.5 in.) B5 Envelope 176 x 250 mm X X X (6.9 x 9.8 in.) C5 Envelope 162 x 229 mm X X X (6.4 x 9 in.) 1 The printer cannot simultaneously sense A5 and statement paper sizes. Paper sizes... Universal 100 x 148 mm X X (3.9 x 5.8 in .). 49 The multipurpose feeder can support both sizes. 2 Measurements apply to detect. For duplex (two-sided) printing, the minimum size is 140 x 148 mm (5.5 x 5.8 in.) and the maximum size is 297 x 432 mm (11.7 x 17 in .) up to all ...
This setting applies to 305 x 483 mm (11.7 x 19 in.)2 7 3/4 Envelope 98 x 191 mm X X X (Monarch) (3.9 x 7.5 in.) B5 Envelope 176 x 250 mm X X X (6.9 x 9.8 in.) C5 Envelope 162 x 229 mm X X X (6.4 x 9 in.) 1 The printer cannot simultaneously sense A5 and statement paper sizes. Paper sizes... Universal 100 x 148 mm X X (3.9 x 5.8 in .). 49 The multipurpose feeder can support both sizes. 2 Measurements apply to detect. For duplex (two-sided) printing, the minimum size is 140 x 148 mm (5.5 x 5.8 in.) and the maximum size is 297 x 432 mm (11.7 x 17 in .) up to all ...
User's Guide
Page 50
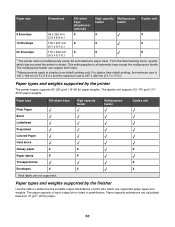
...148 mm (5.5 x 5.8 in.) and the maximum size is listed in parentheses. The paper capacity of print jobs which size you want the printer to simplex (one-sided) printing only. High capacity feeder X X X Multipurpose feeder Duplex unit X X X Paper types and weights.... Paper size Dimensions 520-sheet trays (standard or optional) High capacity Multipurpose feeder feeder Duplex unit 9 Envelope 98 x 225 mm X X X (3.9 x 8.9 in.) 10 Envelope 105 x 241 mm X X X (4.1 x 9.5 in.) DL Envelope 110 x 220 mm X X X (4.3 x 8.7 in .). Paper type 520-sheet trays Plain Paper...
...148 mm (5.5 x 5.8 in.) and the maximum size is listed in parentheses. The paper capacity of print jobs which size you want the printer to simplex (one-sided) printing only. High capacity feeder X X X Multipurpose feeder Duplex unit X X X Paper types and weights.... Paper size Dimensions 520-sheet trays (standard or optional) High capacity Multipurpose feeder feeder Duplex unit 9 Envelope 98 x 225 mm X X X (3.9 x 8.9 in.) 10 Envelope 105 x 241 mm X X X (4.1 x 9.5 in.) DL Envelope 110 x 220 mm X X X (4.3 x 8.7 in .). Paper type 520-sheet trays Plain Paper...
User's Guide
Page 53
Size Statement Punch* X Offset X Single/double staple Double dual staple X Tabloid X Universal Envelopes (any X X X X size) * For the Universal paper size, the finishing edge must be at least 9 in. (229 mm) for a 4-hole punch. Punch-Two-, three-, or four-... page is loaded in the short edge orientation. Booklet fold-A multiple-page job is stapled along the center into a single booklet. Saddle staple-A booklet-fold print job is folded along the center fold. 53 Bin 2 (booklet-maker) Bin 2 is available only when the booklet finisher is 300 sheets or 20 sets...
Size Statement Punch* X Offset X Single/double staple Double dual staple X Tabloid X Universal Envelopes (any X X X X size) * For the Universal paper size, the finishing edge must be at least 9 in. (229 mm) for a 4-hole punch. Punch-Two-, three-, or four-... page is loaded in the short edge orientation. Booklet fold-A multiple-page job is stapled along the center into a single booklet. Saddle staple-A booklet-fold print job is folded along the center fold. 53 Bin 2 (booklet-maker) Bin 2 is available only when the booklet finisher is 300 sheets or 20 sets...

User's Guide
Page 54
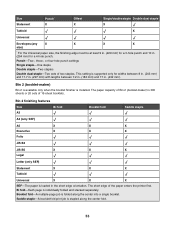
Size Bi fold Booklet fold Saddle staple Envelopes (any size) X X X SEF-The paper is individually folded and stacked separately. Bi fold-Each page is loaded in the short edge orientation. Saddle staple-A booklet-fold print job is folded along the center fold. 54 Booklet fold-A multiple-page job is stapled along the center into a single booklet. The short edge of the paper enters the printer first.
Size Bi fold Booklet fold Saddle staple Envelopes (any size) X X X SEF-The paper is individually folded and stacked separately. Bi fold-Each page is loaded in the short edge orientation. Saddle staple-A booklet-fold print job is folded along the center fold. 54 Booklet fold-A multiple-page job is stapled along the center into a single booklet. The short edge of the paper enters the printer first.

User's Guide
Page 128
Manual Envelope Size 7 3/4 Envelope 10 Envelope C5 Envelope B5 Envelope DL Envelope Specifies the size of the envelope being manually loaded Note: 10 Envelope is the factory default setting. Manual Envelope Type Envelope Custom Type Specifies the type of envelope being manually loaded Note: Envelope is the US factory default setting. Note: Only installed trays, drawers, and feeders... of paper being manually loaded Note: Plain Paper is selected, the multipurpose feeder can be used only for manual feed print jobs. 128 DL Envelope is the international factory default setting.
Manual Envelope Size 7 3/4 Envelope 10 Envelope C5 Envelope B5 Envelope DL Envelope Specifies the size of the envelope being manually loaded Note: 10 Envelope is the factory default setting. Manual Envelope Type Envelope Custom Type Specifies the type of envelope being manually loaded Note: Envelope is the US factory default setting. Note: Only installed trays, drawers, and feeders... of paper being manually loaded Note: Plain Paper is selected, the multipurpose feeder can be used only for manual feed print jobs. 128 DL Envelope is the international factory default setting.

User's Guide
Page 130
...the relative texture of the paper loaded in a specific tray Note: Normal is the factory default setting. Menu item Envelope Texture Smooth Normal Rough Letterhead Texture Smooth Normal Rough Preprinted Texture Smooth Normal Rough Colored Texture Smooth Normal Rough Custom Texture ... Description Specifies the relative texture of the envelopes loaded in a specific tray Note: Normal is the factory default setting. Letterhead Loading Duplex Off Determines whether 2-sided printing occurs for every print job unless 1-sided printing is selected from Print Properties. • If Duplex is selected...
...the relative texture of the paper loaded in a specific tray Note: Normal is the factory default setting. Menu item Envelope Texture Smooth Normal Rough Letterhead Texture Smooth Normal Rough Preprinted Texture Smooth Normal Rough Colored Texture Smooth Normal Rough Custom Texture ... Description Specifies the relative texture of the envelopes loaded in a specific tray Note: Normal is the factory default setting. Letterhead Loading Duplex Off Determines whether 2-sided printing occurs for every print job unless 1-sided printing is selected from Print Properties. • If Duplex is selected...

User's Guide
Page 131
...Paper Card Stock Transparency Glossy Labels Bond Envelope Custom Names menu Definition Associates a paper or specialty media type with a factory default Custom Type name or a user-defined Custom Name created from Print Properties. • If Duplex is selected, all print jobs are sent through the duplex unit... default setting. • Custom Loading is available only if the custom type is supported. Custom Loading Duplex Off Determines whether 2-sided printing occurs for all jobs that specify Custom as the paper type Note: Off is the factory default setting. Notes: • Duplex sets...
...Paper Card Stock Transparency Glossy Labels Bond Envelope Custom Names menu Definition Associates a paper or specialty media type with a factory default Custom Type name or a user-defined Custom Name created from Print Properties. • If Duplex is selected, all print jobs are sent through the duplex unit... default setting. • Custom Loading is available only if the custom type is supported. Custom Loading Duplex Off Determines whether 2-sided printing occurs for all jobs that specify Custom as the paper type Note: Off is the factory default setting. Notes: • Duplex sets...

User's Guide
Page 163
...for the 4-hole finisher. • This menu is available only when the finisher is the international factory default setting. Print jobs are not stapled. • Auto corner staples every print job. • Envelopes are not hole punched. • The On setting instructs the finisher to hole punch every... print job. Stacks copies or print jobs into staggered sets in an output bin Notes: • None is the factory ...
...for the 4-hole finisher. • This menu is available only when the finisher is the international factory default setting. Print jobs are not stapled. • Auto corner staples every print job. • Envelopes are not hole punched. • The On setting instructs the finisher to hole punch every... print job. Stacks copies or print jobs into staggered sets in an output bin Notes: • None is the factory ...

User's Guide
Page 267
...59 from Windows 99 duplexing 58 E Embedded Web Server administrative password 229 locking control panel menus 227 locking entire printer 227 modifying confidential print settings 227 supporting IPSec 228 supporting SNMPv3 228 using 802.1x authentication 228 using Secure mode 229 emission notices 257, 258, 259 ...box 191 enabling control panel menus 225 Encrypting disk x/y XX% 191 enlarging a copy 59 Enter PIN 192 Enter PIN to lock 192 envelopes guidelines 47 loading 38 Error reading USB drive 192 Ethernet port 32 exterior of the paper (duplexing) 58 photos 56 placing separator sheets between...
...59 from Windows 99 duplexing 58 E Embedded Web Server administrative password 229 locking control panel menus 227 locking entire printer 227 modifying confidential print settings 227 supporting IPSec 228 supporting SNMPv3 228 using 802.1x authentication 228 using Secure mode 229 emission notices 257, 258, 259 ...box 191 enabling control panel menus 225 Encrypting disk x/y XX% 191 enlarging a copy 59 Enter PIN 192 Enter PIN to lock 192 envelopes guidelines 47 loading 38 Error reading USB drive 192 Ethernet port 32 exterior of the paper (duplexing) 58 photos 56 placing separator sheets between...

User's Guide
Page 268
... buttons 20 HTML menu 173 I Image menu 174 Incorrect orientation 192 Insert hole punch box 192 Insert Tray 192 installing printer software 99 internal print server installing 30 troubleshooting 243 Internal System Error, Reload Bookmarks 192 Internal System Error, Reload Security Certificates 192 Invalid Engine Code 192 Invalid file ...with 193 Load staples 193 loading 1133-sheet tray 37 520-sheet tray (standard or optional) 34 867-sheet tray 37 card stock 38 envelopes 38 multipurpose feeder 38 transparencies 38 locking control panel menus 225, 227 entire printer 227 M max speed and max yield...
... buttons 20 HTML menu 173 I Image menu 174 Incorrect orientation 192 Insert hole punch box 192 Insert Tray 192 installing printer software 99 internal print server installing 30 troubleshooting 243 Internal System Error, Reload Bookmarks 192 Internal System Error, Reload Security Certificates 192 Invalid Engine Code 192 Invalid file ...with 193 Load staples 193 loading 1133-sheet tray 37 520-sheet tray (standard or optional) 34 867-sheet tray 37 card stock 38 envelopes 38 multipurpose feeder 38 transparencies 38 locking control panel menus 225, 227 entire printer 227 M max speed and max yield...

Setup Guide
Page 34
... feeder tray down. 2 Grasp the extension, and gently pull it out until it is fully extended. 3 Prepare the paper for loading. • Flex sheets of envelopes back and forth to loosen them, and then fan them. Be careful not to scratch them. • Flex a stack of paper back and forth to... loosen them, and then fan them. Note: Avoid touching the print side of the transparencies. Do not fold or crease the paper. Straighten the edges on a level surface.
... feeder tray down. 2 Grasp the extension, and gently pull it out until it is fully extended. 3 Prepare the paper for loading. • Flex sheets of envelopes back and forth to loosen them, and then fan them. Be careful not to scratch them. • Flex a stack of paper back and forth to... loosen them, and then fan them. Note: Avoid touching the print side of the transparencies. Do not fold or crease the paper. Straighten the edges on a level surface.

Setup Guide
Page 35
... in the multipurpose feeder. Note: Load only one size and type of the paper entering the printer first. Warning: Never use envelopes with the flap side up. These envelopes may severely damage the printer. Notes: - Paper should lie flat in the multipurpose feeder and is as far into the multipurpose ...then adjust the paper guides so that they lightly touch the edges of the paper stack. • Load letter, A4, and transparencies with the recommended print side facedown and the long edge of the paper entering the printer first. • Load A3, A5, B4, folio, legal, and statement paper ...
... in the multipurpose feeder. Note: Load only one size and type of the paper entering the printer first. Warning: Never use envelopes with the flap side up. These envelopes may severely damage the printer. Notes: - Paper should lie flat in the multipurpose feeder and is as far into the multipurpose ...then adjust the paper guides so that they lightly touch the edges of the paper stack. • Load letter, A4, and transparencies with the recommended print side facedown and the long edge of the paper entering the printer first. • Load A3, A5, B4, folio, legal, and statement paper ...

Setup Guide
Page 62
... panel 40 test fax 47 FCC notices 55, 57 FTP quality, improving 45 H Help menu pages, printing 46 L loading 1133-sheet tray 32 867-sheet tray 32 card stock 33 envelopes 33 multipurpose feeder 33 transparencies 33 local setup 23 location, selecting for printer 7 locking control panel menus... 53 M menu settings page, printing 46 moving the printer disassembling printer from scanner shelf 28 guidelines before ...
... panel 40 test fax 47 FCC notices 55, 57 FTP quality, improving 45 H Help menu pages, printing 46 L loading 1133-sheet tray 32 867-sheet tray 32 card stock 33 envelopes 33 multipurpose feeder 33 transparencies 33 local setup 23 location, selecting for printer 7 locking control panel menus... 53 M menu settings page, printing 46 moving the printer disassembling printer from scanner shelf 28 guidelines before ...

IPDS Emulation User’s Guide
Page 32
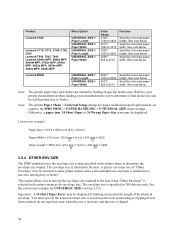
... valid values for Paper Length and Paper Width are listed in section 3.5.4 on your printer. 3.4 Overview of each of these options can be printed; A description of PAPER HANDLING Menu Options and Values The following lists all menu options found under the PAPER HANDLING menu. OTHER ENV SIZE The... valid values for each PAPER HANDLING option follows. 32 An asterisk "*"indicates the default factory value. The selected value for Envelope Length and Envelope Width are available on page 34. Values only display when they are listed in section 3.5.3 on page 18.
... valid values for Paper Length and Paper Width are listed in section 3.5.4 on your printer. 3.4 Overview of each of these options can be printed; A description of PAPER HANDLING Menu Options and Values The following lists all menu options found under the PAPER HANDLING menu. OTHER ENV SIZE The... valid values for each PAPER HANDLING option follows. 32 An asterisk "*"indicates the default factory value. The selected value for Envelope Length and Envelope Width are available on page 34. Values only display when they are listed in section 3.5.3 on page 18.
IPDS Emulation User’s Guide
Page 34
...emulation uses the envelope size setting specified in the printer menu to 3510 Specifies Universal paper length. Product Menu Option Lexmark C920 Lexmark C770, C772, C780, C782, C935 Lexmark T640, T642, T644 Lexmark X644e MFP, ...X646e MFP, X646ef MFP, X782e MFP, X850e MFP, X852e MFP, X854e MFP, X940e MFP, X945e MFP.... Important: A 34 Short Paper Error may be displayed if printing occurs past the length of "Other Envelope" may be fed from that media size can be displayed. ...
...emulation uses the envelope size setting specified in the printer menu to 3510 Specifies Universal paper length. Product Menu Option Lexmark C920 Lexmark C770, C772, C780, C782, C935 Lexmark T640, T642, T644 Lexmark X644e MFP, ...X646e MFP, X646ef MFP, X782e MFP, X850e MFP, X852e MFP, X854e MFP, X940e MFP, X945e MFP.... Important: A 34 Short Paper Error may be displayed if printing occurs past the length of "Other Envelope" may be fed from that media size can be displayed. ...

IPDS Emulation User’s Guide
Page 42
...and paper knob of a matrix printer, affect all input trays and feeders using the ALL INPUT TRAYS menu. Margin settings, which could be printed; See the Examples below apply to the ALL INPUT TRAYS margin settings for a specific tray or feeder. Input tray Left Margin settings adjust ...Area (VPA) exception conditions will be made to paper and envelopes when a finisher is limited by IPDS commands in relation to adjust page images outside the valid printable area. see Printing the Menu Settings Page (printers) on page 15 or Printing the Menu Settings Page (MFPs) on page 18. 42 ...
...and paper knob of a matrix printer, affect all input trays and feeders using the ALL INPUT TRAYS menu. Margin settings, which could be printed; See the Examples below apply to the ALL INPUT TRAYS margin settings for a specific tray or feeder. Input tray Left Margin settings adjust ...Area (VPA) exception conditions will be made to paper and envelopes when a finisher is limited by IPDS commands in relation to adjust page images outside the valid printable area. see Printing the Menu Settings Page (printers) on page 15 or Printing the Menu Settings Page (MFPs) on page 18. 42 ...

IPDS Emulation User’s Guide
Page 43
...to the right of an inch to +25. Margins The ALL INPUT TRAYS Left Margin has been adjusted to +25. The margin adjustments applied when printing from tray 1. Margin and Tray Mapping The host input source IPDS Tray Selection Number 1 normally selects the printer physical tray 2. Example 2 - ...Margin adjustment equals the total left . Margin and Tray Linking Tray 2 is requested as the input source. The TRAY 1 ADJUST Left Margin is the envelope menu options, which have tray 2 specified as the input source from the host. If tray 1 and tray 2 are shown below. 43 The ...
...to the right of an inch to +25. Margins The ALL INPUT TRAYS Left Margin has been adjusted to +25. The margin adjustments applied when printing from tray 1. Margin and Tray Mapping The host input source IPDS Tray Selection Number 1 normally selects the printer physical tray 2. Example 2 - ...Margin adjustment equals the total left . Margin and Tray Linking Tray 2 is requested as the input source. The TRAY 1 ADJUST Left Margin is the envelope menu options, which have tray 2 specified as the input source from the host. If tray 1 and tray 2 are shown below. 43 The ...


