User's Guide
Page 6
... reports...118 Printing the Fax Settings List...118 Blocking junk faxes...119 Blocking unwanted changes to fax settings...120 Maintaining the printer 121 Maintaining print cartridges...121 Contents 6
... reports...118 Printing the Fax Settings List...118 Blocking junk faxes...119 Blocking unwanted changes to fax settings...120 Maintaining the printer 121 Maintaining print cartridges...121 Contents 6
User's Guide
Page 7
Installing print cartridges...121 Removing a used print cartridge ...122 Refilling print cartridges...123 Using genuine Lexmark print cartridges...123 Aligning print cartridges ...123 Cleaning the print cartridge nozzles...124 Checking ink levels...125 Wiping the print cartridge nozzles and contacts ...126 Preserving the print cartridges ...127 Cleaning the scanner glass...127 Cleaning the exterior of the printer...127 Ordering supplies...
Installing print cartridges...121 Removing a used print cartridge ...122 Refilling print cartridges...123 Using genuine Lexmark print cartridges...123 Aligning print cartridges ...123 Cleaning the print cartridge nozzles...124 Checking ink levels...125 Wiping the print cartridge nozzles and contacts ...126 Preserving the print cartridges ...127 Cleaning the scanner glass...127 Cleaning the exterior of the printer...127 Ordering supplies...
User's Guide
Page 13
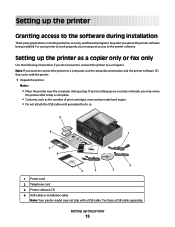
... only or fax only Use the following instructions if you about the printer software being installed. Setting up the printer as the number of print cartridges, may vary by model and region. • Do not attach the USB cable until prompted to a computer, use the setup documentation and the printer software...
... only or fax only Use the following instructions if you about the printer software being installed. Setting up the printer as the number of print cartridges, may vary by model and region. • Do not attach the USB cable until prompted to a computer, use the setup documentation and the printer software...
User's Guide
Page 14
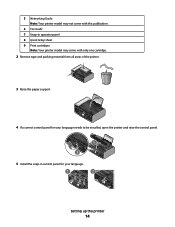
W I F I PRINTING 4 If a correct control panel for your language needs to be installed, open the printer and raise the control panel. 2 1 WI F I PRINTING 3 Raise the paper support. W I F I PRINTING 5 Install the snap-in operator panel 8 Quick Setup sheet 9 Print cartridges Note: Your printer model may come with only one cartridge. 2 Remove tape and packing material from all areas of the printer. 5 Networking Guide Note: Your printer model may not come with this publication. 6 Fax Guide 7 Snap-in control panel for your language. 1 2 Setting up the printer 14
W I F I PRINTING 4 If a correct control panel for your language needs to be installed, open the printer and raise the control panel. 2 1 WI F I PRINTING 3 Raise the paper support. W I F I PRINTING 5 Install the snap-in operator panel 8 Quick Setup sheet 9 Print cartridges Note: Your printer model may come with only one cartridge. 2 Remove tape and packing material from all areas of the printer. 5 Networking Guide Note: Your printer model may not come with this publication. 6 Fax Guide 7 Snap-in control panel for your language. 1 2 Setting up the printer 14
User's Guide
Page 17
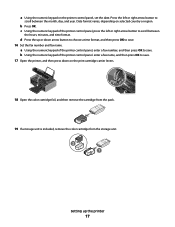
... the up the printer 17 WI F I PRINTING 18 Open the color cartridge foil, and then remove the cartridge from the pack. 19 If a storage unit is included, remove the color cartridge from the storage unit. 2 1 Setting up or down on the print cartridge carrier levers. Press the left or right arrow button to scroll...
... the up the printer 17 WI F I PRINTING 18 Open the color cartridge foil, and then remove the cartridge from the pack. 19 If a storage unit is included, remove the color cartridge from the storage unit. 2 1 Setting up or down on the print cartridge carrier levers. Press the left or right arrow button to scroll...
User's Guide
Page 18
Setting up the printer 18 20 Remove the tape from the color print cartridge, insert the cartridge in the right carrier, and then close the color cartridge lid. 21 If a black print cartridge is included in the box contents, open the black cartridge foil, and then remove the cartridge from the pack.
Setting up the printer 18 20 Remove the tape from the color print cartridge, insert the cartridge in the right carrier, and then close the color cartridge lid. 21 If a black print cartridge is included in the box contents, open the black cartridge foil, and then remove the cartridge from the pack.
User's Guide
Page 19
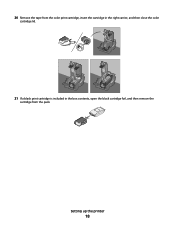
WI F I PRINTING Back Setting up the printer 19 An alignment page prints. 22 Remove the tape from the black print cartridge, insert the cartridge in the left cartridge carrier, and then close the cartridge carrier lid. 23 Close the printer. 24 From the printer control panel, press OK.
WI F I PRINTING Back Setting up the printer 19 An alignment page prints. 22 Remove the tape from the black print cartridge, insert the cartridge in the left cartridge carrier, and then close the cartridge carrier lid. 23 Close the printer. 24 From the printer control panel, press OK.
User's Guide
Page 22
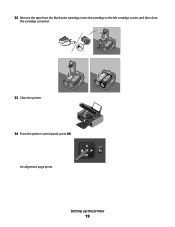
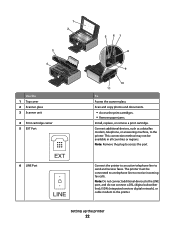
...Remove the plug to the printer. 1 2 3 W I F I PRINTING 5 67 8 4 W I F I PRINTING Use the 1 Top cover 2 Scanner glass 3 Scanner unit 4 Print cartridge carrier 5 EXT Port 6 LINE Port EXT LINE 9 10 11 To Access the scanner glass. Scan and copy photos and documents. • Access the print... cartridges. • Remove paper jams. Install, replace, or remove a print cartridge. Connect the printer to an active telephone line to the printer. This connection method may not be ...
...Remove the plug to the printer. 1 2 3 W I F I PRINTING 5 67 8 4 W I F I PRINTING Use the 1 Top cover 2 Scanner glass 3 Scanner unit 4 Print cartridge carrier 5 EXT Port 6 LINE Port EXT LINE 9 10 11 To Access the scanner glass. Scan and copy photos and documents. • Access the print... cartridges. • Remove paper jams. Install, replace, or remove a print cartridge. Connect the printer to an active telephone line to the printer. This connection method may not be ...
User's Guide
Page 28
... the printer. PictBridge menu Continue Paper Size Photo Size Photos/Page Paper Type Print Quality Setup menu Maintenance • Check Ink Levels • Align Cartridges • Clean Cartridges • Print Test Page Device Setup • Language • Country • Date/Time • Host Fax Settings • Button Beep • Power Saver •...
... the printer. PictBridge menu Continue Paper Size Photo Size Photos/Page Paper Type Print Quality Setup menu Maintenance • Check Ink Levels • Align Cartridges • Clean Cartridges • Print Test Page Device Setup • Language • Country • Date/Time • Host Fax Settings • Button Beep • Power Saver •...
User's Guide
Page 46
... Your printer may not come with cartridge installation. • Print a test page. • Print an alignment page. • Clean the print cartridge nozzles. • Order ink or supplies. • Register the printer. • Contact customer support. Lexmark Network Card Reader • View ...the contents of the printer that you purchased. Lexmark Wireless Setup Assistant Set up the printer...
... Your printer may not come with cartridge installation. • Print a test page. • Print an alignment page. • Clean the print cartridge nozzles. • Order ink or supplies. • Register the printer. • Contact customer support. Lexmark Network Card Reader • View ...the contents of the printer that you purchased. Lexmark Wireless Setup Assistant Set up the printer...
User's Guide
Page 121
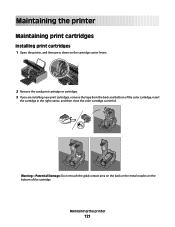
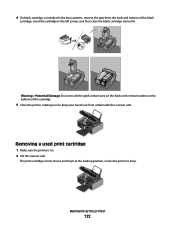
Maintaining the printer Maintaining print cartridges Installing print cartridges 1 Open the printer, and then press down on the bottom of the color cartridge, insert the cartridge in the right carrier, and then close the color cartridge carrier lid. Warning-Potential Damage: Do not touch the gold contact area on the back or the metal nozzles on the cartridge carrier levers. Maintaining the printer 121 W I F I PRINTING 2 Remove the used print cartridge or cartridges. 3 If you are installing new print cartridges, remove the tape from the back and bottom of the cartridge.
Maintaining the printer Maintaining print cartridges Installing print cartridges 1 Open the printer, and then press down on the bottom of the color cartridge, insert the cartridge in the right carrier, and then close the color cartridge carrier lid. Warning-Potential Damage: Do not touch the gold contact area on the back or the metal nozzles on the cartridge carrier levers. Maintaining the printer 121 W I F I PRINTING 2 Remove the used print cartridge or cartridges. 3 If you are installing new print cartridges, remove the tape from the back and bottom of the cartridge.
User's Guide
Page 122
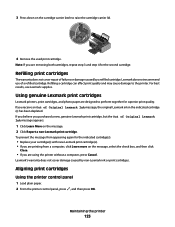
...loading position, unless the printer is busy. WI F I PRINTING Maintaining the printer 122 WI F I PRINTING Removing a used print cartridge 1 Make sure the printer is on the bottom of the cartridge. 5 Close the printer, making sure to keep your hands out from the back and bottom of the black... cartridge, insert the cartridge in the box contents, remove the tape from underneath the scanner unit. 4 If a black cartridge is included in the left carrier, and then close the black cartridge carrier lid. Warning-Potential Damage: Do not touch ...
...loading position, unless the printer is busy. WI F I PRINTING Maintaining the printer 122 WI F I PRINTING Removing a used print cartridge 1 Make sure the printer is on the bottom of the cartridge. 5 Close the printer, making sure to keep your hands out from the back and bottom of the black... cartridge, insert the cartridge in the box contents, remove the tape from underneath the scanner unit. 4 If a black cartridge is included in the left carrier, and then close the black cartridge carrier lid. Warning-Potential Damage: Do not touch ...
User's Guide
Page 123
... panel 1 Load plain paper. 2 From the printer control panel, press , and then press OK. 3 Press down on the message. 2 Click Report a non-Lexmark print cartridge. Note: If you receive an Out of a refilled cartridge. Using genuine Lexmark print cartridges Lexmark printers, print cartridges, and photo paper are removing both cartridges, repeat step 3 and step 4 for superior print quality.
... panel 1 Load plain paper. 2 From the printer control panel, press , and then press OK. 3 Press down on the message. 2 Click Report a non-Lexmark print cartridge. Note: If you receive an Out of a refilled cartridge. Using genuine Lexmark print cartridges Lexmark printers, print cartridges, and photo paper are removing both cartridges, repeat step 3 and step 4 for superior print quality.
User's Guide
Page 124
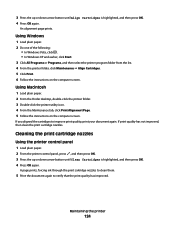
...the printer program folder from the list. 4 From the printer folder, click Maintenance ΠAlign Cartridges. 5 Click Print. 6 Follow the instructions on the computer screen. Cleaning the print cartridge nozzles Using the printer control panel 1 Load plain paper. 2 From the printer control panel, press...Follow the instructions on the computer screen. If print quality has not improved, then clean the print cartridge nozzles. 3 Press the up or down arrow button until Clean Cartridges is highlighted, and then press OK. 4 Press OK again. Maintaining the printer 124 An alignment ...
...the printer program folder from the list. 4 From the printer folder, click Maintenance ΠAlign Cartridges. 5 Click Print. 6 Follow the instructions on the computer screen. Cleaning the print cartridge nozzles Using the printer control panel 1 Load plain paper. 2 From the printer control panel, press...Follow the instructions on the computer screen. If print quality has not improved, then clean the print cartridge nozzles. 3 Press the up or down arrow button until Clean Cartridges is highlighted, and then press OK. 4 Press OK again. Maintaining the printer 124 An alignment ...

User's Guide
Page 125
... has not improved, then try cleaning the nozzles up to exit Setup, or press another mode button. Using Windows Use the Lexmark Service Center to check the ink levels of the cartridges. 1 Do one of the following : • In Windows Vista, click . • In Windows XP and earlier, click ...Start. 3 Click All Programs or Programs, and then select the printer program folder from the list. A page prints, forcing ink through the print cartridge nozzles to clean them . 5 Print the document again to verify that the print quality has improved. Using Windows 1 Load plain paper. 2 Do one...
... has not improved, then try cleaning the nozzles up to exit Setup, or press another mode button. Using Windows Use the Lexmark Service Center to check the ink levels of the cartridges. 1 Do one of the following : • In Windows Vista, click . • In Windows XP and earlier, click ...Start. 3 Click All Programs or Programs, and then select the printer program folder from the list. A page prints, forcing ink through the print cartridge nozzles to clean them . 5 Print the document again to verify that the print quality has improved. Using Windows 1 Load plain paper. 2 Do one...
User's Guide
Page 126
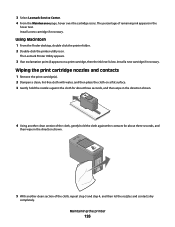
... 1 From the Finder desktop, double click the printer folder. 2 Double-click the printer utility icon. Install a new cartridge if necessary. Maintaining the printer 126 3 Select Lexmark Service Center. 4 From the Maintenance page, hover over the cartridge icons. The percentage of the cloth, repeat step 3 and step 4, and then let the nozzles and contacts...
... 1 From the Finder desktop, double click the printer folder. 2 Double-click the printer utility icon. Install a new cartridge if necessary. Maintaining the printer 126 3 Select Lexmark Service Center. 4 From the Maintenance page, hover over the cartridge icons. The percentage of the cloth, repeat step 3 and step 4, and then let the nozzles and contacts...
User's Guide
Page 127
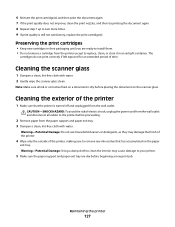
...all ink or corrective fluid on a document is dry before beginning a new print job. Maintaining the printer 127 Preserving the print cartridges • Keep new cartridges in an airtight container. Cleaning the scanner glass 1 Dampen a clean, lint-free cloth with water. Cleaning the exterior of time... and paper exit tray. 3 Dampen a clean, lint-free cloth with water. 2 Gently wipe the scanner glass clean. 6 Reinsert the print cartridge(s), and then print the document again. 7 If the print quality does not improve, clean the print nozzles, and then try printing the document again...
...all ink or corrective fluid on a document is dry before beginning a new print job. Maintaining the printer 127 Preserving the print cartridges • Keep new cartridges in an airtight container. Cleaning the scanner glass 1 Dampen a clean, lint-free cloth with water. Cleaning the exterior of time... and paper exit tray. 3 Dampen a clean, lint-free cloth with water. 2 Gently wipe the scanner glass clean. 6 Reinsert the print cartridge(s), and then print the document again. 7 If the print quality does not improve, clean the print nozzles, and then try printing the document again...
User's Guide
Page 128
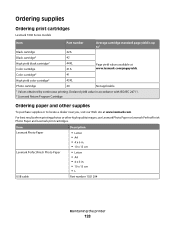
... ISO/IEC 24711. 2 Licensed Return Program Cartridge Ordering paper and other high-quality images, use Lexmark Photo Paper or Lexmark PerfectFinish Photo Paper and Lexmark print cartridges. Declared yield value in . • 10 x 15 cm •L USB cable Part number 1021294 Maintaining the printer 128 Ordering supplies Ordering print cartridges Lexmark 7600 Series models Item Part number...
... ISO/IEC 24711. 2 Licensed Return Program Cartridge Ordering paper and other high-quality images, use Lexmark Photo Paper or Lexmark PerfectFinish Photo Paper and Lexmark print cartridges. Declared yield value in . • 10 x 15 cm •L USB cable Part number 1021294 Maintaining the printer 128 Ordering supplies Ordering print cartridges Lexmark 7600 Series models Item Part number...
User's Guide
Page 132
... on the computer screen to print again. Troubleshooting 132 REMOVE AND THEN RELOAD PAPER CHECK INK Check the ink levels, and then install new print cartridges if necessary. Page does not print These are possible solutions. Try one of the following : • In Windows Vista, click . • In Windows XP and...
... on the computer screen to print again. Troubleshooting 132 REMOVE AND THEN RELOAD PAPER CHECK INK Check the ink levels, and then install new print cartridges if necessary. Page does not print These are possible solutions. Try one of the following : • In Windows Vista, click . • In Windows XP and...
User's Guide
Page 133
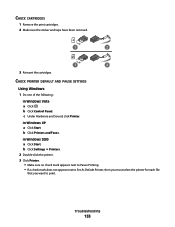
... Windows XP a Click Start. b Click Control Panel. c Under Hardware and Sound, click Printer. b Click Printers and Faxes. CHECK CARTRIDGES 1 Remove the print cartridges. 2 Make sure the sticker and tape have been removed. 1 2 1 2 3 Reinsert the cartridges. b Click Settings Œ Printers. 2 Double-click the printer. 3 Click Printer. • Make sure no check mark appears next...
... Windows XP a Click Start. b Click Control Panel. c Under Hardware and Sound, click Printer. b Click Printers and Faxes. CHECK CARTRIDGES 1 Remove the print cartridges. 2 Make sure the sticker and tape have been removed. 1 2 1 2 3 Reinsert the cartridges. b Click Settings Œ Printers. 2 Double-click the printer. 3 Click Printer. • Make sure no check mark appears next...


