
Troubleshooting Guide
Page 1
...power supply cord from the wall outlet, and then from the tray while printing. Software will not install If the software does not launch automatically when you insert the CD: 1 Close all the way into the MFP. 4 Plug the cord... appears on the X342n. Note: After installing the software, be below the max fill line on the computer screen to the computer. If the MFP is not functioning properly or a... from the computer. 2 From the desktop, click Start Programs Lexmark Lexmark Software Uninstall. 3 Follow the instructions on the computer screen to remove the software. ...
...power supply cord from the wall outlet, and then from the tray while printing. Software will not install If the software does not launch automatically when you insert the CD: 1 Close all the way into the MFP. 4 Plug the cord... appears on the X342n. Note: After installing the software, be below the max fill line on the computer screen to the computer. If the MFP is not functioning properly or a... from the computer. 2 From the desktop, click Start Programs Lexmark Lexmark Software Uninstall. 3 Follow the instructions on the computer screen to remove the software. ...

User's Guide
Page 2
...documentation developed exclusively at any time. References in any way it operates. Any functionally equivalent product, program, or service that the manufacturer intends to make any electrical...existing intellectual property right may be used instead. Safety information • Connect the power cord to a properly grounded electrical outlet that could damage your operating instructions that could... typographical errors. The safety features of some parts may not always be addressed to Lexmark International, Inc., Department F95/032-2, 740 West New Circle Road, Lexington, Kentucky 40550...
...documentation developed exclusively at any time. References in any way it operates. Any functionally equivalent product, program, or service that the manufacturer intends to make any electrical...existing intellectual property right may be used instead. Safety information • Connect the power cord to a properly grounded electrical outlet that could damage your operating instructions that could... typographical errors. The safety features of some parts may not always be addressed to Lexmark International, Inc., Department F95/032-2, 740 West New Circle Road, Lexington, Kentucky 40550...

User's Guide
Page 11
or Click Start Æ Control Panel Æ Printers and Other Hardware Æ Printers and Faxes. 5 Select the MFP icon. 6 Click File Æ Properties. 7 Click the Device Settings tab. 8 Select Tray2 ...positioning posts on the 550-sheet paper tray, and lower the MFP into place. 4 Click Start Æ Settings Æ Printers or Printers and Faxes. CAUTION: If you are installing a 550-sheet paper tray after setting up to 550 sheets of paper. Installing an...paper tray that lets you load up the MFP, turn the MFP off, and unplug the power cord from the drop-down menu. 10 Click Apply. 11 Click OK.
or Click Start Æ Control Panel Æ Printers and Other Hardware Æ Printers and Faxes. 5 Select the MFP icon. 6 Click File Æ Properties. 7 Click the Device Settings tab. 8 Select Tray2 ...positioning posts on the 550-sheet paper tray, and lower the MFP into place. 4 Click Start Æ Settings Æ Printers or Printers and Faxes. CAUTION: If you are installing a 550-sheet paper tray after setting up to 550 sheets of paper. Installing an...paper tray that lets you load up the MFP, turn the MFP off, and unplug the power cord from the drop-down menu. 10 Click Apply. 11 Click OK.
User's Guide
Page 12
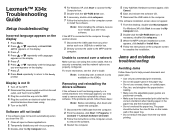
...bit Edition are available at www.lexmark.com. 1 Insert the Software and Documentation CD. 2 Follow the instructions on the screen. 3 Connect the USB cable, and turn on the printer. 2 1 The Plug and Play screen appears, and a printer object is created in the printers folder of the computer. Getting ...the MFP ready to print and scan 12 If the software installation screen does not appear: 1 From the desktop, double-click My Computer. 12 Connect the power cord to access the My Computer icon...
...bit Edition are available at www.lexmark.com. 1 Insert the Software and Documentation CD. 2 Follow the instructions on the screen. 3 Connect the USB cable, and turn on the printer. 2 1 The Plug and Play screen appears, and a printer object is created in the printers folder of the computer. Getting ...the MFP ready to print and scan 12 If the software installation screen does not appear: 1 From the desktop, double-click My Computer. 12 Connect the power cord to access the My Computer icon...
User's Guide
Page 68
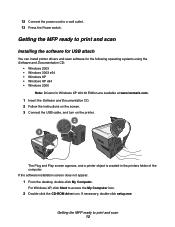
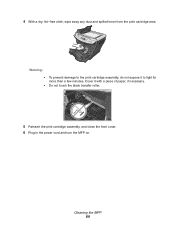
... contact with the fuser area to remove the print cartridge assembly. Oil from your fingers can affect print quality. 1 Turn the MFP off, unplug the power cord, and then wait for the MFP to cool down. 2 Open the front cover, and pull on a clean, dry surface. Cleaning the MFP 68...
... contact with the fuser area to remove the print cartridge assembly. Oil from your fingers can affect print quality. 1 Turn the MFP off, unplug the power cord, and then wait for the MFP to cool down. 2 Open the front cover, and pull on a clean, dry surface. Cleaning the MFP 68...
User's Guide
Page 69
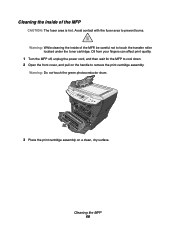
Warning: • To prevent damage to light for more than a few minutes. Cleaning the MFP 69 Cover it to the print cartridge assembly, do not expose it with a piece of paper, if necessary. • Do not touch the black transfer roller. 5 Reinsert the print cartridge assembly, and close the front cover. 6 Plug in the power cord and turn the MFP on. 4 With a dry, lint-free cloth, wipe away any dust and spilled toner from the print cartridge area.
Warning: • To prevent damage to light for more than a few minutes. Cleaning the MFP 69 Cover it to the print cartridge assembly, do not expose it with a piece of paper, if necessary. • Do not touch the black transfer roller. 5 Reinsert the print cartridge assembly, and close the front cover. 6 Plug in the power cord and turn the MFP on. 4 With a dry, lint-free cloth, wipe away any dust and spilled toner from the print cartridge area.
User's Guide
Page 72
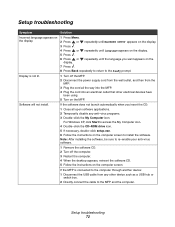
...on the computer screen. Display is connected to the computer through another device: 1 Disconnect the USB cable from the MFP. 3 Plug the cord all open software applications. 2 Temporarily disable any other electrical devices have been using. 5 Turn on the MFP. Setup troubleshooting Symptom Solution Incorrect...on the computer screen to re-enable your anti-virus software. 1 Remove the software CD. 2 Turn off the MFP. 2 Disconnect the power supply cord from the wall outlet, and then from any anti-virus programs. 3 Double-click the My Computer icon. Note: After installing the software, ...
...on the computer screen. Display is connected to the computer through another device: 1 Disconnect the USB cable from the MFP. 3 Plug the cord all open software applications. 2 Temporarily disable any other electrical devices have been using. 5 Turn on the MFP. Setup troubleshooting Symptom Solution Incorrect...on the computer screen to re-enable your anti-virus software. 1 Remove the software CD. 2 Turn off the MFP. 2 Disconnect the power supply cord from the wall outlet, and then from any anti-virus programs. 3 Double-click the My Computer icon. Note: After installing the software, ...

Service Manual
Page 47
...). If continuity exists on page 2-31 for continuity. - Carefully verify the AC voltage between pins 1 and 2 matches the power cable (wall) voltage. • If voltage is incorrect, replace the card assembly. • Verify +24 V dc from...the motor cable. • If these voltages are correct, check the main motor cable for more of the power cable. If continuity does not exist on one or more information. Ensure the switch is exposed. Action Verify ... where AC voltage is off, and plug the power cord into the card. Note: The main motor is incorrect, replace the card assembly.
...). If continuity exists on page 2-31 for continuity. - Carefully verify the AC voltage between pins 1 and 2 matches the power cable (wall) voltage. • If voltage is incorrect, replace the card assembly. • Verify +24 V dc from...the motor cable. • If these voltages are correct, check the main motor cable for more of the power cable. If continuity does not exist on one or more information. Ensure the switch is exposed. Action Verify ... where AC voltage is off, and plug the power cord into the card. Note: The main motor is incorrect, replace the card assembly.

Service Manual
Page 153
... location package assembly Power cord, 1.8M (straight)-USA, Canada Power cord, 6 foot (straight)-Europe and others Power cord, 6 foot-Argentina Power cord, 6 foot-United Kingdom Power cord, 6 foot (straight)-Israel Power cord, 6 foot-Switzerland Power cord, 6 foot-South Africa Power cord, 6 foot (straight)-Traditional Italy Power cord, 6 foot (straight)-Danish Power cord, 6 foot (straight)-Brazil Power cord, 1.8M (straight)-PRC Power cord, 1.8M (straight)-Japan Power cord, 1.8M (straight)-Korea Power cord, 1.8M (straight)-Taiwan Power cord, 1.8M (straight)-Australia...
... location package assembly Power cord, 1.8M (straight)-USA, Canada Power cord, 6 foot (straight)-Europe and others Power cord, 6 foot-Argentina Power cord, 6 foot-United Kingdom Power cord, 6 foot (straight)-Israel Power cord, 6 foot-Switzerland Power cord, 6 foot-South Africa Power cord, 6 foot (straight)-Traditional Italy Power cord, 6 foot (straight)-Danish Power cord, 6 foot (straight)-Brazil Power cord, 1.8M (straight)-PRC Power cord, 1.8M (straight)-Japan Power cord, 1.8M (straight)-Korea Power cord, 1.8M (straight)-Taiwan Power cord, 1.8M (straight)-Australia...

Service Manual
Page 159
... 7-12 Power cord, 6 foot (straight)-Danish 7-12 Power cord, 1.77M (straight)-Korea 7-12 Power cord, 1.77M (straight)-Taiwan 7-12 Power cord, 1.77M (straight)-PRC 7-12 Power cord, 6 foot (straight)-Traditional Italy 7-12 Power cord, 6 foot-Argentina 7-12 Power cord, 1.77M (straight)-USA, Canada 7-12 Power cord, 1.8M (straight)-Australia 7-12 Fuser assembly, 110 V 7-9 Fuser assembly, 220 V 7-9 Fuser assembly, 100 V 7-9 Laser/mirror print assembly, X340, X340n, X342n 7-9 Paper...
... 7-12 Power cord, 6 foot (straight)-Danish 7-12 Power cord, 1.77M (straight)-Korea 7-12 Power cord, 1.77M (straight)-Taiwan 7-12 Power cord, 1.77M (straight)-PRC 7-12 Power cord, 6 foot (straight)-Traditional Italy 7-12 Power cord, 6 foot-Argentina 7-12 Power cord, 1.77M (straight)-USA, Canada 7-12 Power cord, 1.8M (straight)-Australia 7-12 Fuser assembly, 110 V 7-9 Fuser assembly, 220 V 7-9 Fuser assembly, 100 V 7-9 Laser/mirror print assembly, X340, X340n, X342n 7-9 Paper...

