
Sending a fax using the computer
Page 1
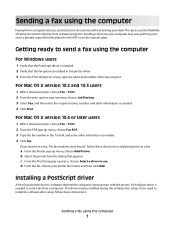
...these instructions: Sending a fax using the computer For Windows users 1 Verify that the PostScript driver is installed. 2 Verify that the fax option is installed in the printer driver. 3 From the Print dialog Fax screen, type the name and number of faxing documents ... that lets the computer communicate with the printer. This driver may save printing costs since a printed copy will not be installed during the initial printer setup. A PostScript driver is software that appears. Installing a PostScript driver A PostScript printer driver is needed to add your computer may ...
...these instructions: Sending a fax using the computer For Windows users 1 Verify that the PostScript driver is installed. 2 Verify that the fax option is installed in the printer driver. 3 From the Print dialog Fax screen, type the name and number of faxing documents ... that lets the computer communicate with the printer. This driver may save printing costs since a printed copy will not be installed during the initial printer setup. A PostScript driver is software that appears. Installing a PostScript driver A PostScript printer driver is needed to add your computer may ...
Sending a fax using the computer
Page 2
.... 7 Choose Select Components, and then click Next. 8 From the "Select your printer from the Lexmark Web site at www.lexmark.com. 2 From the Drivers & Downloads menu, click Driver Finder. 3 Select your printer, select your operating system, and then select the PostScript driver. 4 Download the driver and install the printer software. 5 Click Agree to accept the licensing agreement. 5 From the...
.... 7 Choose Select Components, and then click Next. 8 From the "Select your printer from the Lexmark Web site at www.lexmark.com. 2 From the Drivers & Downloads menu, click Driver Finder. 3 Select your printer, select your operating system, and then select the PostScript driver. 4 Download the driver and install the printer software. 5 Click Agree to accept the licensing agreement. 5 From the...
Sending a fax using the computer
Page 3
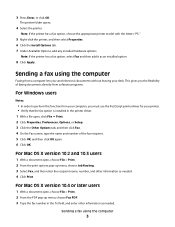
...you the flexibility of faxing documents directly from software programs. For Windows users Notes: • In order to perform this function from a computer lets you must use the PostScript printer driver for your desk. For Mac OS X version 10.4 or later users 1 With a document open , choose File > ...Print. 2 From the print options pop-up menu, choose Fax PDF. 3 Type the fax number in the printer driver. 1 With a file open, click File Print. 2 Click Properties, Preferences, Options, or Setup. 3 Click the Other Options tab, and then click ...
...you the flexibility of faxing documents directly from software programs. For Windows users Notes: • In order to perform this function from a computer lets you must use the PostScript printer driver for your desk. For Mac OS X version 10.4 or later users 1 With a document open , choose File > ...Print. 2 From the print options pop-up menu, choose Fax PDF. 3 Type the fax number in the printer driver. 1 With a file open, click File Print. 2 Click Properties, Preferences, Options, or Setup. 3 Click the Other Options tab, and then click ...

Sending a fax using the computer
Page 4
b Select the printer from the dialog that appears. Sending a fax using the computer 4 If you receive an error, "No fax modems were found", follow these directions to use. c From the Print Using pop-up menu, choose Add Printer. 4 Click Fax. d From the list, choose your printer as a fax: a From the Printer pop-up menu, choose Select a driver to add your printer fax model, and then click Add.
b Select the printer from the dialog that appears. Sending a fax using the computer 4 If you receive an error, "No fax modems were found", follow these directions to use. c From the Print Using pop-up menu, choose Add Printer. 4 Click Fax. d From the list, choose your printer as a fax: a From the Printer pop-up menu, choose Select a driver to add your printer fax model, and then click Add.
Troubleshooting Guide
Page 1
...tips to the computer. The paper should be sure to complete the installation. Removing and reinstalling the drivers software If the software is only available on the X342n. Lexmark™ X34x Troubleshooting Guide Setup troubleshooting Incorrect language appears on the display 1 Press Menu. 2 Press ... down and restart the computer. 1 Disconnect the USB cable from the tray while printing. Unable to connect over a network is not functioning properly or a communications error message appears, you may need to install the software. If necessary, double-click setup.exe. 3 When ...
...tips to the computer. The paper should be sure to complete the installation. Removing and reinstalling the drivers software If the software is only available on the X342n. Lexmark™ X34x Troubleshooting Guide Setup troubleshooting Incorrect language appears on the display 1 Press Menu. 2 Press ... down and restart the computer. 1 Disconnect the USB cable from the tray while printing. Unable to connect over a network is not functioning properly or a communications error message appears, you may need to install the software. If necessary, double-click setup.exe. 3 When ...

Troubleshooting Guide
Page 2
...type. • Use only new, unwrinkled paper. • Prepare the stack of paper for more information, see "Removing and reinstalling the drivers software" on a level surface Paper does not feed • Make sure paper is normal. Print and copy troubleshooting MFP does not print ...cable, and then reconnect it back and forth. or Click Start Control Panel Printers and Other Hardware Printers and Faxes. 2 Double-click the Lexmark X340/X340n/ X342n icon. 3 Click Printer, and make sure the guides are against both sides. • For copies, adjust the darkness ...
...type. • Use only new, unwrinkled paper. • Prepare the stack of paper for more information, see "Removing and reinstalling the drivers software" on a level surface Paper does not feed • Make sure paper is normal. Print and copy troubleshooting MFP does not print ...cable, and then reconnect it back and forth. or Click Start Control Panel Printers and Other Hardware Printers and Faxes. 2 Double-click the Lexmark X340/X340n/ X342n icon. 3 Click Printer, and make sure the guides are against both sides. • For copies, adjust the darkness ...

Troubleshooting Guide
Page 4
.... 5 Click OK. 6 Click Scan Now. Disable this feature before sending a fax. • To ensure the printer is an error message, see "Removing and reinstalling the drivers software" on the computer screen, select the location you are secure, if applicable: - For more information, see the... the photoconductor. Call a service representative. or Click Start Control Panel Printers and Other Hardware Printers and Faxes. 2 Double-click the Lexmark X340/X340n/ X342n icon. 3 Click Printer, and make sure that it directly to Set As Default. If you want to use ...
.... 5 Click OK. 6 Click Scan Now. Disable this feature before sending a fax. • To ensure the printer is an error message, see "Removing and reinstalling the drivers software" on the computer screen, select the location you are secure, if applicable: - For more information, see the... the photoconductor. Call a service representative. or Click Start Control Panel Printers and Other Hardware Printers and Faxes. 2 Double-click the Lexmark X340/X340n/ X342n icon. 3 Click Printer, and make sure that it directly to Set As Default. If you want to use ...

User's Guide
Page 5
... 67 Cleaning the outside of the MFP 67 Cleaning the inside of the MFP 68 Ordering supplies ...70 Recycling Lexmark products 70 Chapter 10: Troubleshooting 71 Setup troubleshooting ...72 Removing and reinstalling the drivers software 74 Jams and misfeeds troubleshooting 75 Clearing a paper jam 76 Print and copy troubleshooting 84 Print quality...
... 67 Cleaning the outside of the MFP 67 Cleaning the inside of the MFP 68 Ordering supplies ...70 Recycling Lexmark products 70 Chapter 10: Troubleshooting 71 Setup troubleshooting ...72 Removing and reinstalling the drivers software 74 Jams and misfeeds troubleshooting 75 Clearing a paper jam 76 Print and copy troubleshooting 84 Print quality...
User's Guide
Page 7
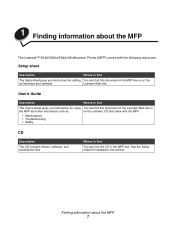
... for setting You can find this document in the MFP box. Lexmark Web site. Finding information about the MFP The Lexmark™ X340/X340n/X342n Multifunction Printer (MFP) comes with the MFP. • Maintenance • Troubleshooting • Safety CD Description The CD contains drivers, software, and publications files. Where to find this document on the...
... for setting You can find this document in the MFP box. Lexmark Web site. Finding information about the MFP The Lexmark™ X340/X340n/X342n Multifunction Printer (MFP) comes with the MFP. • Maintenance • Troubleshooting • Safety CD Description The CD contains drivers, software, and publications files. Where to find this document on the...
User's Guide
Page 12
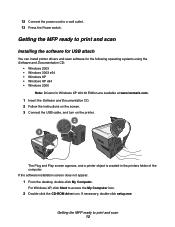
...Double-click the CD-ROM drive icon. For Windows XP, click Start to print and scan Installing the software for USB attach You can install printer drivers and scan software for the following operating systems using the Software and Documentation CD: • Windows 2003 • Windows 2003 x64 •... Windows XP • Windows XP x64 • Windows 2000 Note: Drivers for Windows XP x64 bit Edition are available at www.lexmark.com. 1 Insert the Software and Documentation CD. 2 Follow the instructions on the screen. 3 Connect the USB cable, ...
...Double-click the CD-ROM drive icon. For Windows XP, click Start to print and scan Installing the software for USB attach You can install printer drivers and scan software for the following operating systems using the Software and Documentation CD: • Windows 2003 • Windows 2003 x64 •... Windows XP • Windows XP x64 • Windows 2000 Note: Drivers for Windows XP x64 bit Edition are available at www.lexmark.com. 1 Insert the Software and Documentation CD. 2 Follow the instructions on the screen. 3 Connect the USB cable, ...
User's Guide
Page 13
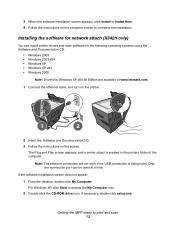
The Plug and Play screen appears, and a printer object is being used at www.lexmark.com. 1 Connect the ethernet cable, and turn on the printer. 1 2 2 Insert the Software and Documentation CD. 3 Follow the instructions on the computer screen to complete the installation. Getting... the screen. Installing the software for network attach (X342n only) You can be used . If the software installation screen does not appear: 1 From the desktop, double-click My Computer. Only one connection port can install printer drivers and scan software for the following operating systems using the...
The Plug and Play screen appears, and a printer object is being used at www.lexmark.com. 1 Connect the ethernet cable, and turn on the printer. 1 2 2 Insert the Software and Documentation CD. 3 Follow the instructions on the computer screen to complete the installation. Getting... the screen. Installing the software for network attach (X342n only) You can be used . If the software installation screen does not appear: 1 From the desktop, double-click My Computer. Only one connection port can install printer drivers and scan software for the following operating systems using the...
User's Guide
Page 74
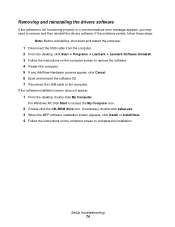
Removing and reinstalling the drivers software If the software is not functioning properly or a communications error message appears, you may need to access the My Computer icon. 2 Double-click the CD-ROM drive icon. For Windows XP, click Start to remove and then reinstall the drivers software. If necessary, double-..., shut down and restart the computer. 1 Disconnect the USB cable from the computer. 2 From the desktop, click Start Æ Programs Æ Lexmark Æ Lexmark Software Uninstall. 3 Follow the instructions on the computer screen to the computer. Setup troubleshooting 74
Removing and reinstalling the drivers software If the software is not functioning properly or a communications error message appears, you may need to access the My Computer icon. 2 Double-click the CD-ROM drive icon. For Windows XP, click Start to remove and then reinstall the drivers software. If necessary, double-..., shut down and restart the computer. 1 Disconnect the USB cable from the computer. 2 From the desktop, click Start Æ Programs Æ Lexmark Æ Lexmark Software Uninstall. 3 Follow the instructions on the computer screen to the computer. Setup troubleshooting 74

User's Guide
Page 88
... sure the document is not on page 54. or Click Start Æ Control Panel Æ Printers and Other Hardware Æ Printers and Faxes. 2 Double-click the Lexmark X340/X340n/X342n icon. 3 Click Printer, and make sure no check mark appears next to Pause Printing. 4 Make sure a check mark...an error message, see Scanning on hold or paused. 1 Click Start Æ Settings Æ Printers and Faxes or Printers. For more information, see Removing and reinstalling the drivers software on page 91. Partial document scans Solution Check the display. For more information, see Error messages...
... sure the document is not on page 54. or Click Start Æ Control Panel Æ Printers and Other Hardware Æ Printers and Faxes. 2 Double-click the Lexmark X340/X340n/X342n icon. 3 Click Printer, and make sure no check mark appears next to Pause Printing. 4 Make sure a check mark...an error message, see Scanning on hold or paused. 1 Click Start Æ Settings Æ Printers and Faxes or Printers. For more information, see Removing and reinstalling the drivers software on page 91. Partial document scans Solution Check the display. For more information, see Error messages...

Service Manual
Page 18
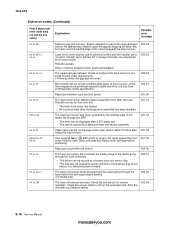
... properly loaded. 7003-XXX Types of print media Ensure trays are not supported. to 6.93 x 9.84 in the Size/Type menu item and on the driver to A4 in . d The paper size must be set to avoid jams. Media weights Heavy 4 Normal 4 Light 4 Media textures Rough 4 Normal 4 Smooth 4 1-4 Service Manual manuals4you...
... properly loaded. 7003-XXX Types of print media Ensure trays are not supported. to 6.93 x 9.84 in the Size/Type menu item and on the driver to A4 in . d The paper size must be set to avoid jams. Media weights Heavy 4 Normal 4 Light 4 Media textures Rough 4 Normal 4 Smooth 4 1-4 Service Manual manuals4you...

Service Manual
Page 37
.... (x1=media size, x2=leading edge of media state, x3=trailing edge state). Paper detected at the manual feeder 200.15 sensor. Possible causes: • Multi-sheet feed. • Paper length. Paper too fast to input sensor. • Gap too small on page 2-30. Possible causes: • Small gap • ....09 This code indicates that the media activated the input sensor before the MFP EP was made to open the gap by the input sensor. Printer driver set to letter when A4 paper is found, it may have also reached the input sensor early. Possible causes: • Slow or missing main motor...
.... (x1=media size, x2=leading edge of media state, x3=trailing edge state). Paper detected at the manual feeder 200.15 sensor. Possible causes: • Multi-sheet feed. • Paper length. Paper too fast to input sensor. • Gap too small on page 2-30. Possible causes: • Small gap • ....09 This code indicates that the media activated the input sensor before the MFP EP was made to open the gap by the input sensor. Printer driver set to letter when A4 paper is found, it may have also reached the input sensor early. Possible causes: • Slow or missing main motor...
Service Manual
Page 38
... value) Possible causes: Slow or missing transport motor positional feedback. 200.23 The measured gap between input and exit sensor 201.00 The main motor driver failed to open the gap by stopping the feed rolls, but never saw the leading edge of media. 202.01 The fuser exit sensor never...
... value) Possible causes: Slow or missing transport motor positional feedback. 200.23 The measured gap between input and exit sensor 201.00 The main motor driver failed to open the gap by stopping the feed rolls, but never saw the leading edge of media. 202.01 The fuser exit sensor never...

Service Manual
Page 45
... is being used on the MFP. Lines on page 2-37. Fax quality low, erratic performance Update firmware to cool. Document does not feed in the driver, or on the MFP. See "Scan quality service checks" on documents sent out. Note: Make sure the correct voltage fuser is not a service part. Warning...
... is being used on the MFP. Lines on page 2-37. Fax quality low, erratic performance Update firmware to cool. Document does not feed in the driver, or on the MFP. See "Scan quality service checks" on documents sent out. Note: Make sure the correct voltage fuser is not a service part. Warning...
Service Manual
Page 52
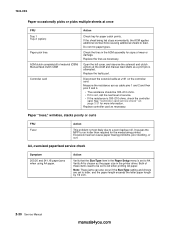
See "Controller card service check" on the controller card. Excessive heat can also occur if the Size/Type setting and drivers are set to letter, and the paper length exceeds the letter paper length by 1/2 inch. 2-30 Service Manual manuals4you.com Open the left cover, and ...observe the solenoid and clutch actions at the ACM and manual feed shafts as the paper size in the printer driver. Both of these items need to be 180-210 ohms. • If it is not, call the next level of service. • If the resistance...
See "Controller card service check" on the controller card. Excessive heat can also occur if the Size/Type setting and drivers are set to letter, and the paper length exceeds the letter paper length by 1/2 inch. 2-30 Service Manual manuals4you.com Open the left cover, and ...observe the solenoid and clutch actions at the ACM and manual feed shafts as the paper size in the printer driver. Both of these items need to be 180-210 ohms. • If it is not, call the next level of service. • If the resistance...
Service Manual
Page 54
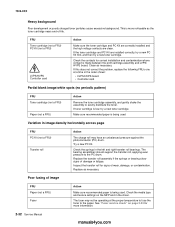
... is being used . The fuser may have an unbalanced pressure against the photoconductor (PC) drum. See "Fuser service check" on the MFP and in the driver. Replace as necessary. 7003-XXX Heavy background Poor development or poorly charged toner particles cause excessive background. FRU Toner cartridge (not a FRU) PC Kit (not...
... is being used . The fuser may have an unbalanced pressure against the photoconductor (PC) drum. See "Fuser service check" on the MFP and in the driver. Replace as necessary. 7003-XXX Heavy background Poor development or poorly charged toner particles cause excessive background. FRU Toner cartridge (not a FRU) PC Kit (not...
Service Manual
Page 56
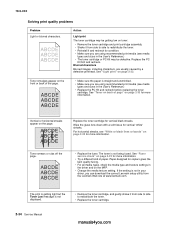
...with a soft tissue for more information. If the setting is straight and unwrinkled. • Make sure you can download the correct Lexmark setup utility from side to side to redistribute the toner. • Replace the toner cartridge. 2-34 Service Manual manuals4you.com The print...toner cartridge for copiers gives the best quality fusing. • For all media types, check the media type and texture settings in your driver, you are usually caused by a defective printhead. Paper designed for vertical black streaks. Blurred characters Blurred images, including characters, are using ...
...with a soft tissue for more information. If the setting is straight and unwrinkled. • Make sure you can download the correct Lexmark setup utility from side to side to redistribute the toner. • Replace the toner cartridge. 2-34 Service Manual manuals4you.com The print...toner cartridge for copiers gives the best quality fusing. • For all media types, check the media type and texture settings in your driver, you are usually caused by a defective printhead. Paper designed for vertical black streaks. Blurred characters Blurred images, including characters, are using ...


