
Sending a fax using the computer
Page 1
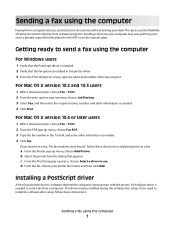
... computer. Getting ready to send a fax using the computer For Windows users 1 Verify that the PostScript driver is installed in the printer driver. 3 From the Print dialog Fax screen, type the name and number of faxing documents directly from software programs. Sending a fax from your... printer fax model, and then click Add. b Select the printer from the dialog that the fax option is installed. 2 Verify that appears. A PostScript driver is software that lets...
... computer. Getting ready to send a fax using the computer For Windows users 1 Verify that the PostScript driver is installed in the printer driver. 3 From the Print dialog Fax screen, type the name and number of faxing documents directly from software programs. Sending a fax from your... printer fax model, and then click Add. b Select the printer from the dialog that the fax option is installed. 2 Verify that appears. A PostScript driver is software that lets...
Sending a fax using the computer
Page 2
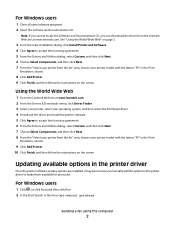
... Click Finish, and then follow the instructions on page 2. 3 From the main installation dialog, click Install Printer and Software. 4 Click Agree to the Lexmark Web site at www.lexmark.com. See "Using the World Wide Web" on the screen. Sending a fax using the computer 2 Note:... Next. 7 Choose Select Components, and then click Next. 8 From the "Select your printer from the Lexmark Web site at www.lexmark.com. 2 From the Drivers & Downloads menu, click Driver Finder. 3 Select your printer, select your operating system, and then select the PostScript driver. 4 Download the driver and...
... Click Finish, and then follow the instructions on page 2. 3 From the main installation dialog, click Install Printer and Software. 4 Click Agree to the Lexmark Web site at www.lexmark.com. See "Using the World Wide Web" on the screen. Sending a fax using the computer 2 Note:... Next. 7 Choose Select Components, and then click Next. 8 From the "Select your printer from the Lexmark Web site at www.lexmark.com. 2 From the Drivers & Downloads menu, click Driver Finder. 3 Select your printer, select your operating system, and then select the PostScript driver. 4 Download the driver and...
Sending a fax using the computer
Page 3
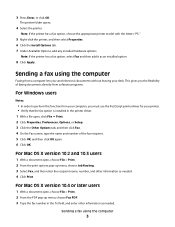
.... 5 Click OK, and then click OK again. 6 Click OK. Sending a fax using the computer Faxing from your computer, you send electronic documents without leaving your printer. • Verify that the fax option is installed in the To field, and enter other information as needed . This gives you the flexibility of faxing... documents directly from software programs. For Windows users Notes: • In order to perform this function from a computer lets you must use the PostScript printer driver for your desk.
.... 5 Click OK, and then click OK again. 6 Click OK. Sending a fax using the computer Faxing from your computer, you send electronic documents without leaving your printer. • Verify that the fax option is installed in the To field, and enter other information as needed . This gives you the flexibility of faxing... documents directly from software programs. For Windows users Notes: • In order to perform this function from a computer lets you must use the PostScript printer driver for your desk.

Sending a fax using the computer
Page 4
If you receive an error, "No fax modems were found", follow these directions to add your printer fax model, and then click Add. b Select the printer from the dialog that appears. Sending a fax using the computer 4 4 Click Fax. c From the Print Using pop-up menu, choose Add Printer. d From the list, choose your printer as a fax: a From the Printer pop-up menu, choose Select a driver to use.
If you receive an error, "No fax modems were found", follow these directions to add your printer fax model, and then click Add. b Select the printer from the dialog that appears. Sending a fax using the computer 4 4 Click Fax. c From the Print Using pop-up menu, choose Add Printer. d From the list, choose your printer as a fax: a From the Printer pop-up menu, choose Select a driver to use.

Troubleshooting Guide
Page 2
...; Disconnect the USB cable, and then reconnect it back and forth. or Click Start Control Panel Printers and Other Hardware Printers and Faxes. 2 Double-click the Lexmark X340/X340n/ X342n icon. 3 Click Printer, and make sure the guides are using the MFP. • Restart the computer. • Make sure the MFP is...
...; Disconnect the USB cable, and then reconnect it back and forth. or Click Start Control Panel Printers and Other Hardware Printers and Faxes. 2 Double-click the Lexmark X340/X340n/ X342n icon. 3 Click Printer, and make sure the guides are using the MFP. • Restart the computer. • Make sure the MFP is...

Troubleshooting Guide
Page 4
... into the ADF or on hold or paused. 1 Click Start Settings Printers and Faxes or Printers. or Click Start Control Panel Printers and Other Hardware Printers and Faxes. 2 Double-click the Lexmark X340/X340n/ X342n icon. 3 Click Printer, and make sure that it is loaded correctly into the jack. 4 If you still...
... into the ADF or on hold or paused. 1 Click Start Settings Printers and Faxes or Printers. or Click Start Control Panel Printers and Other Hardware Printers and Faxes. 2 Double-click the Lexmark X340/X340n/ X342n icon. 3 Click Printer, and make sure that it is loaded correctly into the jack. 4 If you still...
User's Guide
Page 7
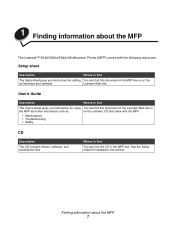
1 Finding information about the MFP 7 Finding information about the MFP The Lexmark™ X340/X340n/X342n Multifunction Printer (MFP) comes with the MFP. • Maintenance • Troubleshooting • Safety CD Description The CD contains drivers, software, and publications files.... Setup sheet Description Where to find The User's Guide gives you instructions for setting You can find this CD in the MFP box. Lexmark Web site. User's Guide Description Where to find The Setup sheet gives you instructions for installation instructions. See the Setup sheet for using...
1 Finding information about the MFP 7 Finding information about the MFP The Lexmark™ X340/X340n/X342n Multifunction Printer (MFP) comes with the MFP. • Maintenance • Troubleshooting • Safety CD Description The CD contains drivers, software, and publications files.... Setup sheet Description Where to find The User's Guide gives you instructions for setting You can find this CD in the MFP box. Lexmark Web site. User's Guide Description Where to find The Setup sheet gives you instructions for installation instructions. See the Setup sheet for using...

User's Guide
Page 11
... posts on the 550-sheet paper tray, and lower the MFP into place. 4 Click Start Æ Settings Æ Printers or Printers and Faxes. or Click Start Æ Control Panel Æ Printers and Other Hardware Æ Printers and Faxes. 5 Select the MFP icon. 6 Click File Æ Properties. 7 Click the Device Settings tab. 8 Select Tray2 from...
... posts on the 550-sheet paper tray, and lower the MFP into place. 4 Click Start Æ Settings Æ Printers or Printers and Faxes. or Click Start Æ Control Panel Æ Printers and Other Hardware Æ Printers and Faxes. 5 Select the MFP icon. 6 Click File Æ Properties. 7 Click the Device Settings tab. 8 Select Tray2 from...
User's Guide
Page 12
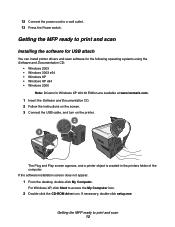
...necessary, double-click setup.exe. For Windows XP, click Start to print and scan Installing the software for USB attach You can install printer drivers and scan software for the following operating systems using the Software and Documentation CD: • Windows 2003 • Windows 2003 x64 ...bit Edition are available at www.lexmark.com. 1 Insert the Software and Documentation CD. 2 Follow the instructions on the screen. 3 Connect the USB cable, and turn on the printer. 2 1 The Plug and Play screen appears, and a printer object is created in the printers folder of the computer. Getting...
...necessary, double-click setup.exe. For Windows XP, click Start to print and scan Installing the software for USB attach You can install printer drivers and scan software for the following operating systems using the Software and Documentation CD: • Windows 2003 • Windows 2003 x64 ...bit Edition are available at www.lexmark.com. 1 Insert the Software and Documentation CD. 2 Follow the instructions on the screen. 3 Connect the USB cable, and turn on the printer. 2 1 The Plug and Play screen appears, and a printer object is created in the printers folder of the computer. Getting...
User's Guide
Page 13
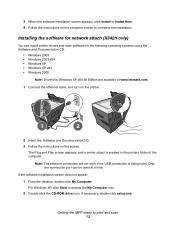
... Getting the MFP ready to access the My Computer icon. 2 Double-click the CD-ROM drive icon. Only one connection port can install printer drivers and scan software for the following operating systems using the Software and Documentation CD: • Windows 2003 • Windows 2003 x64 ...Windows XP x64 • Windows 2000 Note: Drivers for network attach (X342n only) You can be used . The Plug and Play screen appears, and a printer object is being used at www.lexmark.com. 1 Connect the ethernet cable, and turn on the printer. 1 2 2 Insert the Software and Documentation CD. 3 Follow ...
... Getting the MFP ready to access the My Computer icon. 2 Double-click the CD-ROM drive icon. Only one connection port can install printer drivers and scan software for the following operating systems using the Software and Documentation CD: • Windows 2003 • Windows 2003 x64 ...Windows XP x64 • Windows 2000 Note: Drivers for network attach (X342n only) You can be used . The Plug and Play screen appears, and a printer object is being used at www.lexmark.com. 1 Connect the ethernet cable, and turn on the printer. 1 2 2 Insert the Software and Documentation CD. 3 Follow ...

User's Guide
Page 14
... the wall jack. If problems occur, see Setup troubleshooting on the computer screen to send and receive faxes. Note: The printer is required. You do need to attach the printer to a computer, but you want a digital connection such as ISDN, DSL, or ADSL, a third-party device (such as a ...of the telephone cord into the LINE port of the MFP. Other devices (such as a telephone or answering machine) can connect the printer to pass through the printer, as a telephone, an answering machine, or a computer modem. See the following table to determine the best way to fax 14 ...
... the wall jack. If problems occur, see Setup troubleshooting on the computer screen to send and receive faxes. Note: The printer is required. You do need to attach the printer to a computer, but you want a digital connection such as ISDN, DSL, or ADSL, a third-party device (such as a ...of the telephone cord into the LINE port of the MFP. Other devices (such as a telephone or answering machine) can connect the printer to pass through the printer, as a telephone, an answering machine, or a computer modem. See the following table to determine the best way to fax 14 ...
User's Guide
Page 15
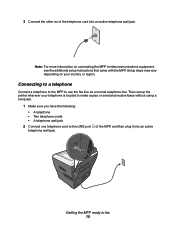
Then set up the printer wherever your country or region. Connecting to a telephone Connect a telephone to the MFP to the LINE port telephone wall jack. Setup steps may vary depending ...
Then set up the printer wherever your country or region. Connecting to a telephone Connect a telephone to the MFP to the LINE port telephone wall jack. Setup steps may vary depending ...

User's Guide
Page 19
... at the same time. Connect the MFP to an active telephone line to fit thicker documents, such as it exits. Remove heavier paper from the printer as books. Connect the MFP to a network using a USB cable. Connect the MFP to a telephone or answering machine. Note: This port is only available on...
... at the same time. Connect the MFP to an active telephone line to fit thicker documents, such as it exits. Remove heavier paper from the printer as books. Connect the MFP to a network using a USB cable. Connect the MFP to a telephone or answering machine. Note: This port is only available on...

User's Guide
Page 25
... until NETWORK SETUP appears, and then press . 3 Press or repeatedly until the length of the above items. After making the necessary adjustments, press and the printer will save your settings and return to the Ready prompt. To set the length of time the MFP waits before restoring default settings: 1 Press Menu... make adjustments to any of time you want appears, and then press . 5 Press Back repeatedly to return to the Ready prompt. Setting the network options (X342n only) Note: These menu items are made, press Back repeatedly to return to the Ready prompt.
... until NETWORK SETUP appears, and then press . 3 Press or repeatedly until the length of the above items. After making the necessary adjustments, press and the printer will save your settings and return to the Ready prompt. To set the length of time the MFP waits before restoring default settings: 1 Press Menu... make adjustments to any of time you want appears, and then press . 5 Press Back repeatedly to return to the Ready prompt. Setting the network options (X342n only) Note: These menu items are made, press Back repeatedly to return to the Ready prompt.
User's Guide
Page 26
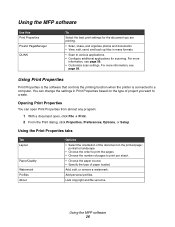
... of the document on the type of paper loaded. Add personal profiles. Using Print Properties Print Properties is the software that controls the printing function when the printer is connected to create. For more information, see page 58. Lists copyright and file versions. Using the MFP software 26 Using the MFP software...
... of the document on the type of paper loaded. Add personal profiles. Using Print Properties Print Properties is the software that controls the printing function when the printer is connected to create. For more information, see page 58. Lists copyright and file versions. Using the MFP software 26 Using the MFP software...
User's Guide
Page 28
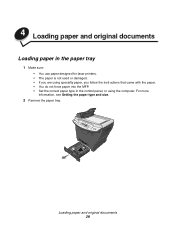
Loading paper and original documents 28 4 Loading paper and original documents Loading paper in the paper tray 1 Make sure: • You use paper designed for laser printers. • The paper is not used or damaged. • If you are using specialty paper, you follow the instructions that came with the paper. • You do not force paper into the MFP. • Set the correct paper type in the control panel, or using the computer. For more information, see Setting the paper type and size. 2 Remove the paper tray.
Loading paper and original documents 28 4 Loading paper and original documents Loading paper in the paper tray 1 Make sure: • You use paper designed for laser printers. • The paper is not used or damaged. • If you are using specialty paper, you follow the instructions that came with the paper. • You do not force paper into the MFP. • Set the correct paper type in the control panel, or using the computer. For more information, see Setting the paper type and size. 2 Remove the paper tray.
User's Guide
Page 32
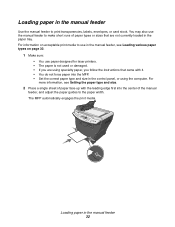
..., see Setting the paper type and size. 2 Place a single sheet of the manual feeder, and adjust the paper guides to use paper designed for laser printers. • The paper is not used or damaged. • If you follow the instructions that are using the computer.
..., see Setting the paper type and size. 2 Place a single sheet of the manual feeder, and adjust the paper guides to use paper designed for laser printers. • The paper is not used or damaged. • If you follow the instructions that are using the computer.

User's Guide
Page 34
Do not use vinyl labels with the MFP. 4 Feed card stock one sheet at a time through the manual feeder. 3 The MFP is intended for laser printers. Lexmark recommends full-sized sheets of postcard stock designed for occasional paper label printing only. Feed one sheet at a time through the manual feeder. Warning: Using ...
Do not use vinyl labels with the MFP. 4 Feed card stock one sheet at a time through the manual feeder. 3 The MFP is intended for laser printers. Lexmark recommends full-sized sheets of postcard stock designed for occasional paper label printing only. Feed one sheet at a time through the manual feeder. Warning: Using ...
User's Guide
Page 40
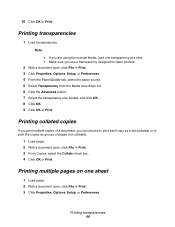
Printing collated copies If you print multiple copies of a document, you use a transparency designed for laser printers. 2 With a document open, click File Æ Print. 3 Click Properties, Options, Setup, or Preferences. 4 From the Paper/Quality tab, select the paper source. 5 Select Transparency from ...
Printing collated copies If you print multiple copies of a document, you use a transparency designed for laser printers. 2 With a document open, click File Æ Print. 3 Click Properties, Options, Setup, or Preferences. 4 From the Paper/Quality tab, select the paper source. 5 Select Transparency from ...
User's Guide
Page 84
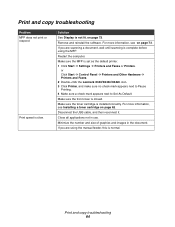
If you are scanning a document, wait until scanning is not lit. or Click Start Æ Control Panel Æ Printers and Other Hardware Æ Printers and Faxes. 2 Double-click the Lexmark X340/X340n/X342n icon. 3 Click Printer, and make sure no check mark appears next to Pause Printing. 4 Make sure a check mark appears next to Set As...
If you are scanning a document, wait until scanning is not lit. or Click Start Æ Control Panel Æ Printers and Other Hardware Æ Printers and Faxes. 2 Double-click the Lexmark X340/X340n/X342n icon. 3 Click Printer, and make sure no check mark appears next to Pause Printing. 4 Make sure a check mark appears next to Set As...


