
Service Manual
Page 4
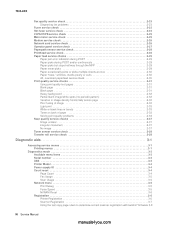
... Diagnostic aids 3-1 Accessing service menus 3-1 Printing menus 3-1 Diagnostics mode 3-2 Available menu items 3-2 Serial number 3-3 USB 3-3 Printer Model 3-4 Power supply ID 3-4 Count reset 3-4 Page Count 3-4 Fax Usage 3-5 Scan Usage 3-5 Network menu 3-5 Print Debug 3-5 Force Speed 3-5 NVRAM Reset 3-6 Registration 3-6 Printer Registration 3-6 Scanner Registration 3-7 Using the test copy page rulers to determine correct scanner registration with build...
... Diagnostic aids 3-1 Accessing service menus 3-1 Printing menus 3-1 Diagnostics mode 3-2 Available menu items 3-2 Serial number 3-3 USB 3-3 Printer Model 3-4 Power supply ID 3-4 Count reset 3-4 Page Count 3-4 Fax Usage 3-5 Scan Usage 3-5 Network menu 3-5 Print Debug 3-5 Force Speed 3-5 NVRAM Reset 3-6 Registration 3-6 Printer Registration 3-6 Scanner Registration 3-7 Using the test copy page rulers to determine correct scanner registration with build...
Service Manual
Page 38
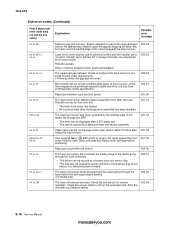
... 89 xx 03 89 xx 04 x1 89 xx 0D Explanation Possible error message Failed no gap at the input sensor. x2+x3=transfer servo count value) Possible causes: Slow or missing transport motor positional feedback. 200.23 The measured gap between input and exit sensor 201.00 The main motor...
... 89 xx 03 89 xx 04 x1 89 xx 0D Explanation Possible error message Failed no gap at the input sensor. x2+x3=transfer servo count value) Possible causes: Slow or missing transport motor positional feedback. 200.23 The measured gap between input and exit sensor 201.00 The main motor...
Service Manual
Page 62
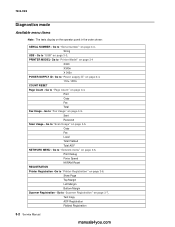
... Margin Left Margin Bottom Margin Scanner Registration - Go to "Printer Model" on page 3-3. String USB - Sent Received Scan Usage - Go to "Printer Registration" on page 3-5. Print Debug Force Speed NVRAM Reset REGISTRATION Printer Registration -Go to "Fax Usage" on page 3-6. Go ...to "Power supply ID" on page 3-3. 7003-XXX Diagnostics mode Available menu items Note: The tests display on page 3-7. Go to "Scanner Registration" on the operator panel in the order shown: SERIAL NUMBER - Go to "Page Count...
... Margin Left Margin Bottom Margin Scanner Registration - Go to "Printer Model" on page 3-3. String USB - Sent Received Scan Usage - Go to "Printer Registration" on page 3-5. Print Debug Force Speed NVRAM Reset REGISTRATION Printer Registration -Go to "Fax Usage" on page 3-6. Go ...to "Power supply ID" on page 3-3. 7003-XXX Diagnostics mode Available menu items Note: The tests display on page 3-7. Go to "Scanner Registration" on the operator panel in the order shown: SERIAL NUMBER - Go to "Page Count...

Service Manual
Page 64
..., press to choose the setting. Use Up or Down to Printer Model. 3. Count reset The count reset menu item is used to view and reset the machine counts. The following sequence is used for all Page Count sub-menu settings. 1. The count for the 100V Japan model. Enter 0 to select Power Supply... used for the selected item is installed To set the power supply ID: 1. 7003-XXX Printer Model Printer model is saved, and the display returns to the selected Page Count sub menu item. 5. Enter DIAGNOSTICS. 2. The MFP reboots. Power supply ID This setting is used on a 220V ...
..., press to choose the setting. Use Up or Down to Printer Model. 3. Count reset The count reset menu item is used to view and reset the machine counts. The following sequence is used for all Page Count sub-menu settings. 1. The count for the 100V Japan model. Enter 0 to select Power Supply... used for the selected item is installed To set the power supply ID: 1. 7003-XXX Printer Model Printer model is saved, and the display returns to the selected Page Count sub menu item. 5. Enter DIAGNOSTICS. 2. The MFP reboots. Power supply ID This setting is used on a 220V ...

Service Manual
Page 65
...item is saved, and the display returns to Force Speed. 2. Use Up or Down to the selected Fax Usage sub menu item. 5. The new count is saved, and the display returns to toggle between the Total ADF and Total Flatbed items. 2. Scan Usage Scan Usage is the final item displayed... in the Count Reset menu. When Scan Usage is displayed, press the key to change the connection setting, perform the following : 1. The print debug report prints. ...
...item is saved, and the display returns to Force Speed. 2. Use Up or Down to the selected Fax Usage sub menu item. 5. The new count is saved, and the display returns to toggle between the Total ADF and Total Flatbed items. 2. Scan Usage Scan Usage is the final item displayed... in the Count Reset menu. When Scan Usage is displayed, press the key to change the connection setting, perform the following : 1. The print debug report prints. ...

Service Manual
Page 155
...count 3-4 scan usage 3-5 fax settings 3-9 autoprint T30 log 3-9 detect EOLs 3-9 fax modulations 3-9 print all T30 logs 3-10 print CND logs 3-10 print stack info 3-10 print T30 log 3-10 print user settings 3-10 station ID 3-10 homologation settings 3-11 network menu 3-5 force speed 3-5 NVRAM reset 3-6 print debug 3-5 power supply ID 3-4 printer... model 3-4 registration 3-6 printer 3-6 scanner 3-7 using the test copy 3-8 scanner calibration 3-9 serial number 3-3 USB 3-3 utilities 3-11 ...
...count 3-4 scan usage 3-5 fax settings 3-9 autoprint T30 log 3-9 detect EOLs 3-9 fax modulations 3-9 print all T30 logs 3-10 print CND logs 3-10 print stack info 3-10 print T30 log 3-10 print user settings 3-10 station ID 3-10 homologation settings 3-11 network menu 3-5 force speed 3-5 NVRAM reset 3-6 print debug 3-5 power supply ID 3-4 printer... model 3-4 registration 3-6 printer 3-6 scanner 3-7 using the test copy 3-8 scanner calibration 3-9 serial number 3-3 USB 3-3 utilities 3-11 ...


