Embedded Web Server Administrator's Guide
Page 28
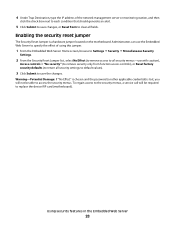
... the Embedded Web Server to specify the effect of the network management server or monitoring station, and then click the check box next to each condition that should generate an alert. 5 Click Submit to save changes, or Reset Form to clear all security settings to default values). 3...to the security menus, a service call will not be required to replace the device RIP card (motherboard). Using security features in the Embedded Web Server 28 Enabling the security reset jumper The Security Reset Jumper is lost, you will be able to access the security menus. Warning-Potential Damage:...
... the Embedded Web Server to specify the effect of the network management server or monitoring station, and then click the check box next to each condition that should generate an alert. 5 Click Submit to save changes, or Reset Form to clear all security settings to default values). 3...to the security menus, a service call will not be required to replace the device RIP card (motherboard). Using security features in the Embedded Web Server 28 Enabling the security reset jumper The Security Reset Jumper is lost, you will be able to access the security menus. Warning-Potential Damage:...
User's Guide
Page 161
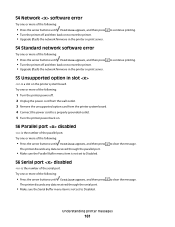
...discards any data received through the parallel port. • Make sure the Parallel Buffer menu item is not set to Disabled. to reset the printer. • Upgrade (flash) the network firmware in the printer or print server. Try one or more of the following : • Press the arrow buttons until Continue ... buttons until Continue appears, and then press • Turn the printer off . 2 Unplug the power cord from the wall outlet. 3 Remove the unsupported option card from the printer system board. 4 Connect the power cord to clear the message. Understanding printer messages 161
...discards any data received through the parallel port. • Make sure the Parallel Buffer menu item is not set to Disabled. to reset the printer. • Upgrade (flash) the network firmware in the printer or print server. Try one or more of the following : • Press the arrow buttons until Continue ... buttons until Continue appears, and then press • Turn the printer off . 2 Unplug the power cord from the wall outlet. 3 Remove the unsupported option card from the printer system board. 4 Connect the power cord to clear the message. Understanding printer messages 161

User's Guide
Page 214
...administrator 150 Menus are Disabled 151 Must be in Ready state to enter menus 151 Network 151 Network 151 Network , 151 No held jobs 151 No jobs found 151 No jobs to cancel 151... from bin 154 Remove paper from standard output bin 154 Replace wiper 155 Resetting active bin 155 Resetting the printer 155 Resetting without replacing may affect print quality. 155 Restore Held Jobs? 155 Restoring ...duplex unit 181 envelope feeder 180 flash memory card 181 hard disk with adapter 182 high capacity output expander 181 Internal Solutions Port 182 memory card 181 option not working 179 output expander ...
...administrator 150 Menus are Disabled 151 Must be in Ready state to enter menus 151 Network 151 Network 151 Network , 151 No held jobs 151 No jobs found 151 No jobs to cancel 151... from bin 154 Remove paper from standard output bin 154 Replace wiper 155 Resetting active bin 155 Resetting the printer 155 Resetting without replacing may affect print quality. 155 Restore Held Jobs? 155 Restoring ...duplex unit 181 envelope feeder 180 flash memory card 181 hard disk with adapter 182 high capacity output expander 181 Internal Solutions Port 182 memory card 181 option not working 179 output expander ...

Service Manual
Page 44
... the RFID firmware card, RFID interface card, RFID cable, and RFID option for correct installation. Displayed when status is at least one input tray beneath the RFID option. 2. This error code displays when too many bins are entered or the printer is reset. See "Network service check" on... the USB port. • Press until the menus are optional trays above the RFID option. The printer discards any data received on page 2-177. Reset Printer Reset Active Bin The following actions may be taken:...
... the RFID firmware card, RFID interface card, RFID cable, and RFID option for correct installation. Displayed when status is at least one input tray beneath the RFID option. 2. This error code displays when too many bins are entered or the printer is reset. See "Network service check" on... the USB port. • Press until the menus are optional trays above the RFID option. The printer discards any data received on page 2-177. Reset Printer Reset Active Bin The following actions may be taken:...
Service Manual
Page 211
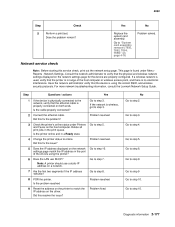
... the Lexmark Network Setup Guide. Problem resolved 3 Check the printer's online status under Menu Reports - Is the problem resolved Go to step 3. Go to step 10. Step Questions / actions Yes 1 If the device is properly connected on page 4-76. If the network is found under Printers Go to "System card assembly removal (T650, T652, T654...
... the Lexmark Network Setup Guide. Problem resolved 3 Check the printer's online status under Menu Reports - Is the problem resolved Go to step 3. Go to step 10. Step Questions / actions Yes 1 If the device is properly connected on page 4-76. If the network is found under Printers Go to "System card assembly removal (T650, T652, T654...


