Embedded Web Server Administrator's Guide
Page 27
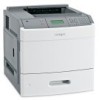
... Embedded Web Server Home screen, browse to Settings ª Security ª SNMP. 2 Click Set SNMP Traps. 3 From the IP Address list, click one of device drivers and other printing applications, select the Enable PPM Mib (Printer Port Monitor MIB) check box. 6 Click Submit to finalize changes, or Reset Form to restore...
... Embedded Web Server Home screen, browse to Settings ª Security ª SNMP. 2 Click Set SNMP Traps. 3 From the IP Address list, click one of device drivers and other printing applications, select the Enable PPM Mib (Printer Port Monitor MIB) check box. 6 Click Submit to finalize changes, or Reset Form to restore...
Troubleshooting Guide
Page 1
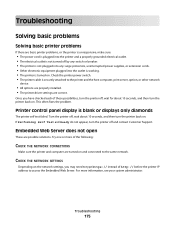
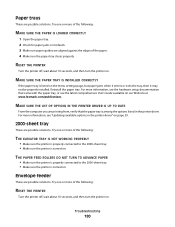
... outlet. • The electrical outlet is functioning correctly. For information regarding tested and approved USB flash memory devices, visit the Lexmark Web site at www.lexmark.com. MAKE SURE YOU ARE USING A RECOMMENDED USB, SERIAL, OR ETHERNET CABLE For more of these possibilities, turn the printer...and the host computer, print server, option, or other network device. • All options are properly installed. • The printer driver settings are running a supported operating system and using compatible printer software. CHECK TO SEE IF THE PAPER TRAY IS EMPTY Load paper ...
... outlet. • The electrical outlet is functioning correctly. For information regarding tested and approved USB flash memory devices, visit the Lexmark Web site at www.lexmark.com. MAKE SURE YOU ARE USING A RECOMMENDED USB, SERIAL, OR ETHERNET CABLE For more of these possibilities, turn the printer...and the host computer, print server, option, or other network device. • All options are properly installed. • The printer driver settings are running a supported operating system and using compatible printer software. CHECK TO SEE IF THE PAPER TRAY IS EMPTY Load paper ...
User's Guide
Page 2
... a menu settings page...38 Printing a network setup page ...38 Setting up the printer software...38 Installing printer software ...38 Updating available options in the printer driver...39 Setting up wireless printing...40 Information you will need to set up the printer on a wireless network 40 Installing the printer on a wireless network...
... a menu settings page...38 Printing a network setup page ...38 Setting up the printer software...38 Installing printer software ...38 Updating available options in the printer driver...39 Setting up wireless printing...40 Information you will need to set up the printer on a wireless network 40 Installing the printer on a wireless network...
User's Guide
Page 38
Note: If you need to verify printer options are installed correctly. Setting up the printer software Installing printer software A printer driver is typically installed during the initial printer setup. If you have not made any menu item settings changes yet, then the menu settings page lists ...
Note: If you need to verify printer options are installed correctly. Setting up the printer software Installing printer software A printer driver is typically installed during the initial printer setup. If you have not made any menu item settings changes yet, then the menu settings page lists ...
User's Guide
Page 39
...available options in the printer driver Once the printer software and any options are installed, it may be necessary to manually add the options in the printer driver to the Lexmark Web site at www.lexmark.com. 2 From the Drivers & Downloads menu, click Driver Finder. 3 Select your ...printer, and then select your operating system. 4 Download the driver and install the printer software. The printer folder opens. ...
...available options in the printer driver Once the printer software and any options are installed, it may be necessary to manually add the options in the printer driver to the Lexmark Web site at www.lexmark.com. 2 From the Drivers & Downloads menu, click Driver Finder. 3 Select your ...printer, and then select your operating system. 4 Download the driver and install the printer software. The printer folder opens. ...
User's Guide
Page 46
... address of your printer in the CD or DVD drive. 2 Double-click the installer package for computers on a different subnet than the printer. 4 Install the drivers and add the printer.
... address of your printer in the CD or DVD drive. 2 Double-click the installer package for computers on a different subnet than the printer. 4 Install the drivers and add the printer.
User's Guide
Page 49
... list. f Click Add. j Click Add. i Select the printer from the list. d Save the new settings. f Click More Printers. e Print a menu settings page. 2 Install the printer driver: a Insert the Software and Documentation CD. In Mac OS X version 10.5 a From the Apple menu, choose System Preferences. After installing the serial port, you have...
... list. f Click Add. j Click Add. i Select the printer from the list. d Save the new settings. f Click More Printers. e Print a menu settings page. 2 Install the printer driver: a Insert the Software and Documentation CD. In Mac OS X version 10.5 a From the Apple menu, choose System Preferences. After installing the serial port, you have...

User's Guide
Page 50
... menu, and then click Add Printer. n Click Finish to complete the printer software installation. 3 Set the COM port parameters: After the printer driver is installed, you attached the serial cable to the computer. f Click OK, and then close all the windows. Additional printer setup 50 b ...port must set the serial parameters to verify printer installation. d Click Properties. k Make any other optional software you want to the printer driver. Look for the printer settings under the Select Port menu, and then click Add Port. This is checked. h Select the printer model...
... menu, and then click Add Printer. n Click Finish to complete the printer software installation. 3 Set the COM port parameters: After the printer driver is installed, you attached the serial cable to the computer. f Click OK, and then close all the windows. Additional printer setup 50 b ...port must set the serial parameters to verify printer installation. d Click Properties. k Make any other optional software you want to the printer driver. Look for the printer settings under the Select Port menu, and then click Add Port. This is checked. h Select the printer model...
User's Guide
Page 74
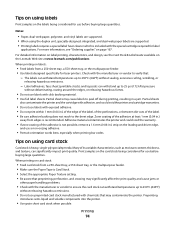
... the perforations, or between die-cuts of the adhesive is not possible, remove a 1.6-mm (0.06-in.) strip on the leading and driver edge, and use a non-oozing adhesive. • Portrait orientation works best, especially when printing bar codes. Partial sheets also contaminate the...a 550-sheet tray, or the multipurpose feeder. • Use labels designed specifically for label applications. Many of the adhesive at www.lexmark.com/publications. Adhesive material contaminates the printer and could void the printer and cartridge warranties. • Do not use labels with chemicals that...
... the perforations, or between die-cuts of the adhesive is not possible, remove a 1.6-mm (0.06-in.) strip on the leading and driver edge, and use a non-oozing adhesive. • Portrait orientation works best, especially when printing bar codes. Partial sheets also contaminate the...a 550-sheet tray, or the multipurpose feeder. • Use labels designed specifically for label applications. Many of the adhesive at www.lexmark.com/publications. Adhesive material contaminates the printer and could void the printer and cartridge warranties. • Do not use labels with chemicals that...
User's Guide
Page 134
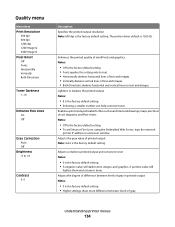
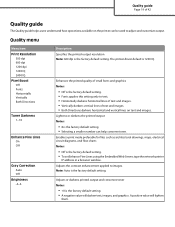
.... • Both Directions darkens horizontal and vertical lines on text and images. Lightens or darkens the printed output Notes: • 8 is 1200 IQ. The printer driver default is the factory default setting. • Selecting a smaller number can help conserve toner. Understanding printer menus 134 Enables a print mode preferable for files such...
.... • Both Directions darkens horizontal and vertical lines on text and images. Lightens or darkens the printed output Notes: • 8 is 1200 IQ. The printer driver default is the factory default setting. • Selecting a smaller number can help conserve toner. Understanding printer menus 134 Enables a print mode preferable for files such...
User's Guide
Page 175
... IP address to the printer and the host computer, print server, option, or other network device. • All options are properly installed. • The printer driver settings are possible solutions. Turn the printer off , wait for about 10 seconds, and then turn the printer off by any switch or breaker. •...
... IP address to the printer and the host computer, print server, option, or other network device. • All options are properly installed. • The printer driver settings are possible solutions. Turn the printer off , wait for about 10 seconds, and then turn the printer off by any switch or breaker. •...
User's Guide
Page 179
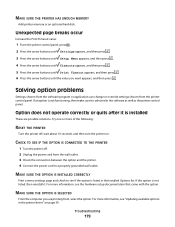
... in the software as well as the printer control panel. If an option is not functioning, then make sure it is selected in the printer driver" on . Unexpected page breaks occur Increase the Print Timeout value: 1 From the printer control panel, press . 2 Press the arrow buttons until Settings appears, and then...
... in the software as well as the printer control panel. If an option is not functioning, then make sure it is selected in the printer driver" on . Unexpected page breaks occur Increase the Print Timeout value: 1 From the printer control panel, press . 2 Press the arrow buttons until Settings appears, and then...
User's Guide
Page 180
...are possible solutions. Try one or more information, see the hardware setup documentation that the paper tray is turned on our Web site at www.lexmark.com/publications. For more of the following: MAKE SURE THE PAPER IS LOADED CORRECTLY 1 Open the paper tray. 2 Check for paper jams or...sure the paper tray closes properly. Paper trays These are possible solutions. Try one or more information, see "Updating available options in the printer driver. RESET THE PRINTER Turn the printer off , wait about 10 seconds, and then turn the printer on the menu settings page, but paper jams...
...are possible solutions. Try one or more information, see the hardware setup documentation that the paper tray is turned on our Web site at www.lexmark.com/publications. For more of the following: MAKE SURE THE PAPER IS LOADED CORRECTLY 1 Open the paper tray. 2 Check for paper jams or...sure the paper tray closes properly. Paper trays These are possible solutions. Try one or more information, see "Updating available options in the printer driver. RESET THE PRINTER Turn the printer off , wait about 10 seconds, and then turn the printer on the menu settings page, but paper jams...
User's Guide
Page 211
... Install bin 148 Install duplex 149 Install envelope feeder 149 Install MICR Cartridge 149 Install tray 149 installation wireless network 41, 42 installing options in driver 39 printer software 38 installing options order of installation 34 installing printer software adding options 39 Internal Solutions Port installing 24 troubleshooting 182 Internal Solutions...
... Install bin 148 Install duplex 149 Install envelope feeder 149 Install MICR Cartridge 149 Install tray 149 installation wireless network 41, 42 installing options in driver 39 printer software 38 installing options order of installation 34 installing printer software adding options 39 Internal Solutions Port installing 24 troubleshooting 182 Internal Solutions...
Help Menu Pages
Page 3
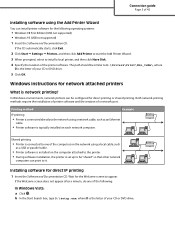
... attached to the printer. • During software installation, the printer is set up to be "shared" so that other network computers can be similar to D:\Drivers\Print\Win_9xMe\, where D is the letter of your CD or DVD drive. 5 Click OK. In Windows environments, network printers can print to one of the...
... attached to the printer. • During software installation, the printer is set up to be "shared" so that other network computers can be similar to D:\Drivers\Print\Win_9xMe\, where D is the letter of your CD or DVD drive. 5 Click OK. In Windows environments, network printers can print to one of the...
Help Menu Pages
Page 19
... a smaller number can be used to adjust and customize output. A positive value will darken text, images, and graphics. Note: Auto is 1200 IQ. The printer driver default is the factory default setting. Enables a print mode preferable for files such as architectural drawings, maps, electrical circuit diagrams, and flow charts Notes: •...
... a smaller number can be used to adjust and customize output. A positive value will darken text, images, and graphics. Note: Auto is 1200 IQ. The printer driver default is the factory default setting. Enables a print mode preferable for files such as architectural drawings, maps, electrical circuit diagrams, and flow charts Notes: •...

Service Manual
Page 32
... required Flat-blade screwdrivers, various sizes #1 Phillips screwdriver, magnetic #2 Phillips screwdriver, magnetic #2 Phillips screwdriver, magnetic short-blade 7/32 inch (5.5 mm) open-end wrench 7.0 mm nut driver Needle nose pliers Diagonal side cutters Spring hook Analog or digital multimeter Flash light (optional) 1-8 Service Manual Results may vary with heavier paper. 4062-XXX...
... required Flat-blade screwdrivers, various sizes #1 Phillips screwdriver, magnetic #2 Phillips screwdriver, magnetic #2 Phillips screwdriver, magnetic short-blade 7/32 inch (5.5 mm) open-end wrench 7.0 mm nut driver Needle nose pliers Diagonal side cutters Spring hook Analog or digital multimeter Flash light (optional) 1-8 Service Manual Results may vary with heavier paper. 4062-XXX...

Service Manual
Page 118
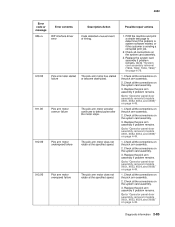
...the customer is sending a corrupted print job. 2. Check all connections on page 4-76. 1. Go to "System card assembly removal (T650, T652, T654, T656)" on the system card assembly. 3. Check all connections on page 4-76. 1. Replace the system card assembly if problem remains. Replace the system... code or message 902.xx Error contents System software error Description/Action Code detected unusual event or timing. 903.xx Paperport link driver error Code detected unusual event or timing. 904.xx Interface violation by RIP Code detected unusual event or timing. 905.xx Interface...
...the customer is sending a corrupted print job. 2. Check all connections on page 4-76. 1. Go to "System card assembly removal (T650, T652, T654, T656)" on the system card assembly. 3. Check all connections on page 4-76. 1. Replace the system card assembly if problem remains. Replace the system... code or message 902.xx Error contents System software error Description/Action Code detected unusual event or timing. 903.xx Paperport link driver error Code detected unusual event or timing. 904.xx Interface violation by RIP Code detected unusual event or timing. 905.xx Interface...
Service Manual
Page 119
... 2. Diagnostic information 2-85 4062 Error code or message 906.xx 910.00 911.00 912.00 913.00 Error contents RIP interface driver error Pick arm motor stalled failure Pick arm motor overrun failure Pick arm motor underspeed failure Pick arm motor overspeed failure Description/Action Code...49. 1. Possible repair actions 1. The pick arm motor has stalled or become obstructed. Go to "System card assembly removal (T650, T652, T654, T656)" on the pick arm assembly. 2. Check all the connections on the system card assembly. 3. Replace the pick arm assembly if problem remains.
... 2. Diagnostic information 2-85 4062 Error code or message 906.xx 910.00 911.00 912.00 913.00 Error contents RIP interface driver error Pick arm motor stalled failure Pick arm motor overrun failure Pick arm motor underspeed failure Pick arm motor overspeed failure Description/Action Code...49. 1. Possible repair actions 1. The pick arm motor has stalled or become obstructed. Go to "System card assembly removal (T650, T652, T654, T656)" on the pick arm assembly. 2. Check all the connections on the system card assembly. 3. Replace the pick arm assembly if problem remains.
Service Manual
Page 149
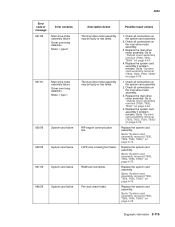
... 937.80 Error contents Main drive motor assembly failure Driver over temp detection. Check all connections on page 4-76. Replace the system card assembly if problem remains. Go to "System card assembly removal (T650, T652, T654, T656)" on the system card assembly. 2. Go...76. Replace the system card assembly. Go to "System card assembly removal (T650, T652, T654, T656)" on page 4-54. 4. Motor = type 0 937.81 Main drive motor assembly failure Driver over temp detection. RAM test incomplete. Pel clock check failed. 1. Replace the main drive motor...
... 937.80 Error contents Main drive motor assembly failure Driver over temp detection. Check all connections on page 4-76. Replace the system card assembly if problem remains. Go to "System card assembly removal (T650, T652, T654, T656)" on the system card assembly. 2. Go...76. Replace the system card assembly. Go to "System card assembly removal (T650, T652, T654, T656)" on page 4-54. 4. Motor = type 0 937.81 Main drive motor assembly failure Driver over temp detection. RAM test incomplete. Pel clock check failed. 1. Replace the main drive motor...

