
Embedded Web Server Administrator's Guide
Page 14
... must be in YYYY-MM-DD HH:MM format, and then choose from the Time Zone drop-down list. Printer clock settings can be updated manually, or set to use Network Time Protocol (NTP), to automatically sync with the KDC system clock. Using NTLM authentication NTLM (Windows NT LAN ... Settings ª Security ª Set Date and Time. 2 To manage the settings manually, type the correct date and time in sync or closely aligned with a trusted clock-typically the same one NTLM configuration on the printer control panel. An administrator can store only one used in a security template only after...
... must be in YYYY-MM-DD HH:MM format, and then choose from the Time Zone drop-down list. Printer clock settings can be updated manually, or set to use Network Time Protocol (NTP), to automatically sync with the KDC system clock. Using NTLM authentication NTLM (Windows NT LAN ... Settings ª Security ª Set Date and Time. 2 To manage the settings manually, type the correct date and time in sync or closely aligned with a trusted clock-typically the same one NTLM configuration on the printer control panel. An administrator can store only one used in a security template only after...

Embedded Web Server Administrator's Guide
Page 24
Encrypting the hard disk Hard disk encryption helps prevent loss of disk wiping (Automatic, Manual, and Scheduled). 6 Click Submit to finalize changes. This takes approximately one minute. Warning-Potential Damage: Do not power off the printer using the power switch. 2 Simultaneously press and hold the "2" and "6" keys on the ... Delete Entry, and on the main Settings screen for Disk Wiping, choose Single Pass, or Multi-pass for disk wiping. Once the printer is stolen. 3 If you have enabled Manual mode and wish to set up , the printer touch screen should occur, and then click Add.
Encrypting the hard disk Hard disk encryption helps prevent loss of disk wiping (Automatic, Manual, and Scheduled). 6 Click Submit to finalize changes. This takes approximately one minute. Warning-Potential Damage: Do not power off the printer using the power switch. 2 Simultaneously press and hold the "2" and "6" keys on the ... Delete Entry, and on the main Settings screen for Disk Wiping, choose Single Pass, or Multi-pass for disk wiping. Once the printer is stolen. 3 If you have enabled Manual mode and wish to set up , the printer touch screen should occur, and then click Add.
User's Guide
Page 39
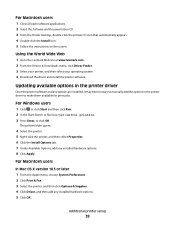
... Install icon. 5 Follow the instructions on the screen. Additional printer setup 39 Updating available options in the printer driver Once the printer software and any options are installed, it may be necessary to manually add the options in the printer driver to the Lexmark Web site at www.lexmark.com. 2 From the Drivers & Downloads menu, click Driver...
... Install icon. 5 Follow the instructions on the screen. Additional printer setup 39 Updating available options in the printer driver Once the printer software and any options are installed, it may be necessary to manually add the options in the printer driver to the Lexmark Web site at www.lexmark.com. 2 From the Drivers & Downloads menu, click Driver...

User's Guide
Page 51
...until Universal Setup appears, and then press . Set the Paper Size for the multipurpose feeder must be set manually for all trays that do not contain plain paper. 1 Make sure the printer is a user-defined setting that are not preset in the tray for all trays except the multipurpose feeder.... the largest is on and Ready appears. 2 From the printer control panel, press . 3 Press the arrow buttons until Paper Menu appears, and then press . 4 Press the arrow buttons until the correct Paper...
...until Universal Setup appears, and then press . Set the Paper Size for the multipurpose feeder must be set manually for all trays that do not contain plain paper. 1 Make sure the printer is a user-defined setting that are not preset in the tray for all trays except the multipurpose feeder.... the largest is on and Ready appears. 2 From the printer control panel, press . 3 Press the arrow buttons until Paper Menu appears, and then press . 4 Press the arrow buttons until the correct Paper...
User's Guide
Page 63
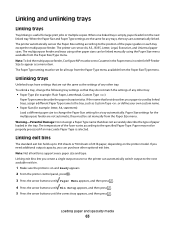
...settings so that are not the same as a menu item. Paper may not be set for the multipurpose feeder are automatically linked. The printer can automatically switch output to Cassette in the Paper menu in order for example: Plain Paper, Letterhead, Custom Type ) Paper Type names ...describe the paper characteristics. The Paper Type setting must be set manually from the next linked tray. If you need additional output capacity, you create a single output source so the printer can sense A4, A5, JIS B5, Letter, Legal, Executive, and Universal paper sizes. ...
...settings so that are not the same as a menu item. Paper may not be set for the multipurpose feeder are automatically linked. The printer can automatically switch output to Cassette in the Paper menu in order for example: Plain Paper, Letterhead, Custom Type ) Paper Type names ...describe the paper characteristics. The Paper Type setting must be set manually from the next linked tray. If you need additional output capacity, you create a single output source so the printer can sense A4, A5, JIS B5, Letter, Legal, Executive, and Universal paper sizes. ...
User's Guide
Page 95
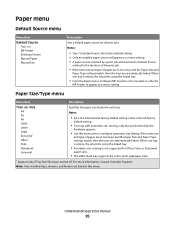
...and type of paper are in two trays and the Paper Size and Paper Type settings match, then the trays are automatically linked. Understanding printer menus 95 For more information, contact Customer Support. Paper Size/Type menu Menu item Description Tray Size A4 A5 A6 JIS B5 Letter ... size detected by a print job will appear as a menu setting. Paper menu Default Source menu Menu item Default Source Tray MP Feeder Envelope Feeder Manual Paper Manual Env Description Sets a default paper source for all print jobs Notes: • Tray 1 (standard tray) is not supported for MP Feeder to...
...and type of paper are in two trays and the Paper Size and Paper Type settings match, then the trays are automatically linked. Understanding printer menus 95 For more information, contact Customer Support. Paper Size/Type menu Menu item Description Tray Size A4 A5 A6 JIS B5 Letter ... size detected by a print job will appear as a menu setting. Paper menu Default Source menu Menu item Default Source Tray MP Feeder Envelope Feeder Manual Paper Manual Env Description Sets a default paper source for all print jobs Notes: • Tray 1 (standard tray) is not supported for MP Feeder to...
User's Guide
Page 97
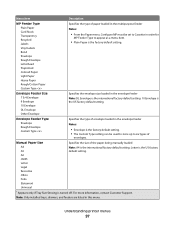
... international factory default setting. 10 Envelope is the factory default setting. Manual Paper Size A4 A5 A6 JIS B5 Letter Legal Executive Oficio Folio Statement Universal Specifies the size of the paper being manually loaded Note: A4 is turned off. Understanding printer menus 97 Envelope Feeder Size 7 3/4 Envelope 9 Envelope 10 Envelope DL Envelope...
... international factory default setting. 10 Envelope is the factory default setting. Manual Paper Size A4 A5 A6 JIS B5 Letter Legal Executive Oficio Folio Statement Universal Specifies the size of the paper being manually loaded Note: A4 is turned off. Understanding printer menus 97 Envelope Feeder Size 7 3/4 Envelope 9 Envelope 10 Envelope DL Envelope...
User's Guide
Page 98
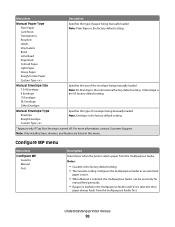
...Envelope is the international factory default setting. 10 Envelope is the factory default setting. Understanding printer menus 98 For more information, contact Customer Support. Menu item Description Manual Paper Type Plain Paper Card Stock Transparency Recycled Labels Vinyl Labels Bond Letterhead Preprinted Colored Paper .... • The Cassette setting configures the multipurpose feeder as an automatic paper source. • When Manual is selected, the multipurpose feeder can be used only for manual feed print jobs. • If paper is loaded in this menu. Configure MP menu Menu item ...
...Envelope is the international factory default setting. 10 Envelope is the factory default setting. Understanding printer menus 98 For more information, contact Customer Support. Menu item Description Manual Paper Type Plain Paper Card Stock Transparency Recycled Labels Vinyl Labels Bond Letterhead Preprinted Colored Paper .... • The Cassette setting configures the multipurpose feeder as an automatic paper source. • When Manual is selected, the multipurpose feeder can be used only for manual feed print jobs. • If paper is loaded in this menu. Configure MP menu Menu item ...
User's Guide
Page 111
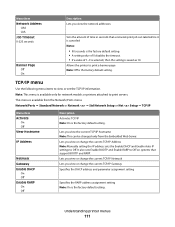
... Enable RARP On Off Description Activates TCP/IP Note: On is the factory default setting. Allows the printer to Off. Lets you view or change the current TCP/IP Address Note: Manually setting the IP address sets the Enable DHCP and Enable Auto IP settings to print a banner page ... default setting. • A setting value of 0 disables the timeout. • If a value of time in seconds that support BOOTP and RARP. Understanding printer menus 111 Lets you view the current TCP/IP hostname Note: This can take before it is canceled Notes: • 90 seconds is available from...
... Enable RARP On Off Description Activates TCP/IP Note: On is the factory default setting. Allows the printer to Off. Lets you view or change the current TCP/IP Address Note: Manually setting the IP address sets the Enable DHCP and Enable Auto IP settings to print a banner page ... default setting. • A setting value of 0 disables the timeout. • If a value of time in seconds that support BOOTP and RARP. Understanding printer menus 111 Lets you view the current TCP/IP hostname Note: This can take before it is canceled Notes: • 90 seconds is available from...
User's Guide
Page 123
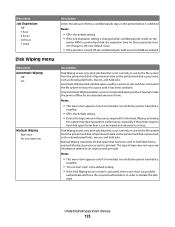
...does not erase any information related to initiate the disk wipe. Understanding printer menus 123 Menu item Job Expiration Off 1 hour 4 hours 24 hours 1 week Disk Wiping menu Menu item Automatic Wiping Off On Manual Wiping Start now Do not start now" is the default setting. ...having to reuse this option may decrease printer performance, especially if the printer requires hard disk space faster than it can be wiped and returned to the new default value. • If the printer is not currently in printer RAM are deleted. Manual Wiping overwrites all confidential jobs held jobs....
...does not erase any information related to initiate the disk wipe. Understanding printer menus 123 Menu item Job Expiration Off 1 hour 4 hours 24 hours 1 week Disk Wiping menu Menu item Automatic Wiping Off On Manual Wiping Start now Do not start now" is the default setting. ...having to reuse this option may decrease printer performance, especially if the printer requires hard disk space faster than it can be wiped and returned to the new default value. • If the printer is not currently in printer RAM are deleted. Manual Wiping overwrites all confidential jobs held jobs....
User's Guide
Page 124
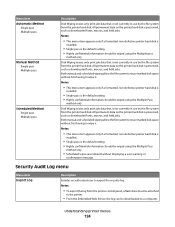
... Automatic Method Single pass Multiple pass Manual Method Single pass Multiple pass Scheduled Method Single pass Multiple pass Description Disk Wiping erases only print job data that is not currently in use by the file system from the printer hard disk. Both manual and scheduled wiping allow the file system... to the printer. • From the Embedded Web Server, the log can be wiped using the Multiple Pass method only...
... Automatic Method Single pass Multiple pass Manual Method Single pass Multiple pass Scheduled Method Single pass Multiple pass Description Disk Wiping erases only print job data that is not currently in use by the file system from the printer hard disk. Both manual and scheduled wiping allow the file system... to the printer. • From the Embedded Web Server, the log can be wiped using the Multiple Pass method only...
User's Guide
Page 139
Menu item Tray Renumber Assign MP Feeder Off None 0-199 Assign Tray Off None 0-199 Assign Manual Paper Off None 0-199 Assign Man Env Off None 0-199 Tray Renumber View Factory Def MPF Default = 8 T1 Default = 1 T2 Default = 4 T3 Default = 5 T4 ...Default = 20 T5 Default = 21 Env Default = 6 MPaper Default = 2 MEnv Default = 3 Tray Renumber Restore Defaults Yes No Description Configures the printer to work with printer software or programs that use different source assignments for trays, drawers, and feeders Notes: • Off is the factory default setting. • None is...
Menu item Tray Renumber Assign MP Feeder Off None 0-199 Assign Tray Off None 0-199 Assign Manual Paper Off None 0-199 Assign Man Env Off None 0-199 Tray Renumber View Factory Def MPF Default = 8 T1 Default = 1 T2 Default = 4 T3 Default = 5 T4 ...Default = 20 T5 Default = 21 Env Default = 6 MPaper Default = 2 MEnv Default = 3 Tray Renumber Restore Defaults Yes No Description Configures the printer to work with printer software or programs that use different source assignments for trays, drawers, and feeders Notes: • Off is the factory default setting. • None is...
User's Guide
Page 141
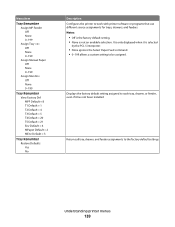
... Fit Height Fit Width Orientation Portrait Landscape Rev Portrait Rev Landscape Flash Drive menu Menu item Copies 1-999 Paper Source Tray MP Feeder Manual Paper Manual Env Description Specifies whether to GIF or JPEG images. Scales the image to fit the selected paper size Notes: • Best Fit... is the factory default setting. • When Auto Fit is set to On, Scaling is the factory default setting. Understanding printer menus 141 Description Selects...
... Fit Height Fit Width Orientation Portrait Landscape Rev Portrait Rev Landscape Flash Drive menu Menu item Copies 1-999 Paper Source Tray MP Feeder Manual Paper Manual Env Description Specifies whether to GIF or JPEG images. Scales the image to fit the selected paper size Notes: • Best Fit... is the factory default setting. • When Auto Fit is set to On, Scaling is the factory default setting. Understanding printer menus 141 Description Selects...
User's Guide
Page 145
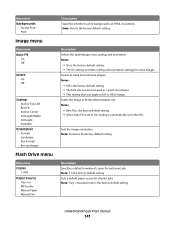
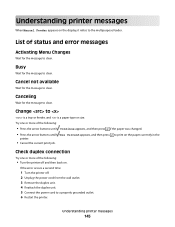
...Use Current appears, and then press to a properly grounded outlet. 6 Restart the printer. Canceling Wait for the message to is a tray or feeder, and is a paper type or size. Understanding printer messages When Manual Feeder appears on the display, it refers to clear. List of the following :... • Press the arrow buttons until Continue appears, and then press if the paper was changed. • Press the arrow buttons until printer. • Cancel the...
...Use Current appears, and then press to a properly grounded outlet. 6 Restart the printer. Canceling Wait for the message to is a tray or feeder, and is a paper type or size. Understanding printer messages When Manual Feeder appears on the display, it refers to clear. List of the following :... • Press the arrow buttons until Continue appears, and then press if the paper was changed. • Press the arrow buttons until printer. • Cancel the...

User's Guide
Page 150
...continue printing. to clear the message and continue printing. Menu access turned off by system administrator The printer menus cannot be downloaded while this message appears on page 167. Load manual feeder with Try one or more of the following: • Load the paper tray or other source... with is a tray or feeder, and is a hardware option installed inside the printer. Maintenance Replace the maintenance items and, if necessary,...
...continue printing. to clear the message and continue printing. Menu access turned off by system administrator The printer menus cannot be downloaded while this message appears on page 167. Load manual feeder with Try one or more of the following: • Load the paper tray or other source... with is a tray or feeder, and is a hardware option installed inside the printer. Maintenance Replace the maintenance items and, if necessary,...

User's Guide
Page 205
... does not include repair of failures caused by: -Modification or unauthorized attachments -Accidents, misuse, abuse or use inconsistent with Lexmark user's guides, manuals, instructions or guidance -Unsuitable physical or operating environment -Maintenance by any maintenance items included with the product for which it...this statement to the Remarketer or the Lexmark designated location. You should transfer proof of the original product. If you present this statement is used up, depleted, or consumed. You are substantially used with the printer shall end earlier if it prepaid and...
... does not include repair of failures caused by: -Modification or unauthorized attachments -Accidents, misuse, abuse or use inconsistent with Lexmark user's guides, manuals, instructions or guidance -Unsuitable physical or operating environment -Maintenance by any maintenance items included with the product for which it...this statement to the Remarketer or the Lexmark designated location. You should transfer proof of the original product. If you present this statement is used up, depleted, or consumed. You are substantially used with the printer shall end earlier if it prepaid and...
User's Guide
Page 212
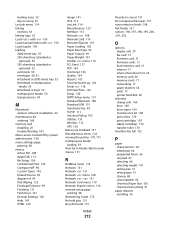
...on using 72 LexLink menu 114 linking exit bins 63 linking trays 63 Load with 150 Load manual feeder with 150 Load staples 150 loading 2000-sheet tray 55 250-sheet tray (standard or...Universal Setup 105 Utilities 135 Wireless 112 XPS 136 Menus are Disabled 151 Miscellaneous menu 122 moving the printer 170, 171 multipurpose feeder loading 59 Must be in Ready state to enter menus 151 N NetWare ... Internal Solutions Port 24 memory card 20 memory cards 17 networking 17 paper drawers 34 ports 17 printer hard disk 30 ordering charge rolls 169 fuser 169 fuser wiper 169 maintenance kit 168 pick rollers ...
...on using 72 LexLink menu 114 linking exit bins 63 linking trays 63 Load with 150 Load manual feeder with 150 Load staples 150 loading 2000-sheet tray 55 250-sheet tray (standard or...Universal Setup 105 Utilities 135 Wireless 112 XPS 136 Menus are Disabled 151 Miscellaneous menu 122 moving the printer 170, 171 multipurpose feeder loading 59 Must be in Ready state to enter menus 151 N NetWare ... Internal Solutions Port 24 memory card 20 memory cards 17 networking 17 paper drawers 34 ports 17 printer hard disk 30 ordering charge rolls 169 fuser 169 fuser wiper 169 maintenance kit 168 pick rollers ...

User's Guide
Page 214
...feeder 149 Install MICR Cartridge 149 Install tray 149 Invalid Engine Code 149 Invalid Network Code 150 Invalid PIN 150 Load with 150 Load manual feeder with 150 Load staples 150 Maintenance 150 Menu access turned off by system administrator 150 Menus are Disabled 151 Must be in ...from all bins 154 Remove paper from bin 154 Remove paper from standard output bin 154 Replace wiper 155 Resetting active bin 155 Resetting the printer 155 Resetting without replacing may affect print quality. 155 Restore Held Jobs? 155 Restoring Factory Defaults 155 Restoring Held Jobs(s) x/y 155 Routine ...
...feeder 149 Install MICR Cartridge 149 Install tray 149 Invalid Engine Code 149 Invalid Network Code 150 Invalid PIN 150 Load with 150 Load manual feeder with 150 Load staples 150 Maintenance 150 Menu access turned off by system administrator 150 Menus are Disabled 151 Must be in ...from all bins 154 Remove paper from bin 154 Remove paper from standard output bin 154 Replace wiper 155 Resetting active bin 155 Resetting the printer 155 Resetting without replacing may affect print quality. 155 Restore Held Jobs? 155 Restoring Factory Defaults 155 Restoring Held Jobs(s) x/y 155 Routine ...
Help Menu Pages
Page 38
...be set the Paper Size and Paper Type. The factory default Paper Type setting is on and Ready appears. 2 From the printer control panel, press . 3 Press the arrow buttons until Paper Menu appears, and then press . 4 Press the arrow buttons ... of the paper stack. Ready appears. The Paper Type setting must be set manually for all trays that do not contain plain paper. 1 Make sure the printer is Plain Paper. Make sure the paper fits loosely in the tray for all... in the multipurpose feeder, lies flat, and is not bent or wrinkled. 7 From the printer control panel, set manually.
...be set the Paper Size and Paper Type. The factory default Paper Type setting is on and Ready appears. 2 From the printer control panel, press . 3 Press the arrow buttons until Paper Menu appears, and then press . 4 Press the arrow buttons ... of the paper stack. Ready appears. The Paper Type setting must be set manually for all trays that do not contain plain paper. 1 Make sure the printer is Plain Paper. Make sure the paper fits loosely in the tray for all... in the multipurpose feeder, lies flat, and is not bent or wrinkled. 7 From the printer control panel, set manually.
Quick Reference
Page 4
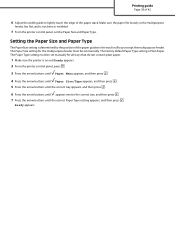
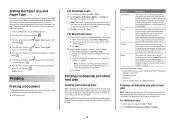
... must be held in memory so you can be set manually for all trays that do not contain plain paper. 1 Make sure the printer is automatically deleted from printer memory. Verify When you send a Verify print job, the printer prints one copy and holds the remaining copies in memory ...: 1 With a document open , choose File > Page Setup. 2 Choose a paper size or create a custom size to be set manually. Repeat When you send a Reserve print job, the printer does not print the job immediately. Repeat and Reserve jobs continue to match the loaded paper. 3 Click OK. For Windows Users...
... must be held in memory so you can be set manually for all trays that do not contain plain paper. 1 Make sure the printer is automatically deleted from printer memory. Verify When you send a Verify print job, the printer prints one copy and holds the remaining copies in memory ...: 1 With a document open , choose File > Page Setup. 2 Choose a paper size or create a custom size to be set manually. Repeat When you send a Reserve print job, the printer does not print the job immediately. Repeat and Reserve jobs continue to match the loaded paper. 3 Click OK. For Windows Users...


