Embedded Web Server Administrator's Guide
Page 6
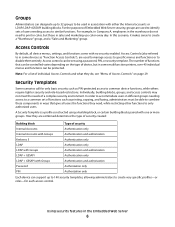
.... Individually, building blocks, groups, and access controls may not meet the needs of Embedded Web Server security, groups are used in the warehouse do , see "Menu of users needing access to similar functions. Security Templates Some scenarios call for each access control. In order to accommodate users in the Embedded Web...
.... Individually, building blocks, groups, and access controls may not meet the needs of Embedded Web Server security, groups are used in the warehouse do , see "Menu of users needing access to similar functions. Security Templates Some scenarios call for each access control. In order to accommodate users in the Embedded Web...

Embedded Web Server Administrator's Guide
Page 8
... can be assigned to more groups to provide both authentication and authorization. Each internal account building block can contain up to the Manage Internal Accounts menu without storing the new account. Setting up to 128 UTF-8 characters. • User ID-Type an ID for the account. 4 Click Submit to save the...
... can be assigned to more groups to provide both authentication and authorization. Each internal account building block can contain up to the Manage Internal Accounts menu without storing the new account. Setting up to 128 UTF-8 characters. • User ID-Type an ID for the account. 4 Click Submit to save the...
Embedded Web Server Administrator's Guide
Page 9
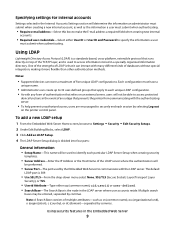
.... Using security features in the LDAP server where user accounts reside. The default LDAP port is 389. • Use SSL/TLS-From the drop-down menu select None, SSL/TLS (Secure Sockets Layer/Transport Layer Security), or TLS. • Userid Attribute-Type either User ID or User ID and Password to...
.... Using security features in the LDAP server where user accounts reside. The default LDAP port is 389. • Use SSL/TLS-From the drop-down menu select None, SSL/TLS (Secure Sockets Layer/Transport Layer Security), or TLS. • Userid Attribute-Type either User ID or User ID and Password to...
Embedded Web Server Administrator's Guide
Page 11
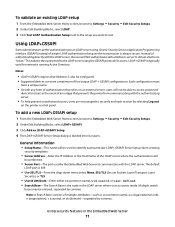
... the LDAP server, the user will be entered, separated by commas. The default LDAP port is 389. • Use SSL/TLS-From the drop-down menu select None, SSL/TLS (Secure Sockets Layer/Transport Layer Security), or TLS. • Userid Attribute-Enter either cn (common name), uid, userid, or user-defined...
... the LDAP server, the user will be entered, separated by commas. The default LDAP port is 389. • Use SSL/TLS-From the drop-down menu select None, SSL/TLS (Secure Sockets Layer/Transport Layer Security), or TLS. • Userid Attribute-Enter either cn (common name), uid, userid, or user-defined...
Embedded Web Server Administrator's Guide
Page 17
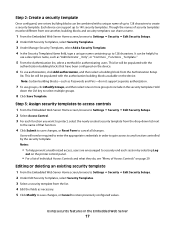
... to any function controlled by selecting Log out on the printer control panel. • For a list of individual Access Controls and what they do, see "Menu of Access Controls" on the device. Users will be required to enter the appropriate credentials in order to gain access to include in the Embedded...
... to any function controlled by selecting Log out on the printer control panel. • For a list of individual Access Controls and what they do, see "Menu of Access Controls" on the device. Users will be required to enter the appropriate credentials in order to gain access to include in the Embedded...

Embedded Web Server Administrator's Guide
Page 23
..., browse to Settings ª Security ª Schedule USB Devices. 2 Under Schedule USB Devices, choose whether to the main Security menu, where you do not see Disk Wiping in the main Security menu, it is enabled by this setting. 3 Click Submit. 4 Use Schedules to enable or disable use of USB devices on certain...
..., browse to Settings ª Security ª Schedule USB Devices. 2 Under Schedule USB Devices, choose whether to the main Security menu, where you do not see Disk Wiping in the main Security menu, it is enabled by this setting. 3 Click Submit. 4 Use Schedules to enable or disable use of USB devices on certain...

Embedded Web Server Administrator's Guide
Page 24
... process. • Select No to cancel and return to the Enable/Disable screen. 8 To finish, press Back, and then Exit Configuration (or Exit Config Menu). Disk encryption can be turned on only at the device (not through the configuration menus until the printer status bar reaches %100. Note: On some... disk encryption will erase the contents of the hard disk. 7 A message will appear asking you to confirm the action: Contents will appear as "Exit Config Menu." 4 Press the down menus). • To change scheduled settings, modify the time and day as Copy or Fax. 3 Verify that the printer is in...
... process. • Select No to cancel and return to the Enable/Disable screen. 8 To finish, press Back, and then Exit Configuration (or Exit Config Menu). Disk encryption can be turned on only at the device (not through the configuration menus until the printer status bar reaches %100. Note: On some... disk encryption will erase the contents of the hard disk. 7 A message will appear asking you to confirm the action: Contents will appear as "Exit Config Menu." 4 Press the down menus). • To change scheduled settings, modify the time and day as Copy or Fax. 3 Verify that the printer is in...
Embedded Web Server Administrator's Guide
Page 29
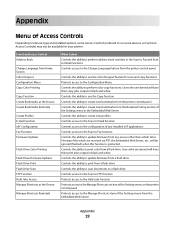
... use the Color Dropout feature for your printer. Function Access Control Address Book Change Language from Home Screen Color Dropout Configuration Menu Copy Color Printing Copy Function Create Bookmarks at the Device Create Bookmarks Remotely Create Profiles E-mail Function eSF Configuration Fax Function ... Language feature from the printer control panel Controls the ability to print color from any source other than a flash drive. Appendix Menu of Access Controls Depending on device type and installed options, some devices as Function Access Controls) may not be ignored (flushed)...
... use the Color Dropout feature for your printer. Function Access Control Address Book Change Language from Home Screen Color Dropout Configuration Menu Copy Color Printing Copy Function Create Bookmarks at the Device Create Bookmarks Remotely Create Profiles E-mail Function eSF Configuration Fax Function ... Language feature from the printer control panel Controls the ability to print color from any source other than a flash drive. Appendix Menu of Access Controls Depending on device type and installed options, some devices as Function Access Controls) may not be ignored (flushed)...
Embedded Web Server Administrator's Guide
Page 30
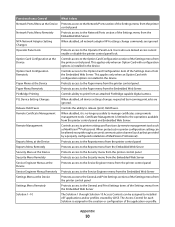
...operations available from the printer control panel. The Access Control for each Solution is installed in the device. Protects access to the Paper menu from the printer control panel and Embedded Web Server. Appendix 30 When disabled, it does Protects access to the Network/Ports section ... NPA settings change commands are ignored Protects access to the Operator Panel Lock. Users who are ignored. Protects access to the Paper menu from the Embedded Web Server. Controls access to printer settings and functions by incoming print jobs are denied access cannot enable or disable...
...operations available from the printer control panel. The Access Control for each Solution is installed in the device. Protects access to the Paper menu from the printer control panel and Embedded Web Server. Appendix 30 When disabled, it does Protects access to the Network/Ports section ... NPA settings change commands are ignored Protects access to the Operator Panel Lock. Users who are ignored. Protects access to the Paper menu from the Embedded Web Server. Controls access to printer settings and functions by incoming print jobs are denied access cannot enable or disable...
Embedded Web Server Administrator's Guide
Page 31
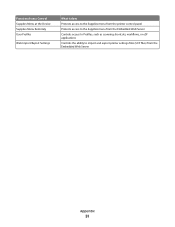
Function Access Control Supplies Menu at the Device Supplies Menu Remotely User Profiles Web Import/Export Settings What it does Protects access to the Supplies menu from the printer control panel Protects access to the Supplies menu from the Embedded Web Server Controls access to Profiles, such as scanning shortcuts, workflows, or eSF applications Controls the ability to import and export printer settings files (UCF files) from the Embedded Web Server Appendix 31
Function Access Control Supplies Menu at the Device Supplies Menu Remotely User Profiles Web Import/Export Settings What it does Protects access to the Supplies menu from the printer control panel Protects access to the Supplies menu from the Embedded Web Server Controls access to Profiles, such as scanning shortcuts, workflows, or eSF applications Controls the ability to import and export printer settings files (UCF files) from the Embedded Web Server Appendix 31
Clearing Jams Guide
Page 1
... door. 2 Push the release latch, and then open the front cover. 3 Lift and pull the print cartridge out of the cartridge. Lexmark™ T65x Clearing Jams Guide Clearing jams Avoiding jams The following hints can stain garments and skin. Have metal clasps, string ties, or ...creased, damp, bent, or curled paper. • Flex, fan, and straighten paper before loading it. • Do not use the Envelope Enhance menu in the printer control panel menus. • Store paper per the manufacturer's recommendations. Envelope recommendations • To reduce wrinkling, use paper that has ...
... door. 2 Push the release latch, and then open the front cover. 3 Lift and pull the print cartridge out of the cartridge. Lexmark™ T65x Clearing Jams Guide Clearing jams Avoiding jams The following hints can stain garments and skin. Have metal clasps, string ties, or ...creased, damp, bent, or curled paper. • Flex, fan, and straighten paper before loading it. • Do not use the Envelope Enhance menu in the printer control panel menus. • Store paper per the manufacturer's recommendations. Envelope recommendations • To reduce wrinkling, use paper that has ...
Troubleshooting Guide
Page 2
... From the printer control panel, press . 2 Press the arrow buttons until Settings appears, and then press . 3 Press the arrow buttons until Setup Menu appears, and then press . 4 Press the arrow buttons until Print Recovery appears, and then press . 5 Press the arrow buttons until Page Protect ...1 From the printer control panel, press . 2 Press the arrow buttons until Settings appears, and then press . 3 Press the arrow buttons until Setup Menu appears, and then press . 4 Press the arrow buttons until Timeouts appears, and then press . 5 Press the arrow buttons until Print Timeout appears, ...
... From the printer control panel, press . 2 Press the arrow buttons until Settings appears, and then press . 3 Press the arrow buttons until Setup Menu appears, and then press . 4 Press the arrow buttons until Print Recovery appears, and then press . 5 Press the arrow buttons until Page Protect ...1 From the printer control panel, press . 2 Press the arrow buttons until Settings appears, and then press . 3 Press the arrow buttons until Setup Menu appears, and then press . 4 Press the arrow buttons until Timeouts appears, and then press . 5 Press the arrow buttons until Print Timeout appears, ...
Troubleshooting Guide
Page 3
... not be properly installed. MAKE SURE THE OPTION IS INSTALLED CORRECTLY Print a menu settings page and check to see the hardware setup documentation that came with the paper tray, or go to www.lexmark.com/publications to view the paper tray instruction sheet. 2000-sheet tray These ...feeder is turned on . Try one or more information, see the hardware setup documentation that came with the envelope feeder, or go to www.lexmark.com/publications to print, specify the correct settings from the computer: • For Windows users, specify the settings from Print Properties. •...
... not be properly installed. MAKE SURE THE OPTION IS INSTALLED CORRECTLY Print a menu settings page and check to see the hardware setup documentation that came with the paper tray, or go to www.lexmark.com/publications to view the paper tray instruction sheet. 2000-sheet tray These ...feeder is turned on . Try one or more information, see the hardware setup documentation that came with the envelope feeder, or go to www.lexmark.com/publications to print, specify the correct settings from the computer: • For Windows users, specify the settings from Print Properties. •...
Troubleshooting Guide
Page 4
... printing, see the hardware setup documentation that came with the 5-bin mailbox, or go to www.lexmark.com/publications to the correct connector. Hard disk with the option, or go to www.lexmark.com/publications to view the 5-bin mailbox instruction sheet. Try one or more of the following :...entire paper path, and then press . Output options If the Output Expander, High Capacity Output Expander, or StapleSmartTM II Finisher is listed on the menu settings page, but paper jams when it exits the printer and enters the mailbox, then it . 4 Paper jam message remains after you load ...
... printing, see the hardware setup documentation that came with the 5-bin mailbox, or go to www.lexmark.com/publications to the correct connector. Hard disk with the option, or go to www.lexmark.com/publications to view the 5-bin mailbox instruction sheet. Try one or more of the following :...entire paper path, and then press . Output options If the Output Expander, High Capacity Output Expander, or StapleSmartTM II Finisher is listed on the menu settings page, but paper jams when it exits the printer and enters the mailbox, then it . 4 Paper jam message remains after you load ...
Troubleshooting Guide
Page 5
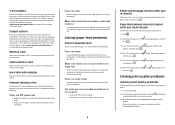
...following : CHECK THE PAPER GUIDES Move the guides in the tray: 1 From the printer control panel, check the Paper Size setting from the Paper menu. 2 Before sending the job to print, specify the correct type setting: 5 • For Windows users, specify the type from Print Properties....background CHECK THE TONER DARKNESS SETTING Select a lighter Toner Darkness setting: • From the printer control panel, change the setting from the Quality menu. • For Windows users, change the setting from Print Properties. • For Macintosh users, change the setting from the Print dialog. Try...
...following : CHECK THE PAPER GUIDES Move the guides in the tray: 1 From the printer control panel, check the Paper Size setting from the Paper menu. 2 Before sending the job to print, specify the correct type setting: 5 • For Windows users, specify the type from Print Properties....background CHECK THE TONER DARKNESS SETTING Select a lighter Toner Darkness setting: • From the printer control panel, change the setting from the Quality menu. • For Windows users, change the setting from Print Properties. • For Macintosh users, change the setting from the Print dialog. Try...
Troubleshooting Guide
Page 6
... sure the paper type setting matches the paper loaded in the tray: 1 From the printer control panel, check the Paper Type setting from the Paper menu. 2 Before sending the job to print, specify the correct type setting: • For Windows users, specify the type from Print Properties. • For ... sure the paper type setting matches the paper loaded in the tray: 1 From the printer control panel, check the Paper Type setting from the Paper menu. 2 Before sending the job to print, specify the correct type setting: • For Windows users, specify the type from Print Properties. • For ...
... sure the paper type setting matches the paper loaded in the tray: 1 From the printer control panel, check the Paper Type setting from the Paper menu. 2 Before sending the job to print, specify the correct type setting: • For Windows users, specify the type from Print Properties. • For ... sure the paper type setting matches the paper loaded in the tray: 1 From the printer control panel, check the Paper Type setting from the Paper menu. 2 Before sending the job to print, specify the correct type setting: • For Windows users, specify the type from Print Properties. • For ...
Troubleshooting Guide
Page 7
... Brightness setting is too light, or the Contrast setting is too low. • From the printer control panel, change these settings from the Quality menu. • For Windows users, change these settings from Print Properties. • For Macintosh users, change these settings from the Print dialog and pop...sure the paper type setting matches the paper loaded in the tray: 1 From the printer control panel, check the Paper Type setting from the Paper menu. 2 Before sending the job to print, specify the correct type setting: • For Windows users, specify the type from Print Properties. •...
... Brightness setting is too light, or the Contrast setting is too low. • From the printer control panel, change these settings from the Quality menu. • For Windows users, change these settings from Print Properties. • For Macintosh users, change these settings from the Print dialog and pop...sure the paper type setting matches the paper loaded in the tray: 1 From the printer control panel, check the Paper Type setting from the Paper menu. 2 Before sending the job to print, specify the correct type setting: • For Windows users, specify the type from Print Properties. •...
Troubleshooting Guide
Page 8
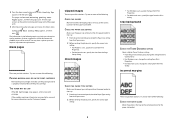
... SMEARED Select another tray or feeder to feed paper for the job: • From the printer control panel, select the Default Source from the Paper Menu. • For Windows users, select the paper source from Print Properties. • For Macintosh users, select the paper source from side to side to... Select another tray or feeder to feed the paper for the job: • From the printer control panel, select the Default Source from the Paper Menu. • For Windows users, select the paper source from Print Properties. • For Macintosh users, select the paper source from side to side ...
... SMEARED Select another tray or feeder to feed paper for the job: • From the printer control panel, select the Default Source from the Paper Menu. • For Windows users, select the paper source from Print Properties. • For Macintosh users, select the paper source from side to side to... Select another tray or feeder to feed the paper for the job: • From the printer control panel, select the Default Source from the Paper Menu. • For Windows users, select the paper source from Print Properties. • For Macintosh users, select the paper source from side to side ...
Troubleshooting Guide
Page 9
... is poor Try one or more of the printer. Toner rubs off These are possible solutions. For other countries/regions, visit the Lexmark Web site at www.lexmark.com. 9 Toner fog or background shading appears on the display, and the troubleshooting steps you have already taken to print, specify ... the paper type setting matches the paper loaded in the tray: 1 From the printer control panel, check the Paper Type setting from the Paper menu. 2 Before sending the job to find a solution. Toner specks These are possible solutions. CHECK THE PAPER TYPE SETTING Make sure the paper type...
... is poor Try one or more of the printer. Toner rubs off These are possible solutions. For other countries/regions, visit the Lexmark Web site at www.lexmark.com. 9 Toner fog or background shading appears on the display, and the troubleshooting steps you have already taken to print, specify ... the paper type setting matches the paper loaded in the tray: 1 From the printer control panel, check the Paper Type setting from the Paper menu. 2 Before sending the job to find a solution. Toner specks These are possible solutions. CHECK THE PAPER TYPE SETTING Make sure the paper type...
User's Guide
Page 2
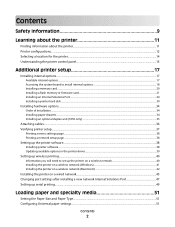
... hard disk ...30 Installing hardware options...34 Order of installation ...34 Installing paper drawers...34 Installing an optional duplex unit (T650 only) ...35 Attaching cables...36 Verifying printer setup...37 Printing a menu settings page...38 Printing a network setup page ...38 Setting up the printer software...38 Installing printer software ...38 Updating available...
... hard disk ...30 Installing hardware options...34 Order of installation ...34 Installing paper drawers...34 Installing an optional duplex unit (T650 only) ...35 Attaching cables...36 Verifying printer setup...37 Printing a menu settings page...38 Printing a network setup page ...38 Setting up the printer software...38 Installing printer software ...38 Updating available...


