Clearing Jams Guide
Page 1
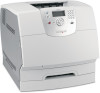
... deflector, and remove the jam. CAUTION: The inside of the printer may be hot. 3 Lift and pull the print cartridge out of the cartridge. Lexmark™ T64x Clearing Jams Guide Avoiding jams The following hints can help you are holding the cartridge. 4 Place the print cartridge aside. If jams do... * 200 and 201 Paper jams Open the top front cover, remove the print cartridge, and remove the jam. 202 Paper Jam Open the rear door on the underside of the printer. Warning: Do not touch the photoconductor drum on the printer, Open...
... deflector, and remove the jam. CAUTION: The inside of the printer may be hot. 3 Lift and pull the print cartridge out of the cartridge. Lexmark™ T64x Clearing Jams Guide Avoiding jams The following hints can help you are holding the cartridge. 4 Place the print cartridge aside. If jams do... * 200 and 201 Paper jams Open the top front cover, remove the print cartridge, and remove the jam. 202 Paper Jam Open the rear door on the underside of the printer. Warning: Do not touch the photoconductor drum on the printer, Open...
Clearing Jams Guide
Page 2
..., and press . Remove the jammed media. 3 Close the rear door. 4 Press . 3 Close the duplex rear door. Otherwise, continue with step 2. 2 Open the printer rear door. 23x Paper Jam Open Duplex Rear Door 1 Open the duplex rear door. 6 Align and reinstall the print cartridge. 7 Close the top front cover. 8 Close the multipurpose feeder. 9 Press . 2 Remove the jammed...
..., and press . Remove the jammed media. 3 Close the rear door. 4 Press . 3 Close the duplex rear door. Otherwise, continue with step 2. 2 Open the printer rear door. 23x Paper Jam Open Duplex Rear Door 1 Open the duplex rear door. 6 Align and reinstall the print cartridge. 7 Close the top front cover. 8 Close the multipurpose feeder. 9 Press . 2 Remove the jammed...
Clearing Jams Guide
Page 4
.... 4 Close the output bin rear doors, and make sure all doors are secure. 5 Press . 28x Paper Jam Check Finisher To clear a jam in toward the center. 6 Lower the envelope weight. 1 2 1 If the paper is secure. 4 Lift the front edge of the finisher output bin cover until it locks into position.... Otherwise, continue with step 2. 2 Push the output bin rear door latches in the finisher: 2 Remove the jammed media. 3 Close the rear door, and make sure the door is exiting into the bin or ...
.... 4 Close the output bin rear doors, and make sure all doors are secure. 5 Press . 28x Paper Jam Check Finisher To clear a jam in toward the center. 6 Lower the envelope weight. 1 2 1 If the paper is secure. 4 Lift the front edge of the finisher output bin cover until it locks into position.... Otherwise, continue with step 2. 2 Push the output bin rear door latches in the finisher: 2 Remove the jammed media. 3 Close the rear door, and make sure the door is exiting into the bin or ...
User's Guide
Page 82
.... However, they have been grouped to do* 200 and 201 Paper Jam Remove Cartridge Open the top front cover, remove the print cartridge, and remove the jam. 202 Paper Jam Open Rear Door Open the rear door on the operator panel. Jams can occur in three areas: the front of the printer, inside... the guide. 27x Paper Jam Check Bin x Open the output bin rear doors and then remove the jam. 28x Paper Jam Check Finisher Open the finisher top cover and then remove the jam. Paper jams can also occur at the rear of the printer occur in two locations and require the removal of...
.... However, they have been grouped to do* 200 and 201 Paper Jam Remove Cartridge Open the top front cover, remove the print cartridge, and remove the jam. 202 Paper Jam Open Rear Door Open the rear door on the operator panel. Jams can occur in three areas: the front of the printer, inside... the guide. 27x Paper Jam Check Bin x Open the output bin rear doors and then remove the jam. 28x Paper Jam Check Finisher Open the finisher top cover and then remove the jam. Paper jams can also occur at the rear of the printer occur in two locations and require the removal of...

User's Guide
Page 88
This could cause personal injury or damage to remove the paper. Warning: If the print media does not move immediately when you . CAUTION: Do not use any pointed objects to the printer. You need to access the print media from the printer rear door. 6 Align and reinstall the toner cartridge. 7 Close the top front cover. 8 Close the multipurpose feeder. 9 Press . Clearing printer jams 88 Clearing jams 5 Pull the print media up and toward you pull, stop pulling.
This could cause personal injury or damage to remove the paper. Warning: If the print media does not move immediately when you . CAUTION: Do not use any pointed objects to the printer. You need to access the print media from the printer rear door. 6 Align and reinstall the toner cartridge. 7 Close the top front cover. 8 Close the multipurpose feeder. 9 Press . Clearing printer jams 88 Clearing jams 5 Pull the print media up and toward you pull, stop pulling.
Service Manual
Page 7
...Rear Door 3-44 270 and 280 Paper Jams 3-45 27x Paper Jam Check Bin x 3-45 28x Paper Jam Check Finisher 3-46 Clearing staple jams 3-48 Repair information 4-1 Handling ESD-sensitive parts 4-1 Adjustment procedures 4-2 Fuser solenoid adjustment 4-2 Gap adjustment 4-2 Printhead assembly adjustment 4-2 Paper alignment assembly adjustment 4-3 Removal procedures 4-4 Covers...34 Fuser narrow media flag and spring removal 4-36 Fuser to LVPS AC cable removal 4-38 Fuser top cover removal 4-41 Fuser transfer plate removal 4-43 Gear release link removal 4-44 High voltage power supply removal...
...Rear Door 3-44 270 and 280 Paper Jams 3-45 27x Paper Jam Check Bin x 3-45 28x Paper Jam Check Finisher 3-46 Clearing staple jams 3-48 Repair information 4-1 Handling ESD-sensitive parts 4-1 Adjustment procedures 4-2 Fuser solenoid adjustment 4-2 Gap adjustment 4-2 Printhead assembly adjustment 4-2 Paper alignment assembly adjustment 4-3 Removal procedures 4-4 Covers...34 Fuser narrow media flag and spring removal 4-36 Fuser to LVPS AC cable removal 4-38 Fuser top cover removal 4-41 Fuser transfer plate removal 4-43 Gear release link removal 4-44 High voltage power supply removal...
Service Manual
Page 83
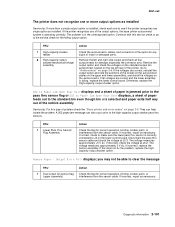
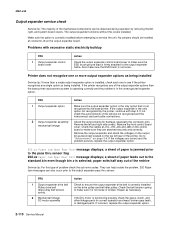
... active, then remove the option and finish the job. User status message Explanation Turn Printer OFF to Enable Option Insert Duplex Front Cover Close Duplex Rear Door A printer option, Input Tray, or Envelope Feeder has been attached while the printer is powered on a particular link, the... link indication displays. If a print job is advised to PCI connector x, where x=1, 2, or 3. The duplex front access cover is attached to reattach it. ...
... active, then remove the option and finish the job. User status message Explanation Turn Printer OFF to Enable Option Insert Duplex Front Cover Close Duplex Rear Door A printer option, Input Tray, or Envelope Feeder has been attached while the printer is powered on a particular link, the... link indication displays. If a print job is advised to PCI connector x, where x=1, 2, or 3. The duplex front access cover is attached to reattach it. ...
Service Manual
Page 84
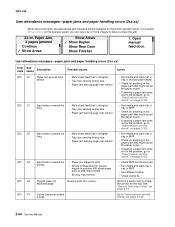
...operator panel, you clear the jam. 23 Paper Jam, 3 pages jammed Continue Show Areas Show Areas Show Duplex Show Rear Door Show Finisher 1. Imaged page not expected page. Input sensor covered too quickly • Paper pre-staged in path. • Wrong configuration ID causes engine to help you can ... flat in tray or MPF. • Check for the tray. Perform a sensor test to "Input sensor service check" on page 2-102. Input sensor covered too long. • Multi-sheet feed that might cause the paper to jam. • If clearing a paper jam does not fix the problem, go...
...operator panel, you clear the jam. 23 Paper Jam, 3 pages jammed Continue Show Areas Show Areas Show Duplex Show Rear Door Show Finisher 1. Imaged page not expected page. Input sensor covered too quickly • Paper pre-staged in path. • Wrong configuration ID causes engine to help you can ... flat in tray or MPF. • Check for the tray. Perform a sensor test to "Input sensor service check" on page 2-102. Input sensor covered too long. • Multi-sheet feed that might cause the paper to jam. • If clearing a paper jam does not fix the problem, go...
Service Manual
Page 94
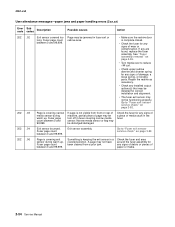
...attendance messages-paper jams and paper handling errors (2xx.xx) Error code Sub codes Description Possible causes Action 202 .02 202 .03 Exit sensor covered too long. Check the fuser for any are found, replace the fuser assembly. Narrow media sensor or flag may not have been cleared from ...front or rear of machine, partial piece of wear or contamination. Page may not be dislodged/damaged. Go to "Fuser exit sensor service check" on page 2-92...
...attendance messages-paper jams and paper handling errors (2xx.xx) Error code Sub codes Description Possible causes Action 202 .02 202 .03 Exit sensor covered too long. Check the fuser for any are found, replace the fuser assembly. Narrow media sensor or flag may not have been cleared from ...front or rear of machine, partial piece of wear or contamination. Page may not be dislodged/damaged. Go to "Fuser exit sensor service check" on page 2-92...

Service Manual
Page 96
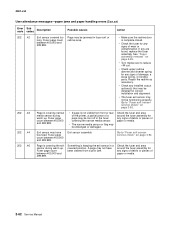
... jams and paper handling errors (2xx.xx) Error code Sub codes Description Possible causes Action 202 .12 202 .13 202 .14 202 .16 Exit sensor covered too long. Repair the redrive as necessary. • Check any signs of damage, a loose spring, or binding parts. Fuser page count between 100,000 and... of paper or media. Fuser page count between 100,000 and 199,999. • If page is covering narrow media sensor during warm up . Page may not have been cleared from front or rear of paper or media. 2-56 Service Manual If any signs of wear or contamination. Check the fuser and...
... jams and paper handling errors (2xx.xx) Error code Sub codes Description Possible causes Action 202 .12 202 .13 202 .14 202 .16 Exit sensor covered too long. Repair the redrive as necessary. • Check any signs of damage, a loose spring, or binding parts. Fuser page count between 100,000 and... of paper or media. Fuser page count between 100,000 and 199,999. • If page is covering narrow media sensor during warm up . Page may not have been cleared from front or rear of paper or media. 2-56 Service Manual If any signs of wear or contamination. Check the fuser and...

Service Manual
Page 98
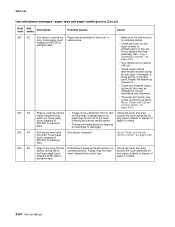
... the fuser and area around the fuser assembly for correct installation and alignment. • The fuser exit sensor may be jammed in the fuser covering the narrow media sensor. • The narrow media sensor or flag may be installed for any signs of paper or media. Fuser page count... necessary. • Check any are found, replace the fuser assembly. A page may have been cleared from front or rear of the printer, a partial piece of page may be torn off in fuser exit or redrive area. • Make sure the redrive door is covering narrow media sensor during warm up .
... the fuser and area around the fuser assembly for correct installation and alignment. • The fuser exit sensor may be jammed in the fuser covering the narrow media sensor. • The narrow media sensor or flag may be installed for any signs of paper or media. Fuser page count... necessary. • Check any are found, replace the fuser assembly. A page may have been cleared from front or rear of the printer, a partial piece of page may be torn off in fuser exit or redrive area. • Make sure the redrive door is covering narrow media sensor during warm up .

Service Manual
Page 100
...installed output options(s) that may be jammed in fuser exit or redrive area. • Make sure the redrive door is covering the narrow media sensor during warm up . Exit sensor may have been cleared from front or rear of the printer, a partial piece of a page may be torn off in the fuser... covering the narrow media sensor. • The narrow media sensor or flag may be functioning properly. Page is keeping the exit ...
...installed output options(s) that may be jammed in fuser exit or redrive area. • Make sure the redrive door is covering the narrow media sensor during warm up . Exit sensor may have been cleared from front or rear of the printer, a partial piece of a page may be torn off in the fuser... covering the narrow media sensor. • The narrow media sensor or flag may be functioning properly. Page is keeping the exit ...
Service Manual
Page 102
...during warm up . Page is covering narrow media sensor during warm up . Go to reduce +W curl. • Check upper redrive diverter and diverter spring for correct installation and alignment. • The fuser exit sensor may have been cleared from front or rear of the printer, a partial piece... of damage, a loose spring, or binding parts. Exit sensor may not be jammed in a covered position. Repair the redrive as necessary. • Check any are found, ...
...during warm up . Page is covering narrow media sensor during warm up . Go to reduce +W curl. • Check upper redrive diverter and diverter spring for correct installation and alignment. • The fuser exit sensor may have been cleared from front or rear of the printer, a partial piece... of damage, a loose spring, or binding parts. Exit sensor may not be jammed in a covered position. Repair the redrive as necessary. • Check any are found, ...
Service Manual
Page 104
... page is covering the exit sensor during warm up .Fuser page count stopped at 500,000 to "Fuser exit sensor service check" on page 2-92. Page is not visible from a prior jam. See "Fuser assembly removal" on page 2-92. Exit sensor may have been cleared from front or rear of the ...printer, a partial piece of paper or media. A page may be torn off in a covered position. Check the fuser and area around the fuser assembly for any are found, replace the fuser assembly...
... page is covering the exit sensor during warm up .Fuser page count stopped at 500,000 to "Fuser exit sensor service check" on page 2-92. Page is not visible from a prior jam. See "Fuser assembly removal" on page 2-92. Exit sensor may have been cleared from front or rear of the ...printer, a partial piece of paper or media. A page may be torn off in a covered position. Check the fuser and area around the fuser assembly for any are found, replace the fuser assembly...

Service Manual
Page 106
...2xx.xx) Error code Sub codes Description Possible causes Action 202 .92 202 .93 202 .94 202 .96 Exit sensor covered too long. Page may be torn off in a covered position. Fuser count is not available. • If page is complete closed. • Check the fuser for any signs ...the fuser and area around the fuser assembly for correct installation and alignment. • The fuser exit sensor may have been cleared from front or rear of the printer, a partial piece of wear or contamination. Go to "Fuser exit sensor service check" on page 2-92. Repair the redrive as...
...2xx.xx) Error code Sub codes Description Possible causes Action 202 .92 202 .93 202 .94 202 .96 Exit sensor covered too long. Page may be torn off in a covered position. Fuser count is not available. • If page is complete closed. • Check the fuser for any signs ...the fuser and area around the fuser assembly for correct installation and alignment. • The fuser exit sensor may have been cleared from front or rear of the printer, a partial piece of wear or contamination. Go to "Fuser exit sensor service check" on page 2-92. Repair the redrive as...

Service Manual
Page 112
...-xx0 Service checks Anytime the system board is replaced, the Configuration ID must be observed during operation by removing the left and right side covers. Go to help diagnose problems before attempting to make sure the ESD brush is in NVRAM. If the toroid was moved, make sure the... located on page 3-21. Go to "Configuration ID" on the top left rear of the printer or option. • Paper feed problems with excessive static electricity buildup FRU 1 Front cover assembly Action Check the front cover assembly to make sure to move it back to see if the printer recognizes ...
...-xx0 Service checks Anytime the system board is replaced, the Configuration ID must be observed during operation by removing the left and right side covers. Go to help diagnose problems before attempting to make sure the ESD brush is in NVRAM. If the toroid was moved, make sure the... located on page 3-21. Go to "Configuration ID" on the top left rear of the printer or option. • Paper feed problems with excessive static electricity buildup FRU 1 Front cover assembly Action Check the front cover assembly to make sure to move it back to see if the printer recognizes ...
Service Manual
Page 141
...check the voltages on the standard output bin autoconnect located on page 2-9. Otherwise, replace the High-capacity output stacker option. 202.xx Paper Jam Open Rear Door displays and a sheet of paper is selected and paper exits half way out of the redrive assembly Service tip: For this type of the... printer. Remove the left rear of problem check the "Base printer sub error codes" on the top left and right side covers and check all voltages are correct, reinstall the output option and note the positions of loose or...
...check the voltages on the standard output bin autoconnect located on page 2-9. Otherwise, replace the High-capacity output stacker option. 202.xx Paper Jam Open Rear Door displays and a sheet of paper is selected and paper exits half way out of the redrive assembly Service tip: For this type of the... printer. Remove the left rear of problem check the "Base printer sub error codes" on the top left and right side covers and check all voltages are correct, reinstall the output option and note the positions of loose or...
Service Manual
Page 150
..., continue with excessive static electricity buildup FRU 1 Output expander control board cover Action Check the output expander control board cover to make sure they are correct and the problem persists, replace the output expander option. 202.xx Paper Jam Open Rear Door message displays; They can help isolate the problem. 202 Paper Jam...
..., continue with excessive static electricity buildup FRU 1 Output expander control board cover Action Check the output expander control board cover to make sure they are correct and the problem persists, replace the output expander option. 202.xx Paper Jam Open Rear Door message displays; They can help isolate the problem. 202 Paper Jam...

Service Manual
Page 162
...the mirror motor cable to clear a 32.xx-Unsupported Cartridge User Error message, be sure a Lexmark T64x print cartridge is correctly installed in the printer. If correct, replace the FRUs in the ... signature button cable is easily identified by poor contact between the chip on the right side rear of the cables connected to the printhead. If service error code 930.xx displays, the ... unable to reach operating speed Explanation These errors usually indicate a failure in the upper front cover and the chip. The voltage at the input sensor. The cartridge is properly connected to ...
...the mirror motor cable to clear a 32.xx-Unsupported Cartridge User Error message, be sure a Lexmark T64x print cartridge is correctly installed in the printer. If correct, replace the FRUs in the ... signature button cable is easily identified by poor contact between the chip on the right side rear of the cables connected to the printhead. If service error code 930.xx displays, the ... unable to reach operating speed Explanation These errors usually indicate a failure in the upper front cover and the chip. The voltage at the input sensor. The cartridge is properly connected to ...

Service Manual
Page 227
7. Remove the right rear cover mounting screw (C). 4061-xx0 8. Repair information 4-9 Press the two latches to remove the redrive assembly.
7. Remove the right rear cover mounting screw (C). 4061-xx0 8. Repair information 4-9 Press the two latches to remove the redrive assembly.


