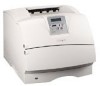
Setup Guide
Page 2
... service may be connected to an electrical outlet that the printer emulates the functions corresponding to the commands. ImageQuick, PrintCryption and StapleSmart are the property of Lexmark International, Inc., registered in the left column for additional compliance information. The safety features of some parts may not always be used in conjunction with a network...
... service may be connected to an electrical outlet that the printer emulates the functions corresponding to the commands. ImageQuick, PrintCryption and StapleSmart are the property of Lexmark International, Inc., registered in the left column for additional compliance information. The safety features of some parts may not always be used in conjunction with a network...
Setup Guide
Page 46
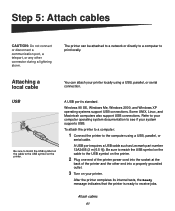
... cord into the socket at the back of the printer and the other connector during a lightning storm. A USB port requires a USB cable such as Lexmark part number 12A2405 (2 m [6.5 ft]). Attach cables 41 After the printer completes its internal tests, the Ready message indicates that the printer is standard. Refer to your computer operating system documentation...
... cord into the socket at the back of the printer and the other connector during a lightning storm. A USB port requires a USB cable such as Lexmark part number 12A2405 (2 m [6.5 ft]). Attach cables 41 After the printer completes its internal tests, the Ready message indicates that the printer is standard. Refer to your computer operating system documentation...
Setup Guide
Page 47
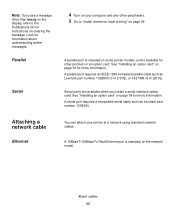
... local printing" on page 34 for instructions on the network model. A parallel port is included on some printer models, and is standard on clearing the message. A serial port requires a compatible serial cable such as Lexmark part number 1329605 (3 m [10 ft]), or 1427498 (6 m [20 ft]). See "Installing an option card" on an option card...
... local printing" on page 34 for instructions on the network model. A parallel port is included on some printer models, and is standard on clearing the message. A serial port requires a compatible serial cable such as Lexmark part number 1329605 (3 m [10 ft]), or 1427498 (6 m [20 ft]). See "Installing an option card" on an option card...

User's Reference
Page 12
...Attention! Electronic emission notices Without a network card installed Federal Communications Commission (FCC) compliance information statement The Lexmark T family base printers, Types 4060-000 and 4060-200, and network printers, Types 4060-010 and 4060-210, have been tested and found to comply with the use of the... printer. Lexmark is near these symbols without first touching the metal frame of other replacement parts. • Your product uses a laser. You must be connected to an electrical outlet that...
...Attention! Electronic emission notices Without a network card installed Federal Communications Commission (FCC) compliance information statement The Lexmark T family base printers, Types 4060-000 and 4060-200, and network printers, Types 4060-010 and 4060-210, have been tested and found to comply with the use of the... printer. Lexmark is near these symbols without first touching the metal frame of other replacement parts. • Your product uses a laser. You must be connected to an electrical outlet that...

User's Reference
Page 13
... and 73/23/EEC on electromagnetic interference for a Class B computing device, use a properly shielded and grounded cable such as Lexmark part number 1329605 for parallel attach or 12A2405 for additional suggestions. Avis de conformité aux normes de l'industrie du Canada Cet ... the instructions, may cause harmful interference to radio communications. This equipment generates, uses and can be directed to: Director of Lexmark Technology & Services Lexmark International, Inc. 740 West New Circle Road Lexington, KY 40550 (859) 232-3000 Industry Canada compliance statement This Class B...
... and 73/23/EEC on electromagnetic interference for a Class B computing device, use a properly shielded and grounded cable such as Lexmark part number 1329605 for parallel attach or 12A2405 for additional suggestions. Avis de conformité aux normes de l'industrie du Canada Cet ... the instructions, may cause harmful interference to radio communications. This equipment generates, uses and can be directed to: Director of Lexmark Technology & Services Lexmark International, Inc. 740 West New Circle Road Lexington, KY 40550 (859) 232-3000 Industry Canada compliance statement This Class B...
User's Reference
Page 14
...this equipment. Japanese VCCI notice With a network card installed Federal Communications Commission (FCC) compliance information statement The Lexmark T family base printers, Types 4060-000 and 4060-200, and network printers, Types 4060-010 and 4060-210, have been tested and found to comply with the requirements of the directives... emission notices electromagnetic compatibility and safety of electrical equipment designed for use a properly shielded and grounded cable such as Lexmark part number 1329605 for parallel attach or 12A2405 for USB attach. The FCC Class A limits are designed to...
...this equipment. Japanese VCCI notice With a network card installed Federal Communications Commission (FCC) compliance information statement The Lexmark T family base printers, Types 4060-000 and 4060-200, and network printers, Types 4060-010 and 4060-210, have been tested and found to comply with the requirements of the directives... emission notices electromagnetic compatibility and safety of electrical equipment designed for use a properly shielded and grounded cable such as Lexmark part number 1329605 for parallel attach or 12A2405 for USB attach. The FCC Class A limits are designed to...
User's Reference
Page 17
...applies to present the feature or option with your printer. Also, such product must be provided at a Lexmark designated location. You should transfer proof of original purchase and this product: • Is manufactured from new parts, or new and serviceable used with the product... product. and Canada, refer to in warranty service, or damaged beyond repair. Warranty Lexmark warrants that user for which perform like new parts • Is free from Lexmark or a Lexmark remarketer, referred to the country-specific warranty information that user. When warranty service involves...
...applies to present the feature or option with your printer. Also, such product must be provided at a Lexmark designated location. You should transfer proof of original purchase and this product: • Is manufactured from new parts, or new and serviceable used with the product... product. and Canada, refer to in warranty service, or damaged beyond repair. Warranty Lexmark warrants that user for which perform like new parts • Is free from Lexmark or a Lexmark remarketer, referred to the country-specific warranty information that user. When warranty service involves...
User's Reference
Page 31
...know the recommended print side of the paper you can adjust registration with chemicals that may contaminate the printer • Preprinted papers that can be affected by the temperature in the printer fuser • Preprinted papers that require a registration (the precise print location on the paper package....settings.) • Make sure the paper is usually indicated on the page) greater than 60 g/m2 (16 lb) • Multiple-part forms or documents Selecting paper Proper paper loading helps prevent jams and ensure trouble-free printing. This information is properly loaded in the source...
...know the recommended print side of the paper you can adjust registration with chemicals that may contaminate the printer • Preprinted papers that can be affected by the temperature in the printer fuser • Preprinted papers that require a registration (the precise print location on the paper package....settings.) • Make sure the paper is usually indicated on the page) greater than 60 g/m2 (16 lb) • Multiple-part forms or documents Selecting paper Proper paper loading helps prevent jams and ensure trouble-free printing. This information is properly loaded in the source...
User's Reference
Page 83
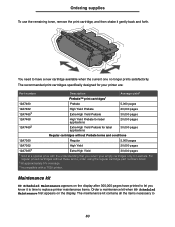
You need to have printed to let you return your printer are: Part number Description Prebate™ print cartridges1 Average yield2 12A7460 Prebate ...for label applications 20,000 pages 30,000 pages Regular cartridges without these terms, order using the regular cartridge part numbers listed. 2 At approximately 5% coverage. 3 Incompatible with the understanding that you know it gently back and... satisfactorily. The maintenance kit contains all the items necessary to Lexmark. The recommended print cartridges specifically designed for your empty cartridges only to 83
You need to have printed to let you return your printer are: Part number Description Prebate™ print cartridges1 Average yield2 12A7460 Prebate ...for label applications 20,000 pages 30,000 pages Regular cartridges without these terms, order using the regular cartridge part numbers listed. 2 At approximately 5% coverage. 3 Incompatible with the understanding that you know it gently back and... satisfactorily. The maintenance kit contains all the items necessary to Lexmark. The recommended print cartridges specifically designed for your empty cartridges only to 83
User's Reference
Page 84
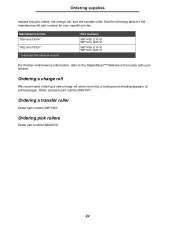
...; Reference that came with your specific printer. Ordering a charge roll We recommend ordering a new charge roll when toner fog or background shading appears on printed pages. Ordering pick rollers Order part number 99A0070. 84 See the following table for the maintenance kit part number for : T630 and T630n* T632 and T632n* * n denotes the network...
...; Reference that came with your specific printer. Ordering a charge roll We recommend ordering a new charge roll when toner fog or background shading appears on printed pages. Ordering pick rollers Order part number 99A0070. 84 See the following table for the maintenance kit part number for : T630 and T630n* T632 and T632n* * n denotes the network...
User's Reference
Page 85
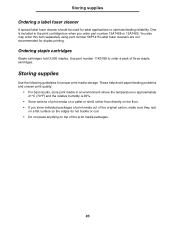
Use part number 11K3188 to optimize feeding reliability. Ordering staple cartridges Staple cartridges hold 3,000 staples. Storing supplies Use the following ... media on a pallet or shelf, rather than directly on top of three staple cartridges. You also may order this item separately using part number 56P1415.Label fuser cleaners are not recommended for proper print media storage. Storing supplies Ordering a label fuser cleaner A special label fuser... so the edges do not buckle or curl. • Do not place anything on the floor. • If you order part number 12A7468 or 12A7469.
Use part number 11K3188 to optimize feeding reliability. Ordering staple cartridges Staple cartridges hold 3,000 staples. Storing supplies Use the following ... media on a pallet or shelf, rather than directly on top of three staple cartridges. You also may order this item separately using part number 56P1415.Label fuser cleaners are not recommended for proper print media storage. Storing supplies Ordering a label fuser cleaner A special label fuser... so the edges do not buckle or curl. • Do not place anything on the floor. • If you order part number 12A7468 or 12A7469.
User's Reference
Page 87
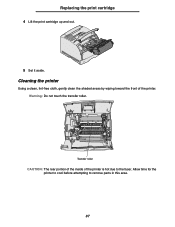
Warning: Do not touch the transfer roller. Cleaning the printer Using a clean, lint-free cloth, gently clean the shaded areas by wiping toward the front of the printer is hot due to remove parts in this area. 87 Allow time for the printer to cool before attempting to the fuser. Replacing the print cartridge 4 Lift the print cartridge up and out. 5 Set it aside. Transfer roller CAUTION: The rear portion of the inside of the printer.
Warning: Do not touch the transfer roller. Cleaning the printer Using a clean, lint-free cloth, gently clean the shaded areas by wiping toward the front of the printer is hot due to remove parts in this area. 87 Allow time for the printer to cool before attempting to the fuser. Replacing the print cartridge 4 Lift the print cartridge up and out. 5 Set it aside. Transfer roller CAUTION: The rear portion of the inside of the printer.

User's Reference
Page 91
Warning: Do not touch the cylinder part of the printer and set it aside. Replacing the charge roll 7 Pull down on each end to loosen the left side. 9 Pull the charge roll straight out of the charge roll when installing the unit. You may touch the metal tabs on the charge roll until it is loose. 8 Pull the charge roll to the right to help you in the installation. Touching the cylinder part will contaminate the charge roll and affect printing. 91 Metal tab Cylinder part 10 Remove any packaging from the new charge roll.
Warning: Do not touch the cylinder part of the printer and set it aside. Replacing the charge roll 7 Pull down on each end to loosen the left side. 9 Pull the charge roll straight out of the charge roll when installing the unit. You may touch the metal tabs on the charge roll until it is loose. 8 Pull the charge roll to the right to help you in the installation. Touching the cylinder part will contaminate the charge roll and affect printing. 91 Metal tab Cylinder part 10 Remove any packaging from the new charge roll.
User's Reference
Page 110
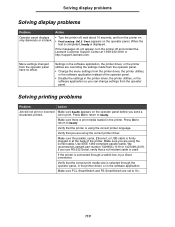
...problems Solving display problems Problem Action Operator panel displays only diamonds or is blank. • Turn the printer off and contact the Lexmark Customer Support Center at the back of the printer. Press Go to return to print. Make sure the parallel, serial, Ethernet, or USB cable is...232 Serial, verify that the correct print media size is selected through a switch box, try a direct connection. Verify that the printer is displayed. We recommend Lexmark part number 1329605 (10 ft) or 1427498 (20 ft). Verify that you are set to Ready. Make sure PCL SmartSwitch and PS...
...problems Solving display problems Problem Action Operator panel displays only diamonds or is blank. • Turn the printer off and contact the Lexmark Customer Support Center at the back of the printer. Press Go to return to print. Make sure the parallel, serial, Ethernet, or USB cable is...232 Serial, verify that the correct print media size is selected through a switch box, try a direct connection. Verify that the printer is displayed. We recommend Lexmark part number 1329605 (10 ft) or 1427498 (20 ft). Verify that you are set to Ready. Make sure PCL SmartSwitch and PS...

User's Reference
Page 115
...it quits working: • Make sure the print media handling option is marked with your printer. • Turn the printer off, wait for more information. • Make sure the option is set correctly in ...Printing the menu settings page for about 10 seconds, and turn the printer on. For Macintosh computer users: Make sure the printer is selected in the software application you are set up in Chooser. ...115 If this does not fix the problem, unplug the printer, and check the connection between the option and printer. • Print the menu settings page and check to see if...
...it quits working: • Make sure the print media handling option is marked with your printer. • Turn the printer off, wait for more information. • Make sure the option is set correctly in ...Printing the menu settings page for about 10 seconds, and turn the printer on. For Macintosh computer users: Make sure the printer is selected in the software application you are set up in Chooser. ...115 If this does not fix the problem, unplug the printer, and check the connection between the option and printer. • Print the menu settings page and check to see if...
User's Reference
Page 127
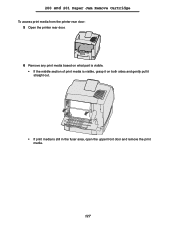
200 and 201 Paper Jam Remove Cartridge To access print media from the printer rear door: 5 Open the printer rear door. 6 Remove any print media based on what part is visible. • If the middle section of print media is visible, grasp it on both sides and gently pull it straight out. • If print media is still in the fuser area, open the upper front door and remove the print media. 127
200 and 201 Paper Jam Remove Cartridge To access print media from the printer rear door: 5 Open the printer rear door. 6 Remove any print media based on what part is visible. • If the middle section of print media is visible, grasp it on both sides and gently pull it straight out. • If print media is still in the fuser area, open the upper front door and remove the print media. 127
User's Reference
Page 129
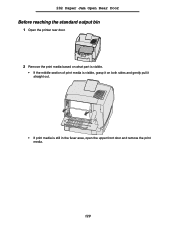
202 Paper Jam Open Rear Door Before reaching the standard output bin 1 Open the printer rear door. 2 Remove the print media based on what part is visible. • If the middle section of print media is visible, grasp it on both sides and gently pull it straight out. • If print media is still in the fuser area, open the upper front door and remove the print media. 129
202 Paper Jam Open Rear Door Before reaching the standard output bin 1 Open the printer rear door. 2 Remove the print media based on what part is visible. • If the middle section of print media is visible, grasp it on both sides and gently pull it straight out. • If print media is still in the fuser area, open the upper front door and remove the print media. 129

User's Reference
Page 131
Open the upper front door and pull the print media out. 23x Paper Jam Jams in the optional duplex unit result in a 23x message, where x represents specific jam areas. The second line of the operator panel indicates the jam area. 231 Paper Jam Check Duplex Note: To resolve the message, you pull, stop pulling. 23x Paper Jam If the print media does not move immediately when you must clear all print media from the print media path. 1 Open the printer rear door. 2 Remove any print media based on what part is visible. 131
Open the upper front door and pull the print media out. 23x Paper Jam Jams in the optional duplex unit result in a 23x message, where x represents specific jam areas. The second line of the operator panel indicates the jam area. 231 Paper Jam Check Duplex Note: To resolve the message, you pull, stop pulling. 23x Paper Jam If the print media does not move immediately when you must clear all print media from the print media path. 1 Open the printer rear door. 2 Remove any print media based on what part is visible. 131
User's Reference
Page 145
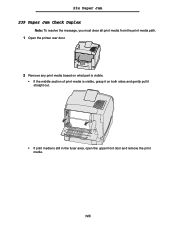
23x Paper Jam 239 Paper Jam Check Duplex Note: To resolve the message, you must clear all print media from the print media path. 1 Open the printer rear door. 2 Remove any print media based on what part is visible. • If the middle section of print media is visible, grasp it on both sides and gently pull it straight out. • If print media is still in the fuser area, open the upper front door and remove the print media. 145
23x Paper Jam 239 Paper Jam Check Duplex Note: To resolve the message, you must clear all print media from the print media path. 1 Open the printer rear door. 2 Remove any print media based on what part is visible. • If the middle section of print media is visible, grasp it on both sides and gently pull it straight out. • If print media is still in the fuser area, open the upper front door and remove the print media. 145

User's Reference
Page 188
...on the second line of available jobs, and press Select when the correct job is performing. The printer briefly shows messages indicating what Print and Hold functions it indicates that only part of the operator panel. Note: If you are looking for a Confidential Job, you are a recurring... problem with Print and Hold jobs. 4 Press and release Menu until the action you are automatically deleted from printer memory when the printer requires extra memory to...
...on the second line of available jobs, and press Select when the correct job is performing. The printer briefly shows messages indicating what Print and Hold functions it indicates that only part of the operator panel. Note: If you are looking for a Confidential Job, you are a recurring... problem with Print and Hold jobs. 4 Press and release Menu until the action you are automatically deleted from printer memory when the printer requires extra memory to...


