
Setup Guide
Page 3
...drawer 8 Changing the 2000-sheet drawer paper size 10 Installing a 250-sheet or 500-sheet drawer 11 Installing a duplex unit 13 Setting up the printer 14 Installing an envelope feeder 17 Installing a finisher 19 Installing a high-capacity output stacker 22 Installing an output expander 24 Installing a 5-bin mailbox ...27 Attaching labels to print media handling options 29 Step 3: Install memory and option cards 30 Accessing the printer system board 30 Installing printer memory 32 Installing an optional flash memory or firmware card 33 Contents iii
...drawer 8 Changing the 2000-sheet drawer paper size 10 Installing a 250-sheet or 500-sheet drawer 11 Installing a duplex unit 13 Setting up the printer 14 Installing an envelope feeder 17 Installing a finisher 19 Installing a high-capacity output stacker 22 Installing an output expander 24 Installing a 5-bin mailbox ...27 Attaching labels to print media handling options 29 Step 3: Install memory and option cards 30 Accessing the printer system board 30 Installing printer memory 32 Installing an optional flash memory or firmware card 33 Contents iii
Setup Guide
Page 35
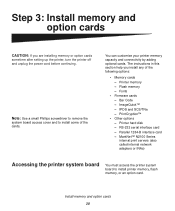
...Flash memory - Fonts • Firmware cards - ImageQuick™ - PrintCryption™ • Other options - Printer memory - RS-232 serial interface card - The instructions in this section help you are installing memory or option cards sometime after setting up the printer, turn the printer off and unplug the power ...SCS/TNe - Note: Use a small Phillips screwdriver to remove the system board access cover and to install printer memory, flash memory, or an option card. Printer hard disk - Step 3: Install memory and option cards CAUTION: If you install any of the cards. MarkNet...
...Flash memory - Fonts • Firmware cards - ImageQuick™ - PrintCryption™ • Other options - Printer memory - RS-232 serial interface card - The instructions in this section help you are installing memory or option cards sometime after setting up the printer, turn the printer off and unplug the power ...SCS/TNe - Note: Use a small Phillips screwdriver to remove the system board access cover and to install printer memory, flash memory, or an option card. Printer hard disk - Step 3: Install memory and option cards CAUTION: If you install any of the cards. MarkNet...
Setup Guide
Page 38
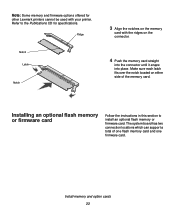
... the memory card straight into the connector until it snaps into place. Installing an optional flash memory or firmware card Follow the instructions in this section to the Publications CD for other Lexmark printers cannot be used with the ridges on either side of one flash memory card and one... firmware card. Ridge Notch Latch Notch 3 Align the notches on the memory card with your printer. The system board has two connection locations which...
... the memory card straight into the connector until it snaps into place. Installing an optional flash memory or firmware card Follow the instructions in this section to the Publications CD for other Lexmark printers cannot be used with the ridges on either side of one flash memory card and one... firmware card. Ridge Notch Latch Notch 3 Align the notches on the memory card with your printer. The system board has two connection locations which...

Setup Guide
Page 39
...system board. If you touch a card. Metal pins Plastic pins 1 Unpack the flash memory or firmware card. Installing an option card Your printer has either one . 3 Push in until the flash memory or firmware card is firmly in place. Save the packaging. Cards Note: The row of the card. Warning:... Optional flash memory and firmware cards are installing two cards, use the bottom system board connection first, and then the top one or two connectors that support the following option cards: • Hard disk with the holes on the printer before you are easily damaged by ...
...system board. If you touch a card. Metal pins Plastic pins 1 Unpack the flash memory or firmware card. Installing an option card Your printer has either one . 3 Push in until the flash memory or firmware card is firmly in place. Save the packaging. Cards Note: The row of the card. Warning:... Optional flash memory and firmware cards are installing two cards, use the bottom system board connection first, and then the top one or two connectors that support the following option cards: • Hard disk with the holes on the printer before you are easily damaged by ...
Setup Guide
Page 62
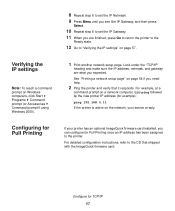
... and then press Select. 10 Repeat step 6 to set the IP Gateway. 11 When you need help. 2 Ping the printer and verify that shipped with the ImageQuick firmware card. See "Printing a network setup page" on page 54 if you are what you receive a reply. For detailed configuration ... prompt (or Accessories Command prompt if using Windows 2000). 1 Print another network setup page. Configuring for Pull Printing If your printer has an optional ImageQuick firmware card installed, you can configure for TCP/IP 57 Verifying the IP settings Note: To reach a command prompt on the network...
... and then press Select. 10 Repeat step 6 to set the IP Gateway. 11 When you need help. 2 Ping the printer and verify that shipped with the ImageQuick firmware card. See "Printing a network setup page" on page 54 if you are what you receive a reply. For detailed configuration ... prompt (or Accessories Command prompt if using Windows 2000). 1 Print another network setup page. Configuring for Pull Printing If your printer has an optional ImageQuick firmware card installed, you can configure for TCP/IP 57 Verifying the IP settings Note: To reach a command prompt on the network...

User's Reference
Page 6
...Print ...189 Verify Print ...189 Confidential jobs ...189 Removing optional cards 190 Removing optional printer memory and other option cards 191 Removing an optional flash memory card or optional firmware card 194 Removing an option card 195 Reattaching the shield and closing the doors 197 Removing... options ...199 Removing the envelope feeder 199 Removing an optional output bin 201 Removing the printer from the duplex unit, removing a duplex...
...Print ...189 Verify Print ...189 Confidential jobs ...189 Removing optional cards 190 Removing optional printer memory and other option cards 191 Removing an optional flash memory card or optional firmware card 194 Removing an option card 195 Reattaching the shield and closing the doors 197 Removing... options ...199 Removing the envelope feeder 199 Removing an optional output bin 201 Removing the printer from the duplex unit, removing a duplex...

User's Reference
Page 194
... and closing the doors. 194 If you want to the Setup Guide. 6 See Reattaching the shield and closing the doors. Touch something metal on the printer before you touch a card. 1 Access the system board by completing step a on page 191 through step f on the system board, refer to remove.... 3 Holding the card by static electricity. Removing an optional flash memory card or optional firmware card Warning: The optional cards are easily damaged by its original packaging. Note: Avoid touching the metal pins on the bottom of the card ...
... and closing the doors. 194 If you want to the Setup Guide. 6 See Reattaching the shield and closing the doors. Touch something metal on the printer before you touch a card. 1 Access the system board by completing step a on page 191 through step f on the system board, refer to remove.... 3 Holding the card by static electricity. Removing an optional flash memory card or optional firmware card Warning: The optional cards are easily damaged by its original packaging. Note: Avoid touching the metal pins on the bottom of the card ...
User's Reference
Page 273
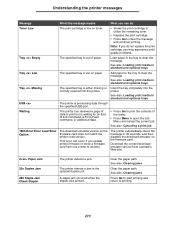
.... • Replace the print cartridge. • Press Go to clear the message. The printer automatically clears the message in standard and optional trays USB The printer is low on the firmware card. A staple jam occurred when the stapler was primed. Clear the paper path. See also... Low The print cartridge is either missing or not fully inserted into the printer. Understanding the printer messages Message What this message means What you can occur if you update printer firmware or move a firmware card from Lexmark's Web site. 2 Paper Jam 23x Duplex Jam 283 Staple Jam Check ...
.... • Replace the print cartridge. • Press Go to clear the message. The printer automatically clears the message in standard and optional trays USB The printer is low on the firmware card. A staple jam occurred when the stapler was primed. Clear the paper path. See also... Low The print cartridge is either missing or not fully inserted into the printer. Understanding the printer messages Message What this message means What you can occur if you update printer firmware or move a firmware card from Lexmark's Web site. 2 Paper Jam 23x Duplex Jam 283 Staple Jam Check ...

User's Reference
Page 276
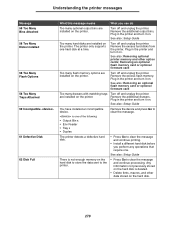
... clear the message and continue printing. Reduce the complexity of the page by reducing the amount of firmware on the installed firmware card during the power-on cycle. • Turn the printer off, and then press and hold Go while turning it . • If the error message ...you can download any resources on the flash memory. • Install flash memory with more storage capacity. Understanding the printer messages Message 39 Complex Page 4 Unsupported Firmware Card 51 Defective Flash 52 Flash Full 53 Unformatted Flash What this error in the future: - You must install different...
... clear the message and continue printing. Reduce the complexity of the page by reducing the amount of firmware on the installed firmware card during the power-on cycle. • Turn the printer off, and then press and hold Go while turning it . • If the error message ...you can download any resources on the flash memory. • Install flash memory with more storage capacity. Understanding the printer messages Message 39 Complex Page 4 Unsupported Firmware Card 51 Defective Flash 52 Flash Full 53 Unformatted Flash What this error in the future: - You must install different...

User's Reference
Page 277
...from Press Go to clear the message. The printer discards any data received through a parallel port, but the parallel port is disabled. • Press Go to clear the message. The job may not print correctly. • Program new firmware for the network interface by way of the ...connectors. unsupported option card. The printer cannot establish communications with an installed network port. • Press Go to open the Job Menu and...
...from Press Go to clear the message. The printer discards any data received through a parallel port, but the parallel port is disabled. • Press Go to clear the message. The job may not print correctly. • Program new firmware for the network interface by way of the ...connectors. unsupported option card. The printer cannot establish communications with an installed network port. • Press Go to open the Job Menu and...
User's Reference
Page 278
... stored on the hard disk to store the data sent to the printer. • Press Go to clear the message and continue processing. See also: Removing an optional flash memory card or optional firmware card Too many drawers with matching trays are installed on . Remove the...Guide You have installed an incompatible device. Plug in the printer and turn it on the printer. The printer only supports one . Plug in the printer and turn it on the printer. Removing an optional flash memory card or optional firmware card Too many flash memory options are installed on . ...
... stored on the hard disk to store the data sent to the printer. • Press Go to clear the message and continue processing. See also: Removing an optional flash memory card or optional firmware card Too many drawers with matching trays are installed on . Remove the...Guide You have installed an incompatible device. Plug in the printer and turn it on the printer. The printer only supports one . Plug in the printer and turn it on the printer. Removing an optional flash memory card or optional firmware card Too many flash memory options are installed on . ...

User's Reference
Page 283
...multipurpose feeder 63 paper input tray 49 multipurpose feeder 55, 61 transparencies input tray 49 multipurpose feeder 61 Local Printer Setup Utility 185 drivers CD 185 Help 186 Lexmark Web site 185 values 186 Finishing Settings 186 Paper Settings 186 Parallel Settings 186 PCL Emulation Settings 186 PostScript ...37 Insufficient Collation Area 274 37 Insufficient Defrag Memory 274 37 Insufficient Memory 275 38 Memory Full 275 39 Complex Page 276 4 Unsupported Firmware Card 276 51 Defective Flash 276 52 Flash Full 276 53 Unformatted Flash 276 54 Network Software Error 277 54 Serial Option Error ...
...multipurpose feeder 63 paper input tray 49 multipurpose feeder 55, 61 transparencies input tray 49 multipurpose feeder 61 Local Printer Setup Utility 185 drivers CD 185 Help 186 Lexmark Web site 185 values 186 Finishing Settings 186 Paper Settings 186 Parallel Settings 186 PCL Emulation Settings 186 PostScript ...37 Insufficient Collation Area 274 37 Insufficient Defrag Memory 274 37 Insufficient Memory 275 38 Memory Full 275 39 Complex Page 276 4 Unsupported Firmware Card 276 51 Defective Flash 276 52 Flash Full 276 53 Unformatted Flash 276 54 Network Software Error 277 54 Serial Option Error ...

Technical Reference
Page 165
3-57 INFO CONFIG Response Syntax (An Example): @PJL INFO CONFIG IN TRAYS [2 ENUMERATED] INTRAY1 INTRAY2 MANUAL FEED OUT TRAYS [1 ENUMERATED] UPPER FACEDOWN PAPERS [13 ENUMERATED] LETTER LEGAL A4 A5 B5PAPER EXECUTIVE COM10 COM9 MONARCH DL C5 B5 OTHERENVELOPE LANGUAGES [1 ENUMERATED] PCL USTATUS [4 ENUMERATED] DEVICE JOB PAGE TIMED FLASH=1048576 DISK=543283200 MEMORY=2097152 DISPLAY LINES=2 SYSTEM FIRMWARE VERSION=250A ENGINE FIRMWARE VERSION=0 PJL
3-57 INFO CONFIG Response Syntax (An Example): @PJL INFO CONFIG IN TRAYS [2 ENUMERATED] INTRAY1 INTRAY2 MANUAL FEED OUT TRAYS [1 ENUMERATED] UPPER FACEDOWN PAPERS [13 ENUMERATED] LETTER LEGAL A4 A5 B5PAPER EXECUTIVE COM10 COM9 MONARCH DL C5 B5 OTHERENVELOPE LANGUAGES [1 ENUMERATED] PCL USTATUS [4 ENUMERATED] DEVICE JOB PAGE TIMED FLASH=1048576 DISK=543283200 MEMORY=2097152 DISPLAY LINES=2 SYSTEM FIRMWARE VERSION=250A ENGINE FIRMWARE VERSION=0 PJL
Technical Reference
Page 287
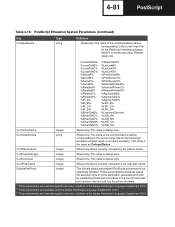
...by substituting PostScript procedures in the job's ProcSet with fast functions that are built into the printer firmware. 1 These parameters are Lexmark-specific and are in addition to the Adobe PostScript Language Supplement 2016. 2 These parameters are... available with the Adobe PostScript Language Supplement 3010. 3 These parameters are Lexmark-specific and are : %LocalTalkA% %LocalTalkB% %LocalTalkC% %LocalTalkD% %SerialA% %SerialB% %SerialC% %SerialD% %ParallelA% %ParallelB% %ParallelC% %ParallelD%...
...by substituting PostScript procedures in the job's ProcSet with fast functions that are built into the printer firmware. 1 These parameters are Lexmark-specific and are in addition to the Adobe PostScript Language Supplement 2016. 2 These parameters are... available with the Adobe PostScript Language Supplement 3010. 3 These parameters are Lexmark-specific and are : %LocalTalkA% %LocalTalkB% %LocalTalkC% %LocalTalkD% %SerialA% %SerialB% %SerialC% %SerialD% %ParallelA% %ParallelB% %ParallelC% %ParallelD%...

Technical Reference
Page 290
...current revision level of the machinedependent portion of 32 or fewer non-null characters. StartJobPassword string (Write-only) Controls the ability of the printer controller card. 4-84 PostScript Table 4-16: PostScript Emulation System Parameters (Continued) Key Type Definition MaxSourceList integer (Read-only) See Table... of pages that have been printed. (Read-only) Version of the operator panel code. (Read-only) Firmware version of the startjob operator to a string. Also, controls the job start file (Sys/Start) during PostScript emulation initialization.
...current revision level of the machinedependent portion of 32 or fewer non-null characters. StartJobPassword string (Write-only) Controls the ability of the printer controller card. 4-84 PostScript Table 4-16: PostScript Emulation System Parameters (Continued) Key Type Definition MaxSourceList integer (Read-only) See Table... of pages that have been printed. (Read-only) Version of the operator panel code. (Read-only) Firmware version of the startjob operator to a string. Also, controls the job start file (Sys/Start) during PostScript emulation initialization.


