User's Guide
Page 4
...specifications 25 Chapter 8: Loading print material 29 Chapter 9: Loading a paper tray 30 Loading letterhead 31 Chapter 10: Loading the multipurpose feeder 32 Capacity ...32 Paper dimensions 32 Trouble-free printing 32 Loading paper and transparencies 36 Loading envelopes 36 Loading letterhead 37 Closing the multipurpose... the envelope feeder 40 Chapter 12: Loading the 2000-sheet drawer 44 Chapter 13: Storing paper 45 Chapter 14: Tray linking 46 Chapter 15: Tips for avoiding paper jams 47 Chapter 16: Replacing the print cartridge 48 Chapter 17: Replacing the charge roll 49 ...
...specifications 25 Chapter 8: Loading print material 29 Chapter 9: Loading a paper tray 30 Loading letterhead 31 Chapter 10: Loading the multipurpose feeder 32 Capacity ...32 Paper dimensions 32 Trouble-free printing 32 Loading paper and transparencies 36 Loading envelopes 36 Loading letterhead 37 Closing the multipurpose... the envelope feeder 40 Chapter 12: Loading the 2000-sheet drawer 44 Chapter 13: Storing paper 45 Chapter 14: Tray linking 46 Chapter 15: Tips for avoiding paper jams 47 Chapter 16: Replacing the print cartridge 48 Chapter 17: Replacing the charge roll 49 ...

User's Guide
Page 5
... Chapter 22: Storing supplies 55 Chapter 23: Checking an unresponsive printer 56 Chapter 24: Clearing paper jams 57 Identifying paper jam areas 57 Accessing paper jam areas 59 200 and 201 Paper Jam Remove Cartridge 59 202 Paper Jam Open Rear Door 60 Before reaching the output bin 61 While exiting to the output bin 62...three trays 67 Between a tray, the duplex unit, and the integrated tray 68 In the 2000-sheet drawer 70 250 Paper Jam Check MP Feeder 71 260 Paper Jam Check Env Feeder 71 At entry into the envelope feeder 71 Between the envelope feeder and the printer 72 Chapter 25: ...
... Chapter 22: Storing supplies 55 Chapter 23: Checking an unresponsive printer 56 Chapter 24: Clearing paper jams 57 Identifying paper jam areas 57 Accessing paper jam areas 59 200 and 201 Paper Jam Remove Cartridge 59 202 Paper Jam Open Rear Door 60 Before reaching the output bin 61 While exiting to the output bin 62...three trays 67 Between a tray, the duplex unit, and the integrated tray 68 In the 2000-sheet drawer 70 250 Paper Jam Check MP Feeder 71 260 Paper Jam Check Env Feeder 71 At entry into the envelope feeder 71 Between the envelope feeder and the printer 72 Chapter 25: ...
User's Guide
Page 20
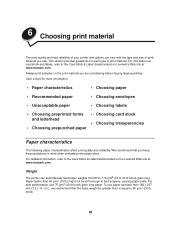
... & Label Guide located on Lexmark's Web site at www.lexmark.com. To use 75 g/m2 (20 lb bond) grain long paper. This section provides guidelines for more information: • Paper characteristics • Choosing paper • Recommended paper • Choosing envelopes • Unacceptable paper • Choosing labels •...g/m2 (16 lb) might not be stiff enough to feed properly, causing paper jams. For best performance, use paper narrower than 182 x 257 mm (7.2 x 10.1 in mind when evaluating new paper stock. Weight The printer can vary with the type and size of print ...
... & Label Guide located on Lexmark's Web site at www.lexmark.com. To use 75 g/m2 (20 lb bond) grain long paper. This section provides guidelines for more information: • Paper characteristics • Choosing paper • Recommended paper • Choosing envelopes • Unacceptable paper • Choosing labels •...g/m2 (16 lb) might not be stiff enough to feed properly, causing paper jams. For best performance, use paper narrower than 182 x 257 mm (7.2 x 10.1 in mind when evaluating new paper stock. Weight The printer can vary with the type and size of print ...
User's Guide
Page 23
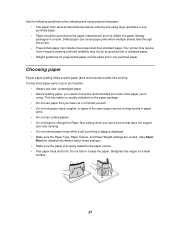
.... 21 Use the following guidelines when selecting and using prepunched paper: • Test paper from several manufacturers before ordering and using . Choosing paper Proper paper loading helps prevent paper jams and ensures trouble-free printing. This information is displayed. • Make sure the Paper Type, Paper Texture, and Paper Weight settings are the same as that you 're using...
.... 21 Use the following guidelines when selecting and using prepunched paper: • Test paper from several manufacturers before ordering and using . Choosing paper Proper paper loading helps prevent paper jams and ensures trouble-free printing. This information is displayed. • Make sure the Paper Type, Paper Texture, and Paper Weight settings are the same as that you 're using...
User's Guide
Page 31
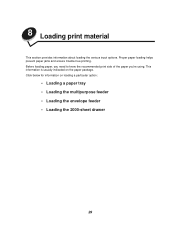
8 Loading print material This section provides information about loading the various input options. Proper paper loading helps prevent paper jams and ensure trouble-free printing. Before loading paper, you need to know the recommended print side of the paper you're using. Click below for information on the paper package. This information is usually indicated on loading a particular option: • Loading a paper tray • Loading the multipurpose feeder • Loading the envelope feeder • Loading the 2000-sheet drawer 29
8 Loading print material This section provides information about loading the various input options. Proper paper loading helps prevent paper jams and ensure trouble-free printing. Before loading paper, you need to know the recommended print side of the paper you're using. Click below for information on the paper package. This information is usually indicated on loading a particular option: • Loading a paper tray • Loading the multipurpose feeder • Loading the envelope feeder • Loading the 2000-sheet drawer 29

User's Guide
Page 34
... print quality, use in .) to the multipurpose feeder while the printer is designed for single page printing on paper, see Choosing print material. • To prevent paper jams, do not add or remove paper when there is still paper in .). 10 Loading the multipurpose feeder The multipurpose feeder can hold several sizes and types of...
... print quality, use in .) to the multipurpose feeder while the printer is designed for single page printing on paper, see Choosing print material. • To prevent paper jams, do not add or remove paper when there is still paper in .). 10 Loading the multipurpose feeder The multipurpose feeder can hold several sizes and types of...

User's Guide
Page 35
...the lower release latch. Simplex letterhead Duplex letterhead Envelope Note: The Paper Loading menu item in the Paper Menu lets you how to load letterhead paper for simplex and duplex printing. Note: The multipurpose feeder may cause a paper jam. See Loading letterhead for detailed instructions on loading documents loaded on ... optional envelope feeder installed. Also, avoid pressing down or applying excessive force on it. • Do not remove any paper tray while a job is printing from the multipurpose feeder or Busy is displayed on the multipurpose feeder. Doing so may be used...
...the lower release latch. Simplex letterhead Duplex letterhead Envelope Note: The Paper Loading menu item in the Paper Menu lets you how to load letterhead paper for simplex and duplex printing. Note: The multipurpose feeder may cause a paper jam. See Loading letterhead for detailed instructions on loading documents loaded on ... optional envelope feeder installed. Also, avoid pressing down or applying excessive force on it. • Do not remove any paper tray while a job is printing from the multipurpose feeder or Busy is displayed on the multipurpose feeder. Doing so may be used...

User's Guide
Page 45
Note: Software settings may override operator panel settings. If envelopes jam, see Clearing paper jams. 43 7 Lower the envelope weight to the stack. 8 Select the paper source, size, and type from your software application. 9 Select the paper size and type from printer operator panel: a Make sure the Paper Size for the envelope feeder (Env Feeder Size) is set to the correct envelope size you are loading. (See Paper Size for detailed information about this setting.) b Press Go to return to Ready.
Note: Software settings may override operator panel settings. If envelopes jam, see Clearing paper jams. 43 7 Lower the envelope weight to the stack. 8 Select the paper source, size, and type from your software application. 9 Select the paper size and type from printer operator panel: a Make sure the Paper Size for the envelope feeder (Env Feeder Size) is set to the correct envelope size you are loading. (See Paper Size for detailed information about this setting.) b Press Go to return to Ready.

User's Guide
Page 49
...are positioned correctly. • Do not overload the paper trays. If jams do occur, follow the steps outlined in Clearing paper jams. If jams occur frequently, make sure you follow these tips to avoid jams: • See Loading print material to existing paper in tray. 15 Tips for simplex printing when ... Keep print materials stored in an acceptable environment. Allow tray to go empty before loading them properly, you can avoid most paper jams. If jams do occur using the multipurpose feeder, try feeding one sheet at a time. • Do not load wrinkled, creased, damp, or curled...
...are positioned correctly. • Do not overload the paper trays. If jams do occur, follow the steps outlined in Clearing paper jams. If jams occur frequently, make sure you follow these tips to avoid jams: • See Loading print material to existing paper in tray. 15 Tips for simplex printing when ... Keep print materials stored in an acceptable environment. Allow tray to go empty before loading them properly, you can avoid most paper jams. If jams do occur using the multipurpose feeder, try feeding one sheet at a time. • Do not load wrinkled, creased, damp, or curled...

User's Guide
Page 59
...page 58 for avoiding paper jams.) If paper jams do occur, follow the steps in Tips for the path the paper travels through the printer and options, and areas where jams may occur. Press Go to On or Auto; To resolve the paper jam messages, you can avoid most paper jams. (See the suggestions... in this section. 23 Clearing paper jams By carefully selecting print materials...
...page 58 for avoiding paper jams.) If paper jams do occur, follow the steps in Tips for the path the paper travels through the printer and options, and areas where jams may occur. Press Go to On or Auto; To resolve the paper jam messages, you can avoid most paper jams. (See the suggestions... in this section. 23 Clearing paper jams By carefully selecting print materials...

User's Guide
Page 60
.... The 260 Paper Jam is located. Both types of jams occur in the same way. 201 Paper Jam 200 Paper Jam 260 Paper Jam 250 Paper Jam 230 Paper Jam 24x Paper Jam Note: 24x Paper Jam may occur in the optional envelope feeder. Note: If a jam occurs in the multipurpose feeder, you receive a 250 Paper Jam message. x indicates the tray where the jam is shown here for a jam in any of...
.... The 260 Paper Jam is located. Both types of jams occur in the same way. 201 Paper Jam 200 Paper Jam 260 Paper Jam 250 Paper Jam 230 Paper Jam 24x Paper Jam Note: 24x Paper Jam may occur in the optional envelope feeder. Note: If a jam occurs in the multipurpose feeder, you receive a 250 Paper Jam message. x indicates the tray where the jam is shown here for a jam in any of...
User's Guide
Page 61
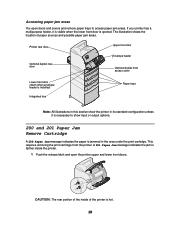
...1 Push the release latch and open doors and covers and remove paper trays to show input or output options. 200 and 201 Paper Jam Remove Cartridge A 200 Paper Jam message indicates the paper is opened. Accessing paper jam areas You open the printer upper and lower front doors. If... your printer has a multipurpose feeder, it is necessary to access paper jam areas. A 201 Paper Jam message indicates the jam is farther ...
...1 Push the release latch and open doors and covers and remove paper trays to show input or output options. 200 and 201 Paper Jam Remove Cartridge A 200 Paper Jam message indicates the paper is opened. Accessing paper jam areas You open the printer upper and lower front doors. If... your printer has a multipurpose feeder, it is necessary to access paper jam areas. A 201 Paper Jam message indicates the jam is farther ...

User's Guide
Page 62
... the print cartridge. 5 Close the upper and lower front doors. 202 Paper Jam Open Rear Door Jams that cause a 202 Paper Jam message require opening the printer rear door. You may need to the output bin 60 For instructions on a sheet of paper. 3 Pull the paper up toward the upper front door, and then pull it aside...
... the print cartridge. 5 Close the upper and lower front doors. 202 Paper Jam Open Rear Door Jams that cause a 202 Paper Jam message require opening the printer rear door. You may need to the output bin 60 For instructions on a sheet of paper. 3 Pull the paper up toward the upper front door, and then pull it aside...

User's Guide
Page 65
... rear of the printer, do not pull it out. If most of the paper to the inner wall, grasp it and pull it out; See 200 and 201 Paper Jam Remove Cartridge for the edge of the paper is visible toward you cannot grasp it may be easier to access from the... paper path. 1 Open the duplex rear door. 2 Look under the duplex rear door for instructions. - If a short piece is jammed: - 230 Paper Jam Check Duplex Jams that cause a 230 Paper Jam message require opening the duplex front access cover. If you : 63 it ...
... rear of the printer, do not pull it out. If most of the paper to the inner wall, grasp it and pull it out; See 200 and 201 Paper Jam Remove Cartridge for the edge of the paper is visible toward you cannot grasp it may be easier to access from the... paper path. 1 Open the duplex rear door. 2 Look under the duplex rear door for instructions. - If a short piece is jammed: - 230 Paper Jam Check Duplex Jams that cause a 230 Paper Jam message require opening the duplex front access cover. If you : 63 it ...

User's Guide
Page 68
...area between two trays 1 Pull the paper tray halfway out of a tray or between two trays • Between three trays (This may happen if you must clear all paper from the paper path. 24x Paper Jam Check Tray x Jams in four areas result in a 24x Paper Jam message, where x represents the tray ...number where the jam has occurred. If the paper is lying on clearing the jam, click the area where the jam occurred: • On the incline...
...area between two trays 1 Pull the paper tray halfway out of a tray or between two trays • Between three trays (This may happen if you must clear all paper from the paper path. 24x Paper Jam Check Tray x Jams in four areas result in a 24x Paper Jam message, where x represents the tray ...number where the jam has occurred. If the paper is lying on clearing the jam, click the area where the jam occurred: • On the incline...
User's Guide
Page 72
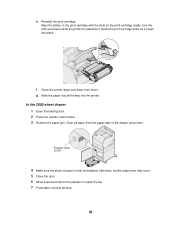
Clear all the way into place. g Slide the paper tray all paper from the paper path of paper is neat and aligned; Align the slides on the print cartridge with the slots on the print cartridge cradle. Guide the print cartridge down as ... door. 2 Press the elevator down button 4 Make sure the stack of the drawer and printer. otherwise, another paper jam may occur. 5 Close the door. 6 Allow a few seconds for placement. Elevator down button. 3 Remove the paper jam. e Reinstall the print cartridge. Use the colored arrows inside the printer for the elevator to reach the top...
Clear all the way into place. g Slide the paper tray all paper from the paper path of paper is neat and aligned; Align the slides on the print cartridge with the slots on the print cartridge cradle. Guide the print cartridge down as ... door. 2 Press the elevator down button 4 Make sure the stack of the drawer and printer. otherwise, another paper jam may occur. 5 Close the door. 6 Allow a few seconds for placement. Elevator down button. 3 Remove the paper jam. e Reinstall the print cartridge. Use the colored arrows inside the printer for the elevator to reach the top...

User's Guide
Page 73
..., you must clear all paper from the paper path. 260 Paper Jam Check Env Feeder Envelope jams may occur in two areas. 250 Paper Jam Check MP Feeder Slowly pull the jammed print material straight out of envelopes from the envelope feeder. 71 For instructions on the bottom is jammed. 1 Lift the envelope weight...the stack of the multipurpose feeder. Note: To resolve the message, you must clear all paper from the bottom of the stack, the envelope on clearing the jam, click the area where the jam occurred: • At entry into the envelope feeder • Between the envelope feeder and ...
..., you must clear all paper from the paper path. 260 Paper Jam Check Env Feeder Envelope jams may occur in two areas. 250 Paper Jam Check MP Feeder Slowly pull the jammed print material straight out of envelopes from the envelope feeder. 71 For instructions on the bottom is jammed. 1 Lift the envelope weight...the stack of the multipurpose feeder. Note: To resolve the message, you must clear all paper from the bottom of the stack, the envelope on clearing the jam, click the area where the jam occurred: • At entry into the envelope feeder • Between the envelope feeder and ...

User's Guide
Page 88
X Y Z 0 1 2 2 Paper Jam 3 31 Defective Print Cartridge 32 Unsupported Print Cartridge 34 Short Paper 35 Res Save Off Deficient Memory 37 Insufficient Collation Area 37 Insufficient Defrag Memory 37 Insufficient Memory 38 Memory Full 39 Complex Page 4 5 51 Defective ...Flash 52 Flash Full 53 Unformatted Flash 54 Serial Option Error 54 Network Software Error 54 Par ENA Connection Lost 54 Parallel Error 54 Parallel Option Error 54 Std Network Software Error 54 Std Par ENA Connection Lost 56 Parallel Port Disabled 56 Std Parallel Port Disabled 56 Serial Port Disabled...
X Y Z 0 1 2 2 Paper Jam 3 31 Defective Print Cartridge 32 Unsupported Print Cartridge 34 Short Paper 35 Res Save Off Deficient Memory 37 Insufficient Collation Area 37 Insufficient Defrag Memory 37 Insufficient Memory 38 Memory Full 39 Complex Page 4 5 51 Defective ...Flash 52 Flash Full 53 Unformatted Flash 54 Serial Option Error 54 Network Software Error 54 Par ENA Connection Lost 54 Parallel Error 54 Parallel Option Error 54 Std Network Software Error 54 Std Par ENA Connection Lost 56 Parallel Port Disabled 56 Std Parallel Port Disabled 56 Serial Port Disabled...

User's Guide
Page 107
... print the contents of the buffer. • Press Menu to print but is processing data through the specified USB port. What you must clear paper from the entire paper path. USB What this message means: The printer is waiting for an End of Job command, a Form Feed command, or... print cartridge and install a new one. 105 Although the location of the paper jam appears on the second line of data to open the Job Menu and cancel the current job. 2 Paper Jam What this message means: The printer detects a paper jam. Waiting What this message means: A defective print cartridge is installed.
... print the contents of the buffer. • Press Menu to print but is processing data through the specified USB port. What you must clear paper from the entire paper path. USB What this message means: The printer is waiting for an End of Job command, a Form Feed command, or... print cartridge and install a new one. 105 Although the location of the paper jam appears on the second line of data to open the Job Menu and cancel the current job. 2 Paper Jam What this message means: The printer detects a paper jam. Waiting What this message means: A defective print cartridge is installed.

User's Guide
Page 209
...setting 168 Auto Continue (Setup Menu) 169 Auto CR after LF (PCL Emul Menu) 150 Auto LF after CR (PCL Emul Menu) 150 avoiding paper jams 47 B Baud (Serial Menu) 162 bitmapped fonts 191 Blank Pages (Finishing Menu) 119 buffer, infrared 125 buffer, LocalTalk 134 buffer, network 138 ...buffer, parallel 156 buffer, serial 167 buffer, USB 180 C Cancel Job (Job Menu) 130 card stock, choosing 23 charge roll, replacing 49 clearing paper jams 57 Collation (Finishing Menu) 120 collation, enabling 120 complex page errors 170 Confidential Job (Job Menu...
...setting 168 Auto Continue (Setup Menu) 169 Auto CR after LF (PCL Emul Menu) 150 Auto LF after CR (PCL Emul Menu) 150 avoiding paper jams 47 B Baud (Serial Menu) 162 bitmapped fonts 191 Blank Pages (Finishing Menu) 119 buffer, infrared 125 buffer, LocalTalk 134 buffer, network 138 ...buffer, parallel 156 buffer, serial 167 buffer, USB 180 C Cancel Job (Job Menu) 130 card stock, choosing 23 charge roll, replacing 49 clearing paper jams 57 Collation (Finishing Menu) 120 collation, enabling 120 complex page errors 170 Confidential Job (Job Menu...


