User's Reference (3.4 MB)
Page 152
...product under this Statement of a product. In no event will Lexmark be limited to the greater of Lexmark or a Remarketer for any lost profits, lost savings, incidental damage, or other than Lexmark supplies (such as toner cartridges, inkjet cartridges, and ribbons) • Use of remedies are not cumulative.... AND FITNESS FOR A PARTICULAR PURPOSE, ARE LIMITED IN DURATION TO THE WARRANTY PERIOD. This is true even if you advise Lexmark or a Remarketer of the possibility of incidental or consequential damages. Extent of warranty We do not warrant uninterrupted or error-free...
...product under this Statement of a product. In no event will Lexmark be limited to the greater of Lexmark or a Remarketer for any lost profits, lost savings, incidental damage, or other than Lexmark supplies (such as toner cartridges, inkjet cartridges, and ribbons) • Use of remedies are not cumulative.... AND FITNESS FOR A PARTICULAR PURPOSE, ARE LIMITED IN DURATION TO THE WARRANTY PERIOD. This is true even if you advise Lexmark or a Remarketer of the possibility of incidental or consequential damages. Extent of warranty We do not warrant uninterrupted or error-free...
Technical Reference
Page 168
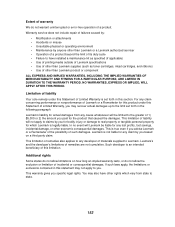
... 40038 Replace PC Kit FALSE Intervention required: replace photoconductor kit to continue 40038 Replace PC Kit To Continue FALSE Intervention required: replace toner cartridge 40038 Replace Toner Cartridge FALSE Intervention required: 40038 replace toner cartridge to the DISPLAY CHARACTER SIZE returned in the current language. A display string that is returned is returned in INFO CONFIG. 3-70...
... 40038 Replace PC Kit FALSE Intervention required: replace photoconductor kit to continue 40038 Replace PC Kit To Continue FALSE Intervention required: replace toner cartridge 40038 Replace Toner Cartridge FALSE Intervention required: 40038 replace toner cartridge to the DISPLAY CHARACTER SIZE returned in the current language. A display string that is returned is returned in INFO CONFIG. 3-70...
Technical Reference
Page 424
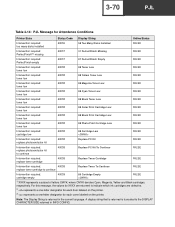
... - 3-70 Replace PC Kit Intervention Required - 3-70 Replace PC Kit To Continue Intervention Required - 3-70 Replace Toner Cartridge Status Code 40029 40030 40030 40030 40036 40037 40037 40038 40038 40038 40038 40038 40038 Return String Check Mailbox Installation 58...Toner Low 88 Yellow Toner Low 88 Magenta Toner Low 88 Cyan Toner Low 88 Black Toner Low 88 Color Print Cartridge Low 88 Black Print Cartridge Low 88 Photo Print Cartridge Low 88 Cartridge Low Replace PC Kit Replace PC Kit To Continue Replace Toner Cartridge Printer Model B-22 PJL Support C720 C750 C910 E320, E322 J110 T420...
... - 3-70 Replace PC Kit Intervention Required - 3-70 Replace PC Kit To Continue Intervention Required - 3-70 Replace Toner Cartridge Status Code 40029 40030 40030 40030 40036 40037 40037 40038 40038 40038 40038 40038 40038 Return String Check Mailbox Installation 58...Toner Low 88 Yellow Toner Low 88 Magenta Toner Low 88 Cyan Toner Low 88 Black Toner Low 88 Color Print Cartridge Low 88 Black Print Cartridge Low 88 Photo Print Cartridge Low 88 Cartridge Low Replace PC Kit Replace PC Kit To Continue Replace Toner Cartridge Printer Model B-22 PJL Support C720 C750 C910 E320, E322 J110 T420...

Technical Reference
Page 425
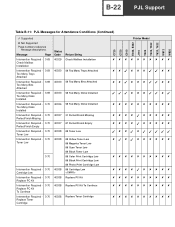
Message Page Intervention Required - 3-70 Replace Toner Cartridge To Continue Intervention Required - 3-70 Cartridge Empty Intervention Required - 3-71 Load Staples Intervention Required - 3-71 Priming Failed. Retry? OPMSG message STMSG message Replace Fuser Replace Transfer ...40048 40049 40050 40050 40087 40088 40089 40090 40095 40095 40096 40096 40101 Return String Replace Toner To Continue 89 Cartridge Empty Load Staples Priming Failed. B-23 PJL Support C720 C750 C910 E320, E322 J110 T420 T520, T522 T620, T622 W812 W820 Table B-11: PJL Messages for Attendance Conditions (...
Message Page Intervention Required - 3-70 Replace Toner Cartridge To Continue Intervention Required - 3-70 Cartridge Empty Intervention Required - 3-71 Load Staples Intervention Required - 3-71 Priming Failed. Retry? OPMSG message STMSG message Replace Fuser Replace Transfer ...40048 40049 40050 40050 40087 40088 40089 40090 40095 40095 40096 40096 40101 Return String Replace Toner To Continue 89 Cartridge Empty Load Staples Priming Failed. B-23 PJL Support C720 C750 C910 E320, E322 J110 T420 T520, T522 T620, T622 W812 W820 Table B-11: PJL Messages for Attendance Conditions (...
Technical Reference
Page 466
... Insert Duplex Option 3-71 Insert PC Cartridge 3-68 Insert Print Cartridge 3-69 Install Bin x or Cancel Job 3-69 Install Duplex or Cancel Job 3-71 Install Env Feed or Cancel Job 3-69 Install Tray x or Cancel Job 3-... Envelope Feeder 3-69 Reattach MP Feeder 3-69 Reattach Output Bin 3-69 Replace Fuser 3-71 Replace PC Kit 3-70 Replace PC Kit To Continue 3-70 Replace Toner Cartridge 3-70 Replace Toner Cartridge To Continue
... Insert Duplex Option 3-71 Insert PC Cartridge 3-68 Insert Print Cartridge 3-69 Install Bin x or Cancel Job 3-69 Install Duplex or Cancel Job 3-71 Install Env Feed or Cancel Job 3-69 Install Tray x or Cancel Job 3-... Envelope Feeder 3-69 Reattach MP Feeder 3-69 Reattach Output Bin 3-69 Replace Fuser 3-71 Replace PC Kit 3-70 Replace PC Kit To Continue 3-70 Replace Toner Cartridge 3-70 Replace Toner Cartridge To Continue

Service Manual
Page 66
... is installed and the cover closes all the way, engaging the cover open switch lever. 4048-00x Cover Interlock Switch Service Check Note: Make sure a toner cartridge is not present, see "RIP Card Service Check" on page 2-31. Replace the switch if faulty. 2-30 Service Manual Open the switch and verify continuity...
... is installed and the cover closes all the way, engaging the cover open switch lever. 4048-00x Cover Interlock Switch Service Check Note: Make sure a toner cartridge is not present, see "RIP Card Service Check" on page 2-31. Replace the switch if faulty. 2-30 Service Manual Open the switch and verify continuity...

Service Manual
Page 84
Ensure clean electrical contacts on the right side. 2-48 Service Manual 4048-00x Print Quality Service Checks Blank Page FRU Toner Cartridge Action Remove the toner cartridge and gently shake the assembly to evenly distribute the toner.
Ensure clean electrical contacts on the right side. 2-48 Service Manual 4048-00x Print Quality Service Checks Blank Page FRU Toner Cartridge Action Remove the toner cartridge and gently shake the assembly to evenly distribute the toner.

Service Manual
Page 87
... a FRU) HVPS Contacts HVPS Card RIP Card Assembly Cartridge Contacts Assembly Action Make sure the toner cartridge is made with the toner cartridge and HVPS card. If this does not correct the problem, replace the following FRUs one at a time in the order shown: •... Adjustment" on page 4-2 for correct installation and contamination where contact is correctly installed and the high voltage contacts are clean. If the cartridge is more noticeable as necessary. Clean as the toner cartridge nears end of the printhead. This is installed correctly and the problem persists, try a new...
... a FRU) HVPS Contacts HVPS Card RIP Card Assembly Cartridge Contacts Assembly Action Make sure the toner cartridge is made with the toner cartridge and HVPS card. If this does not correct the problem, replace the following FRUs one at a time in the order shown: •... Adjustment" on page 4-2 for correct installation and contamination where contact is correctly installed and the high voltage contacts are clean. If the cartridge is more noticeable as necessary. Clean as the toner cartridge nears end of the printhead. This is installed correctly and the problem persists, try a new...

Service Manual
Page 88
... the fuser hot roll. 4048-00x Partial Blank Image/White Spots (no periodic pattern) FRU Toner Cartridge (not a FRU) Fuser Backup Roll Springs (not a FRU) Fuser Assembly Paper Action Remove the toner cartridge and gently shake the assembly to the PC drum. Check springs at both ends of damage... or fatigue. Try a new toner cartridge. Inspect the transfer roller for equal forces at both bearing assemblies if either spring shows signs of the transfer roller. If the toner cartridge is being used. Make sure recommended paper is low, try a new one...
... the fuser hot roll. 4048-00x Partial Blank Image/White Spots (no periodic pattern) FRU Toner Cartridge (not a FRU) Fuser Backup Roll Springs (not a FRU) Fuser Assembly Paper Action Remove the toner cartridge and gently shake the assembly to the PC drum. Check springs at both ends of damage... or fatigue. Try a new toner cartridge. Inspect the transfer roller for equal forces at both bearing assemblies if either spring shows signs of the transfer roller. If the toner cartridge is being used. Make sure recommended paper is low, try a new one...

Service Manual
Page 89
.... Inspect the HVPS contact (transfer roller) for contamination. Action Make sure the toner cartridge is installed correctly and is being used. If the problem continues, install a new toner cartridge. 4048-00x Poor Fusing of Image FRU Fuser Lamp Light Print FRU Toner Cartridge Transfer Roller HVPS Contact (Transfer Roller) HVPS Card Action The fuser may not...
.... Inspect the HVPS contact (transfer roller) for contamination. Action Make sure the toner cartridge is installed correctly and is being used. If the problem continues, install a new toner cartridge. 4048-00x Poor Fusing of Image FRU Fuser Lamp Light Print FRU Toner Cartridge Transfer Roller HVPS Contact (Transfer Roller) HVPS Card Action The fuser may not...

Service Manual
Page 90
...as light or dark horizontal lines on a uniformly gray page or on the hot roll. 4048-00x White or Black Lines or Bands FRU Toner Cartridge Paper Feed Drive Gears Action Banding appears as necessary. Inspect the hot roll and backup roller for signs of printed pages. Inspect the... toner cartridge and paper feed components, especially the drive gears, for contamination and replace as it feeds through the printer especially in the speed of the paper, if toner is building up on a page with a soft cloth or compressed air...
...as light or dark horizontal lines on a uniformly gray page or on the hot roll. 4048-00x White or Black Lines or Bands FRU Toner Cartridge Paper Feed Drive Gears Action Banding appears as necessary. Inspect the hot roll and backup roller for signs of printed pages. Inspect the... toner cartridge and paper feed components, especially the drive gears, for contamination and replace as it feeds through the printer especially in the speed of the paper, if toner is building up on a page with a soft cloth or compressed air...

Service Manual
Page 104
... the lights cycle. The printed page comes from tray 1, MPF, or tray 2 (if installed). 5. When edge-to-edge is set the margins accordingly. - Note: The toner cartridge lockout function is disabled in the Configuration mode. Note: The next two items run in this sheet be printed unless the... toner cartridge has a machine class ID that are the same pages that matches the machine class ID held in NVRAM on /off . Print simplex from printer ROM ...
... the lights cycle. The printed page comes from tray 1, MPF, or tray 2 (if installed). 5. When edge-to-edge is set the margins accordingly. - Note: The toner cartridge lockout function is disabled in the Configuration mode. Note: The next two items run in this sheet be printed unless the... toner cartridge has a machine class ID that are the same pages that matches the machine class ID held in NVRAM on /off . Print simplex from printer ROM ...

Service Manual
Page 106
... remove the HVPS and check the cartridge contact assemblies (springs) for more information. 3. Remove the right side cover. Check from the Dr. B, TAR, DEV, T, and DC (photoconductor) respectively to the bearing on the right side frame where the toner cartridge makes its contacts. See "High ...Voltage Power Supply (HVPS)" on HVPS/Cartridge Continuity between the HVPS and the charge roll, Dr. B (blade), TAR (toner adder roll), the developer roll, and the photoconductor (DC) can...
... remove the HVPS and check the cartridge contact assemblies (springs) for more information. 3. Remove the right side cover. Check from the Dr. B, TAR, DEV, T, and DC (photoconductor) respectively to the bearing on the right side frame where the toner cartridge makes its contacts. See "High ...Voltage Power Supply (HVPS)" on HVPS/Cartridge Continuity between the HVPS and the charge roll, Dr. B (blade), TAR (toner adder roll), the developer roll, and the photoconductor (DC) can...

Service Manual
Page 114
Open the rear exit door. 4. A 4-8 Service Manual 4048-00x Top Cover Assembly Removal 1. Remove the two (2) screws in the rear [A]. A 3. Remove the two screws in front [A]. Remove the toner cartridge. 2.
Open the rear exit door. 4. A 4-8 Service Manual 4048-00x Top Cover Assembly Removal 1. Remove the two (2) screws in the rear [A]. A 3. Remove the two screws in front [A]. Remove the toner cartridge. 2.

Service Manual
Page 131
Unsnap the latches from the frame. 4. Note: The bracket can be removed (with possible latch breakage) by wedging a screwdriver or similar tool between the bracket and the frame. 4048-00x Bracket, Opener Shutter Removal 1. Remove the HVPS. See "HVPS Card Removal" on page 4-56 for more information. 2. Remove the opener shutter bracket. Repair Information 4-25 Remove the toner cartridge. 3.
Unsnap the latches from the frame. 4. Note: The bracket can be removed (with possible latch breakage) by wedging a screwdriver or similar tool between the bracket and the frame. 4048-00x Bracket, Opener Shutter Removal 1. Remove the HVPS. See "HVPS Card Removal" on page 4-56 for more information. 2. Remove the opener shutter bracket. Repair Information 4-25 Remove the toner cartridge. 3.

Service Manual
Page 132
Remove the HVPS. Remove the toner cartridge. 3. See "Upper (MPF) Housing Assembly (with Paper Flag) Removal" on page 4-56 for more information. 2. Remove the paper guide roller. 4-26 Service Manual Unsnap the latch, which is part of the roller hub [A]. 5. See "HVPS Card Removal" on page 4-49 for more information. 4. Remove the upper body MPF assembly. 4048-00x Paper Guide Roller Removal 1.
Remove the HVPS. Remove the toner cartridge. 3. See "Upper (MPF) Housing Assembly (with Paper Flag) Removal" on page 4-56 for more information. 2. Remove the paper guide roller. 4-26 Service Manual Unsnap the latch, which is part of the roller hub [A]. 5. See "HVPS Card Removal" on page 4-49 for more information. 4. Remove the upper body MPF assembly. 4048-00x Paper Guide Roller Removal 1.

Service Manual
Page 133
Repair Information 4-27 4048-00x Charge Roll Removal 1. Warning: Handle the charge roll with clean dry hands and only at the ends. 3. After the left end, and push the bearing and roll away from the right side bearing. Open the front cover and remove the toner cartridge. 2. Grasp the charge roll on the left side is removed from the bearing, slide the roll from each other.
Repair Information 4-27 4048-00x Charge Roll Removal 1. Warning: Handle the charge roll with clean dry hands and only at the ends. 3. After the left end, and push the bearing and roll away from the right side bearing. Open the front cover and remove the toner cartridge. 2. Grasp the charge roll on the left side is removed from the bearing, slide the roll from each other.

Service Manual
Page 134
... for more information. 3. Remove two screws in place) Removal" on page 4-27 for more information. 3. Remove the toner cartridge. 2. See "RIP Card Cage (with card in the right guide (above and behind the HVPS). 6. Remove the toner cartridge. 2. Remove the HVPS. Remove the top cover. 4048-00x Right Guide Removal 1. Left Guide Removal 1. Remove...
... for more information. 3. Remove two screws in place) Removal" on page 4-27 for more information. 3. Remove the toner cartridge. 2. See "RIP Card Cage (with card in the right guide (above and behind the HVPS). 6. Remove the toner cartridge. 2. Remove the HVPS. Remove the top cover. 4048-00x Right Guide Removal 1. Left Guide Removal 1. Remove...

Service Manual
Page 137
Remove the toner cartridge. 2. Remove the gear train assembly. Remove the screw holding the smart button sensor [A]. 6. Remove the sensor by pushing from inside the printer. Note: Unplug the ...
Remove the toner cartridge. 2. Remove the gear train assembly. Remove the screw holding the smart button sensor [A]. 6. Remove the sensor by pushing from inside the printer. Note: Unplug the ...

Service Manual
Page 139
Remove the transfer roll. Repair Information 4-33 Remove the toner cartridge. 2. 4048-00x Transfer Roll Assembly and Left Transfer Support Bearing Removal Note: Do not touch the transfer roll except on the right side fully into the slot. Unlatch and lift the right transfer support bearing. 4. Note: After reinstalling the transfer roll, use a thin screwdriver to push the copper tab on the ends. 1. Unlatch and lift the left side support bearing. 3.
Remove the transfer roll. Repair Information 4-33 Remove the toner cartridge. 2. 4048-00x Transfer Roll Assembly and Left Transfer Support Bearing Removal Note: Do not touch the transfer roll except on the right side fully into the slot. Unlatch and lift the right transfer support bearing. 4. Note: After reinstalling the transfer roll, use a thin screwdriver to push the copper tab on the ends. 1. Unlatch and lift the left side support bearing. 3.


