Quick Reference Guide (410 KB)
Page 2
... your printer. • Contact your administrator or Help desk if you still have to check each possible jam area to the Setup Guide or the Publications CD for information about network printing. 4 Reinstall the print cartridge. 5 Close the upper front door. Press down the green lever on the right under the printer...
... your printer. • Contact your administrator or Help desk if you still have to check each possible jam area to the Setup Guide or the Publications CD for information about network printing. 4 Reinstall the print cartridge. 5 Close the upper front door. Press down the green lever on the right under the printer...

Setup Guide (881 KB)
Page 4
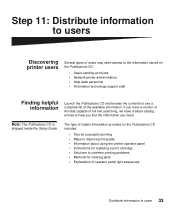
Step 7: Attach cables 22 Setting up for network printing 22 Setting up for local printing 22 Step 8: Verify printer setup 24 Turning on the printer 24 Printing setup pages 24 Step 9: Configure for TCP/IP 26 Assigning a printer IP address 26 Verifying the IP settings 26 Step 10: Install printer drivers 28 Configuring for network printing 28 Configuring for local printing 31 Step 11: Distribute information to users 33 Discovering printer users 33 Finding helpful information 33 Distributing the information 34 Storing the quick reference card 34 Congratulations 34 iv Contents
Step 7: Attach cables 22 Setting up for network printing 22 Setting up for local printing 22 Step 8: Verify printer setup 24 Turning on the printer 24 Printing setup pages 24 Step 9: Configure for TCP/IP 26 Assigning a printer IP address 26 Verifying the IP settings 26 Step 10: Install printer drivers 28 Configuring for network printing 28 Configuring for local printing 31 Step 11: Distribute information to users 33 Discovering printer users 33 Finding helpful information 33 Distributing the information 34 Storing the quick reference card 34 Congratulations 34 iv Contents
Setup Guide (881 KB)
Page 28
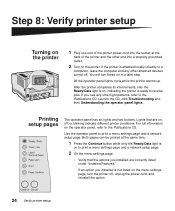
... on in a later step. Lights that the options you see any other light patterns, refer to print a menu settings page and a network setup page. Use the operator panel to the Publications CD. Launch the CD, click Troubleshooting and then Understanding the operator panel lights. If you ...while only the Ready/Data light is on the printer. If the printer is attached locally (directly to print a menu settings page and a network setup page. 2 On the menu settings page: • Verify that are correctly listed under "Installed Features." All the operator panel lights cycle while...
... on in a later step. Lights that the options you see any other light patterns, refer to print a menu settings page and a network setup page. Use the operator panel to the Publications CD. Launch the CD, click Troubleshooting and then Understanding the operator panel lights. If you ...while only the Ready/Data light is on the printer. If the printer is attached locally (directly to print a menu settings page and a network setup page. 2 On the menu settings page: • Verify that are correctly listed under "Installed Features." All the operator panel lights cycle while...

Setup Guide (881 KB)
Page 29
It may be provided on Lexmark's Web site at www.lexmark.com. If Status is correctly listed under "Printer Information." • Verify that the trays are connected to change the configuration, use . Task Configure for ...CD booklet to verify this. 3 On the network setup page, confirm that you need to your network. Consult your network cable may also be malfunctioning. The Local Printer Setup Utility is "Connected." Save the network setup page for a solution, and then print another network setup page to page... 26 28 Verify printer setup 25 If you are configured for the...
It may be provided on Lexmark's Web site at www.lexmark.com. If Status is correctly listed under "Printer Information." • Verify that the trays are connected to change the configuration, use . Task Configure for ...CD booklet to verify this. 3 On the network setup page, confirm that you need to your network. Consult your network cable may also be malfunctioning. The Local Printer Setup Utility is "Connected." Save the network setup page for a solution, and then print another network setup page to page... 26 28 Verify printer setup 25 If you are configured for the...
Setup Guide (881 KB)
Page 30
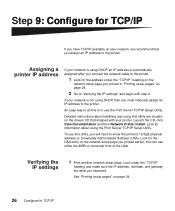
...UAA. Detailed instructions about using the Print Server TCP/IP Setup Utility. You can use the Print Server TCP/IP Setup Utility. Verifying the IP settings 1 Print another network setup page. Assigning a printer IP address If your network is using DHCP, an IP address is not using DHCP...UAA entry on page 24. 2 Go to the printer. Look under the "TCP/IP" heading on the network setup page you printed in "Printing setup pages" on the network setup page you printed earlier. Step 9: Configure for information about installing and using this utility are what you expected....
...UAA. Detailed instructions about using the Print Server TCP/IP Setup Utility. You can use the Print Server TCP/IP Setup Utility. Verifying the IP settings 1 Print another network setup page. Assigning a printer IP address If your network is using DHCP, an IP address is not using DHCP...UAA entry on page 24. 2 Go to the printer. Look under the "TCP/IP" heading on the network setup page you printed in "Printing setup pages" on the network setup page you printed earlier. Step 9: Configure for information about installing and using this utility are what you expected....
Setup Guide (881 KB)
Page 37
The type of helpful information provided on the Publications CD: • Users sending print jobs • Network printer administrators • Help desk personnel • Information technology support staff Finding helpful information Launch the Publications CD and browse the contents ...33 Step 11: Distribute information to users Discovering printer users Several types of users may need . Note: The Publications CD is shipped inside the Setup Guide. If you have a version of Acrobat capable of full text searching, we have created catalog entries to help you find the information you...
The type of helpful information provided on the Publications CD: • Users sending print jobs • Network printer administrators • Help desk personnel • Information technology support staff Finding helpful information Launch the Publications CD and browse the contents ...33 Step 11: Distribute information to users Discovering printer users Several types of users may need . Note: The Publications CD is shipped inside the Setup Guide. If you have a version of Acrobat capable of full text searching, we have created catalog entries to help you find the information you...

User's Reference (3.4 MB)
Page 18
... list of installed options and features • Available printer memory If your printer has a network port, an additional page prints to the Technical Reference on Lexmark's Web site for information about network settings. Refer to indicate more about PJL. Check the drivers CD booklet to verify that all...You can also be provided on Lexmark's Web site at www.lexmark.com. Settings for menu items can use the menu settings page to verify this. The Network Menu and network settings are only shown if you are set through the Local Printer Setup Utility. It may also be ...
... list of installed options and features • Available printer memory If your printer has a network port, an additional page prints to the Technical Reference on Lexmark's Web site for information about network settings. Refer to indicate more about PJL. Check the drivers CD booklet to verify that all...You can also be provided on Lexmark's Web site at www.lexmark.com. Settings for menu items can use the menu settings page to verify this. The Network Menu and network settings are only shown if you are set through the Local Printer Setup Utility. It may also be ...

User's Reference (3.4 MB)
Page 76
... driver is being used , verify that the upper front door is loaded in the Local Printer Setup Utility. • Make sure PCL SmartSwitch and PS SmartSwitch are set to print. See Loading...Make sure that the spooler is not stalled. • If you print across a network or on a Macintosh, see Solving network printing problems. • Determine which host interface you are using. 76 Press the ...down the right side of a page. If you use the parallel port, we recommend the cable with Lexmark part number 12A2405 (2M). • If the printer is connected through a switch box, try a direct...
... driver is being used , verify that the upper front door is loaded in the Local Printer Setup Utility. • Make sure PCL SmartSwitch and PS SmartSwitch are set to print. See Loading...Make sure that the spooler is not stalled. • If you print across a network or on a Macintosh, see Solving network printing problems. • Determine which host interface you are using. 76 Press the ...down the right side of a page. If you use the parallel port, we recommend the cable with Lexmark part number 12A2405 (2M). • If the printer is connected through a switch box, try a direct...

User's Reference (3.4 MB)
Page 108
...low on toner and the Toner Alarm is not displayed with other status light sequences. For more information, see Using the Local Printer Setup Utility. See Replacing the print cartridge for an illustration of the printer, such as light sequences for clearing jams, changing the cartridge..., closing doors, inserting trays, loading print media, or printer memory, flash memory, and network errors. Note: The Toner Alarm setting is available in Replacing the print cartridge for instructions to replace the print cartridge. What you can ...
...low on toner and the Toner Alarm is not displayed with other status light sequences. For more information, see Using the Local Printer Setup Utility. See Replacing the print cartridge for an illustration of the printer, such as light sequences for clearing jams, changing the cartridge..., closing doors, inserting trays, loading print media, or printer memory, flash memory, and network errors. Note: The Toner Alarm setting is available in Replacing the print cartridge for instructions to replace the print cartridge. What you can ...

User's Reference (3.4 MB)
Page 121
...and hold Cancel to reset the printer. 121 Downloaded fonts and macros not previously stored in flash memory are trying to download. Refer to the Setup Guide for more storage capacity. What you can do : Press and release Continue to clear the message and continue printing. Delete fonts, macros,... and other data stored on the flash memory. • Press and release Continue to clear the message and continue printing. Network interface error What this light sequence means: There is not enough free space in the flash memory to store the data you are deleted. •...
...and hold Cancel to reset the printer. 121 Downloaded fonts and macros not previously stored in flash memory are trying to download. Refer to the Setup Guide for more storage capacity. What you can do : Press and release Continue to clear the message and continue printing. Delete fonts, macros,... and other data stored on the flash memory. • Press and release Continue to clear the message and continue printing. Network interface error What this light sequence means: There is not enough free space in the flash memory to store the data you are deleted. •...

User's Reference (3.4 MB)
Page 127
...; Two pages with graphics to use to evaluate how well the printer is rejected as streaking. If data is not in the Network Printing Alliance (NPA) Protocol. Setup menu Use the Setup menu to the printer through a parallel port. Printer does not perform a carriage return after a line feed control command. Values: Off* - On...
...; Two pages with graphics to use to evaluate how well the printer is rejected as streaking. If data is not in the Network Printing Alliance (NPA) Protocol. Setup menu Use the Setup menu to the printer through a parallel port. Printer does not perform a carriage return after a line feed control command. Values: Off* - On...
User's Reference (3.4 MB)
Page 153
Index A Activating menu changes 115 Auto CR after LF (Setup menu) 127 Auto LF after CR (Setup menu) 127 automatic tray linking 93 avoiding print media jams 8 B background shading 84 binding, duplex 57 bins 59 rear output bin 60 standard output bin ... loading 55 Error light 106 print cartridge error 105 print cartridge not installed 105 printer upper front door open 105 exiting the menus 126 External network adapter (ENA) connection lost 119 F factory default setting 134 factory defaults, restoring 131 FCC notices 147 Flash full 121 flash memory, removing 140 Flushing buffer...
Index A Activating menu changes 115 Auto CR after LF (Setup menu) 127 Auto LF after CR (Setup menu) 127 automatic tray linking 93 avoiding print media jams 8 B background shading 84 binding, duplex 57 bins 59 rear output bin 60 standard output bin ... loading 55 Error light 106 print cartridge error 105 print cartridge not installed 105 printer upper front door open 105 exiting the menus 126 External network adapter (ENA) connection lost 119 F factory default setting 134 factory defaults, restoring 131 FCC notices 147 Flash full 121 flash memory, removing 140 Flushing buffer...
User's Reference (3.4 MB)
Page 154
...51 optional 250-sheet tray 37 optional 500-sheet tray 42 optional label tray 37 standard tray 37 Local Printer Setup Utility 134 drivers CD 134 Help 134 Lexmark Web site 134 values 134 Finishing Settings 134 Paper Settings 134 Parallel Settings 135 PCL Emulation Settings 134 PostScript Settings... 134 Quality Settings 135 Setup Settings 135 USB Settings 134 logo 54 M MAC Binary PS (Network menu) 129 MAC Binary PS (Parallel menu...
...51 optional 250-sheet tray 37 optional 500-sheet tray 42 optional label tray 37 standard tray 37 Local Printer Setup Utility 134 drivers CD 134 Help 134 Lexmark Web site 134 values 134 Finishing Settings 134 Paper Settings 134 Parallel Settings 135 PCL Emulation Settings 134 PostScript Settings... 134 Quality Settings 135 Setup Settings 135 USB Settings 134 logo 54 M MAC Binary PS (Network menu) 129 MAC Binary PS (Parallel menu...

User's Reference (3.4 MB)
Page 158
130 Setup Menu 127 shield, removing 138 Short paper 117 sizes, print media 10 (Com-10) 22 7 3/4 (Monarch) 21 9 envelope 21 A4 21 A5 21 B5 envelope ... to On 108 Too many flash options 122 transparencies guidelines 89 loading 54 tray linking 93 Tray 1 is missing when tray 2 is installed 107 troubleshooting network problems incorrect characters printing 86 job not printing 86 option problems does not operate after installation 85 quits working 85 other problems obtaining updated drivers...
130 Setup Menu 127 shield, removing 138 Short paper 117 sizes, print media 10 (Com-10) 22 7 3/4 (Monarch) 21 9 envelope 21 A4 21 A5 21 B5 envelope ... to On 108 Too many flash options 122 transparencies guidelines 89 loading 54 tray linking 93 Tray 1 is missing when tray 2 is installed 107 troubleshooting network problems incorrect characters printing 86 job not printing 86 option problems does not operate after installation 85 quits working 85 other problems obtaining updated drivers...

Technical Reference
Page 339
... parallel interface option. Some printers have a standard serial connector for more information about serial interface. For detailed installation or setup instructions, refer to your printer to your printer user documentation for information on page 8-53 for more information. See page... 8-35 for RS-232C serial interface. See "Network Support" on which printer interface options your printer user documentation for detailed installation instructions. 8-1 Interfaces CHAPTER 8: Printer Interfaces ...
... parallel interface option. Some printers have a standard serial connector for more information about serial interface. For detailed installation or setup instructions, refer to your printer to your printer user documentation for information on page 8-53 for more information. See page... 8-35 for RS-232C serial interface. See "Network Support" on which printer interface options your printer user documentation for detailed installation instructions. 8-1 Interfaces CHAPTER 8: Printer Interfaces ...
Technical Reference
Page 345
...host system with a Centronics-compatible parallel port. • Attach your printer: standard parallel connector, USB connector, or network connector. Refer to the MarkNet™ Quick Start book or your printer. Note: Lexmark also offers a 20-ft parallel interface cable (part number 1427498). • Share the printer using a printer-sharing... a job. 8-7 Interfaces Deciding Which Interface to Use On some printers, you : • Attach your printer user documentation for additional setup information. Then it prints the job and begins searching the interfaces for the next job.
...host system with a Centronics-compatible parallel port. • Attach your printer: standard parallel connector, USB connector, or network connector. Refer to the MarkNet™ Quick Start book or your printer. Note: Lexmark also offers a 20-ft parallel interface cable (part number 1427498). • Share the printer using a printer-sharing... a job. 8-7 Interfaces Deciding Which Interface to Use On some printers, you : • Attach your printer user documentation for additional setup information. Then it prints the job and begins searching the interfaces for the next job.


