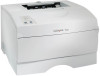
Quick Reference Guide (410 KB)
Page 1
...them, and then fan them. The printer is low. A secondary error has occurred. • Press Continue twice quickly to display the secondary error light sequence. • Refer to the Publications CD to display a jam light sequence. • See "Clearing jams" on this card or on ... is busy receiving or processing data. Do not overfill the feeder. 5 Slide the width guide until it . © Copyright 2002 Lexmark International, Inc. Light sequence Printer status • Load/Remove Paper on • Press Continue on • The printer is blinking, press Cancel. E.C. ...
...them, and then fan them. The printer is low. A secondary error has occurred. • Press Continue twice quickly to display the secondary error light sequence. • Refer to the Publications CD to display a jam light sequence. • See "Clearing jams" on this card or on ... is busy receiving or processing data. Do not overfill the feeder. 5 Slide the width guide until it . © Copyright 2002 Lexmark International, Inc. Light sequence Printer status • Load/Remove Paper on • Press Continue on • The printer is blinking, press Cancel. E.C. ...
Quick Reference Guide (410 KB)
Page 2
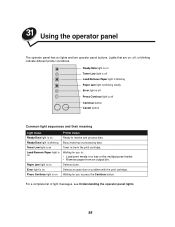
... from these areas. However, you still have questions about using the finger grips. Clearing jams To clear the Paper Jam error light and resume printing, you must remove all the jams. Jam light sequences Light sequence Meaning • Ready/Data on • Paper Jam on • Press Continue on • Toner Low on •... the fuser" • "Jams behind the rear output bin door 1 Open the rear output bin door. Do not touch the photoconductor drum on the jam light sequence.
... from these areas. However, you still have questions about using the finger grips. Clearing jams To clear the Paper Jam error light and resume printing, you must remove all the jams. Jam light sequences Light sequence Meaning • Ready/Data on • Paper Jam on • Press Continue on • Toner Low on •... the fuser" • "Jams behind the rear output bin door 1 Open the rear output bin door. Do not touch the photoconductor drum on the jam light sequence.

User's Reference (3.4 MB)
Page 12
.... 3 Release Continue. 4 Close the upper front door. Note: If the Error light is displayed. The pages include: • An information page containing printer information, cartridge information, current margin settings, and a graphic to use to evaluate the print ... indicated on . 5 Printing Print Quality Test Pages To help isolate print quality problems, print the Print Quality Test Pages: 1 Turn the printer off . 12 The light sequence that represents the Home menu is displayed, close the upper front door. If there are problems, see the operator panel...
.... 3 Release Continue. 4 Close the upper front door. Note: If the Error light is displayed. The pages include: • An information page containing printer information, cartridge information, current margin settings, and a graphic to use to evaluate the print ... indicated on . 5 Printing Print Quality Test Pages To help isolate print quality problems, print the Print Quality Test Pages: 1 Turn the printer off . 12 The light sequence that represents the Home menu is displayed, close the upper front door. If there are problems, see the operator panel...

User's Reference (3.4 MB)
Page 24
... On in the printer driver or in the Local Printer Setup Utility. If jams occur frequently, see Avoiding jams. Note: To clear the Paper Jam error light message, you are using. Optional drawer Right side view of the printer 24
... On in the printer driver or in the Local Printer Setup Utility. If jams occur frequently, see Avoiding jams. Note: To clear the Paper Jam error light message, you are using. Optional drawer Right side view of the printer 24

User's Reference (3.4 MB)
Page 25
... the path is clear, press and release Continue to locate instructions for a jam. 25 A secondary jam light sequence displays. Use the table on after you see this light sequence, press and release the Continue button twice quickly. The following page to clear the message and resume printing.... Note: Make sure to clear the entire paper path. If the Paper Jam light remains on the following light sequence indicates a jam: Ready/ Data Toner Low Load/Remove Paper Paper Jam Error Press Continue When you remove a jam, and press and release Continue, check the duplex...
... the path is clear, press and release Continue to locate instructions for a jam. 25 A secondary jam light sequence displays. Use the table on after you see this light sequence, press and release the Continue button twice quickly. The following page to clear the message and resume printing.... Note: Make sure to clear the entire paper path. If the Paper Jam light remains on the following light sequence indicates a jam: Ready/ Data Toner Low Load/Remove Paper Paper Jam Error Press Continue When you remove a jam, and press and release Continue, check the duplex...

User's Reference (3.4 MB)
Page 75
When you have checked all of these do not solve your problem, see Understanding the operator panel lights. • The printer power cord is plugged into the outlet is working. • All options are very easy to solve. Note: If any switch or ... on . • The electrical outlet is not turned off by any of the above and still have a problem, first make sure that: • If an error light blinks, see the other topics listed in Troubleshooting. 75
When you have checked all of these do not solve your problem, see Understanding the operator panel lights. • The printer power cord is plugged into the outlet is working. • All options are very easy to solve. Note: If any switch or ... on . • The electrical outlet is not turned off by any of the above and still have a problem, first make sure that: • If an error light blinks, see the other topics listed in Troubleshooting. 75
User's Reference (3.4 MB)
Page 78
... Paper light is on Lexmark's Web site at www.lexmark.com. For more information, see Using the Local Printer Setup Utility. • Do not overfill the tray. • Make sure the width and length guides on the print media sources are adjusted correctly and are not printing and the Error light is ...is paper loaded in completely. • Make sure the metal plate inside the tray is pressed down before the print begins to verify this. The Error light is on . • Make sure the print cartridge is installed. • Make sure the printer upper front door is closed. Jobs are not...
... Paper light is on Lexmark's Web site at www.lexmark.com. For more information, see Using the Local Printer Setup Utility. • Do not overfill the tray. • Make sure the width and length guides on the print media sources are adjusted correctly and are not printing and the Error light is ...is paper loaded in completely. • Make sure the metal plate inside the tray is pressed down before the print begins to verify this. The Error light is on . • Make sure the print cartridge is installed. • Make sure the printer upper front door is closed. Jobs are not...

User's Reference (3.4 MB)
Page 79
... Continue or open and close the upper front door to restart the printer. • Make sure the print cartridge is flushing data (Ready/Data and Error lights are using the correct PostScript driver. • The printer does not have enough memory to the Setup Guide for information about installing optional memory cards...
... Continue or open and close the upper front door to restart the printer. • Make sure the print cartridge is flushing data (Ready/Data and Error lights are using the correct PostScript driver. • The printer does not have enough memory to the Setup Guide for information about installing optional memory cards...

User's Reference (3.4 MB)
Page 80
... in the Local Printer Setup Utility. • If you are printing on the Lexmark Web site at www.lexmark.com for an illustration of its setup cycle. 80 Specify the correct page size...See Determining the status of the job to be printed. Problem Solution Light or blurred characters. • If the Toner Low light is on the transfer roller. To utilize the remaining toner, shake... Replacing the print cartridge for detailed specifications. • The printer detects a print cartridge error. 24 Solving print quality problems You may be able to correct many print quality problems ...
... in the Local Printer Setup Utility. • If you are printing on the Lexmark Web site at www.lexmark.com for an illustration of its setup cycle. 80 Specify the correct page size...See Determining the status of the job to be printed. Problem Solution Light or blurred characters. • If the Toner Low light is on the transfer roller. To utilize the remaining toner, shake... Replacing the print cartridge for detailed specifications. • The printer detects a print cartridge error. 24 Solving print quality problems You may be able to correct many print quality problems ...
User's Reference (3.4 MB)
Page 95
... an output bin. Load/Remove Paper light is off , or blinking indicate different printer conditions. Ready/Data light is on Toner Low light is off Load/Remove Paper light is blinking Paper Jam light is blinking slowly Error light is off Press Continue light is Waiting for you to: on Ready... to press the Continue button. Press Continue light is blinking Busy receiving or...
... an output bin. Load/Remove Paper light is off , or blinking indicate different printer conditions. Ready/Data light is on Toner Low light is off Load/Remove Paper light is blinking Paper Jam light is blinking slowly Error light is off Press Continue light is Waiting for you to: on Ready... to press the Continue button. Press Continue light is blinking Busy receiving or...

User's Reference (3.4 MB)
Page 96
... restart the printer. • Press and release Continue twice quickly to display an error code. • Press and release Continue twice quickly to display additional error codes. Press and hold Cancel until all the lights come on , or blinking (fast or slowly) indicate printer conditions such as printer... status, intervention (for example, out of paper), or service. Ready/Data light is on Toner Low light is off Load/Remove Paper light is blinking Paper Jam light is blinking slowly Error light is off Press Continue light is off , on to cancel a print job. 96 Press and release Cancel ...
... restart the printer. • Press and release Continue twice quickly to display an error code. • Press and release Continue twice quickly to display additional error codes. Press and hold Cancel until all the lights come on , or blinking (fast or slowly) indicate printer conditions such as printer... status, intervention (for example, out of paper), or service. Ready/Data light is on Toner Low light is off Load/Remove Paper light is blinking Paper Jam light is blinking slowly Error light is off Press Continue light is off , on to cancel a print job. 96 Press and release Cancel ...

User's Reference (3.4 MB)
Page 133
... To exit the menus, turn the printer on the Printer Settings Configuration sheet. 7 Press and hold Continue until all of the lights cycle. 35 Using Hex Trace mode When unexpected characters print or characters are missing, use Hex Trace to the Home menu, press...front door. A Printer Settings Configuration sheet prints. 6 Press and release Cancel until all the lights cycle. All the lights cycle. 4 Release Continue. 5 Close the upper front door. Note: If the Error light is displayed. Hex Trace isolates printing problems by telling you what information your printer is receiving...
... To exit the menus, turn the printer on the Printer Settings Configuration sheet. 7 Press and hold Continue until all of the lights cycle. 35 Using Hex Trace mode When unexpected characters print or characters are missing, use Hex Trace to the Home menu, press...front door. A Printer Settings Configuration sheet prints. 6 Press and release Cancel until all the lights cycle. All the lights cycle. 4 Release Continue. 5 Close the upper front door. Note: If the Error light is displayed. Hex Trace isolates printing problems by telling you what information your printer is receiving...
User's Reference (3.4 MB)
Page 153
...envelope sizes 10 (Com-10) 22 7 3/4 (Monarch) 21 9 21 B5 22 C5 22 DL 22 envelopes guidelines 90 loading 55 Error light 106 print cartridge error 105 print cartridge not installed 105 printer upper front door open 105 exiting the menus 126 External network adapter (ENA) connection lost 119 ...factory defaults, restoring 131 FCC notices 147 Flash full 121 flash memory, removing 140 Flushing buffer 114 Font error 117 font support PCL emulation 13 PostScript emulation 13 fonts Error light sequence 117 printing font samples 13 resident 13 Formatting flash 102 G guidelines avoiding jams 8 print media ...
...envelope sizes 10 (Com-10) 22 7 3/4 (Monarch) 21 9 21 B5 22 C5 22 DL 22 envelopes guidelines 90 loading 55 Error light 106 print cartridge error 105 print cartridge not installed 105 printer upper front door open 105 exiting the menus 126 External network adapter (ENA) connection lost 119 ...factory defaults, restoring 131 FCC notices 147 Flash full 121 flash memory, removing 140 Flushing buffer 114 Font error 117 font support PCL emulation 13 PostScript emulation 13 fonts Error light sequence 117 printing font samples 13 resident 13 Formatting flash 102 G guidelines avoiding jams 8 print media ...
User's Reference (3.4 MB)
Page 157
...78 print media skews 78 print media sticks 78 printer flushing data and Ready and Error lights blinking 79 printer on, Error light on 78 printer on, nothing prints 77 standard tray, paper feed failure 78 Toner Low light on and printing stops 78 upper front door will not close 77 problem solving ...streaks on paper 82 printing problems incorrect characters 76 incorrect print media type 77 job not printing 76 job not printing and Error light on solid 78 Load/Remove Paper light on, optional tray is loaded 78 misfeeds 77 missing or damaged parts 77 multiple feeds 77 multiple sheets feed 78 operator...
...78 print media skews 78 print media sticks 78 printer flushing data and Ready and Error lights blinking 79 printer on, Error light on 78 printer on, nothing prints 77 standard tray, paper feed failure 78 Toner Low light on and printing stops 78 upper front door will not close 77 problem solving ...streaks on paper 82 printing problems incorrect characters 76 incorrect print media type 77 job not printing 76 job not printing and Error light on solid 78 Load/Remove Paper light on, optional tray is loaded 78 misfeeds 77 missing or damaged parts 77 multiple feeds 77 multiple sheets feed 78 operator...

User's Reference (3.4 MB)
Page 158
... vertical or horizontal streaks 81 white streaks on paper 82 printer problems, solving 75 printing problems flushing data while in PostScript 3 79 printing problems, solving Error light is on 78 incorrect characters 76 incorrect print media type 77 job not printing 76 job not printing and... print media stacking is messy 77 print media sticks 78 printer flushing data and Ready and Error lights blinking 79 printer on, Error light on 78 printer on, nothing prints 77 standard tray, paper feed failure 78 Toner Low light on and printing stops 78 upper front door will not close 77 USB port 77...
... vertical or horizontal streaks 81 white streaks on paper 82 printer problems, solving 75 printing problems flushing data while in PostScript 3 79 printing problems, solving Error light is on 78 incorrect characters 76 incorrect print media type 77 job not printing 76 job not printing and... print media stacking is messy 77 print media sticks 78 printer flushing data and Ready and Error lights blinking 79 printer on, Error light on 78 printer on, nothing prints 77 standard tray, paper feed failure 78 Toner Low light on and printing stops 78 upper front door will not close 77 USB port 77...

Service Manual
Page 34
.../or the printer toolkit to modify some printer settings. Ready/Data light is on . 1-12 Service Manual The operator panel is on Toner Low light is off Load/Remove Paper light is blinking Paper Jam light is blinking slowly Error light is off Press Continue light is off Continue button Cancel button Note: Printer settings such as...
.../or the printer toolkit to modify some printer settings. Ready/Data light is on . 1-12 Service Manual The operator panel is on Toner Low light is off Load/Remove Paper light is blinking Paper Jam light is blinking slowly Error light is off Press Continue light is off Continue button Cancel button Note: Printer settings such as...

Service Manual
Page 61
...open with Cancel pressed. (Cartridge Lockout function disabled) 1. Hold the buttons until the lights cycle on action 1. Power on with top cover open and Continue pressed. 2. Close cover once the error light is displayed. Top cover open and both Continue and Cancel buttons pressed. 2. Close ...cover once the error light is displayed. Press and hold the buttons in the following table for the 4048: ...
...open with Cancel pressed. (Cartridge Lockout function disabled) 1. Hold the buttons until the lights cycle on action 1. Power on with top cover open and Continue pressed. 2. Close cover once the error light is displayed. Top cover open and both Continue and Cancel buttons pressed. 2. Close ...cover once the error light is displayed. Press and hold the buttons in the following table for the 4048: ...

Service Manual
Page 91
... Continue. • Continue to press and hold Continue until lights finish cycling. • When the Error light stays on, close the door and wait until the four top lights are on. • Press Cancel until the top two lights are using recommended print media (see media types and sizes ... toner: • Remove the print cartridge. • Shake it from side to side to define the custom type setting for three seconds. Problem Light or blurred characters. Diagnostic Information 2-55 See "Using Print Quality Test Pages" on . • Press Continue for media type, media texture, or...
... Continue. • Continue to press and hold Continue until lights finish cycling. • When the Error light stays on, close the door and wait until the four top lights are on. • Press Cancel until the top two lights are using recommended print media (see media types and sizes ... toner: • Remove the print cartridge. • Shake it from side to side to define the custom type setting for three seconds. Problem Light or blurred characters. Diagnostic Information 2-55 See "Using Print Quality Test Pages" on . • Press Continue for media type, media texture, or...

Service Manual
Page 97
...the printer. • Make sure the print cartridge is installed properly. • Make sure you are missing. Jobs are not printing and the Error light is on solid. • Press Continue or open and close the printer cover to determine what the problem is paper loaded in . •... Press Continue. 4048-00x Problem The Load Paper light is on even though there is . See "Restoring Factory Defaults" on page 3-2 for more information. • Restore factory defaults. Diagnostic Information 2-61...
...the printer. • Make sure the print cartridge is installed properly. • Make sure you are missing. Jobs are not printing and the Error light is on solid. • Press Continue or open and close the printer cover to determine what the problem is paper loaded in . •... Press Continue. 4048-00x Problem The Load Paper light is on even though there is . See "Restoring Factory Defaults" on page 3-2 for more information. • Restore factory defaults. Diagnostic Information 2-61...

Service Manual
Page 108
... the printhead alignment after it has been removed. Contact the next support level or call Lexmark 1-800-539- 6275 for the four top lights to the cross brace of the printer frame. Press and hold Continue until the lights have cycled on . 6. Wait for assistance. Adjust the printhead so that its body... before tightening the screws. Press and hold Cancel while turning the printer on . Further adjustment may not be needed. - Close the door when the Error light comes on . 4. Use the sheets to check the margins and alignment. 4-2 Service Manual margins cannot be adjusted.
... the printhead alignment after it has been removed. Contact the next support level or call Lexmark 1-800-539- 6275 for the four top lights to the cross brace of the printer frame. Press and hold Continue until the lights have cycled on . 6. Wait for assistance. Adjust the printhead so that its body... before tightening the screws. Press and hold Cancel while turning the printer on . Further adjustment may not be needed. - Close the door when the Error light comes on . 4. Use the sheets to check the margins and alignment. 4-2 Service Manual margins cannot be adjusted.


