Quick Reference Guide (410 KB)
Page 1
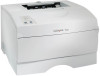
... media type (envelopes, transparencies, and so on a level surface. Removing the cartridge and shaking it may cause a jam. 9 Reinstall the tray. For the optional 500-sheet tray, open or ...the print cartridge is prompting you print more information. For the optional 500-sheet tray, close the cover.... • Press Continue to load a single sheet of the tray and insert it . © Copyright 2002 Lexmark International, Inc. Metal stop , print side down . 3 Squeeze the width guide tab and the width guide together...
... media type (envelopes, transparencies, and so on a level surface. Removing the cartridge and shaking it may cause a jam. 9 Reinstall the tray. For the optional 500-sheet tray, open or ...the print cartridge is prompting you print more information. For the optional 500-sheet tray, close the cover.... • Press Continue to load a single sheet of the tray and insert it . © Copyright 2002 Lexmark International, Inc. Metal stop , print side down . 3 Squeeze the width guide tab and the width guide together...
Quick Reference Guide (410 KB)
Page 2
...down on the left under the printer. 6 Remove any jams. You may have to remove the print cartridge to the Setup Guide or the Publications CD for information about network printing. 4 Reinstall the print cartridge. 5 Close the upper front door. Do not touch the photoconductor drum on the bottom of the ...8226; Paper Jam on • Press Continue on • Ready/Data blinks • Paper Jam on • Press Continue on the right under the print cartridge or in use. Jams under the printer Print media can see the jam. 2 Remove any jams. 3 Remove any jams. 4 Grasp the tab on the jam...
...down on the left under the printer. 6 Remove any jams. You may have to remove the print cartridge to the Setup Guide or the Publications CD for information about network printing. 4 Reinstall the print cartridge. 5 Close the upper front door. Do not touch the photoconductor drum on the bottom of the ...8226; Paper Jam on • Press Continue on • Ready/Data blinks • Paper Jam on • Press Continue on the right under the print cartridge or in use. Jams under the printer Print media can see the jam. 2 Remove any jams. 3 Remove any jams. 4 Grasp the tab on the jam...

Setup Guide (881 KB)
Page 3
... optional drawer 4 Step 3: Prepare the printer 6 Positioning the printer 6 Raising the paper rest 7 Attaching an operator panel overlay 7 Step 4: Prepare the print cartridge 8 Removing the packaging 8 Installing the print cartridge 9 Step 5: Install memory cards 11 Removing the side cover 11 Removing the shield 12 Installing a memory card 13 Reattaching the shield 13...
... optional drawer 4 Step 3: Prepare the printer 6 Positioning the printer 6 Raising the paper rest 7 Attaching an operator panel overlay 7 Step 4: Prepare the print cartridge 8 Removing the packaging 8 Installing the print cartridge 9 Step 5: Install memory cards 11 Removing the side cover 11 Removing the shield 12 Installing a memory card 13 Reattaching the shield 13...

Setup Guide (881 KB)
Page 7
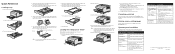
... carton and packing material in .) clearance on the right side of the printer for the cooling fan to the Publications CD for the designated Lexmark support phone number for your printer that provides room for your country. Allow at least 7.62 cm (3 in case you have the following... items: • Printer with one 250-sheet tray • Power cord • Print cartridge (shipped inside printer, wrapped in packaging) • Setup Guide with a Publications CD and Quick Reference card • Drivers CD • Operator panel overlay (...
... carton and packing material in .) clearance on the right side of the printer for the cooling fan to the Publications CD for the designated Lexmark support phone number for your printer that provides room for your country. Allow at least 7.62 cm (3 in case you have the following... items: • Printer with one 250-sheet tray • Power cord • Print cartridge (shipped inside printer, wrapped in packaging) • Setup Guide with a Publications CD and Quick Reference card • Drivers CD • Operator panel overlay (...

Setup Guide (881 KB)
Page 12
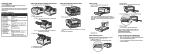
Step 4: Prepare the print cartridge Removing the packaging 1 Open the upper front door. Finger grips Handle 2 Grasp the print cartridge by the handle. Lift the cartridge out of the printer. 8 Prepare the print cartridge
Step 4: Prepare the print cartridge Removing the packaging 1 Open the upper front door. Finger grips Handle 2 Grasp the print cartridge by the handle. Lift the cartridge out of the printer. 8 Prepare the print cartridge

Setup Guide (881 KB)
Page 13
Installing the print cartridge 1 Hold the print cartridge by the handle and gently shake it to distribute the toner. Retain the packaging material. Warning! Do not touch the photoconductor drum on the bottom of the print cartridge. 3 Remove the packaging material from the cartridge. Prepare the print cartridge 9
Installing the print cartridge 1 Hold the print cartridge by the handle and gently shake it to distribute the toner. Retain the packaging material. Warning! Do not touch the photoconductor drum on the bottom of the print cartridge. 3 Remove the packaging material from the cartridge. Prepare the print cartridge 9

Setup Guide (881 KB)
Page 14
Go to page... 11 15 10 Prepare the print cartridge b Align the tabs on each side of the print cartridge with the slots on both sides, or the printer will not function properly. What do I do next? c Slide the print cartridge into the printer until it snaps into place. 3 Close the upper front door. Make sure the door snaps closed on each side of the print cartridge cradle. Task Install memory cards Load print media 2 Install the print cartridge: a Grasp the print cartridge by the handle.
Go to page... 11 15 10 Prepare the print cartridge b Align the tabs on each side of the print cartridge with the slots on both sides, or the printer will not function properly. What do I do next? c Slide the print cartridge into the printer until it snaps into place. 3 Close the upper front door. Make sure the door snaps closed on each side of the print cartridge cradle. Task Install memory cards Load print media 2 Install the print cartridge: a Grasp the print cartridge by the handle.
Setup Guide (881 KB)
Page 37
... includes: • Tips for successful printing • Ways to improve print quality • Information about using the printer operator panel • Instructions for replacing a print cartridge • Solutions to common printing problems • Methods for clearing jams • Explanation of operator panel light sequences Distribute information to see a complete list of...
... includes: • Tips for successful printing • Ways to improve print quality • Information about using the printer operator panel • Instructions for replacing a print cartridge • Solutions to common printing problems • Methods for clearing jams • Explanation of operator panel light sequences Distribute information to see a complete list of...

User's Reference (3.4 MB)
Page 4
... 17: Maintaining your printer 66 Chapter 18: Ordering supplies 67 Ordering a print cartridge 67 Chapter 19: Storing the print cartridge 68 Chapter 20: Replacing the print cartridge 69 Removing the used print cartridge 69 Cleaning the printer 71 Installing the new print cartridge 71 Chapter 21: Cleaning the printhead lens 74 Chapter 22: Solving basic...
... 17: Maintaining your printer 66 Chapter 18: Ordering supplies 67 Ordering a print cartridge 67 Chapter 19: Storing the print cartridge 68 Chapter 20: Replacing the print cartridge 69 Removing the used print cartridge 69 Cleaning the printer 71 Installing the new print cartridge 71 Chapter 21: Cleaning the printhead lens 74 Chapter 22: Solving basic...

User's Reference (3.4 MB)
Page 12
... printer off and open the upper front door. 2 Press and hold Continue as indicated on . The pages include: • An information page containing printer information, cartridge information, current margin settings, and a graphic to use to evaluate the print quality • Two pages with graphics to use to evaluate how well the...
... printer off and open the upper front door. 2 Press and hold Continue as indicated on . The pages include: • An information page containing printer information, cartridge information, current margin settings, and a graphic to use to evaluate the print quality • Two pages with graphics to use to evaluate how well the...

User's Reference (3.4 MB)
Page 18
..., Quality Menu, Setup Menu, PCL Emul Menu (Emul stands for emulation), PostScript Menu, Parallel Menu, Network Menu, and USB Menu • Cartridge information • A list of installed options and features • Available printer memory If your printer has a network port, an additional page prints... to the Technical Reference on Lexmark's Web site for information about network settings. The following steps explain how to print a menu settings page. 1 Make sure the printer ...
..., Quality Menu, Setup Menu, PCL Emul Menu (Emul stands for emulation), PostScript Menu, Parallel Menu, Network Menu, and USB Menu • Cartridge information • A list of installed options and features • Available printer memory If your printer has a network port, an additional page prints... to the Technical Reference on Lexmark's Web site for information about network settings. The following steps explain how to print a menu settings page. 1 Make sure the printer ...

User's Reference (3.4 MB)
Page 26
... Jams in the tray 2 area on page 34 • Jams inside a tray after clearing the metal stop on page 34 • Jams under the print cartridge on page 27 • Exiting to the standard output bin on page 31 Jam between Jams under the print the input area... cartridge on page 33 Note: To avoid tearing print media, pull all jams out gently and slowly. 26 Ready/ Data Toner Low Load/ Remove Paper Paper ...
... Jams in the tray 2 area on page 34 • Jams inside a tray after clearing the metal stop on page 34 • Jams under the print cartridge on page 27 • Exiting to the standard output bin on page 31 Jam between Jams under the print the input area... cartridge on page 33 Note: To avoid tearing print media, pull all jams out gently and slowly. 26 Ready/ Data Toner Low Load/ Remove Paper Paper ...

User's Reference (3.4 MB)
Page 27
Jams under the print cartridge Since the jam may occur farther back in the printer behind the print cartridge area, you may need to reach in farther to remove the jam. 1 Open the upper front door. 2 Remove the print cartridge. (See Removing the used print cartridge for instructions.) CAUTION: The rear portion of the inside of the print media may be visible. 27 Note: The ends of the printer may not be hot.
Jams under the print cartridge Since the jam may occur farther back in the printer behind the print cartridge area, you may need to reach in farther to remove the jam. 1 Open the upper front door. 2 Remove the print cartridge. (See Removing the used print cartridge for instructions.) CAUTION: The rear portion of the inside of the print media may be visible. 27 Note: The ends of the printer may not be hot.

User's Reference (3.4 MB)
Page 28
... standard output bin. Jams behind the upper front door and the rear output bin door to continue. 4 Reinstall the print cartridge. (See pages 72 through 73 of Installing the new print cartridge for instructions.) 5 Close the upper front door. See Jams behind the upper front door and the rear output bin door...
... standard output bin. Jams behind the upper front door and the rear output bin door to continue. 4 Reinstall the print cartridge. (See pages 72 through 73 of Installing the new print cartridge for instructions.) 5 Close the upper front door. See Jams behind the upper front door and the rear output bin door...

User's Reference (3.4 MB)
Page 30
... it straight out toward you. Jams in the fuser 1 Open the upper front door. (See page 69 in Removing the used print cartridge if you need instructions.) 2 Remove the print cartridge. (See page 70 in the middle under the tab. Note: Make sure the door closes on both sides. 2 Gently remove the... based on how much is visible. • If the middle of the sheet of print media is visible, pull it in Removing the used print cartridge if you need instructions.) CAUTION: The inside rear of the printer may be hot. 30
... it straight out toward you. Jams in the fuser 1 Open the upper front door. (See page 69 in Removing the used print cartridge if you need instructions.) 2 Remove the print cartridge. (See page 70 in the middle under the tab. Note: Make sure the door closes on both sides. 2 Gently remove the... based on how much is visible. • If the middle of the sheet of print media is visible, pull it in Removing the used print cartridge if you need instructions.) CAUTION: The inside rear of the printer may be hot. 30

User's Reference (3.4 MB)
Page 31
Exiting to the standard output bin 1 Gently pull the jam straight out. 2 If the print media does not pull easily from here, continue with Jams behind the rear output bin door on page 32. 31 3 Locate the jam inside the printer. 4 Gently pull the jam straight out and then up. 5 Reinstall the print cartridge. 6 Close the upper front door.
Exiting to the standard output bin 1 Gently pull the jam straight out. 2 If the print media does not pull easily from here, continue with Jams behind the rear output bin door on page 32. 31 3 Locate the jam inside the printer. 4 Gently pull the jam straight out and then up. 5 Reinstall the print cartridge. 6 Close the upper front door.

User's Reference (3.4 MB)
Page 32
Remove the print cartridge, and then pull the jam out. Also, set the Paper Length to the standard output bin. 1 Open the rear output bin door. 2 Gently remove the ...
Remove the print cartridge, and then pull the jam out. Also, set the Paper Length to the standard output bin. 1 Open the rear output bin door. 2 Gently remove the ...

User's Reference (3.4 MB)
Page 33
Jams in . 33 Jams in the tray 1 area Print media is jammed in the area under the print cartridge, but the jam is not visible. 1 Gently pull tray 1 (standard tray or optional label tray) out. 2 Pull the jam straight out. 3 Push the tray in the multipurpose feeder Gently pull the jam straight out of the multipurpose feeder.
Jams in . 33 Jams in the tray 1 area Print media is jammed in the area under the print cartridge, but the jam is not visible. 1 Gently pull tray 1 (standard tray or optional label tray) out. 2 Pull the jam straight out. 3 Push the tray in the multipurpose feeder Gently pull the jam straight out of the multipurpose feeder.
User's Reference (3.4 MB)
Page 63
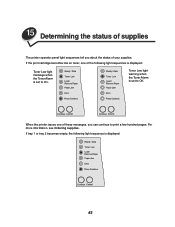
For more information, see Ordering supplies. 15 Determining the status of supplies The printer operator panel light sequences tell you can continue to print a few hundred pages. If the print cartridge becomes low on toner, one of these messages, you about the status of the following light sequence is displayed: 63 Toner Low light warning when the Toner Alarm is set to On. If tray 1 or tray 2 becomes empty, the following light sequences is displayed: Toner Low light message when the Toner Alarm is set to Off. When the printer issues one of your supplies.
For more information, see Ordering supplies. 15 Determining the status of supplies The printer operator panel light sequences tell you can continue to print a few hundred pages. If the print cartridge becomes low on toner, one of these messages, you about the status of the following light sequence is displayed: 63 Toner Low light warning when the Toner Alarm is set to On. If tray 1 or tray 2 becomes empty, the following light sequences is displayed: Toner Low light message when the Toner Alarm is set to Off. When the printer issues one of your supplies.

User's Reference (3.4 MB)
Page 66
... people are using the printer, you need to replace the print cartridge and clean the printer to maintain optimum print quality. See Replacing the print cartridge and Cleaning the printer for information about Lexmark Authorized Supplies Dealers in your area. In other countries or regions,... visit the Lexmark Web site at 1-800-539-6275 for more information. Refer printing...
... people are using the printer, you need to replace the print cartridge and clean the printer to maintain optimum print quality. See Replacing the print cartridge and Cleaning the printer for information about Lexmark Authorized Supplies Dealers in your area. In other countries or regions,... visit the Lexmark Web site at 1-800-539-6275 for more information. Refer printing...

