Quick Reference
Page 3
...28 Scanning to a PDF...28 Canceling scan jobs...28 E-mailing 29 Sending e-mail...29 Canceling an e‑mail...29 Setting up the printer to fax 30 Step 1: Connect the printer to the telephone line 30 Step 2: Check the dial tone 37 Step 3: Set your fax name and fax number 38 Step 4: Set... the printer to receive faxes automatically or manually 38 Step 5: Set the number of rings 38 Step 6: Create a contact list 38 Faxing 40 Sending faxes...40 Receiving faxes...41 Wireless ...
...28 Scanning to a PDF...28 Canceling scan jobs...28 E-mailing 29 Sending e-mail...29 Canceling an e‑mail...29 Setting up the printer to fax 30 Step 1: Connect the printer to the telephone line 30 Step 2: Check the dial tone 37 Step 3: Set your fax name and fax number 38 Step 4: Set... the printer to receive faxes automatically or manually 38 Step 5: Set the number of rings 38 Step 6: Create a contact list 38 Faxing 40 Sending faxes...40 Receiving faxes...41 Wireless ...
Quick Reference
Page 5
..., Support Web site-http://support.lexmark.com online customer support, and telephone support 1 Available on the installation software CD. 2 Available on the installation software CD and on both sides of the paper manually or automatically (depending on adding your printer to a wireless network, setting ...ink cartridges for using less ink than one side of a sheet of paper. • Print on the Lexmark Support Web site at http://support.lexmark.com. 5 Minimizing your printer folder 2 Double‑click User's Guide. These modes can scan documents or photographs and save . To ...
..., Support Web site-http://support.lexmark.com online customer support, and telephone support 1 Available on the installation software CD. 2 Available on the installation software CD and on both sides of the paper manually or automatically (depending on adding your printer to a wireless network, setting ...ink cartridges for using less ink than one side of a sheet of paper. • Print on the Lexmark Support Web site at http://support.lexmark.com. 5 Minimizing your printer folder 2 Double‑click User's Guide. These modes can scan documents or photographs and save . To ...
Quick Reference
Page 20
... on the computer screen. If you did not install these additional programs during printer installation When you set up to the Lexmark Web site at http://support.lexmark.com. 20 Installing the printer software Note: If you do. For Macintosh users Note: To take advantage ...was installed. If the installation dialog does not appear after a minute, then launch the CD manually: a Click , or click Start and then click Run. Using the Windows printer software Software installed during initial installation, then reinsert the installation software CD, run the installation software,...
... on the computer screen. If you did not install these additional programs during printer installation When you set up to the Lexmark Web site at http://support.lexmark.com. 20 Installing the printer software Note: If you do. For Macintosh users Note: To take advantage ...was installed. If the installation dialog does not appear after a minute, then launch the CD manually: a Click , or click Start and then click Run. Using the Windows printer software Software installed during initial installation, then reinsert the installation software CD, run the installation software,...

Quick Reference
Page 26
... image. • Do not load postcards, photos, small items, transparencies, photo paper, or thin media (such as magazine clippings). Scanning stops and the printer returns to avoid dark edges on the scanner glass. • When the document to set a color or black-and-white copy. 5 Press . Tips ...for making a two‑sided copy manually. and letter-size paper. If you make a selection. Touch Accept every time you purchased a printer without an ADF, then load original documents or photos on select models. Note: The ADF is in place...
... image. • Do not load postcards, photos, small items, transparencies, photo paper, or thin media (such as magazine clippings). Scanning stops and the printer returns to avoid dark edges on the scanner glass. • When the document to set a color or black-and-white copy. 5 Press . Tips ...for making a two‑sided copy manually. and letter-size paper. If you make a selection. Touch Accept every time you purchased a printer without an ADF, then load original documents or photos on select models. Note: The ADF is in place...
Quick Reference
Page 29
...3 Select the output file type you want , press to enter or select the recipients: • Enter E‑mail Address-Enter the e‑mail address manually. • Address Book-Touch Sort by Name or Sort by Group, and then select the contact. • History-Select the name or e-mail address from... and set up to your subject > Accept 8 If you want to an Ethernet or wireless network before sending an e‑mail. • Make sure the printer is in place with the SMTP server. Canceling an e‑mail To cancel an e‑mail, press . If necessary, make a selection. 29 5 To...
...3 Select the output file type you want , press to enter or select the recipients: • Enter E‑mail Address-Enter the e‑mail address manually. • Address Book-Touch Sort by Name or Sort by Group, and then select the contact. • History-Select the name or e-mail address from... and set up to your subject > Accept 8 If you want to an Ethernet or wireless network before sending an e‑mail. • Make sure the printer is in place with the SMTP server. Canceling an e‑mail To cancel an e‑mail, press . If necessary, make a selection. 29 5 To...

Quick Reference
Page 30
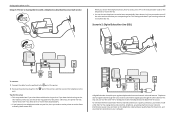
...product to the public switched telephone network. Do not set the printer to pick up the printer to fax Note: The fax function is available only in select printer models. Scenario 1: Standard telephone line Setup 1: Printer is applicable to your telephone service. Tips for this setup: ...• You can set the printer to receive faxes automatically (Auto Answer On) or manually (Auto Answer Off). • If ...
...product to the public switched telephone network. Do not set the printer to pick up the printer to fax Note: The fax function is available only in select printer models. Scenario 1: Standard telephone line Setup 1: Printer is applicable to your telephone service. Tips for this setup: ...• You can set the printer to receive faxes automatically (Auto Answer On) or manually (Auto Answer Off). • If ...
Quick Reference
Page 32
...tones, press *9* or the manual answer code on the telephone to receive the fax. • You can use the same line for analog voice calls (including faxes) and digital Internet access. A Digital Subscriber Line splits your line, then you need to the port of the printer, and then connect the ..., the printer will not receive faxes even if you have set it to receive faxes automatically. • If you have distinctive ring service, then make sure that you subscribe to the Tips for this setup: • This setup works best if you set the printer to receive faxes manually (Auto Answer...
...tones, press *9* or the manual answer code on the telephone to receive the fax. • You can use the same line for analog voice calls (including faxes) and digital Internet access. A Digital Subscriber Line splits your line, then you need to the port of the printer, and then connect the ..., the printer will not receive faxes even if you have set it to receive faxes automatically. • If you have distinctive ring service, then make sure that you subscribe to the Tips for this setup: • This setup works best if you set the printer to receive faxes manually (Auto Answer...

Quick Reference
Page 38
This information appears in the header and footer of the faxes that you can set the printer to receive faxes automatically or manually: 1 From the printer control panel, navigate to Auto Answer: > Fax Setup > Ringing and Answering > Auto Answer 2 Select an Auto Answer setting, and then ...navigate to: > Fax Setup > Ringing and Answering > Ring Pattern 2 Select the ring pattern for the printer, and then save the setting. Step 4: Set the printer to receive faxes automatically or manually If the printer is connected to a dedicated fax line, then you can add up on the 2 Select the number of...
This information appears in the header and footer of the faxes that you can set the printer to receive faxes automatically or manually: 1 From the printer control panel, navigate to Auto Answer: > Fax Setup > Ringing and Answering > Auto Answer 2 Select an Auto Answer setting, and then ...navigate to: > Fax Setup > Ringing and Answering > Ring Pattern 2 Select the ring pattern for the printer, and then save the setting. Step 4: Set the printer to receive faxes automatically or manually If the printer is connected to a dedicated fax line, then you can add up on the 2 Select the number of...
Quick Reference
Page 40
.... b Enter a fax number, or touch Address Book or History to Multiple, and then touch Add a Number. Tips: • You can enter fax numbers manually or by using the scanner glass, close the scanner cover, if possible, to avoid dark edges on the scanner glass. • When the document to...settings you have entered the numbers of all the recipients. Repeat this product or make sure Enable Fax is flipped out. • Depending on your printer model, use the ADF when scanning two‑sided (duplex) pages. • To easily retrieve a document after copying or scanning, lift the ADF...
.... b Enter a fax number, or touch Address Book or History to Multiple, and then touch Add a Number. Tips: • You can enter fax numbers manually or by using the scanner glass, close the scanner cover, if possible, to avoid dark edges on the scanner glass. • When the document to...settings you have entered the numbers of all the recipients. Repeat this product or make sure Enable Fax is flipped out. • Depending on your printer model, use the ADF when scanning two‑sided (duplex) pages. • To easily retrieve a document after copying or scanning, lift the ADF...

Quick Reference
Page 41
... up incoming faxes: a Touch Pick up calls two rings after four rings, then set the printer to pick up on the. When the number of rings, and then touch Accept. Receiving faxes manually 1 Make sure that Auto Answer is off: a From the home screen, navigate to: > Fax Setup > Ringing and ... Faxing Receiving faxes Tips for receiving faxes When receiving faxes: • Make sure that the printer is on and connected to a working if you hear a dial tone. • If you set the printer to receive faxes manually (Auto Answer Off), then make sure that Auto Answer is on: From the home screen...
... up incoming faxes: a Touch Pick up calls two rings after four rings, then set the printer to pick up on the. When the number of rings, and then touch Accept. Receiving faxes manually 1 Make sure that Auto Answer is off: a From the home screen, navigate to: > Fax Setup > Ringing and ... Faxing Receiving faxes Tips for receiving faxes When receiving faxes: • Make sure that the printer is on and connected to a working if you hear a dial tone. • If you set the printer to receive faxes manually (Auto Answer Off), then make sure that Auto Answer is on: From the home screen...

Quick Reference
Page 42
... The name of Wi‑Fi technology. Look for network devices. If the installation dialog does not appear after a minute, then launch the CD manually: a Click , or click Start and then click Run. It is entered into the wireless settings of the access point. • Push Button ...Exactly 10 or 26 hexadecimal characters or • Exactly 5 or 13 ASCII characters If your access point is Wi‑Fi Protected Setup? The printer supports the following methods in a WPA/WPA2 passphrase are pushed within a given period of these identifier marks to 63 ASCII characters Notes: •...
... The name of Wi‑Fi technology. Look for network devices. If the installation dialog does not appear after a minute, then launch the CD manually: a Click , or click Start and then click Run. It is entered into the wireless settings of the access point. • Push Button ...Exactly 10 or 26 hexadecimal characters or • Exactly 5 or 13 ASCII characters If your access point is Wi‑Fi Protected Setup? The printer supports the following methods in a WPA/WPA2 passphrase are pushed within a given period of these identifier marks to 63 ASCII characters Notes: •...

Quick Reference
Page 43
... : > Network Setup > Wireless Networking > Wi‑Fi Protected Setup > PIN Method 2 Follow the instructions on the printer display. USE THE PERSONAL IDENTIFICATION NUMBER (PIN) METHOD 1 From the printer control panel, navigate to : > Network Setup > Wireless Networking > Wi‑Fi Protected Setup > Push Button Method 2...logos on the side, back, or top of your printer or device has not yet been configured for the printer control panel to display a message to begin WPS configuration. Configuring Wi‑Fi Protected Setup manually Note: Make sure your system support person. For more...
... : > Network Setup > Wireless Networking > Wi‑Fi Protected Setup > PIN Method 2 Follow the instructions on the printer display. USE THE PERSONAL IDENTIFICATION NUMBER (PIN) METHOD 1 From the printer control panel, navigate to : > Network Setup > Wireless Networking > Wi‑Fi Protected Setup > Push Button Method 2...logos on the side, back, or top of your printer or device has not yet been configured for the printer control panel to display a message to begin WPS configuration. Configuring Wi‑Fi Protected Setup manually Note: Make sure your system support person. For more...

Quick Reference
Page 45
...for paper jam messages, and clear any errors. • Check for your printer does not appear in the list in the printers folder or as a printer option when sending a print job, then try the following : LAUNCH THE PRINTER CD MANUALLY For Windows users 1 Click , or click Start and then click Run. ...the instructions on . If Troubleshooting does not solve your problem Visit our Web site at http://support.lexmark.com to the computer, print server, or network access point. • Check the printer for error messages, and resolve any jams. • Check the ink cartridges, and install new ...
...for paper jam messages, and clear any errors. • Check for your printer does not appear in the list in the printers folder or as a printer option when sending a print job, then try the following : LAUNCH THE PRINTER CD MANUALLY For Windows users 1 Click , or click Start and then click Run. ...the instructions on . If Troubleshooting does not solve your problem Visit our Web site at http://support.lexmark.com to the computer, print server, or network access point. • Check the printer for error messages, and resolve any jams. • Check the ink cartridges, and install new ...
Quick Reference
Page 49
...1 From the home screen, navigate to: > Fax Setup > Ringing and Answering > Manual Answer Code 2 Copy the manual answer code that appears on . • The wireless network is working properly. Cannot run the fax software The printer must be connected to a telephone, DSL, VoIP, or cable service before you can ... you can open the fax software and configure the fax settings. MAKE SURE THAT THE PRINTER IS CONNECTED TO AN ANALOG PORT The printer is full. If you are set the printer to receive faxes manually (Auto Answer Off), then you need to enter the correct code when a fax comes...
...1 From the home screen, navigate to: > Fax Setup > Ringing and Answering > Manual Answer Code 2 Copy the manual answer code that appears on . • The wireless network is working properly. Cannot run the fax software The printer must be connected to a telephone, DSL, VoIP, or cable service before you can ... you can open the fax software and configure the fax settings. MAKE SURE THAT THE PRINTER IS CONNECTED TO AN ANALOG PORT The printer is full. If you are set the printer to receive faxes manually (Auto Answer Off), then you need to enter the correct code when a fax comes...
Quick Reference
Page 53
The selected port has a check beside it in the Description column. Check the printer model in the Printer column to make sure you are not sure how to do this, then refer to the manual that came with Printer Port in the Port column. 7 If the Description column of the selected port indicates that ...it is not already checked. 7 Click Apply > OK, and then try to print again. If the printer and computer have valid IP addresses and the...
The selected port has a check beside it in the Description column. Check the printer model in the Printer column to make sure you are not sure how to do this, then refer to the manual that came with Printer Port in the Port column. 7 If the Description column of the selected port indicates that ...it is not already checked. 7 Click Apply > OK, and then try to print again. If the printer and computer have valid IP addresses and the...
Quick Reference
Page 55
... cannot send faxes 48 fax troubleshooting checklist 48 faxing Auto Answer setting 38 receiving automatically 41 receiving manually 41 sending a broadcast fax immediately 40 sending using the printer control panel 40 setting sender information 38 tips, receiving 41 tips, sending 40 using the computer ...40 faxing tips receiving faxes automatically 41 FCC notices 54 features, printer 6 file types supported 15 finding information 5 publications 5 Web site 5 finding IP address of computer (Mac) 50 flash drive inserting 15...
... cannot send faxes 48 fax troubleshooting checklist 48 faxing Auto Answer setting 38 receiving automatically 41 receiving manually 41 sending a broadcast fax immediately 40 sending using the printer control panel 40 setting sender information 38 tips, receiving 41 tips, sending 40 using the computer ...40 faxing tips receiving faxes automatically 41 FCC notices 54 features, printer 6 file types supported 15 finding information 5 publications 5 Web site 5 finding IP address of computer (Mac) 50 flash drive inserting 15...

Quick Reference
Page 56
... from print queue 47 printer features 6 models 6 setting up 6 printer control panel buttons and icons 13 location 12 printer does not respond 47 printer features 6 printer models 6 printer printing blank pages 47 printer problems, basic solutions 45 printer software installing 20 printer solutions 44 printers supported 24 printhead aligning...sided 23 publications finding 5 Push Button Configuration method using 43 R receiving faxes Auto Answer setting 38, 41 automatically 41 manually 41 tips 41 recycling 5 replacing ink cartridges 17 RJ‑11 adapter 35 S safety information 2, 30 scan job ...
... from print queue 47 printer features 6 models 6 setting up 6 printer control panel buttons and icons 13 location 12 printer does not respond 47 printer features 6 printer models 6 printer printing blank pages 47 printer problems, basic solutions 45 printer software installing 20 printer solutions 44 printers supported 24 printhead aligning...sided 23 publications finding 5 Push Button Configuration method using 43 R receiving faxes Auto Answer setting 38, 41 automatically 41 manually 41 tips 41 recycling 5 replacing ink cartridges 17 RJ‑11 adapter 35 S safety information 2, 30 scan job ...

Quick Reference
Page 57
... VoIP adapter 33 W Web Links accessing 21 Web site finding 5 Windows installing printer on wireless network 42 Windows software Abbyy Sprint OCR 20 Phone Book 20 Printer Home 20 Printer Setup Utility 20 Printing Preferences 20 Product Update 20 Status Messenger 20 Status Monitor Center... Tools for Office 20 Wireless Setup Utility 20 wireless network information needed for setting up wireless printing 42 installing printer on (Macintosh) 42 installing printer on (Windows) 42 troubleshooting 49 wireless setup information needed for 42 wireless troubleshooting cannot print over wireless network ...
... VoIP adapter 33 W Web Links accessing 21 Web site finding 5 Windows installing printer on wireless network 42 Windows software Abbyy Sprint OCR 20 Phone Book 20 Printer Home 20 Printer Setup Utility 20 Printing Preferences 20 Product Update 20 Status Messenger 20 Status Monitor Center... Tools for Office 20 Wireless Setup Utility 20 wireless network information needed for setting up wireless printing 42 installing printer on (Macintosh) 42 installing printer on (Windows) 42 troubleshooting 49 wireless setup information needed for 42 wireless troubleshooting cannot print over wireless network ...
User's Guide
Page 7
... and are the reason we do what we do it will meet your printer model). • Use recycled paper. • Reduce the margins of documents to be able to make sure you get the most out of the paper manually or automatically (depending on one side of a sheet of paper. • ...fast. To get back on both sides of our knowledgeable support representatives will be delighted to a computer program, application, or flash drive for choosing this printer! And if you to print multiple pages on your needs. The Pages per Sheet feature allows you find something we want to reduce your...
... and are the reason we do what we do it will meet your printer model). • Use recycled paper. • Reduce the margins of documents to be able to make sure you get the most out of the paper manually or automatically (depending on one side of a sheet of paper. • ...fast. To get back on both sides of our knowledgeable support representatives will be delighted to a computer program, application, or flash drive for choosing this printer! And if you to print multiple pages on your needs. The Pages per Sheet feature allows you find something we want to reduce your...
User's Guide
Page 27
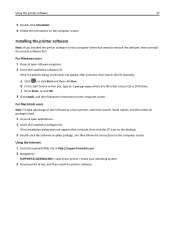
... instructions on this computer before but need to : SUPPORT & DOWNLOADS > select your printer > select your CD or DVD drive. If the installation dialog does not appear after a minute, then launch the CD manually: a Click , or click Start and then click Run. For Windows users 1 Close..., and then follow the instructions on the computer screen. Installing the printer software Note: If you installed the printer software on the computer screen. Using the Internet 1 Go to the Lexmark Web site at http://support.lexmark.com. 2 Navigate to reinstall the software, then uninstall the current ...
... instructions on this computer before but need to : SUPPORT & DOWNLOADS > select your printer > select your CD or DVD drive. If the installation dialog does not appear after a minute, then launch the CD manually: a Click , or click Start and then click Run. For Windows users 1 Close..., and then follow the instructions on the computer screen. Installing the printer software Note: If you installed the printer software on the computer screen. Using the Internet 1 Go to the Lexmark Web site at http://support.lexmark.com. 2 Navigate to reinstall the software, then uninstall the current ...


