Quick Reference
Page 2
... a properly grounded electrical outlet that cartridges are available through www.lexmark.com and may be used with this printer. Visit www.lexmark.com/recycle to Lexmark's recycling partner. Go to abrasion or stress. Replacement inkjet cartridge(s) sold without these things happen, a risk of fire,...cabling connections, such as otherwise provided below, and (2) pass this license/agreement to use only genuine Lexmark inkjet cartridges with the licensed printer. This patented printer is preaddressed. Do not place or use this single use, the license to any subsequent user of...
... a properly grounded electrical outlet that cartridges are available through www.lexmark.com and may be used with this printer. Visit www.lexmark.com/recycle to Lexmark's recycling partner. Go to abrasion or stress. Replacement inkjet cartridge(s) sold without these things happen, a risk of fire,...cabling connections, such as otherwise provided below, and (2) pass this license/agreement to use only genuine Lexmark inkjet cartridges with the licensed printer. This patented printer is preaddressed. Do not place or use this single use, the license to any subsequent user of...
User's Guide
Page 31
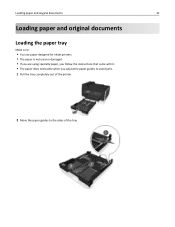
Loading paper and original documents 31 Loading paper and original documents Loading the paper tray Make sure: • You use paper designed for inkjet printers. • The paper is not used or damaged. • If you are using specialty paper, you follow the instructions that came with it. • The paper does not buckle when you adjust the paper guides to avoid jams. 1 Pull the tray completely out of the printer. 2 Move the paper guides to the sides of the tray.
Loading paper and original documents 31 Loading paper and original documents Loading the paper tray Make sure: • You use paper designed for inkjet printers. • The paper is not used or damaged. • If you are using specialty paper, you follow the instructions that came with it. • The paper does not buckle when you adjust the paper guides to avoid jams. 1 Pull the tray completely out of the printer. 2 Move the paper guides to the sides of the tray.
User's Guide
Page 36
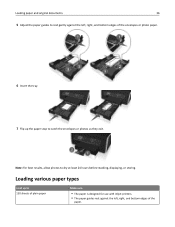
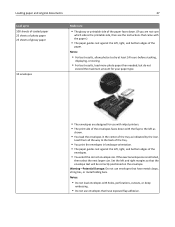
Loading paper and original documents 36 5 Adjust the paper guides to rest gently against the left, right, and bottom edges of the envelopes or photo paper. 6 Insert the tray. 7 Flip up to 150 sheets of plain paper Make sure • The paper is designed for use with inkjet printers. • The paper guides rest against the left, right, and bottom edges of the paper. Note: For best results, allow photos to catch the envelopes or photos as they exit. Loading various paper types Load up the paper stop to dry at least 24 hours before stacking, displaying, or storing.
Loading paper and original documents 36 5 Adjust the paper guides to rest gently against the left, right, and bottom edges of the envelopes or photo paper. 6 Insert the tray. 7 Flip up to 150 sheets of plain paper Make sure • The paper is designed for use with inkjet printers. • The paper guides rest against the left, right, and bottom edges of the paper. Note: For best results, allow photos to catch the envelopes or photos as they exit. Loading various paper types Load up the paper stop to dry at least 24 hours before stacking, displaying, or storing.
User's Guide
Page 37
... before stacking, displaying, or storing. • For best results, load more photo paper than needed, but do not exceed the maximum amount for use with inkjet printers. • The print side of the envelopes faces down with the flap to the left as shown. • You load the envelopes in landscape orientation...
... before stacking, displaying, or storing. • For best results, load more photo paper than needed, but do not exceed the maximum amount for use with inkjet printers. • The print side of the envelopes faces down with the flap to the left as shown. • You load the envelopes in landscape orientation...


