

Getting Started
Page 2
... for USB attach. The FCC Class B limits are the user's responsibility. Some states do not imply that may be directed to restrictions as Lexmark part number 12A2405 for any time. The manufacturer is near the product and easily accessible. • Refer service or repairs, other products, programs, or services, except those expressly designated by using other than those described in Technical Data and Computer Software...
... for USB attach. The FCC Class B limits are the user's responsibility. Some states do not imply that may be directed to restrictions as Lexmark part number 12A2405 for any time. The manufacturer is near the product and easily accessible. • Refer service or repairs, other products, programs, or services, except those expressly designated by using other than those described in Technical Data and Computer Software...
Getting Started
Page 5
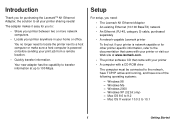
... to 10.1 1 Getting Started Windows Me - Your new adapter has the capability to transfer information at www.lexmark.com. • The printer software CD that came with your printer • A computer with your printer is powered on before sending your print job from a remote location. • Quickly transfer information. Introduction Thank you for purchasing the LexmarkTM N1 Ethernet Adapter, the solution to 9.2 - Windows 98 - Windows 2000 - Mac OS 8.6 to...
... to 10.1 1 Getting Started Windows Me - Your new adapter has the capability to transfer information at www.lexmark.com. • The printer software CD that came with your printer • A computer with your printer is powered on before sending your print job from a remote location. • Quickly transfer information. Introduction Thank you for purchasing the LexmarkTM N1 Ethernet Adapter, the solution to 9.2 - Windows 98 - Windows 2000 - Mac OS 8.6 to...
Getting Started
Page 6
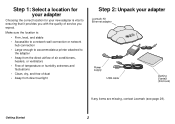
... your adapter Lexmark N1 Ethernet adapter Power supply USB cable Getting Started (this book) If any items are missing, contact Lexmark (see page 29). Make sure the location is: • Firm, level, and stable • Accessible to a network wall connection or network hub connection • Large enough to accommodate a printer attached to ensuring that it provides you with the quality of dust • Away from direct sunlight Step 2: Unpack your new adapter...
... your adapter Lexmark N1 Ethernet adapter Power supply USB cable Getting Started (this book) If any items are missing, contact Lexmark (see page 29). Make sure the location is: • Firm, level, and stable • Accessible to a network wall connection or network hub connection • Large enough to accommodate a printer attached to ensuring that it provides you with the quality of dust • Away from direct sunlight Step 2: Unpack your new adapter...

Getting Started
Page 7
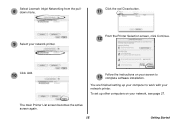
... parallel cable. 3 Place the printer next to uninstall it at its new location. 4 Make sure the printer power light is on the network, - For help, refer to the instructions that came with your printer. 2 To help configure your printer. Note: Your printer may look different from the one shown. 3 Getting Started Note: If necessary, disconnect the printer power supply, and then reconnect it . Step 3: Prepare your printer 1 Unpack and set...
... parallel cable. 3 Place the printer next to uninstall it at its new location. 4 Make sure the printer power light is on the network, - For help, refer to the instructions that came with your printer. 2 To help configure your printer. Note: Your printer may look different from the one shown. 3 Getting Started Note: If necessary, disconnect the printer power supply, and then reconnect it . Step 3: Prepare your printer 1 Unpack and set...
Getting Started
Page 12
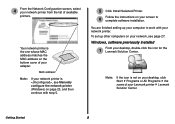
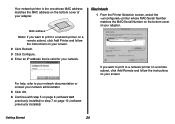
... your adapter. MAC address Note: If your network printer. To set up your computer to work with step 5. 5 Click Install Selected Printer. 6 Follow the instructions on page 23, and then continue with your network printer is , see page 27. 4 From the Network Configuration screen, select your desktop, double-click the icon for the 1 Lexmark Solution Center. Your network printer is not on your network, see Manually configure the network printer (Windows) on your Lexmark printer Lexmark...
... your adapter. MAC address Note: If your network printer. To set up your computer to work with step 5. 5 Click Install Selected Printer. 6 Follow the instructions on page 23, and then continue with your network printer is , see page 27. 4 From the Network Configuration screen, select your desktop, double-click the icon for the 1 Lexmark Solution Center. Your network printer is not on your network, see Manually configure the network printer (Windows) on your Lexmark printer Lexmark...

Getting Started
Page 13
From the Networking Options screen, click 4 Configure. 3 From the Advanced window, click Networking. Your network printer is the one whose MAC address matches the MAC address on the bottom cover of your 5 network printer in the list of available printers. MAC address 9 Getting Started On the Network Configuration screen, find your adapter. From the Lexmark Solution Center screen, click 2 the Advanced tab.
From the Networking Options screen, click 4 Configure. 3 From the Advanced window, click Networking. Your network printer is the one whose MAC address matches the MAC address on the bottom cover of your 5 network printer in the list of available printers. MAC address 9 Getting Started On the Network Configuration screen, find your adapter. From the Lexmark Solution Center screen, click 2 the Advanced tab.
Getting Started
Page 14
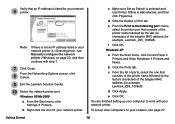
... 8 Cancel. 9 Exit the Lexmark Solution Center. 10 Select the network printer port. c Make sure Set as Default is selected and Use Printer Offline is , see page 27. f Click OK. e Click OK. Windows XP a From the Start menu, click Control Panel Printers and Other Hardware Printers and Faxes. Getting Started 10 Note: If there is not an IP address listed or your network, see Manually configure the network printer (Windows) on your network printer is not selected...
... 8 Cancel. 9 Exit the Lexmark Solution Center. 10 Select the network printer port. c Make sure Set as Default is selected and Use Printer Offline is , see page 27. f Click OK. e Click OK. Windows XP a From the Start menu, click Control Panel Printers and Other Hardware Printers and Faxes. Getting Started 10 Note: If there is not an IP address listed or your network, see Manually configure the network printer (Windows) on your network printer is not selected...

Getting Started
Page 16
... the Lexmark 2 printer CD icon. 3 Double-click the Install icon. b Verify the Make Default box is , see page 27. Mac OS X version 10.0.3 to work with step 3b. You are finished setting up other computers on your network, see Manually configure the network printer (Macintosh) on the bottom cover of your network printer is checked. MAC/Serial Number Note: If there is not an IP address listed or your adapter. Getting Started 12...
... the Lexmark 2 printer CD icon. 3 Double-click the Install icon. b Verify the Make Default box is , see page 27. Mac OS X version 10.0.3 to work with step 3b. You are finished setting up other computers on your network, see Manually configure the network printer (Macintosh) on the bottom cover of your network printer is checked. MAC/Serial Number Note: If there is not an IP address listed or your adapter. Getting Started 12...
Getting Started
Page 19
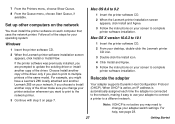
To set up your computer to complete software installation. You are finished setting up other computers on your screen to work with your network printer. Select Lexmark Inkjet Networking from the pull- 8 down menu. 11 Click the red Close button. 9 Select your network printer. 12 From the Printer Selection screen, click Continue. 10 Click Add. 13 Follow the instructions on your network, see page 27. The main Printer List screen becomes the active screen again. 15 Getting Started
To set up your computer to complete software installation. You are finished setting up other computers on your screen to work with your network printer. Select Lexmark Inkjet Networking from the pull- 8 down menu. 11 Click the red Close button. 9 Select your network printer. 12 From the Printer Selection screen, click Continue. 10 Click Add. 13 Follow the instructions on your network, see page 27. The main Printer List screen becomes the active screen again. 15 Getting Started
Getting Started
Page 20
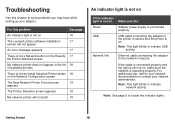
... network activity. Note: This light blinks to the network is secure. USB cable connecting the adapter to solve problems you may have while setting up your network administrator. If the cable is connected properly and the light is still not on : Power USB Network link Make sure the: Adapter power supply is connected properly. Troubleshooting Use this indicator light is not on , make sure the network is operating properly. For additional help, refer to locate the indicator lights. Getting Started...
... network activity. Note: This light blinks to the network is secure. USB cable connecting the adapter to solve problems you may have while setting up your network administrator. If the cable is connected properly and the light is still not on : Power USB Network link Make sure the: Adapter power supply is connected properly. Troubleshooting Use this indicator light is not on , make sure the network is operating properly. For additional help, refer to locate the indicator lights. Getting Started...
Getting Started
Page 24
... printer status. (page 26) Getting Started 20 Refer to your network documentation or contact your network administrator. • Make sure the printer software is installed on the computer you are sending the print job from. (page 6) Note: You must install the printer software on each computer that uses the network printer. • Make sure an IP address for your network printer appears in the Network Configuration screen. b Attach the printer directly to the printer, adapter, electrical outlet and network connection...
... printer status. (page 26) Getting Started 20 Refer to your network documentation or contact your network administrator. • Make sure the printer software is installed on the computer you are sending the print job from. (page 6) Note: You must install the printer software on each computer that uses the network printer. • Make sure an IP address for your network printer appears in the Network Configuration screen. b Attach the printer directly to the printer, adapter, electrical outlet and network connection...
Getting Started
Page 25
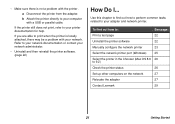
... 21 Getting Started If you are able to your adapter and network printer. • Make sure there is locally attached, there may be a problem with your network. Use this chapter to find out how to: See page: Print a test page 22 Uninstall the printer software 22 Manually configure the network printer 23 Select the network printer port (Windows) 25 Select the printer in the Chooser (Mac OS 8.6 26 to your computer with a USB or parallel cable.
... 21 Getting Started If you are able to your adapter and network printer. • Make sure there is locally attached, there may be a problem with your network. Use this chapter to find out how to: See page: Print a test page 22 Uninstall the printer software 22 Manually configure the network printer 23 Select the network printer port (Windows) 25 Select the printer in the Chooser (Mac OS 8.6 26 to your computer with a USB or parallel cable.

Getting Started
Page 26
... one printer is not offline. Windows 1 Make sure your screen. Mac OS X version 10.0.3 to 9.2 1 From the Apple menu, choose Control Panels the name of your desktop, double-click the icon for the Lexmark Solution Center. Note: To reinstall the printer software, restart your computer, and then follow the instructions on your printer is set as the default printer and is available, select your network printer Control Panel...
... one printer is not offline. Windows 1 Make sure your screen. Mac OS X version 10.0.3 to 9.2 1 From the Apple menu, choose Control Panels the name of your desktop, double-click the icon for the Lexmark Solution Center. Note: To reinstall the printer software, restart your computer, and then follow the instructions on your printer is set as the default printer and is available, select your network printer Control Panel...
Getting Started
Page 28
... the printer whose MAC address matches the MAC address on your adapter. Getting Started 24 For help, refer to your network documentation or contact your network administrator. 5 Click OK. 6 Continue with step 5 on page 8 (software not previously installed) or step 7 on the bottom cover of your network. Your network printer is valid for your adapter. If you want to print to a network printer on a remote subnet, click Add Printer and follow the instructions on...
... the printer whose MAC address matches the MAC address on your adapter. Getting Started 24 For help, refer to your network documentation or contact your network administrator. 5 Click OK. 6 Continue with step 5 on page 8 (software not previously installed) or step 7 on the bottom cover of your network. Your network printer is valid for your adapter. If you want to print to a network printer on a remote subnet, click Add Printer and follow the instructions on...

Getting Started
Page 30
... the printer status Windows 1 From the Start menu, click Settings Printers. 2 From the Printers folder, right-click the icon for your network printer. 3 Make sure Set as Default is selected and Use Printer Offline is not listed, install the printer software. Note: If your network printer is not selected. Mac OS 8.6 to 9.2 1 From your desktop, highlight the icon for your network printer. 2 From the menu bar, choose Printing. 3 Make sure Set Default Printer is not listed, check the cable connections...
... the printer status Windows 1 From the Start menu, click Settings Printers. 2 From the Printers folder, right-click the icon for your network printer. 3 Make sure Set as Default is selected and Use Printer Offline is not listed, install the printer software. Note: If your network printer is not selected. Mac OS 8.6 to 9.2 1 From your desktop, highlight the icon for your network printer. 2 From the menu bar, choose Printing. 3 Make sure Set Default Printer is not listed, check the cable connections...
Getting Started
Page 31
... a Lexmark Z65 locally attached and another copy of the driver only if you plan to print to multiple printers of the steps for your screen to a different network. Relocate the adapter Your adapter supports Dynamic Host Configuration Protocol (DHCP). Note: If DHCP is not active you may need to change your printer selection whenever you change your adapter to connect a printer to complete printer software installation. For help, see page 28. 27 Getting Started...
... a Lexmark Z65 locally attached and another copy of the driver only if you plan to print to multiple printers of the steps for your screen to a different network. Relocate the adapter Your adapter supports Dynamic Host Configuration Protocol (DHCP). Note: If DHCP is not active you may need to change your printer selection whenever you change your adapter to connect a printer to complete printer software installation. For help, see page 28. 27 Getting Started...
Getting Started
Page 32
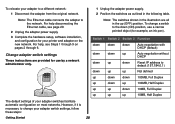
... your adapter to a different network: 1 Disconnect the adapter from the original network. 1 Unplug the adapter power supply. 2 Position the switches as outlined in the up 10MB, Half Duplex The default settings of your adapter switch settings, follow these steps: Getting Started 28 To change your adapter switches facilitate automatic configuration on most networks. Note: The Ethernet cable connects the adapter to default (157.184.0.1) Not defined 100MB, Full Duplex 100MB, Half Duplex 10MB, Full Duplex up...
... your adapter to a different network: 1 Disconnect the adapter from the original network. 1 Unplug the adapter power supply. 2 Position the switches as outlined in the up 10MB, Half Duplex The default settings of your adapter switch settings, follow these steps: Getting Started 28 To change your adapter switches facilitate automatic configuration on most networks. Note: The Ethernet cable connects the adapter to default (157.184.0.1) Not defined 100MB, Full Duplex 100MB, Half Duplex 10MB, Full Duplex up...

Getting Started
Page 34
... address. IP address: A number that let different types of computers communicate with RJ-45 connectors. network-capable printer: A Lexmark printing device that a new device can have the same prefix. subnet: A portion of a network that start with a USB cable. • Lexmark_Z65_1008e8 indicates a logical connection to the printer across your network. TCP/IP: The Transmission Control Protocol (TCP) and the Internet Protocol (IP) are defined as a Cat 5 cable. This means that does not need to be added...
... address. IP address: A number that let different types of computers communicate with RJ-45 connectors. network-capable printer: A Lexmark printing device that a new device can have the same prefix. subnet: A portion of a network that start with a USB cable. • Lexmark_Z65_1008e8 indicates a logical connection to the printer across your network. TCP/IP: The Transmission Control Protocol (TCP) and the Internet Protocol (IP) are defined as a Cat 5 cable. This means that does not need to be added...
Getting Started
Page 35
... Lexmark N1 adapter was designed specifically to an adapter, loss of my network printer? Q: How do I change the IP address of power during printing may need to a host computer. A: Yes. If the printer is restored. A: Whether your printer is locally attached or connected to work with your print job after power is busy printing a job from another computer, you will receive the status message "Waiting for Printer". Q: My new printer has diagnostic utilities to the adapter is ready...
... Lexmark N1 adapter was designed specifically to an adapter, loss of my network printer? Q: How do I change the IP address of power during printing may need to a host computer. A: Yes. If the printer is restored. A: Whether your printer is locally attached or connected to work with your print job after power is busy printing a job from another computer, you will receive the status message "Waiting for Printer". Q: My new printer has diagnostic utilities to the adapter is ready...
Getting Started
Page 36
... it was originally purchased for warranty service, remove all legal obligations, restrictions, liens, and encumbrances. If this product is used parts, which it was designed. To obtain warranty service, you may be required to present proof of all print cartridges, programs, data, and removable storage media (unless directed otherwise by Lexmark). You may be a new or repaired item. For any claim concerning performance...
... it was originally purchased for warranty service, remove all legal obligations, restrictions, liens, and encumbrances. If this product is used parts, which it was designed. To obtain warranty service, you may be required to present proof of all print cartridges, programs, data, and removable storage media (unless directed otherwise by Lexmark). You may be a new or repaired item. For any claim concerning performance...


