Quick Reference
Page 2
...arrive at the upper left corner of the home screen and appears as Replace separator pad or Cartridge low. • Show intervention messages so the scanner can view and remotely configure scanner and printer settings even when you change the primary language of the scanner. 2 Copy Access the Copy ...job names • USB container or print job names for held jobs. • Show a warning or error message whenever the scanner or the printer requires intervention to an FTP server. 6 Arrows Scroll up window that menu. Status message bar • Show the current status such as Ready or...
...arrive at the upper left corner of the home screen and appears as Replace separator pad or Cartridge low. • Show intervention messages so the scanner can view and remotely configure scanner and printer settings even when you change the primary language of the scanner. 2 Copy Access the Copy ...job names • USB container or print job names for held jobs. • Show a warning or error message whenever the scanner or the printer requires intervention to an FTP server. 6 Arrows Scroll up window that menu. Status message bar • Show the current status such as Ready or...
Quick Reference
Page 24
...3 4 1 5 6 2 7 3 8 4 24 Jam location Staple finisher Standard bin Inside the printer Multipurpose feeder Printer message What to do [x]‑page jam, remove paper, open the stapler door, then remove the staple cartridge, and then remove the jammed staples. [x]‑page jam, remove standard bin jam. [203] Remove ...page jam, lift Open the front front cover to cover and the remove multipurpose cartridge. [200- Check your printed output for blank pages. • When Jam Recovery is set to On, the printer flushes blank pages or pages with partial prints to the standard bin after a...
...3 4 1 5 6 2 7 3 8 4 24 Jam location Staple finisher Standard bin Inside the printer Multipurpose feeder Printer message What to do [x]‑page jam, remove paper, open the stapler door, then remove the staple cartridge, and then remove the jammed staples. [x]‑page jam, remove standard bin jam. [203] Remove ...page jam, lift Open the front front cover to cover and the remove multipurpose cartridge. [200- Check your printed output for blank pages. • When Jam Recovery is set to On, the printer flushes blank pages or pages with partial prints to the standard bin after a...

Quick Reference
Page 25
... What to do 2 Lift the green handle, and then pull out the toner cartridge from the printer. 5 Duplex area [x]‑page jam, Pull out tray 1 12 Automatic [x]‑page jam, Remove all paper fragments are removed. 25 jammed paper. 6 Trays [x]‑... a flat, smooth surface. Warning-Potential Damage: Do not expose the imaging unit to cool before touching. bin. [41y.xx] the jammed paper. 3 Place the cartridge aside. 8 Upper rear door [x]‑page jam, Open the rear open finisher staple finisher, rear door. Extended exposure to light may cause print quality problems...
... What to do 2 Lift the green handle, and then pull out the toner cartridge from the printer. 5 Duplex area [x]‑page jam, Pull out tray 1 12 Automatic [x]‑page jam, Remove all paper fragments are removed. 25 jammed paper. 6 Trays [x]‑... a flat, smooth surface. Warning-Potential Damage: Do not expose the imaging unit to cool before touching. bin. [41y.xx] the jammed paper. 3 Place the cartridge aside. 8 Upper rear door [x]‑page jam, Open the rear open finisher staple finisher, rear door. Extended exposure to light may cause print quality problems...
Quick Reference
Page 26
...from a hot component, allow the surface to cool before touching. 2 Firmly grasp the jammed paper on the side of the printer as a guide. 8 Insert the cartridge into the printer, and then push the green handle back into place. 10 From the scanner control panel, touch Done to clear the message...Warning-Potential Damage: The jammed paper may be hot. Notes: • Align the arrows on the guides of the printer might be covered with the arrows in the printer. • Make sure the cartridge is fully pushed in. 9 Close the multipurpose feeder door and the front cover. 1 Pull down the rear door....
...from a hot component, allow the surface to cool before touching. 2 Firmly grasp the jammed paper on the side of the printer as a guide. 8 Insert the cartridge into the printer, and then push the green handle back into place. 10 From the scanner control panel, touch Done to clear the message...Warning-Potential Damage: The jammed paper may be hot. Notes: • Align the arrows on the guides of the printer might be covered with the arrows in the printer. • Make sure the cartridge is fully pushed in. 9 Close the multipurpose feeder door and the front cover. 1 Pull down the rear door....

Quick Reference
Page 31
... pull it clicks into place. 31 Note: Make sure all paper fragments are removed. 3 Pull down the latch of the staple cartridge holder, and then pull out the holder from the printer. 5 Press down the staple guard until it out. 2 Open the stapler door. 4 Use the metal tab to lift the staple...
... pull it clicks into place. 31 Note: Make sure all paper fragments are removed. 3 Pull down the latch of the staple cartridge holder, and then pull out the holder from the printer. 5 Press down the staple guard until it out. 2 Open the stapler door. 4 Use the metal tab to lift the staple...
User's Guide
Page 5
...supplies...254 Checking the status of supplies...254 Ordering supplies...255 Replacing supplies...259 Moving the scanner and the printer...266 Managing the scanner and the printer 270 Finding advanced networking and administrator information 270 Checking the virtual display...270 Setting up e‑mail alerts... default settings...272 Clearing jams 273 Avoiding jams...273 Understanding jam messages and locations 275 [x]‑page jam, lift front cover to remove cartridge. [200-201 278 [x]‑page jam, open upper rear door. [202 280 [x]‑page jam, open upper and lower rear door...
...supplies...254 Checking the status of supplies...254 Ordering supplies...255 Replacing supplies...259 Moving the scanner and the printer...266 Managing the scanner and the printer 270 Finding advanced networking and administrator information 270 Checking the virtual display...270 Setting up e‑mail alerts... default settings...272 Clearing jams 273 Avoiding jams...273 Understanding jam messages and locations 275 [x]‑page jam, lift front cover to remove cartridge. [200-201 278 [x]‑page jam, open upper rear door. [202 280 [x]‑page jam, open upper and lower rear door...

User's Guide
Page 17
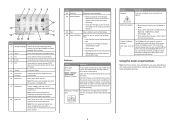
.... Status message bar Scanner IP address Example: 123.123.123.123 • Show the current status such as Ready or Busy. • Show scanner and printer conditions such as four sets of options. 2 Copy It Print a copy. 3 Advanced Options Select a copy option. 4 Home Go to the home screen. 5 ... on your network scanner is located at the upper left corner of the home screen and appears as Replace separator pad or Cartridge low. • Show intervention messages so the scanner can view and remotely configure scanner and printer settings even when you can continue processing.
.... Status message bar Scanner IP address Example: 123.123.123.123 • Show the current status such as Ready or Busy. • Show scanner and printer conditions such as four sets of options. 2 Copy It Print a copy. 3 Advanced Options Select a copy option. 4 Home Go to the home screen. 5 ... on your network scanner is located at the upper left corner of the home screen and appears as Replace separator pad or Cartridge low. • Show intervention messages so the scanner can view and remotely configure scanner and printer settings even when you can continue processing.

User's Guide
Page 101
... contaminate the printer and the cartridge with adhesive, and could void the printer and toner cartridge warranties. • Do not use labels with the manufacturer or vendor to loosen them from sticking together. • Page orientation is in a jam. Have any exposed adhesive when the flap is important when printing on the Lexmark Web site...
... contaminate the printer and the cartridge with adhesive, and could void the printer and toner cartridge warranties. • Do not use labels with the manufacturer or vendor to loosen them from sticking together. • Page orientation is in a jam. Have any exposed adhesive when the flap is important when printing on the Lexmark Web site...

User's Guide
Page 195
..." appears only if Energy Conserve is printed before the scanner and the printer go into a reduced power state. Understanding printer menus Use Web Page Refresh Rate 30-300 Contact Name Location Alarms Alarm Control Cartridge Alarm Staple Alarm Hole Punch Alarm Timeouts Standby Mode Disabled 1-240 Timeouts...no alarm will sound. • Continuous repeats three beeps every 10 seconds. Note: The location is the factory default setting for Cartridge Alarm, Staple Alarm, and Hole Punch Alarm. Set the amount of inactivity before returning the scanner display to sound when the scanner ...
..." appears only if Energy Conserve is printed before the scanner and the printer go into a reduced power state. Understanding printer menus Use Web Page Refresh Rate 30-300 Contact Name Location Alarms Alarm Control Cartridge Alarm Staple Alarm Hole Punch Alarm Timeouts Standby Mode Disabled 1-240 Timeouts...no alarm will sound. • Continuous repeats three beeps every 10 seconds. Note: The location is the factory default setting for Cartridge Alarm, Staple Alarm, and Hole Punch Alarm. Set the amount of inactivity before returning the scanner display to sound when the scanner ...

User's Guide
Page 242
... efficiencies result in your printer or cartridge and use the prepaid shipping label. Lexmark cartons are either reused or demanufactured for reuse or recycling. Returning Lexmark cartridges for reuse or recycling Lexmark Cartridge Collection Program diverts millions of the empty cartridges returned to Lexmark for recycling. Less packaging helps to www.lexmark.com/recycle. 2 From the Toner Cartridges section, select your...
... efficiencies result in your printer or cartridge and use the prepaid shipping label. Lexmark cartons are either reused or demanufactured for reuse or recycling. Returning Lexmark cartridges for reuse or recycling Lexmark Cartridge Collection Program diverts millions of the empty cartridges returned to Lexmark for recycling. Less packaging helps to www.lexmark.com/recycle. 2 From the Toner Cartridges section, select your...

User's Guide
Page 255
... for Standardization* test methods and page content. * Average continuous black declared cartridge yield in accordance with Lexmark supplies and parts, and may deliver unpredictable results if third-party supplies or parts are designed to function with ISO/IEC 19752. In other printer settings. All life indicators are used. Ordering scanner supplies Ordering a cleaning...
... for Standardization* test methods and page content. * Average continuous black declared cartridge yield in accordance with Lexmark supplies and parts, and may deliver unpredictable results if third-party supplies or parts are designed to function with ISO/IEC 19752. In other printer settings. All life indicators are used. Ordering scanner supplies Ordering a cleaning...

User's Guide
Page 256
Part name Separator pad Part number 40X6447 Ordering printer supplies Ordering toner cartridges Notes: • Estimated cartridge yield is supported only in a region, visit www.lexmark.com/regions. For more information on the ISO/IEC 19752 standard. • Extremely low print coverage for extended periods of time may negatively affect actual ...
Part name Separator pad Part number 40X6447 Ordering printer supplies Ordering toner cartridges Notes: • Estimated cartridge yield is supported only in a region, visit www.lexmark.com/regions. For more information on the ISO/IEC 19752 standard. • Extremely low print coverage for extended periods of time may negatively affect actual ...
User's Guide
Page 257
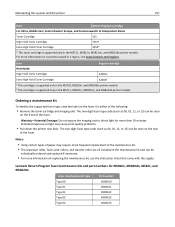
... and replaced if necessary. • For more information on the front of the fuser. Lexmark Return Program fuser maintenance kits and part numbers for more information on the fuser. Maintaining the scanner and the printer 257 Item Return Program cartridge For Africa, Middle East, Central Eastern Europe, and Commonwealth of Independent States Toner...
... and replaced if necessary. • For more information on the front of the fuser. Lexmark Return Program fuser maintenance kits and part numbers for more information on the fuser. Maintaining the scanner and the printer 257 Item Return Program cartridge For Africa, Middle East, Central Eastern Europe, and Commonwealth of Independent States Toner...

User's Guide
Page 258
Maintaining the scanner and the printer 258 Lexmark Return Program fuser maintenance kits and part numbers for MS71x Fuser maintenance kit type Type 11, 110-120V Type 13, 220-240V Type 15, 100V Part number 40X8530 40X8531 40X8532 Lexmark regular fuser maintenance kits and part numbers for MS810n, MS810dn, MS811, ... exhaustion of toner. For more information on replacing the imaging unit, see the instruction sheet that came with the supply. Part name Lexmark Return Program Regular Imaging unit 520Z 520ZA Ordering staple cartridges Part name Staple cartridges Part number 25A0013
Maintaining the scanner and the printer 258 Lexmark Return Program fuser maintenance kits and part numbers for MS71x Fuser maintenance kit type Type 11, 110-120V Type 13, 220-240V Type 15, 100V Part number 40X8530 40X8531 40X8532 Lexmark regular fuser maintenance kits and part numbers for MS810n, MS810dn, MS811, ... exhaustion of toner. For more information on replacing the imaging unit, see the instruction sheet that came with the supply. Part name Lexmark Return Program Regular Imaging unit 520Z 520ZA Ordering staple cartridges Part name Staple cartridges Part number 25A0013

User's Guide
Page 260
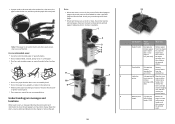
Maintaining the scanner and the printer 260 4 Close the ADF cover. 5 Dispose of the old separator pad. Replacing the toner cartridge 1 Lift the front cover, and then pull down the multipurpose feeder door.
Maintaining the scanner and the printer 260 4 Close the ADF cover. 5 Dispose of the old separator pad. Replacing the toner cartridge 1 Lift the front cover, and then pull down the multipurpose feeder door.

User's Guide
Page 261
... problems. Note: Make sure the cartridge is fully pushed in. Maintaining the scanner and the printer 261 2 Pull the cartridge out of the printer using the handle. 3 Unpack the new toner cartridge, then remove the packing material, and then shake the cartridge to redistribute the toner. 4 Insert the toner cartridge into the printer by aligning the side rails...
... problems. Note: Make sure the cartridge is fully pushed in. Maintaining the scanner and the printer 261 2 Pull the cartridge out of the printer using the handle. 3 Unpack the new toner cartridge, then remove the packing material, and then shake the cartridge to redistribute the toner. 4 Insert the toner cartridge into the printer by aligning the side rails...

User's Guide
Page 263
Extended exposure to direct light for more than 10 minutes. Warning-Potential Damage: Do not expose the imaging unit to light may affect the quality of the printer using the handle. 4 Unpack the new imaging unit, and then remove all packing materials. Maintaining the scanner and the printer 263 2 Pull the cartridge out of the printer using the handle. 3 Pull the imaging unit out of future print jobs. Doing so may cause print quality problems. Warning-Potential Damage: Do not touch the shiny blue photoconductor drum under the imaging unit.
Extended exposure to direct light for more than 10 minutes. Warning-Potential Damage: Do not expose the imaging unit to light may affect the quality of the printer using the handle. 4 Unpack the new imaging unit, and then remove all packing materials. Maintaining the scanner and the printer 263 2 Pull the cartridge out of the printer using the handle. 3 Pull the imaging unit out of future print jobs. Doing so may cause print quality problems. Warning-Potential Damage: Do not touch the shiny blue photoconductor drum under the imaging unit.

User's Guide
Page 264
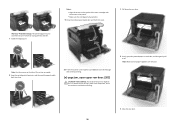
Maintaining the scanner and the printer 264 5 Shake the new imaging unit. 6 Insert the imaging unit into the printer by aligning the arrows on the side rails of the imaging unit with the arrows on the side rails inside the printer. 7 Insert the toner cartridge into the printer by aligning the side rails of the cartridge with the arrows on the side rails inside the printer.
Maintaining the scanner and the printer 264 5 Shake the new imaging unit. 6 Insert the imaging unit into the printer by aligning the arrows on the side rails of the imaging unit with the arrows on the side rails inside the printer. 7 Insert the toner cartridge into the printer by aligning the side rails of the cartridge with the arrows on the side rails inside the printer.

User's Guide
Page 265
Maintaining the scanner and the printer 265 8 Close the multipurpose feeder door and the front cover. Replacing a staple cartridge 1 Open the stapler door. 2 Pull down the latch of the staple cartridge holder, and then pull the holder out of the finisher.
Maintaining the scanner and the printer 265 8 Close the multipurpose feeder door and the front cover. Replacing a staple cartridge 1 Open the stapler door. 2 Pull down the latch of the staple cartridge holder, and then pull the holder out of the finisher.

User's Guide
Page 266
... the scanner CAUTION-POTENTIAL INJURY: Before moving the scanner, follow these guidelines to the scanner caused by the scanner warranty. Maintaining the scanner and the printer 266 3 Squeeze both sides of the empty staple case with your fingers, and then remove the staple case from the scanner before moving is not... off the scanner using the power switch, and then unplug the power cord from the wall outlet. • Disconnect all cords and cables from the cartridge. 2 1 1 4 Insert the front side of the new staple case into the staple...
... the scanner CAUTION-POTENTIAL INJURY: Before moving the scanner, follow these guidelines to the scanner caused by the scanner warranty. Maintaining the scanner and the printer 266 3 Squeeze both sides of the empty staple case with your fingers, and then remove the staple case from the scanner before moving is not... off the scanner using the power switch, and then unplug the power cord from the wall outlet. • Disconnect all cords and cables from the cartridge. 2 1 1 4 Insert the front side of the new staple case into the staple...


